上一篇主要做了MAKA APP的需求分析,功能结构分解,架构分析,API分析,API数据结构分析。
这篇主要讲如何从零做iOS应用架构。
全系列
【HELLO WAKA】WAKA iOS客户端 之一 APP分析篇
【HELLO WAKA】WAKA iOS客户端 之二 架构设计与实现篇
【HELLO WAKA】WAKA iOS客户端 之三 创作模块分析与实现篇(上)
【HELLO WAKA】WAKA iOS客户端 之三 创作模块分析与实现篇(下)
【HELLO WAKA】WAKA iOS客户端 之四 服务器架构设计
1. iOS客户端架构
按照功能模块划分。这里可以使用二层设计也可以使用三层设计。MVC, MVCS, MVVM, MVP, VIPER, DDD, 洋葱模型等。理论补充可以自行google。
个人倾向三层设计。由于PL层使用DDD方式还没完全掌握,所以暂时使用VM来替代DDD。降级为二层设计+MVVM。
1) DAL。使用ReactiveCocoa。采用响应式编程。
2) BLL。这层使用DDD。但是还没有使用熟练,所以暂时还是使用VM来替代DDD。这样其实降级为二层设计
3) PL。使用MVVM+MVC模式。比较复杂的界面使用MVVM模式,简单界面还是使用MVC模式。

下图是按照功能结构的划分。
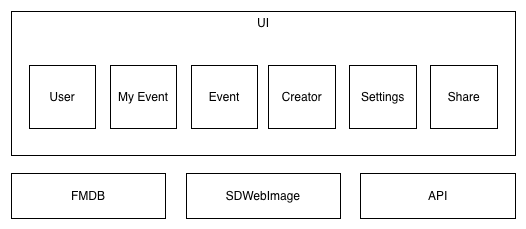
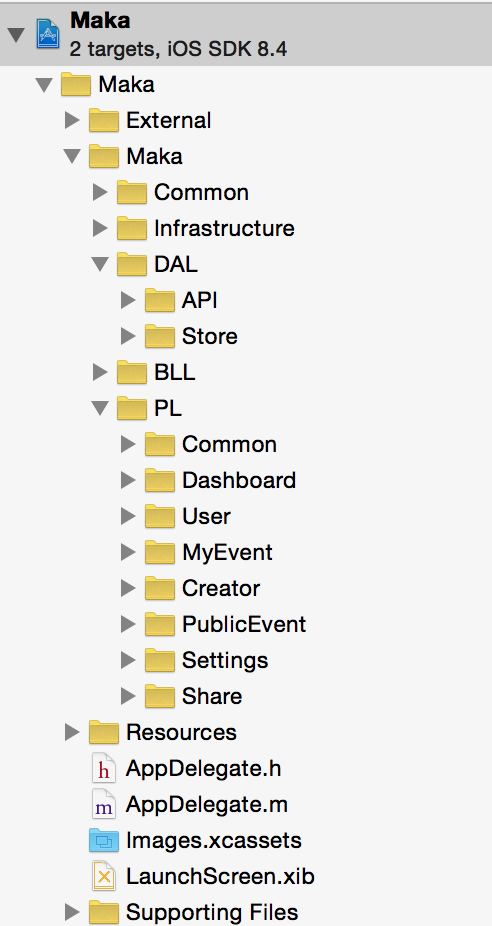
2. 工程结构
二层设计 + 按模块划分 + MVVM
3. DAL层之API设计
1. 库使用:AFNetworking + ReactiveCocoa + AFNetworking-RACExtensions。采用响应式编程方式。
2. 类设计。
1)使用单件模式。只通过访问MKAPIClient类来访问接口。保持接口统一访问,参数统一配置。
2)使用类扩展的方式。既保证各模块代码分类又保证了访问的统一性,并且容易横向扩展。
3) 面向函数编程。
4)面向响应编程方式。参考:http://reactivex.io
5)面向轨道编程方式(应该是非正式名称)。参考:面向轨道编程 - Swift中的异常处理

用户接口模块定义


 1 @interface MKAPIClient (User)
 2
 3 /**
 4  *  用户注册
 5  *
 6  *  @param email    邮箱
 7  *  @param password 密码
 8  *
 9  *  @return 信号
10  */
11 - (RACSignal *)registWithEmail:(NSString *)email password:(NSString *)password;
12
13
14 /**
15  *  用户登陆
16  *
17  *  @param email    邮箱
18  *  @param password 密码
19  *
20  *  @return 信号
21  */
22 - (RACSignal *)loginWithEmail:(NSString *)email password:(NSString *)password;
23
24
25 /**
26  *  忘记密码
27  *
28  *  @param email 邮箱
29  *
30  *  @return 信号
31  */
32 - (RACSignal *)forgetPasswordWithEmail:(NSString *)email;
33
34
35 /**
36  *  用户信息
37  *
38  *  @return 信号
39  */
40 - (RACSignal *)userInfo;
41
42 /**
43  *  修改用户信息
44  *
45  *  @param key   字段
46  *  @param value 值
47  *
48  *  @return 信号
49  */
50 - (RACSignal *)updateUserInfoWithKey:(NSString *)key value:(NSString *)value;
51
52 @end
登陆接口实现
/**
 *  用户登陆
 *
 *  @param email    邮箱
 *  @param password 密码
 *
 *  @return 信号
 */
- (RACSignal *)loginWithEmail:(NSString *)email password:(NSString *)password {
    NSParameterAssert(email);
    NSParameterAssert(password);

    NSDictionary *params = @{@"email" : email, @"password" : password};

    @weakify(self);
    return [[RACSignal createSignal:^RACDisposable *(id<RACSubscriber> subscriber) {
        @strongify(self);
        return [[self.client rac_POST:@"/app/user/login" parameters:params] subscribeNext:^(RACTuple *x) {
            NSDictionary *result = x.first;

            @try {
                if ([result[@"code"] intValue] == 200) {
                    NSDictionary *data = result[@"data"];
                    self.uid = [data[@"uid"] intValue];
                    self.token = data[@"token"];

                    [subscriber sendNext:data];
                } else {
                    NSError *err = [NSError errorWithDomain:MKAPIClientErrorDomain code:[result[@"code"] intValue] userInfo:nil];
                    [subscriber sendError:err];
                }
            } @catch (NSException *exception) {
                NSError *err = [NSError errorWithDomain:MKAPIClientErrorDomain code:10001 userInfo:nil];
                [subscriber sendError:err];
            }
        } error:^(NSError *error) {
            [subscriber sendError:error];
        } completed:^{
            [subscriber sendCompleted];
        }];
    }] setNameWithFormat:@"%s", __FUNCTION__];
}
3. BLL - 业务逻辑层
这层还没想好怎么做比较好。暂时使用MVVM的VM来替代业务逻辑层。
4. PL - UI模块实现
主要采用MVVM模式,简单界面还是使用MVC实现。
说明:
1. 下图中的MKPublicEventItem为MKPublicEventCell的属性,不是Domain。参考:UINavigationItem设计。

2. Domain与Item关系。Item为PL层数据。
说明:MKItem为所有表现层数据的基类,提供与Domain映射的基本功能。 参考Three20的Item设计和UIView tag值设计。
1 @interface MKItem : NSObject
2
3 @property(nonatomic, weak)NSObject *weakRef;
4 @property(nonatomic, strong)NSObject *ref;
5 @property(nonatomic, strong)NSIndexPath *indexPath;
6 @property(nonatomic, assign)int tag;
7
8 @end
XXXItem只提供UI显示的数据。属于贫血模型。
1 @interface MKPublicEventItem : MKItem
2
3 @property(nonatomic, copy)NSString *title;
4 @property(nonatomic, copy)NSString *cover;
5 @property(nonatomic, copy)NSString *username;
6 @property(nonatomic, copy)NSString *publishTime;
7
8 @end
MKPublicEventItem+Event。该扩展用于从Domain创建Item方法。功能与reformer相同。参考: iOS应用架构谈 网络层设计方案
 1 @implementation MKPublicEventItem (Event)
 2
 3
 4 + (instancetype)itemWithDictionary:(NSDictionary *)event {
 5     MKPublicEventItem *item = [[MKPublicEventItem alloc] init];
 6     item.title = event[@"title"];
 7     item.cover = event[@"firstImgUrl"];
 8     item.username = event[@"author"];
 9     item.publishTime = event[@"publishTime"];
10     item.ref = event;
11
12     return item;
13 }
14
15 - (NSString *)eventId {
16     return [(NSDictionary *)self.ref objectForKey:@"id"];
17 }
18
19 @end
MKPublicEventCell
说明:
1. 属性使用lazy load方式创建。
 1 @interface MKPublicEventCell : UICollectionViewCell
 2
 3
 4 @property(nonatomic, strong)MKPublicEventItem *item;
 5
 6 + (float)cellHeightWithWidth:(float)width;
 7
 8 @end
 9
10
11 @interface MKPublicEventCell ()
12
13 @property(nonatomic, strong)UIImageView *imageView;
14 @property(nonatomic, strong)MKPublicEventToolbar *toolbar;
15
16 @end
17
18 @implementation MKPublicEventCell
19
20 + (float)cellHeightWithWidth:(float)width {
21     return width * 504/320 + [MKPublicEventToolbar toolbarHeight];
22 }
23
24 - (instancetype)initWithFrame:(CGRect)frame {
25     if (self = [super initWithFrame:frame]) {
26         [self setup];
27     }
28
29     return self;
30 }
31
32 - (UIImageView *)imageView {
33     if (!_imageView) {
34         UIImageView *imageView = [[UIImageView alloc] initWithFrame:CGRectZero];
35         imageView.backgroundColor = [UIColor randomLightColor];
36         imageView.contentMode = UIViewContentModeScaleAspectFill;
37         imageView.clipsToBounds = YES;
38         _imageView = imageView;
39     }
40
41     return _imageView;
42 }
43
44 - (MKPublicEventToolbar *)toolbar {
45     if (!_toolbar) {
46         MKPublicEventToolbar *toolbar = [[MKPublicEventToolbar alloc] initWithFrame:CGRectZero];
47         _toolbar = toolbar;
48     }
49
50     return _toolbar;
51 }
52
53 - (void)setup {
54     [self.contentView addSubview:self.imageView];
55     [self.contentView addSubview:self.toolbar];
56 }
57
58 - (void)layoutSubviews {
59     [super layoutSubviews];
60     // h'/w' = h/w
61     self.imageView.frame = CGRectMake(0, 0, self.bounds.size.width, [MKPublicEventCell cellHeightWithWidth:self.bounds.size.width] - [MKPublicEventToolbar toolbarHeight]);
62     self.toolbar.frame = CGRectMake(0, self.imageView.bounds.size.height, self.bounds.size.width, [MKPublicEventToolbar toolbarHeight]);
63 }
64
65 - (void)setItem:(MKPublicEventItem *)item {
66     _item = item;
67
68     [self.imageView sd_setImageWithURL:[NSURL URLWithString:item.cover] placeholderImage:nil];
69     self.toolbar.usernameLabel.text = item.username;
70     self.toolbar.titleLabel.text = item.title;
71     self.toolbar.dateLabel.text = item.publishTime;
72 }
73
74 @end
5. 单元测试
使用Specta + Expecta+ReactiveCocoa
 1 SpecBegin(User)
 2
 3 describe(@"用户", ^{
 4
 5     __block MKAPIClient *client;
 6     beforeAll(^{
 7         client = [MKAPIClient defaultClient];
 8     });
 9
10     beforeEach(^{
11
12     });
13
14     context(@"当登陆", ^{
15         it(@"应该成功", ^{
16             RACSignal *signal = [client loginWithEmail:@"test@test.com" password:@"password"];
17             expect(signal).will.complete();
18         });
19     });
20
21     afterEach(^{
22
23     });
24
25     afterAll(^{
26
27     });
28 });
29
30 SpecEnd
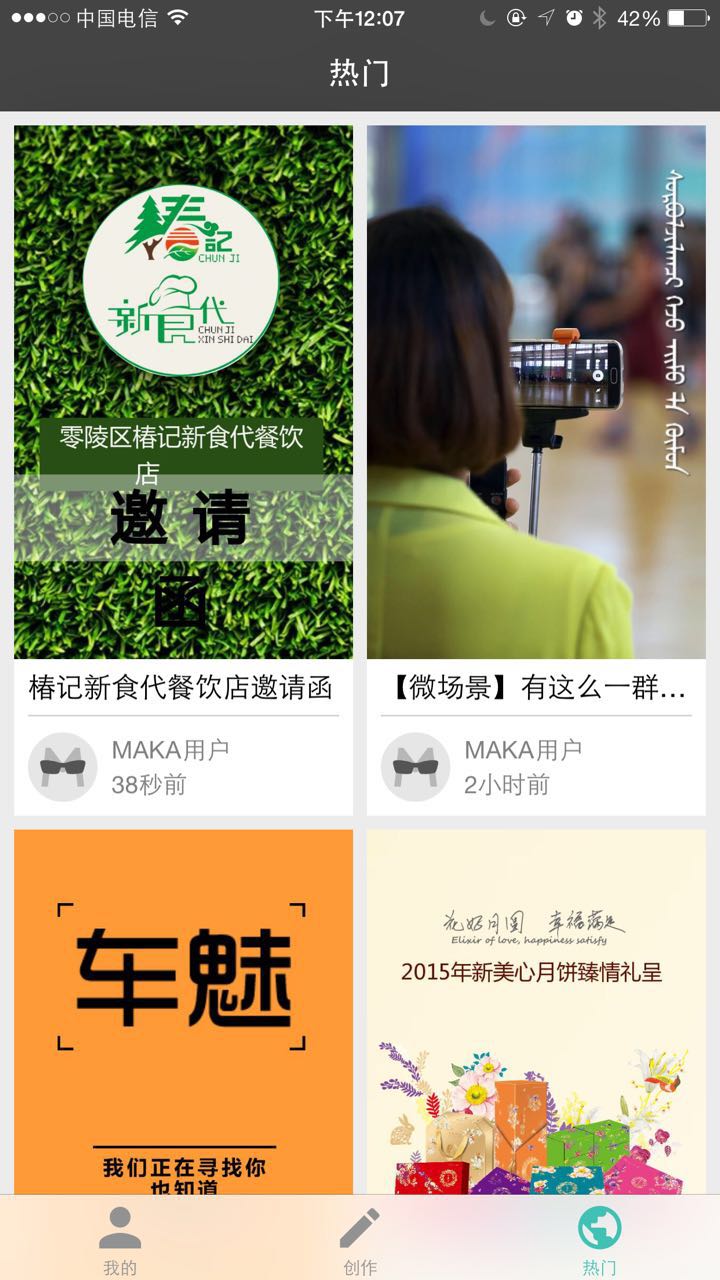
6. 效果
周末花了2天时间做分析并且实现。
1. API层对接完毕。
2. 基础框架搭建完毕。
3. 实现热门基本UI。
7. 总结
以上为架构设计与实现。
从功能来说整体还是相对简单。
由于时间比较仓促。只实现了热门模块的部分功能。
另外,还没有对创作模块做详细分析。下篇会做更深入的了解。