Linux systemd
参考:
https://www.ruanyifeng.com/blog/2016/03/systemd-tutorial-commands.html
https://www.ruanyifeng.com/blog/2016/03/systemd-tutorial-part-two.html
https://zh.wikipedia.org/wiki/Systemd
https://wiki.archlinux.org/index.php/systemd_(简体中文)
概述
[root@cyberpelican ~]# /etc/init.d/apache2 start
or
[root@cyberpelican ~]# service apache2 start
这种方法有两个缺点。
-
启动时间长。
init进程是串行启动,只有前一个进程启动完,才会启动下一个进程。 -
启动脚本复杂。
init进程只是执行启动脚本,不管其他事情。脚本需要自己处理各种情况,这往往使得脚本变得很长。
注意网络任然可以通过该方式启动
[root@cyberpelican ~]# cd /etc/init.d/
[root@cyberpelican init.d]# ls
functions  netconsole  network  README
Systemd 就是为了解决这些问题而诞生的。它的设计目标是,为系统的启动和管理提供一套完整的解决方案。兼容SysV
根据Unix 惯例,字母d是守护进程(daemon)的缩写。 Systemd 这个名字的含义,就是它要守护整个系统。
使用了 Systemd,就不需要再用init了。Systemd 取代了initd,成为系统的第一个进程(PID 等于 1),其他进程都是它的子进程。
通过如下命令可以查看systemd的版本
[root@cyberpelican init.d]# systemctl --version
systemd 219
+PAM +AUDIT +SELINUX +IMA -APPARMOR +SMACK +SYSVINIT +UTMP +LIBCRYPTSETUP +GCRYPT +GNUTLS +ACL +XZ +LZ4 -SECCOMP +BLKID +ELFUTILS +KMOD +IDN
Systemd 的优点是功能强大,使用方便,缺点是体系庞大,非常复杂。事实上,现在还有很多人反对使用 Systemd,理由就是它过于复杂,与操作系统的其他部分强耦合,违反"keep simple, keep stupid"
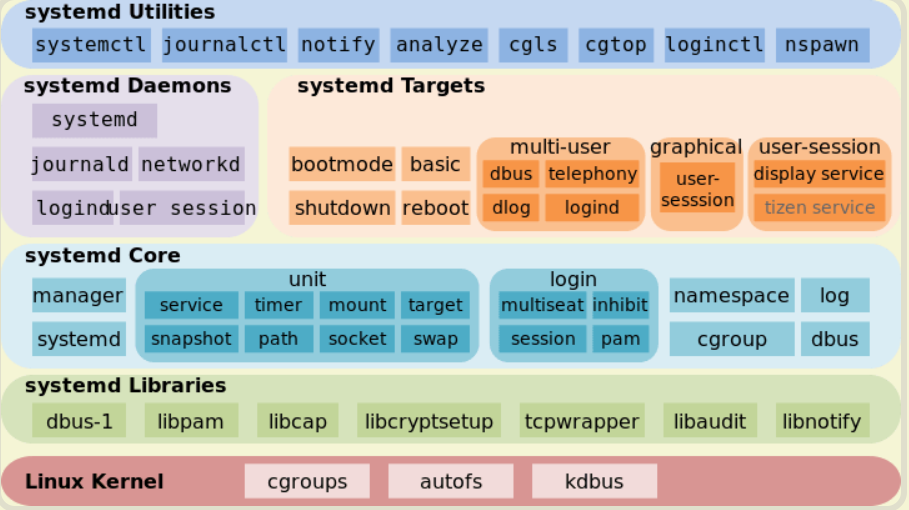
Unit
Systemd 可以管理所有系统资源。不同的资源统称为 Unit(单位)。通过systemd.unit来查看,具体使用查看systmctl
Service unit:系统服务
Target unit:多个 Unit 构成的一个组
Device Unit:硬件设备
Mount Unit:文件系统的挂载点
Automount Unit:自动挂载点
Path Unit:文件或路径
Scope Unit:不是由 Systemd 启动的外部进程
Slice Unit:进程组
Snapshot Unit:Systemd 快照,可以切回某个快照
Socket Unit:进程间通信的 socket
Swap Unit:swap 文件
Timer Unit:定时器
systemd Utilities
systemctl
systemctl 用于管理系统电源,以及Unit(服务)
系统电源
reboot,poweroff ,halt,suspend 无需添加systemctl,具体查看manual
systemctl reboot #重启
systemctl poweroff #关闭系统,切断电源 等价于 shutdown -h 0
systemctl halt #cpu停止工作
systemctl suspend #暂停系统
systemctl hibernate #进入冬眠状态
systemctl hybrid-sleep # 等价于 suspend 和 hibernate
Unit 管理
对unit的操作等价于操作
/etc/systemd/system目录下的配置文件,Sytemd默认的后缀名为
.service,所以httpd会被理解成httpd.service。有socket和service两种Unit 之间存在依赖关系:A 依赖于 B,就意味着 Systemd 在启动 A 的时候,同时会去启动 B。
systemctl list-dependencies命令列出一个 Unit 的所有依赖。
-
systemctl输出所有active的unit,等价于
systemctl list-units[root@cyberpelican init.d]# systemctl UNIT LOAD ACTIVE SUB DESCRIPTION proc-sys-fs-binfmt_misc.automount loaded active waiting Arbitrary Executable File Formats File System Automount Point sys-devices-pci0000:00-0000:00:07.1-ata2-host2-target2:0:0-2:0:0:0-block-sr0.device loaded active plugged VMware_Virtual_IDE_CDROM_Drive CentOS_ sys-devices-pci0000:00-0000:00:10.0-host0-target0:0:0-0:0:0:0-block-sda-sda1.device loaded active plugged VMware_Virtual_S 1 sys-devices-pci0000:00-0000:00:10.0-host0-target0:0:0-0:0:0:0-block-sda-sda2.device loaded active plugged LVM PV eA52jE-SFuU-BG5t-Isyw-wWdY-lj4K sys-devices-pci0000:00-0000:00:10.0-host0-target0:0:0-0:0:0:0-block-sda.device loaded active plugged VMware_Virtual_S -
systemctl list-units显示所有运行的unit,可以使用
--type和--state参数[root@cyberpelican ~]# systemctl list-units|grep httpd httpd.service loaded active running The Apache HTTP Server [root@cyberpelican ~]# systemctl list-units --type=service --state=active -
systemctl list-unit-files列出所有配置文件,使用
-t参数指定配置文件类型[root@cyberpelican init.d]# systemctl list-unit-files UNIT FILE STATE proc-sys-fs-binfmt_misc.automount static dev-hugepages.mount static dev-mqueue.mount static proc-fs-nfsd.mount static proc-sys-fs-binfmt_misc.mount static sys-fs-fuse-connections.mount static sys-kernel-config.mount static sys-kernel-debug.mount static --- [root@cyberpelican init.d]# systemctl list-unit-files -t service UNIT FILE STATE abrt-ccpp.service enabled abrt-oops.service enabled abrt-pstoreoops.service disabled abrt-vmcore.service enabled abrt-xorg.service enabled abrtd.service enabled accounts-daemon.service enabled alsa-restore.service static alsa-state.service static anaconda-direct.service static四种状态
enable 已建立启动链接,开机自动启动 disable 没有建立链接 static 该配置文件没有[Install]部分(无法执行),只能作为其他配置文件的依赖 masked 该配置文件被禁止建立启动链接,无法被启动 注意,从配置文件的状态无法看出,该 Unit 是否正在运行。这必须执行前面提到的
systemctl status命令 -
systemctl is-active|is-failed|is-enabled# 显示某个 Unit 是否正在运行 [root@cyberpelican ~]# systemctl is-active httpd active # 显示某个 Unit 是否处于启动失败状态 [root@cyberpelican ~]# systemctl is-failed httpd active # 显示某个 Unit 服务是否建立了启动链接 [root@cyberpelican ~]# systemctl is-enabled httpd enabled -
systemctl mask <unit>禁用服务,取消链接
[root@cyberpelican init.d]# systemctl mask httpd Created symlink from /etc/systemd/system/httpd.service to /dev/null. -
systemctl unmask <unit>取消禁用服务
[root@cyberpelican init.d]# systemctl unmask httpd Removed symlink /etc/systemd/system/httpd.service. -
systemctl status [pid|unit name]查看当前运行所有unit的状态,无参表示查看所有
[root@cyberpelican init.d]# systemctl status
● cyberpelican
    State: degraded
     Jobs: 0 queued
   Failed: 1 units
    Since: Thu 2020-10-29 17:15:22 CST; 1h 0min ago
   CGroup: /

   ...
---

[root@cyberpelican init.d]# systemctl status httpd
● httpd.service - The Apache HTTP Server
   Loaded: loaded (/usr/lib/systemd/system/httpd.service; enabled; vendor preset: disabled)
   Active: active (running) since Thu 2020-10-29 17:25:15 CST; 52min ago
     Docs: man:httpd(8)
           man:apachectl(8)
 Main PID: 1610 (httpd)
   Status: "Total requests: 0; Current requests/sec: 0; Current traffic:   0 B/sec"
    Tasks: 7
   CGroup: /system.slice/httpd.service
           ├─1610 /usr/sbin/httpd -DFOREGROUND
           ├─2208 /usr/sbin/httpd -DFOREGROUND
           ├─2209 /usr/sbin/httpd -DFOREGROUND
           ├─2210 /usr/sbin/httpd -DFOREGROUND
           ├─2211 /usr/sbin/httpd -DFOREGROUND
           ├─2212 /usr/sbin/httpd -DFOREGROUND
           └─2213 /usr/sbin/httpd -DFOREGROUND

Oct 29 17:24:49 cyberpelican systemd[1]: Starting The Apache HTTP Server...
Oct 29 17:25:05 cyberpelican httpd[1610]: AH00558: httpd: Could not reliably determine the server's fully qualified domain name, using fe... message
Oct 29 17:25:15 cyberpelican systemd[1]: Started The Apache HTTP Server.
Hint: Some lines were ellipsized, use -l to show in full.
Loaded 配置文件的位置;是否开机启动 Active 当前状态 active|inactive|activing;状态切换的时间 Docs 帮助文档 Main PID 主进程ID status 应用软件提供的状态 CGroup 所有子进程 log block 应用在systemd中的日志 -
systemctl start <unit>启动服务
systemctl start httpd -
systemctl enable <unit>开机启动服务
对于那些支持 Systemd 的软件,安装的时候,会自动在
/usr/lib/systemd/system目录添加一个配置文件。systemctl enable httpd 等价于 ln -s '/usr/lib/systemd/system/httpd.service' '/etc/systemd/system/multi-user.target.wants/httpd.service'上面的命令相当于在
/etc/systemd/system目录添加一个符号链接,指向/usr/lib/systemd/system里面的httpd.service文件。这是因为开机时,
Systemd只执行/etc/systemd/system目录里面的配置文件。这也意味着,如果把修改后的配置文件放在该目录,就可以达到覆盖原始配置的效果 -
systemctl disable <unit>取消开机启动服务,撤销两个目录之间的链接
systemctl disable httpd -
systemctl start <unit>启动服务
[root@cyberpelican init.d]# systemctl start httpd -
systemctl stop <unit>停止服务,如果无法终止进程使用
systemctl kill[root@cyberpelican init.d]# systemctl stop httpd -
systemctl retart <unit>[root@cyberpelican init.d]# systemctl restart httpd -
systemctl kill httpd[root@cyberpelican init.d]# systemctl kill httpd [root@cyberpelican init.d]# ps -ef|grep httpd root 4681 3674 0 18:55 pts/1 00:00:00 grep --color=auto httpd
analyze
-
systemd-analyze查看启动(boot-up)耗时
[root@cyberpelican init.d]# systemd-analyze Startup finished in 677ms (kernel) + 2.579s (initrd) + 47.339s (userspace) = 50.597s -
systemd-analyze critical-chain httpd查看某个unit启动的过程和时间
[root@cyberpelican ~]# systemd-analyze critical-chain httpd.service
The time after the unit is active or started is printed after the "@" character.
The time the unit takes to start is printed after the "+" character.

httpd.service +25.646s
└─remote-fs.target @8.921s
  └─remote-fs-pre.target @8.919s
    └─iscsi-shutdown.service @8.855s +57ms
      └─network.target @8.835s
        └─wpa_supplicant.service @13.631s +67ms
          └─basic.target @4.799s
            └─sockets.target @4.798s
              └─dbus.socket @4.798s
                └─sysinit.target @4.784s
                  └─sys-fs-fuse-connections.mount @30.645s +24ms
                    └─system.slice
                      └─-.slice
loginctl
-
loginctl显示当前登入的用户,等价于
loginctl list-sessions,一个账号能有多个session(tty)[root@cyberpelican systemd]# loginctl SESSION UID USER SEAT c1 42 gdm seat0 1 0 root seat0 22 0 root 3 sessions listed. -
loginctl lock-session <session id>lock指定session ID,对非图形化界面不生效
[root@cyberpelican systemd]# loginctl lock-session 1 -
loginctl kill-session <session id>直接关闭session,等价于
terminate-sessiono,回到登入界面[root@cyberpelican systemd]# loginctl kill-session 22
-
loginctl list-users列出当前登入的账号
[root@cyberpelican systemd]# loginctl list-users UID USER 42 gdm 0 root 2 users listed. -
loginctl show-user <logined user>显示具体用户的信息,对比
id[root@cyberpelican systemd]# loginctl show-user root UID=0 GID=0 Name=root Timestamp=Thu 2020-10-29 19:16:46 CST TimestampMonotonic=30183376 RuntimePath=/run/user/0 Slice=user-0.slice Display=1 State=active Sessions=1 IdleHint=no IdleSinceHint=0 IdleSinceHintMonotonic=0 Linger=no [root@cyberpelican systemd]# id root uid=0(root) gid=0(root) groups=0(root) -
loginctl kill-user <user>关闭指定user的所有session,等价于
terminate-user,回到登入界面[root@cyberpelican ~]# loginctl kill-user root
journalctl
参考:
https://www.cnblogs.com/sparkdev/p/8795141.html
systemd-journald.service默认将日志保存在
/var/log/journal下,用户没有权限修改日志,重启系统后日志丢失。
-
journalctl不带任何参数显示启动系统后的所有日志
[root@cyberpelican ~]# journalctl -- Logs begin at Thu 2020-10-29 19:07:10 CST, end at Thu 2020-10-29 19:24:08 CST. -- Oct 29 19:07:10 chz systemd-journal[91]: Runtime journal is using 6.0M (max allowed 48.6M, trying to lea Oct 29 19:07:10 chz kernel: Initializing cgroup subsys cpuset Oct 29 19:07:10 chz kernel: Initializing cgroup subsys cpu Oct 29 19:07:10 chz kernel: Initializing cgroup subsys cpuacct Oct 29 19:07:10 chz kernel: Linux version 3.10.0-1062.el7.x86_64 (mockbuild@kbuilder.bsys.centos.org) (g Oct 29 19:07:10 chz kernel: Command line: BOOT_IMAGE=/vmlinuz-3.10.0-1062.el7.x86_64 root=/dev/mapper/ce Oct 29 19:07:10 chz kernel: Disabled fast string operations -
journalctl -f实时滚动显示日志
-
journalctl -e查看日志并使用G
Oct 29 20:09:02 cyberpelican systemd[1]: Started Network Manager Script Dispatcher Service. Oct 29 20:09:02 cyberpelican nm-dispatcher[3671]: req:1 'dhcp4-change' [ens33]: new request (4 scripts) Oct 29 20:09:02 cyberpelican nm-dispatcher[3671]: req:1 'dhcp4-change' [ens33]: start running ordered sc Oct 29 20:10:01 cyberpelican systemd[1]: Started Session 8 of user root. Oct 29 20:10:01 cyberpelican CROND[3701]: (root) CMD (/usr/lib64/sa/sa1 1 1) lines 1001-1038/1038 (END) -
journalctl -x当存在错误信息时,使用
-x参数可以给出简单的帮助信息,可以配合-e参数一起使用Oct 29 20:27:01 cyberpelican systemd[1]: [/usr/lib/systemd/system/mdcheck_start.timer:12] Failed to pars Oct 29 20:27:01 cyberpelican systemd[1]: mdcheck_start.timer lacks value setting. Refusing. Oct 29 20:27:01 cyberpelican systemd[1]: [/usr/lib/systemd/system/mdcheck_start.service:14] Invalid envi Oct 29 20:27:01 cyberpelican systemd[1]: [/usr/lib/systemd/system/mdcheck_continue.service:14] Invalid e Oct 29 20:27:03 cyberpelican polkitd[1118]: Registered Authentication Agent for unix-process:4091:424719 Oct 29 20:27:03 cyberpelican polkitd[1118]: Unregistered Authentication Agent for unix-process:4091:4247 lines 2774-2811/2811 (END) -
journalctl _PID=<pid>查看指定pid进程日志,同样的也可以使用
_UID来查看某一个用户的日志[root@cyberpelican system]# journalctl _PID=1593 -- Logs begin at Thu 2020-10-29 19:07:10 CST, end at Fri 2020-10-30 09:04:15 CST. -- Oct 29 19:16:42 cyberpelican httpd[1593]: AH00558: httpd: Could not reliably determin --- [root@cyberpelican system]# journalctl _UID=0 -- Logs begin at Thu 2020-10-29 19:07:10 CST, end at Fri 2020-10-30 09:04:15 CST. -- Oct 29 19:07:10 chz systemd-journal[91]: Runtime journal is using 6.0M (max allowed 4 Oct 29 19:07:10 chz systemd-journal[91]: Journal started Oct 29 19:07:10 chz systemd[1]: Started dracut cmdline hook. Oct 29 19:07:10 chz systemd[1]: Starting dracut pre-udev hook... Oct 29 19:07:10 chz systemd[1]: Started dracut pre-udev hook. Oct 29 19:07:10 chz systemd[1]: Starting udev Kernel Device Manager... Oct 29 19:07:10 chz systemd-udevd[242]: starting version 219 -
journalctl -u <unit>指定显示某一个unit,使用
--since和--until参数查看指定时间段内的日志[root@cyberpelican ~]# journalctl -u httpd.service --since "2020-10-29" -- Logs begin at Thu 2020-10-29 19:07:10 CST, end at Thu 2020-10-29 20:27:03 CST. -- Oct 29 19:16:27 cyberpelican systemd[1]: Starting The Apache HTTP Server... Oct 29 19:16:42 cyberpelican httpd[1593]: AH00558: httpd: Could not reliably determine the server's full Oct 29 19:16:53 cyberpelican systemd[1]: Started The Apache HTTP Server. -
journalctl -o指定output输出的内容格式
[root@cyberpelican systemd]# journalctl -o json-pretty { "__CURSOR" : "s=80e1f974ad0643998becb58e51847d4a;i=1;b=d466e1cc725d4316875231666fd7de59;m=ad297;t=5b2cd480f "__REALTIME_TIMESTAMP" : "1603969630547679", "__MONOTONIC_TIMESTAMP" : "709271", "_BOOT_ID" : "d466e1cc725d4316875231666fd7de59", "PRIORITY" : "6", "_TRANSPORT" : "driver", "MESSAGE" : "Runtime journal is using 6.0M (max allowed 48.6M, trying to leave 72.9M free of 480.1M availab "MESSAGE_ID" : "ec387f577b844b8fa948f33cad9a75e6", "_PID" : "91", "_UID" : "0", "_GID" : "0", "_COMM" : "systemd-journal", "_EXE" : "/usr/lib/systemd/systemd-journald", "_CMDLINE" : "/usr/lib/systemd/systemd-journald", "_CAP_EFFECTIVE" : "5402800cf", "_SYSTEMD_CGROUP" : "/system.slice/systemd-journald.service", "_SYSTEMD_UNIT" : "systemd-journald.service", "_SYSTEMD_SLICE" : "system.slice", "_MACHINE_ID" : "fbb74b6620184684961580de92e236c2", "_HOSTNAME" : "chz" } -
journalctl -p指定输出日志的等级,显示当前等级及以下的内容
[root@cyberpelican ~]# journalctl -e -p 3 Oct 29 20:26:58 cyberpelican systemd[1]: [/usr/lib/systemd/system/mdcheck_continue.service:14] Invalid e Oct 29 20:26:58 cyberpelican systemd[1]: [/usr/lib/systemd/system/mdcheck_continue.service:14] Invalid e Oct 29 20:26:58 cyberpelican systemd[1]: [/usr/lib/systemd/system/mdcheck_start.timer:12] Failed to pars Oct 29 20:26:58 cyberpelican systemd[1]: mdcheck_start.timer lacks value setting. Refusing. Oct 29 20:26:58 cyberpelican systemd[1]: [/usr/lib/systemd/system/mdcheck_start.service:14] Invalid envi Oct 29 20:26:58 cyberpelican systemd[1]: [/usr/lib/systemd/system/mdcheck_continue.service:14] Invalid e Oct 29 20:26:58 cyberpelican systemd[1]: [/usr/lib/systemd/system/mdcheck_continue.service:14] Invalid e Oct 29 20:26:58 cyberpelican systemd[1]: [/usr/lib/systemd/system/mdcheck_start.service:14] Invalid envi -
journalctl --disk-usage查看当前主机存储日志的大小
[root@cyberpelican ~]# journalctl --disk-usage Archived and active journals take up 6.0M on disk. -
journalctl --vacuum-size | vacuum-time删除指定大小或是指定时间内的日志
[root@cyberpelican systemd]# journalctl --vacuum-size=1G
Vacuuming done, freed 0B of archived journals on disk.


#在 1 hour之前的内容删除
[root@cyberpelican systemd]# journalctl --vacuum-time=1h
Vacuuming done, freed 0B of archived journals on disk.=
配置文件
[root@cyberpelican systemd]# cat journald.conf
#  This file is part of systemd.
#
#  systemd is free software; you can redistribute it and/or modify it
#  under the terms of the GNU Lesser General Public License as published by
#  the Free Software Foundation; either version 2.1 of the License, or
#  (at your option) any later version.
#
# Entries in this file show the compile time defaults.
# You can change settings by editing this file.
# Defaults can be restored by simply deleting this file.
#
# See journald.conf(5) for details.

[Journal]
#Storage=auto  #默认使用auto,volatile存储在内存中,persistence存储在物理硬盘中
#Compress=yes #是否压缩日志
#Seal=yes
#SplitMode=uid
#SyncIntervalSec=5m
#RateLimitInterval=30s
#RateLimitBurst=1000
#SystemMaxUse= #指定journal能使用的最高持久存储容量
#SystemKeepFree= #指定journal在添加新条目时需要保留的剩余空间
#SystemMaxFileSize=	#控制单一journal文件大小,符合条件方可被转为持久存储
#RuntimeMaxUse= #指定易失性存储纵的最大可用磁盘容量
#RuntimeKeepFree= #指定向易失性存储内写入数据时为其它应用保留的空间量
#RuntimeMaxFileSize= #指定单一journal文件可占用的最大易失性存储容量
#MaxRetentionSec=
#MaxFileSec=1month
#ForwardToSyslog=yes
#ForwardToKMsg=no
#ForwardToConsole=no
#ForwardToWall=yes
#TTYPath=/dev/console
#MaxLevelStore=debug
#MaxLevelSyslog=debug
#MaxLevelKMsg=notice
#MaxLevelConsole=info
#MaxLevelWall=emerg
#LineMax=48K
hostnamectl
查看当前主机的信息
-
hostnamectl等价于
hostnamectl status,对比uname -r和cat /proc/version[root@cyberpelican systemd]# hostnamectl Static hostname: cyberpelican Icon name: computer-vm Chassis: vm Machine ID: fbb74b6620184684961580de92e236c2 Boot ID: d466e1cc725d4316875231666fd7de59 Virtualization: vmware Operating System: CentOS Linux 7 (Core) CPE OS Name: cpe:/o:centos:centos:7 Kernel: Linux 3.10.0-1062.el7.x86_64 Architecture: x86-64 [root@cyberpelican systemd]# cat /proc/version Linux version 3.10.0-1062.el7.x86_64 (mockbuild@kbuilder.bsys.centos.org) (gcc version 4.8.5 20150623 (Red Hat 4.8.5-36) (GCC) ) #1 SMP Wed Aug 7 18:08:02 UTC 2019 [root@cyberpelican systemd]# uname -r 3.10.0-1062.el7.x86_64 -
hostnamectl set-hostname设置主机名
[root@cyberpelican systemd]# hostnamectl set-hostname cyberpelican
localectl
查看和设置本地化(语言)
-
localectl等价于
localectl status,查看当前系统的本地化设置[root@chz systemd]# localectl System Locale: LANG=en_US.UTF-8 VC Keymap: us X11 Layout: us -
localectl set-locale | set-keymap设置显示语言或输入语言,结合
--list-locales和--list-keymap一起使用[root@cyberpelican systemd]# localectl set-locale LANG=zh_CN.UTF-8 [root@cyberpelican systemd]# localectl System Locale: LANG=zh_CN.UTF-8 VC Keymap: us X11 Layout: us [root@cyberpelican systemd]# localectl set-keymap zh_CN [root@cyberpelican systemd]# localectl System Locale: LANG=zh_CN.UTF-8 VC Keymap: zh_CN X11 Layout: us
timedatectl
与locatectl相似,具体查看manual
-
timedatectl等价于
timedatectl status,区别于date[root@cyberpelican systemd]# timedatectl Local time: Thu 2020-10-29 21:34:37 CST Universal time: Thu 2020-10-29 13:34:37 UTC RTC time: Thu 2020-10-29 13:25:31 Time zone: Asia/Shanghai (CST, +0800) NTP enabled: no NTP synchronized: no RTC in local TZ: no DST active: n/a [root@cyberpelican systemd]# date Thu Oct 29 21:34:41 CST 2020
Unit配置文件
配置文件主要放在/usr/lib/systemd/system目录,也可能在/etc/systemd/system目录。找到配置文件以后,使用文本编辑器打开即可。使用systemctl cat <unit>,查看配置文件的内容
[root@cyberpelican ~]# systemctl cat httpd
# /usr/lib/systemd/system/httpd.service
[Unit]
Description=The Apache HTTP Server
After=network.target remote-fs.target nss-lookup.target
Documentation=man:httpd(8)
Documentation=man:apachectl(8)

[Service]
Type=notify
EnvironmentFile=/etc/sysconfig/httpd
ExecStart=/usr/sbin/httpd $OPTIONS -DFOREGROUND
ExecReload=/usr/sbin/httpd $OPTIONS -k graceful
ExecStop=/bin/kill -WINCH ${MAINPID}
# We want systemd to give httpd some time to finish gracefully, but still want
# it to kill httpd after TimeoutStopSec if something went wrong during the
# graceful stop. Normally, Systemd sends SIGTERM signal right after the
# ExecStop, which would kill httpd. We are sending useless SIGCONT here to give
# httpd time to finish.
KillSignal=SIGCONT
PrivateTmp=true

[Install]
WantedBy=multi-user.target
从上面的输出可以看到,配置文件分成几个区块。每个区块的第一行,是用方括号表示的区别名,比如[Unit]。注意,配置文件的区块名和字段名,都是大小写敏感的。
每个区块内部是一些等号连接的键值对。
[Section]
Directive1=value
Directive2=value
. . .
注意,键值对的等号两侧不能有空格。
配置文件的区块
Unit
[Unit]区块通常是配置文件的第一个区块,用来定义 Unit 的元数据,以及配置与其他 Unit 的关系。它的主要字段如下。
Description:简短描述
Documentation:文档地址
Requires:当前 Unit 依赖的其他 Unit,如果它们没有运行,当前 Unit 会启动失败
Wants:与当前 Unit 配合的其他 Unit,如果它们没有运行,当前 Unit 不会启动失败
BindsTo:与Requires类似,它指定的 Unit 如果退出,会导致当前 Unit 停止运行
Before:如果该字段指定的 Unit 也要启动,那么必须在当前 Unit 之后启动
After:如果该字段指定的 Unit 也要启动,那么必须在当前 Unit 之前启动
Conflicts:这里指定的 Unit 不能与当前 Unit 同时运行
Condition...:当前 Unit 运行必须满足的条件,否则不会运行
Assert...:当前 Unit 运行必须满足的条件,否则会报启动失败
Service
[Service]区块用来 Service 的配置,只有 Service 类型的 Unit 才有这个区块。它的主要字段如下。
Type:定义启动时的进程行为。它有以下几种值。
Type=simple:默认值,执行ExecStart指定的命令,启动主进程
Type=forking:以 fork 方式从父进程创建子进程,创建后父进程会立即退出
Type=oneshot:一次性进程,Systemd 会等当前服务退出,再继续往下执行
Type=dbus:当前服务通过D-Bus启动
Type=notify:当前服务启动完毕,会通知Systemd,再继续往下执行
Type=idle:若有其他任务执行完毕,当前服务才会运行
ExecStart:启动当前服务的命令
ExecStartPre:启动当前服务之前执行的命令
ExecStartPost:启动当前服务之后执行的命令
ExecReload:重启当前服务时执行的命令
ExecStop:停止当前服务时执行的命令
ExecStopPost:停止当其服务之后执行的命令
RestartSec:自动重启当前服务间隔的秒数
Restart:定义何种情况 Systemd 会自动重启当前服务,可能的值包括always(总是重启)、on-success、on-failure、on-abnormal、on-abort、on-watchdog
TimeoutSec:定义 Systemd 停止当前服务之前等待的秒数
Environment:指定环境变量
Install
[Install]通常是配置文件的最后一个区块,用来定义如何启动,以及是否开机启动。它的主要字段如下。
WantedBy:它的值是一个或多个 Target,当前 Unit 激活时(enable)符号链接会放入/etc/systemd/system目录下面以 Target 名 + .wants后缀构成的子目录中
RequiredBy:它的值是一个或多个 Target,当前 Unit 激活时,符号链接会放入/etc/systemd/system目录下面以 Target 名 + .required后缀构成的子目录中
Alias:当前 Unit 可用于启动的别名
Also:当前 Unit 激活(enable)时,会被同时激活的其他 Unit
Unit 配置文件的完整字段清单,请参考官方文档。
例子
[root@cyberpelican system]# systemctl cat sshd
# /usr/lib/systemd/system/sshd.service
[Unit]
Description=OpenSSH server daemon
Documentation=man:sshd(8) man:sshd_config(5)
After=network.target sshd-keygen.service
Wants=sshd-keygen.service

[Service]
Type=notify
EnvironmentFile=/etc/sysconfig/sshd
ExecStart=/usr/sbin/sshd -D $OPTIONS
ExecReload=/bin/kill -HUP $MAINPID
KillMode=process
Restart=on-failure
RestartSec=42s

[Install]
WantedBy=multi-user.target
Unit
-
After
表示sshd需要在
network.target和sshd-keygen.service启动之后启动 -
Wants
表示
sshd.service与sshd-keygen.service之间存在"弱依赖"关系,即如果"sshd-keygen.service"启动失败或停止运行,不影响sshd.service继续执行。 -
Requires
表示"强依赖"关系,即如果该服务启动失败或异常退出,那么
sshd.service也必须退出。 -
EnvironmentFile
指定当前服务的环境参数文件。该文件内部的
key=value键值对,可以用$key的形式,在当前配置文件中获取。许多软件都有自己的环境参数文件,该文件可以用
EnvironmentFile字段读取。
Service
-
ExecStart
定义启动进程时执行的命令。上面的例子中,启动
sshd,执行的命令是/usr/sbin/sshd -D $OPTIONS,其中的变量$OPTIONS就来自EnvironmentFile字段指定的环境参数文件。与之作用相似的,还有如下这些字段。ExecReload字段:重启服务时执行的命令 ExecStop字段:停止服务时执行的命令 ExecStartPre字段:启动服务之前执行的命令 ExecStartPost字段:启动服务之后执行的命令 ExecStopPost字段:停止服务之后执行的命令请看下面的例子。
[Service]
ExecStart=/bin/echo execstart1
ExecStart=
ExecStart=/bin/echo execstart2
ExecStartPost=/bin/echo post1
ExecStartPost=/bin/echo post2
上面这个配置文件,第二行
ExecStart设为空值,等于取消了第一行的设置,运行结果如下。execstart2 post1 post2所有的启动设置之前,都可以加上一个连词号(
-),表示"抑制错误",即发生错误的时候,不影响其他命令的执行。比如,EnvironmentFile=-/etc/sysconfig/sshd(注意等号后面的那个连词号),就表示即使/etc/sysconfig/sshd文件不存在,也不会抛出错误。 -
Type
定义启动类型。它可以设置的值如下。
simple(默认值):ExecStart字段启动的进程为主进程
forking:ExecStart字段将以fork()方式启动,此时父进程将会退出,子进程将成为主进程
oneshot:类似于simple,但只执行一次,Systemd 会等它执行完,才启动其他服务
dbus:类似于simple,但会等待 D-Bus 信号后启动
notify:类似于simple,启动结束后会发出通知信号,然后 Systemd 再启动其他服务
idle:类似于simple,但是要等到其他任务都执行完,才会启动该服务。一种使用场合是为让该服务的输出,不与其他服务的输出相混合
下面是一个
oneshot的例子,笔记本电脑启动时,要把触摸板关掉,配置文件可以这样写。[Unit] Description=Switch-off Touchpad [Service] Type=oneshot ExecStart=/usr/bin/touchpad-off [Install] WantedBy=multi-user.target上面的配置文件,启动类型设为
oneshot,就表明这个服务只要运行一次就够了,不需要长期运行。如果关闭以后,将来某个时候还想打开,配置文件修改如下。
[Unit]
Description=Switch-off Touchpad

[Service]
Type=oneshot
ExecStart=/usr/bin/touchpad-off start
ExecStop=/usr/bin/touchpad-off stop
RemainAfterExit=yes

[Install]
WantedBy=multi-user.target
上面配置文件中,
RemainAfterExit字段设为yes,表示进程退出以后,服务仍然保持执行。这样的话,一旦使用systemctl stop命令停止服务,ExecStop指定的命令就会执行,从而重新开启触摸板。 -
KillMode
定义 Systemd 如何停止 sshd 服务。
上面这个例子中,将
KillMode设为process,表示只停止主进程,不停止任何sshd 子进程,即子进程打开的 SSH session 仍然保持连接。这个设置不太常见,但对 sshd 很重要,否则你停止服务的时候,会连自己打开的 SSH session 一起杀掉。KillMode字段可以设置的值如下。control-group(默认值):当前控制组里面的所有子进程,都会被杀掉 process:只杀主进程 mixed:主进程将收到 SIGTERM 信号,子进程收到 SIGKILL 信号 none:没有进程会被杀掉,只是执行服务的 stop 命令。 -
Restart
定义了 sshd 退出后,Systemd 的重启方式。
上面的例子中,
Restart设为on-failure,表示任何意外的失败,就将重启sshd。如果 sshd 正常停止(比如执行systemctl stop命令),它就不会重启。Restart字段可以设置的值如下。no(默认值):退出后不会重启 on-success:只有正常退出时(退出状态码为0),才会重启 on-failure:非正常退出时(退出状态码非0),包括被信号终止和超时,才会重启 on-abnormal:只有被信号终止和超时,才会重启 on-abort:只有在收到没有捕捉到的信号终止时,才会重启 on-watchdog:超时退出,才会重启 always:不管是什么退出原因,总是重启对于守护进程,推荐设为
on-failure。对于那些允许发生错误退出的服务,可以设为on-abnormal。 -
RestartSec
表示 Systemd 重启服务之前,需要等待的秒数。上面的例子设为等待42秒。
install
-
WantedBy
表示该服务所在的 Target。
Target的含义是服务组,表示一组服务。WantedBy=multi-user.target指的是,sshd 所在的 Target 是multi-user.target。这个设置非常重要,因为执行
systemctl enable sshd.service命令时,sshd.service的一个符号链接,就会放在/etc/systemd/system目录下面的multi-user.target.wants子目录之中。(开机启动的服务)
Target
概述
与传统方式中的RunLevel相似,由于systemd取代了init(SysV),所以chkconfig命令也应该取消使用
启动计算机的时候,需要启动大量的 Unit。如果每一次启动,都要一一写明本次启动需要哪些 Unit,显然非常不方便。Systemd 的解决方案就是 Target。
简单说,Target 就是一个 Unit 组,包含许多相关的 Unit 。启动某个 Target 的时候,Systemd 就会启动里面所有的 Unit。从这个意义上说,Target 这个概念类似于"状态点",启动某个 Target 就好比启动到某种状态。
传统的init启动模式里面,有 RunLevel 的概念,跟 Target 的作用很类似。不同的是,RunLevel 是互斥的,不可能多个 RunLevel 同时启动,但是多个 Target 可以同时启动(意味着可以,即是graphical.target 也是multi-user.target)。
"SysV 运行级别" 与 "systemd 目标" 对照表
| SysV 运行级别 | Systemd 目标 | 注释 |
|---|---|---|
| 0 | runlevel0.target, poweroff.target | 中断系统(halt) |
| 1, s, single | runlevel1.target, rescue.target | 单用户模式 |
| 2, 4 | runlevel2.target, runlevel4.target, multi-user.target | 用户自定义运行级别,通常识别为级别3。 |
| 3 | runlevel3.target, multi-user.target | 多用户,无图形界面。用户可以通过终端或网络登录。 |
| 5 | runlevel5.target, graphical.target | 多用户,图形界面。继承级别3的服务,并启动图形界面服务。 |
| 6 | runlevel6.target, reboot.target | 重启 |
| emergency | emergency.target | 急救模式(Emergency shell) |
-
systemctl list-unit-files -t type列出所有的target
[root@cyberpelican multi-user.target.wants]# systemctl list-unit-files -t target UNIT FILE STATE anaconda.target static basic.target static bluetooth.target static cryptsetup-pre.target static cryptsetup.target static ctrl-alt-del.target disabled default.target enabled emergency.target static final.target static getty-pre.target static getty.target static graphical.target enabled -
systemctl get-default获取默认启动的target。这个组内的所有服务,都将开机启动,关联配置文件
WantedBy字段[root@cyberpelican system]# systemctl get-default graphical.target上面的结果表示,默认的启动 Target 是
multi-user.target。在这个组里的所有服务,都将开机启动。这就是为什么systemctl enable命令能设置开机启动的原因。 -
systemctl list-denpendencies multi-user.target列出指定target包含的所有服务
[root@cyberpelican system]# systemctl list-dependencies multi-user.target multi-user.target ● ├─abrt-ccpp.service ● ├─abrt-oops.service ● ├─abrt-vmcore.service ● ├─abrt-xorg.service ● ├─abrtd.service ● ├─atd.service -
systemctl isolate rescue.target直接切换target,终止其他所有非指定target的服务,
.target可以被省略[root@cyberpelican system]# systemctl isolate rescue -
systemctl set-default rescue.target设置启动默认的target,target可以被省略
[root@cyberpelican ~]# systemctl set-default multi-user
Removed symlink /etc/systemd/system/default.target.
Created symlink from /etc/systemd/system/default.target to /usr/lib/systemd/system/multi-user.target.
Target配置文件
systemctl cat <target>查看配置文件
[root@cyberpelican ~]# systemctl cat multi-user.target
# /usr/lib/systemd/system/multi-user.target
#  This file is part of systemd.
#
#  systemd is free software; you can redistribute it and/or modify it
#  under the terms of the GNU Lesser General Public License as published
#  the Free Software Foundation; either version 2.1 of the License, or
#  (at your option) any later version.

[Unit]
Description=Multi-User System
Documentation=man:systemd.special(7)
Requires=basic.target
Conflicts=rescue.service rescue.target
After=basic.target rescue.service rescue.target
AllowIsolate=yes
注意,Target 配置文件里面没有启动命令。
- Requires:要求与
basic.target一起运行 - conflicts:冲突字段。如果
rescue.service或rescue.target正在运行,multi-user.target就不能运行,反之亦然。 - After:表示
multi-user.target在basic.target、rescue.service、rescue.target之后启动,如果它们有启动的话。 - AllowIsolate:允许使用
systemctl isolate命令切换到multi-user.target。
如果修改了配置文件,需要使用
systemctl daemon-reload使配置文件重新加载
与SysV的差别
-
默认的 RunLevel(在
/etc/inittab文件设置)现在被默认的 Target 取代,位置是/etc/systemd/system/default.target,通常符号链接到graphical.target(图形界面)或者multi-user.target(多用户命令行)。[root@cyberpelican system]# ll|grep default.target lrwxrwxrwx. 1 root root 36 Aug 24 07:59 default.target -> /lib/systemd/system/graphical.target -
启动脚本的位置,以前是
/etc/init.d目录,符号链接到不同的 RunLevel 目录 (比如/etc/rc3.d、/etc/rc5.d等),现在则存放在/lib/systemd/system和/etc/systemd/system目录。 -
配置文件的位置,以前
init进程的配置文件是/etc/inittab,各种服务的配置文件存放在/etc/sysconfig目录。现在的配置文件主要存放在/lib/systemd目录,在/etc/systemd目录里面的修改可以覆盖原始设置。