- ansible playbook介绍
- ansible playbook基础组件
- playbook中使用变量
一、ansible playbook介绍
playbook是由一个或多个“play”组成的列表(剧本是由多出戏组成的)。play的主要功能在于将事先归并为一组的主机装扮成事先通过ansible中的task定义好的角色。从根本上来讲,所谓task无非是调用ansible的一个module。将多个play组织在一个playbook中,即可以让它们联同起来按事先编排的机制同唱一台大戏。下面是一个简单示例。

- hosts: webnodes
  vars:
  http_port: 80
  max_clients: 256
  remote_user: root
  tasks:
  - name: ensure apache is at the latest version
    yum: name=httpd state=latest
  - name: ensure apache is running
    service: name=httpd state=started
    handlers:
    - name: restart apache
      service: name=httpd state=restarted
其中,tasks是一个一个任务。
二、ansible playbook基础组件
Playbooks结构:
- Tasks:任务,即调用模块完成的某操作。
- Variables:变量
- Templates:模板
- Handlers:处理器,指的是在某条件满足时能够触发完成的功能,或者说是由某事件触发执行的操作
- Roles:角色。
1. Hosts和Users
playbook中的每一个play的目的都是为了让某个或某些主机以某个指定的用户身份执行任务。hosts用于指定要执行指定任务的主机,其可以是一个或多个由冒号分隔主机组;remote_user则用于指定远程主机上的执行任务的用户。如上面示例中的
- hosts: webnodes
  remote_user: root
不过,remote_user也可用于各task中。也可以通过指定其通过sudo的方式在远程主机上执行任务,其可用于play全局或某任务;此外,甚至可以在sudo时使用sudo_user指定sudo时切换的用户。
- hosts: webnodes
  remote_user: mageedu
  tasks:
  - name: test connection
    ping:
    remote_user: mageedu
    sudo: yes
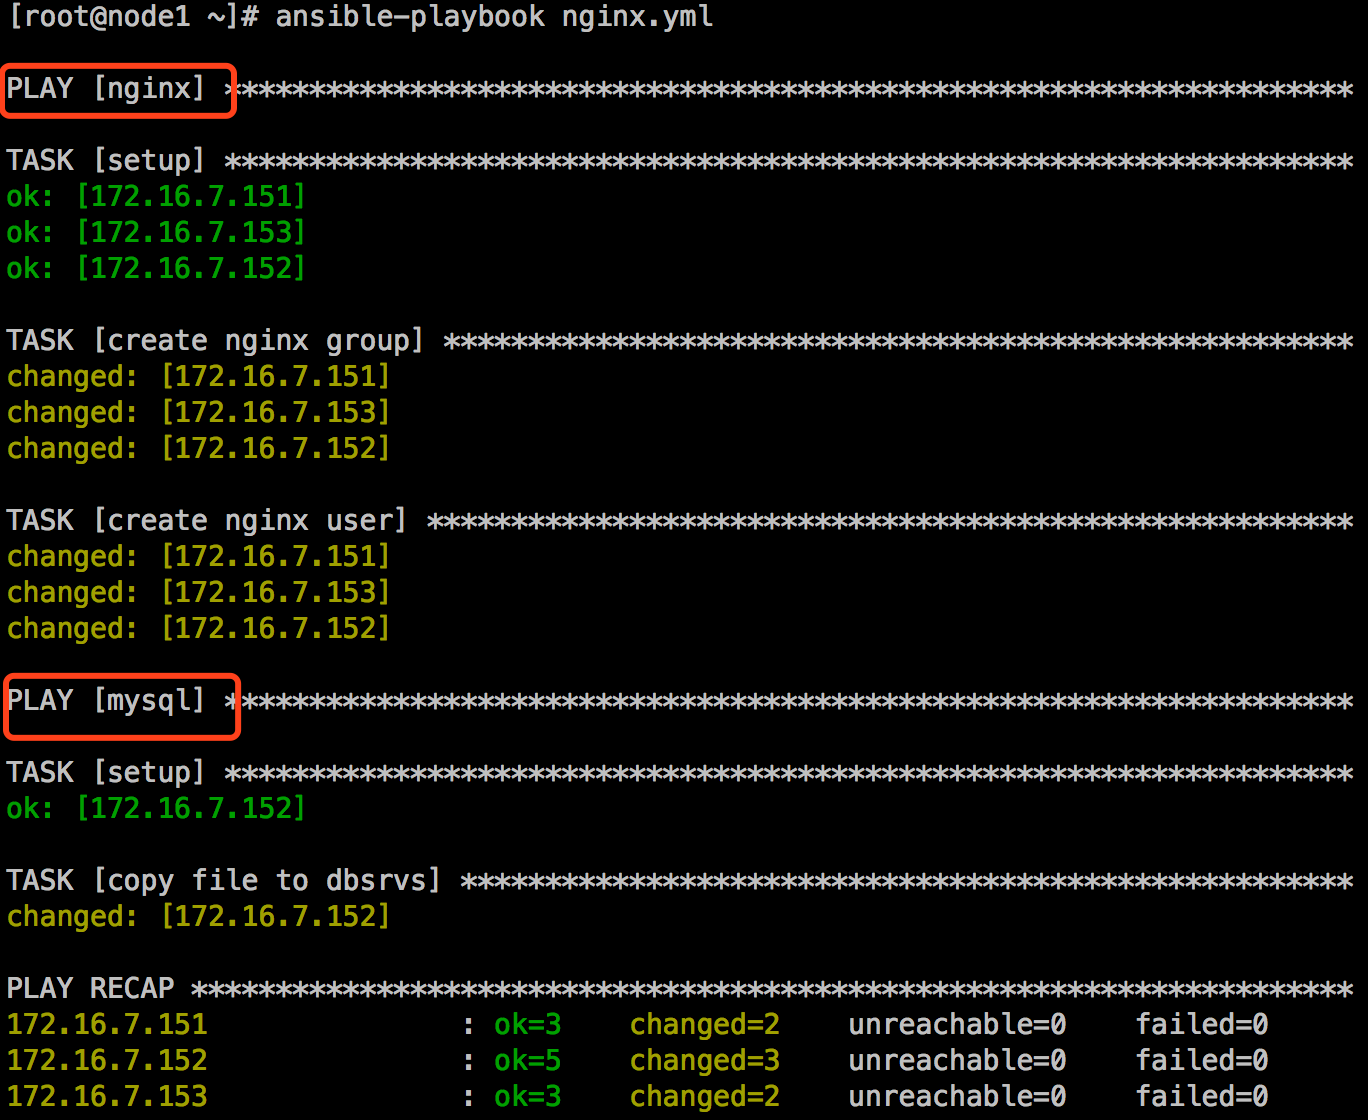
比如写一个最简单的playbook,里面写了两个play,一个play是在nginx组的主机上都创建一个nginx组,nginx用户,另一个play是复制一个文件到mysql组的主机上:
[root@node1 ~]# vim nginx.yml
- hosts: nginx
  remote_user: root
  tasks:
  - name: create nginx group
    group: name=nginx system=yes gid=208
  - name: create nginx user
    user: name=nginx uid=208 group=nginx system=yes
- hosts: mysql
  remote_user: root
  tasks:
  - name: copy file to mysql hosts
    copy: src=/etc/inittab dest=/tmp/inittab.ans
查看ansible-playbook的使用方法:
[root@node1 ~]# man ansible-playbook
运行playbook:
[root@node1 ~]# ansible-playbook nginx.yml
2. 任务列表(Tasks)和action
play的主体部分是task list。task list中的各任务按次序逐个在hosts中指定的所有主机上执行,即在所有主机上完成第一个任务后再开始第二个。在运行自下而下某playbook时,如果中途发生错误,所有已执行任务都可能回滚,因此,在更正playbook后重新执行一次即可。(因为具有幂等性)
task的目的是使用指定的参数执行模块,而在模块参数中可以使用变量。模块执行是幂等的,这意味着多次执行是安全的,因为其结果均一致。
每个task都应该有其name,用于playbook的执行结果输出,建议其内容尽可能清晰地描述任务执行步骤。如果未提供name,则action的结果将用于输出。
定义task的可以使用“action: module options”(这个在较新版本上才能执行)或“module: options”的格式,推荐使用后者以实现向后兼容。如果action一行的内容过多,也可以使用在行首使用几个空白字符进行换行。
tasks:
- name: make sure apache is running
  service: name=httpd state=running
在众多模块中,只有command和shell模块仅需要给定一个列表而无需使用“key=value”格式,例如:
tasks:
- name: disable selinux
  command: /sbin/setenforce 0
如果命令或脚本的退出码不为零,可能会阻止playbook继续往下执行可以使用如下方式替代:
tasks:
- name: run this command and ignore the result
  shell: /usr/bin/somecommand || /bin/true
也就是说这个命令失败也是要继续往下走的,就是失败了但不要影响下面的操作。或者使用ignore_errors来忽略错误信息:
tasks:
- name: run this command and ignore the result
  shell: /usr/bin/somecommand
  ignore_errors: True
3. handlers
用于当关注的资源发生变化时采取一定的操作。
“notify”这个action可用于在每个play的最后被触发,这样可以避免多次有改变发生时每次都执行指定的操作,取而代之,仅在所有的变化发生完成后一次性地执行指定操作。在notify中列出的操作称为handler,也即notify中调用handler中定义的操作。
- name: template configuration file
  template: src=template.j2 dest=/etc/foo.conf
  notify:
  - restart memcached
  - restart apache
handler是task列表,这些task与前述的task并没有本质上的不同。
handlers:
- name: restart memcached
  service:  name=memcached state=restarted
- name: restart apache
  service: name=apache state=restarted
【举例】:比如有个配置apache的playbook,然后利用这个来说明handlers。
1.先创建一个apache.yml,里面定义play安装启动apache
[root@node1 ~]# vim apache.yml
- hosts: mysql
  remote_user: root
  tasks:
  - name: install httpd package
    yum: name=httpd state=latest
  - name: install configuration file for httpd
    copy: src=/root/conf/httpd.conf dest=/etc/httpd/conf/httpd.conf
  - name: start httpd service
    service: enabled=true name=httpd state=started
[root@node1 ~]# ansible-playbook apache.yml
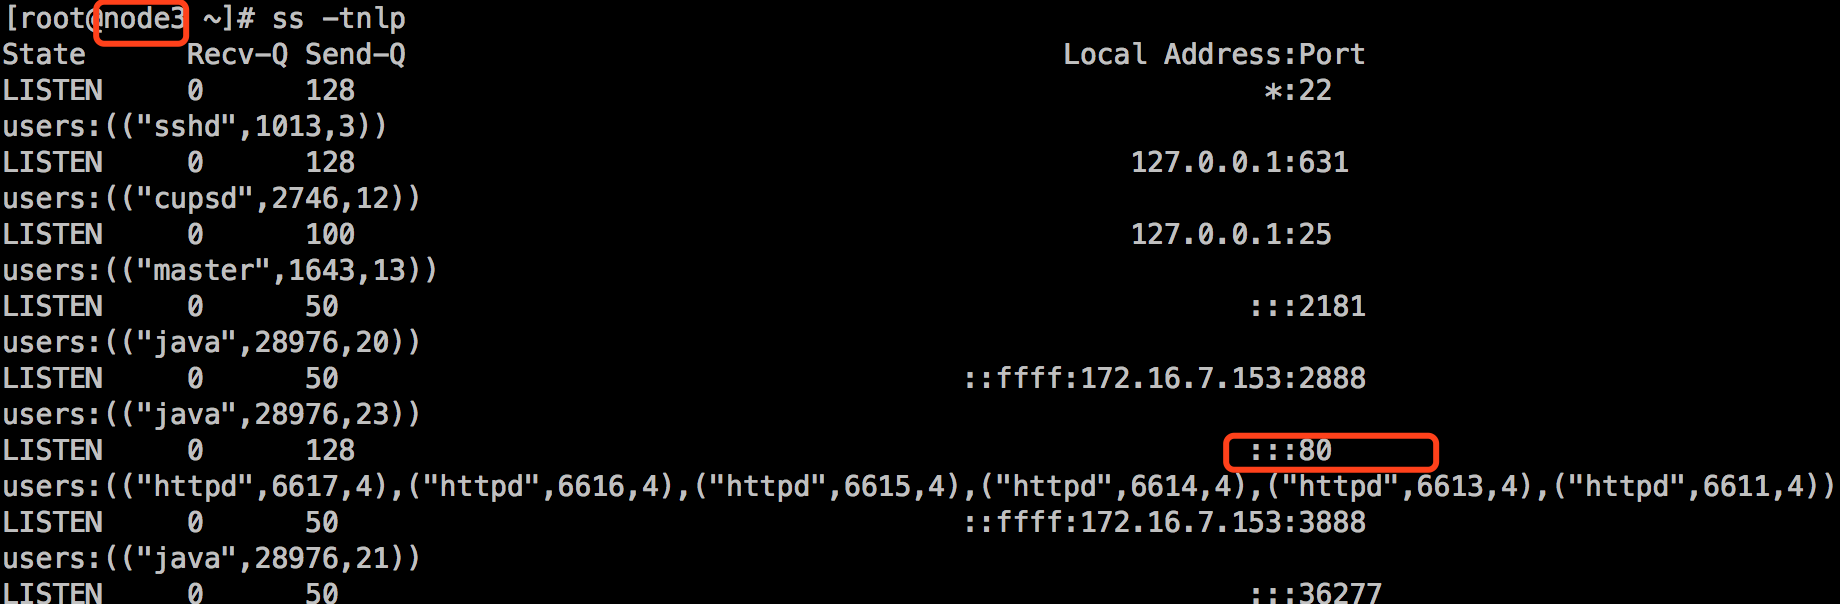
2.假如说某个时刻httpd.conf发生改变了,比如说不再监听在80,而是监听在8080端口,其他没变。修改/root/conf/httpd.conf,把端口改成8080,再执行这个playbook:
[root@node1 ~]# ansible-playbook apache.yml
到mysql组所在的主机172.16.7.153上查看端口,发现监听端口仍然是80:
[root@node3 ~]# ss -tnlp
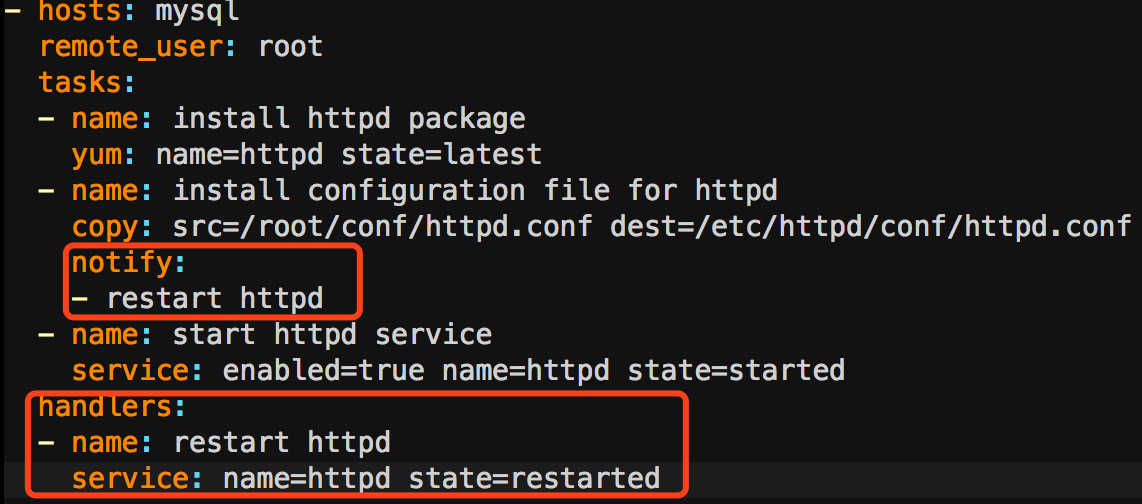
3.一个程序的配置文件发生了改变,那么程序应该重读配置文件才对。然而默认情况下,你多次唱同一个剧本,如果那个task此前执行过,为了保证幂等性,它是不会再被执行。handlers就是为了解决这种问题而生的。Handlers也是任务,但它不是上来就执行的,只有某个条件满足时才会执行。所以我们去修改apache.yml:
- hosts: mysql
  remote_user: root
  tasks:
  - name: install httpd package
    yum: name=httpd state=latest
  - name: install configuration file for httpd
    copy: src=/root/conf/httpd.conf dest=/etc/httpd/conf/httpd.conf
    notify:
    - restart httpd
    - name: start httpd service
      service: enabled=true name=httpd state=started
   handlers:
   - name: restart httpd
     service: name=httpd state=restarted
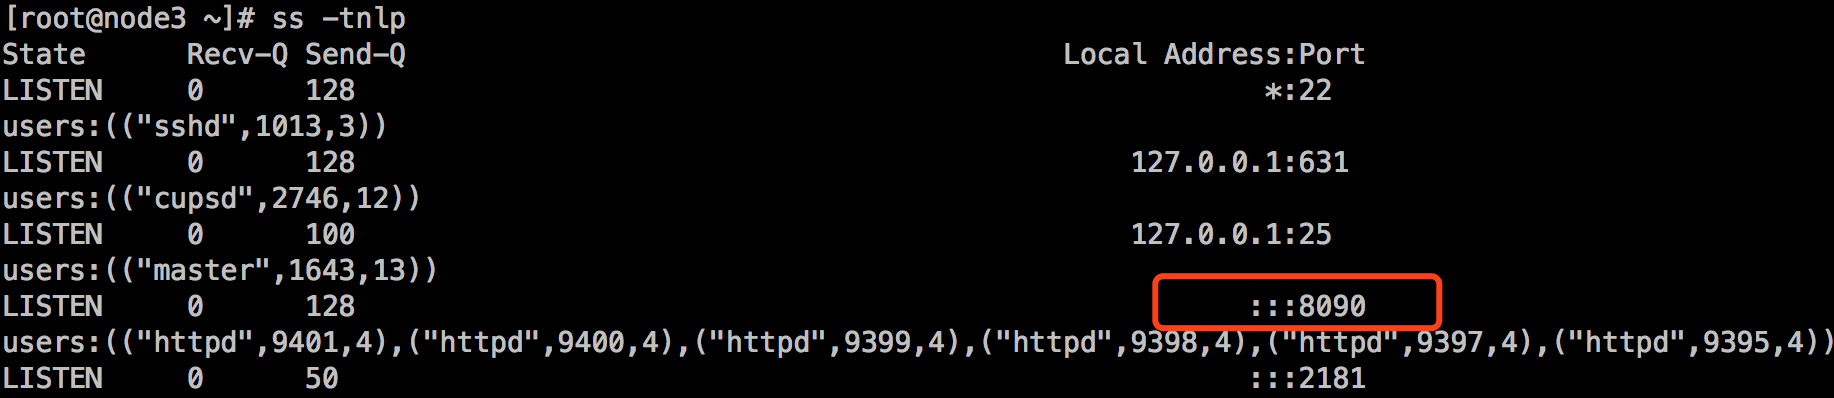
修改/root/conf/httpd.conf,把端口改成8090,再执行这个playbook:
[root@node1 ~]# ansible-playbook apache.yml
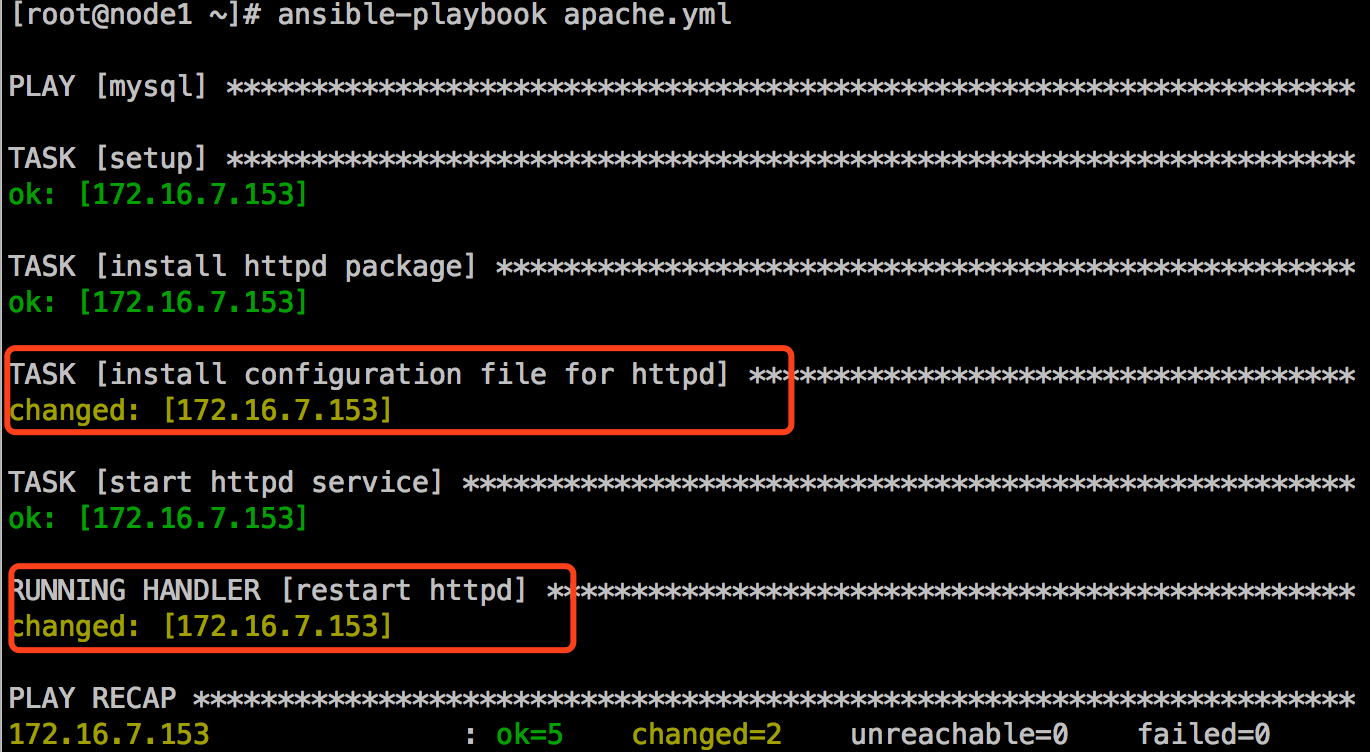
到mysql组所在的主机172.16.7.153上查看端口,发现监听端口改变了,变成了8090:
三、playbook中使用变量
- hosts: mysql
  remote_user: root
  vars:
  - package: httpd
  tasks:
  - name: install httpd package
    yum: name={{ package }} state=latest
  - name: install configuration file for httpd
    copy: src=/root/conf/httpd.conf dest=/etc/httpd/conf/httpd.conf
    notify:
    - restart httpd
  - name: start httpd service
    service: enabled=true name=httpd state=started
  handlers:
  - name: restart httpd
    service: name=httpd state=restarted
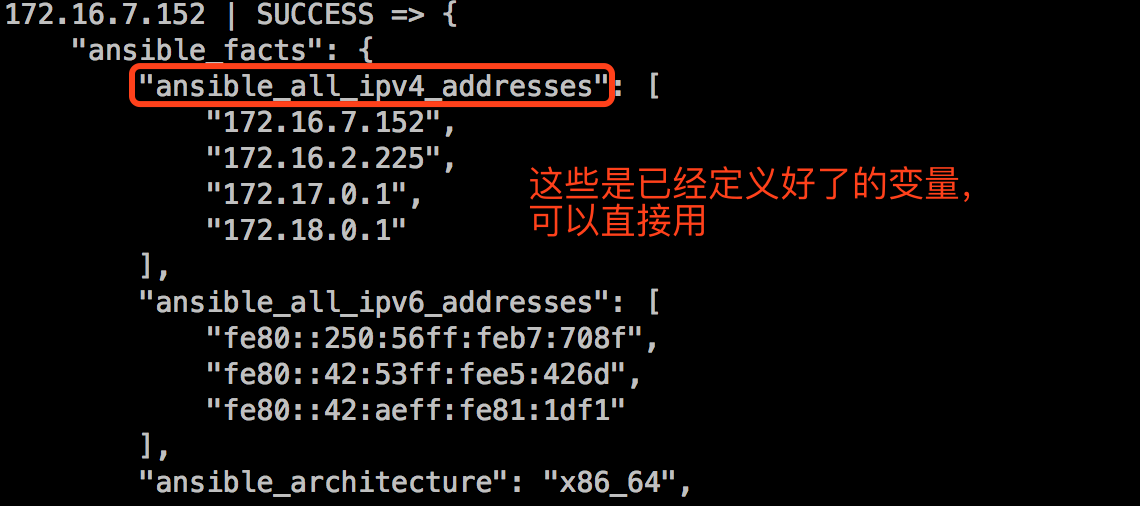
【注意】:playbook中能使用的变量不仅仅是这里定义的变量,而是可以使用ansible中定义的所有变量。例如:
[root@node1 ~]# ansible 172.16.7.152 -m setup
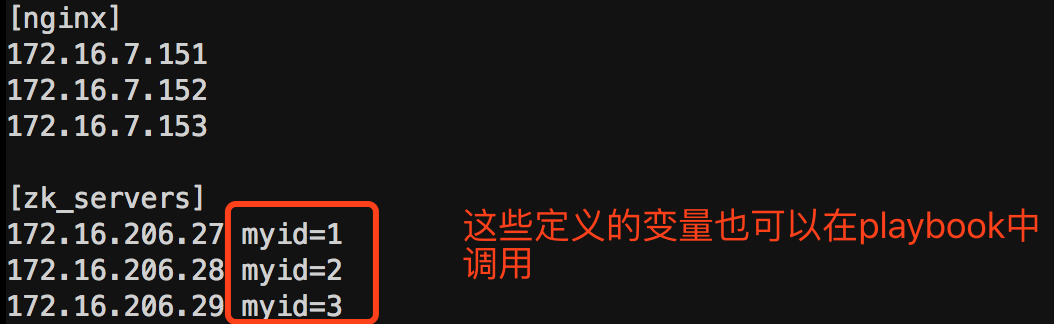
另外,在inventory中定义的变量也可以在playbook中调用。例如:
[root@node1 ~]# vim /etc/ansible/hosts
Playbook
1、语法特性如下:
(1)"---"首行顶格开始
(2)#号注释
(3)缩进统一,不同的缩进代表不同的级别,缩进要对齐,空格和tab不能混用
(4)区别大小写,键值对k/v的值也大小写敏感
(5)k/v的值同行使用":"分开,换行写需以"-"分隔
2、格式
---
- name: test
hosts: test
gather_facts: no
vars:
http: 8080
https: 1443
vars_files:
- vars/server_vars.yml
remote_user: root
sudo: yes
tasks:
- name: test1
copy: src=/opt/apps/web/* dest=/opt/apps/web/
notify:
- restart apache
- name: test2
yum: name={{ item }} state=present
with_items:
- httpd
- httpd-devel
- name: test3
shell: "echo $TEST"
environment:
- TEST: abc
handlers:
- name: restart apache
service: name=httpd state=restarted
说明:
hosts:test #表示test组的节点主机
gather_facts: no #跳过收集facts信息,默认是yes
vars: #定义变量,引用变量{{vars}}
vars_files: #使用文件定义变量,文件中也是用k/v形式定义变量
remote_user: root #远程使用root用户
sudo:yes #使用sudo
tasks: #指定一系列将要运行的任务
name: test1 #test1任务,copy模块
notify: #与下面handlers对应,上一步copy之后文件发生改变,则通过name匹配handlers中的任务,这里匹配restart appche的service任务
name: test2 #test2任务,yum模块
with_items: #定义列表变量,直接用{{item}}引用。该关键字也可以用来定义数组。
with_dict: #定义字典
3、正式运行Playbook之前,可以--check或-C来检测,输出的结果和实际执行一模一样,但不会有实际影响。
4、ansible-playbook
-i 指定inventory文件
-v 详细输出,-vvv更详细,-vvvv更更详细
-f 并发数
-e 定义Playbook中使用的变量,格式"key=value,key=value"
--remote-user #远程用户
--ask-pass #远程用户密码
--sudo #使用sudo
--sudo-user #sudo的用户,默认root
--ask-sudo-pass #sudo密码
扩展:
(1)handlers:见test1
(2)environment:为某个play设置单独的环境变量,例子见P94-95
(3)delegate_to:任务委派
例:- name: 123
shell: "echo $PATH>/test/1"
delegate_to: 192.168.2.30
把shell命令委派给192.168.2.30节点执行,其他hosts中指定的节点不执行。
(4)register:注册变量
将操作结果,包括stdout和stderr,保存到变量中,再根据变量的内容决定下一步,这个保存操作结果的变量就是注册变量。
例:- shell: ***
register: result
使用result.stdout和result.stderr读取执行结果的标准输出和标准错误。
(5)vars_prompt: 交互式提示
例:
---
- hosts: all
vars_prompt:
- name: share_user
prompt: "username?"
- name: share_pass
prompt: "password"
private: yes
常用选项:
private: yes #用户输入不可见
default #设置默认值
confirm: yes #要求输入两次
5、流程控制
(1)when条件判断 P109
例1:第一步执行的返回值中有'ready'时,再执行下一步操作。
- command: my-app --status
register: myapp_result
- command: do-something
when: "'ready' in myapp_result"
例2:stat模块查看文件信息,如果文件没创建,则执行command
- stat: path=/etc/sysctl.conf
register: stat_result
- command: touch /etc/sysctl.conf
when: stat_result.stat.exists == false
(2)changed_when和failed_when P110-111
(3)wait_for模块,任务暂停 P112
6、循环
原文:http://xdays.me/ansible状态管理.html
(1)标准遍历
用with_items可以遍历一个列表,注意这里只会遍历一层。示例如下:
- name: add several users
user: name={{ item }} state=present groups=wheel
with_items:
- testuser1
- testuser2
(2)嵌套遍历
用with_nested可以遍历一个列表,注意这里会遍历多层,直到最内层。示例如下:
- name: give users access to multiple databases
mysql_user: name={{ item[0] }} priv={{ item[1] }}.*:ALL append_privs=yes password=foo
with_nested:
- [ 'alice', 'bob', 'eve' ]
- [ 'clientdb', 'employeedb', 'providerdb' ]
(3)遍历字典
用with_dict可以遍历一个字典,用key和value来表示。示例如下:
#变量文件
---
users:
alice:
name: Alice Appleworth
telephone: 123-456-7890
bob:
name: Bob Bananarama
telephone: 987-654-3210
#playbook文件
tasks:
- name: Print phone records
debug: msg="User {{ item.key }} is {{ item.value.name }} ({{ item.value.telephone }})"
with_dict: users
(4)文件通配符循环
用with_fileglob可以获取本地文件列表。示例如下:
# copy each file over that matches the given pattern
- copy: src={{ item }} dest=/etc/fooapp/ owner=root mode=600
with_fileglob:
- /playbooks/files/fooapp/*
(5)对齐的列表
用with_together可以达到类似Python里的zip函数的功能。示例如下:
#变量文件:
---
alpha: [ 'a', 'b', 'c', 'd' ]
numbers: [ 1, 2, 3, 4 ]
#playbook文件
tasks:
- debug: msg="{{ item.0 }} and {{ item.1 }}"
with_together:
- alpha
- numbers
(6)循环一个task的输出
with_lines指令后跟一个命令,ansible会遍历命令的输出。示例如下:
- name: Example of looping over a command result
shell: /usr/bin/frobnicate {{ item }}
with_lines: /usr/bin/frobnications_per_host --param {{ inventory_hostname }}
7、Tags标签 #P113-114
标签功能可以给Roles、文件、单独的任务甚至整个Playbook打上标签,然后利用这些标签来指定要运行或不运行Playbook中的个别任务。
例:
vim test.yml
---
- hosts: test
tags: deploy #给整个Playbook打一个标签
tasks:
- name: test_tags
shell: ***
tags: #为任务打标签
- test1
- test2
- include: foo.yml
tags: foo
ansible-playbook test.yml --tags "test1" #只执行test_tags任务
ansible-playbook test.yml --skip-tags "test2" #跳过test_tags任务
写法格式:
tags: ['one','two']
tags:
- one
- two
8、Block块 P115-116
9、Include