Drone 官方示例 - Example Go project
用 Docker 部署 Go 服务器
Golang 官方示例 - outyet
一个生产环境的例子
用 rsync 复制文件的方式进行部署的例子
实际的 DevOps 项目中,在 pipeline 流水线中包含下载代码、测试、构建、发布、部署、通知等步骤。基本流程如下,当然不同的语言或不同的需求下流程会有所差异:
clone -> test -> build -> publish -> deploy -> notify包含开发的完整流程为:
- 开发项目代码,包括
.drone.yml文件和 Dockerfile 文件 - 上传代码至 Gogs,通过 Gogs 的 webhook 触发 Drone 的 Pipeline
- Drone 开始 Pipeline 的执行
- clone 代码至容器
- 测试
- 编译代码,构建可执行文件(Java、Golang 等编译型语言需要,PHP 之类的脚本语言则不需要)
- 将项目和运行环境打包成镜像,发布到 Registry(当然也可以使用 rsync 将编译后的文件(Golang 等)或源码(PHP 等)部署到服务器,此时需要在目标服务器提前安装运行环境)
- 部署至生产环境
- 发送邮件等通知信息
Drone 的文档挺差劲,不过 Drone 用起来还是挺简单的,比 Jenkins 简单到无法描述。
打通 Gogs 和 Drone
创建 Git 项目
登录 Gogs 后,从 Web 页面创建项目。我的 Gogs 项目地址是 https://gogs.kikakika.com。
创建完成后,可以在 Web 页面添加文件,但是比较麻烦。这里把仓库添加到本地:
git clone https://gogs.kikakika.com/lihongfeng/first.git然后,在仓库中创建 .drone.yml 和 hello.go、hello_test.go 三个文件。
编写 .drone.yml 文件
这里直接使用 Go 的官方镜像:
workspace:
  base: /go
  path: src/gogs.kikakika.com/lihongfeng/first

pipeline:
  build:
    image: golang:1.10.2
    commands:
      - go test
      - go build
其中,workspace 定义了可以在构建步骤之间共享的 volume 和工作目录。建议设置 workspace 以使用所需的 GOPATH。其中:
- base 定义了一个可用于所有 pipeline 步骤的共享的 volume。这可确保源代码、依赖项和编译的二进制文件在步骤之间持久保存和共享。
- path 定义了用于构建的工作目录。代码会克隆到这个位置,并且构建过程中每个步骤都会使用这个工作目录作为默认的工作目录。path 必须是相对路径,并且可以与 base 相结合。
编写 Golang 代码
main.go :
package main

import (
    "fmt"
)

func main() {
    fmt.Printf("hello world");
}

func hello() string {
    return "hello world";
}
main_test.go :
package main

import "testing"

func TestHello(t *testing.T) {
    if hello() != "hello world" {
        t.Error("Testing error")
    }
}
提交代码
$ git add ./
$ git commit -m "try drone with golang demo"
[master f8a6927] try drone with golang demo
 3 files changed, 33 insertions(+)
 create mode 100644 .drone.yml
 create mode 100644 main.go
 create mode 100644 main_test.go
$ git push
Counting objects: 5, done.
Delta compression using up to 4 threads.
Compressing objects: 100% (5/5), done.
Writing objects: 100% (5/5), 696 bytes | 696.00 KiB/s, done.
Total 5 (delta 0), reused 0 (delta 0)
To https://gogs.kikakika.com/lihongfeng/first.git
   b8c5bdd..f8a6927  master -> master
查看 Drone 的 web 端是否成功触发
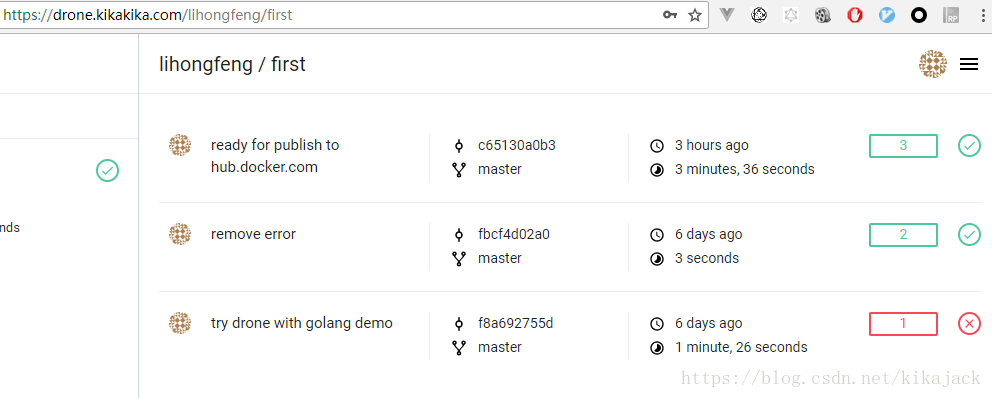
可以看到成功触发了 CI。具体页面截图如下。
- 项目主页:
- clone 阶段:
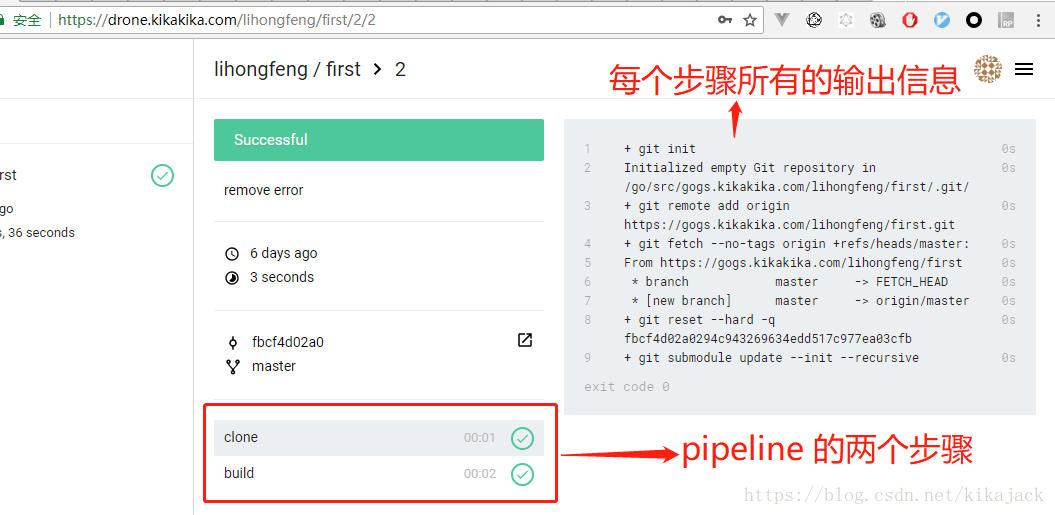
+ git init
Initialized empty Git repository in /go/src/gogs.kikakika.com/lihongfeng/first/.git/
+ git remote add origin https://gogs.kikakika.com/lihongfeng/first.git
+ git fetch --no-tags origin +refs/heads/master:
From https://gogs.kikakika.com/lihongfeng/first
 * branch            master     -> FETCH_HEAD
 * [new branch]      master     -> origin/master
+ git reset --hard -q fbcf4d02a0294c943269634edd517c977ea03cfb
+ git submodule update --init --recursive- build 阶段:
+ go test
PASS
ok      gogs.kikakika.com/lihongfeng/first  0.002s
+ go build
实现 CI/CD
上面的例子只是构建项目及运行测试,并没有构建镜像及将镜像发布到 Registry,更没有操作生产环境服务器更新镜像。
构建镜像需要用到 Docker 插件.
通过更新上面的 .drone.yml 文件实现这几个步骤:
workspace:
  base: /go
  path: src/gogs.kikakika.com/lihongfeng/first

pipeline:
  test:
    image: golang:1.10.2
    commands:
      - go test
  build:
    image: golang:1.10.2
    commands:
      - go build
  publish:
    image: plugins/docker
    repo: kikajack/first
    dockerfile: ./Dockerfile
    tags: latest
    # registry: https://harbor.kikakika.com # 如果使用自建的镜像仓库,例如 Harbor,这里可以通过 registry 指定
    secrets: [ docker_username, docker_password ] # 这里的用户名和密码在 web 界面指定

    # 如果需要自动部署容器到服务器,可以打开下面这部分代码
  # deploy:
  #   image: appleboy/drone-ssh # 用于连接服务器
  #   host:
  #     - your_host
  #   username: your_name
  #   password: your_pass
  #   port: 22
  #   command_timeout: 300 # ssh命令行执行超时时间,300秒
  #   script:
  #     - docker pull repo_url:latest
  #     - docker rm -f docker-demo || true # 这里这样是因为如果不存在docker-demo,rm会报错
  #     - docker run -d -p 8065:8065 --name docker-demo repo_url
其中 secrets: [ docker_username, docker_password ] 中指定的用户名密码,需要在 Drone 的 Web 页面设置。这样可以避免在配置文件中出现密码,安全。
Dockerfile 文件
需要在项目根目录中创建 Dockerfile 文件,用于构建镜像。可以参考 通过 Docker 部署 Go 服务器,这里有完整的示例。这个文件支持两种方式构建镜像:容器外编译后复制二进制文件到容器,或复制源代码到容器后在容器中编译得到二进制文件。
复制源代码到容器后在容器内编译:
# 官方的 Golang 镜像基于 Debian,且 workspace(GOPATH)配置为 /go
FROM golang:1.10.2

# 将本地的 Go 文件复制到容器中的 workspace
ADD . /go/src/gogs.kikakika.com/lihongfeng/first

# 在容器内编译构建应用。可以在这里获取或管理依赖关系,可以手动或使用诸如“godep”之类的工具
RUN go install gogs.kikakika.com/lihongfeng/first

# 容器启动时,默认运行 first 应用
ENTRYPOINT /go/bin/first

# 监听 8080 端口
EXPOSE 8080
容器外编译后复制二进制文件到容器
可以参考 这个例子。
Dockerfile文件:
FROM plugins/base:multiarch

LABEL maintainer="Bo-Yi Wu <appleboy.tw@gmail.com>"
  org.label-schema.name="Drone Workshop"
  org.label-schema.vendor="Bo-Yi Wu"
  org.label-schema.schema-version="1.0"

ADD release/linux/amd64/helloworld /bin/

HEALTHCHECK --interval=30s --timeout=30s --start-period=5s --retries=3 CMD [ "/bin/helloworld", "-ping" ]

ENTRYPOINT ["/bin/helloworld"].drone.yml文件:
workspace:
  base: /go
  path: src/github.com/go-training/drone-golang-example

clone:
  git:
    image: plugins/git
    depth: 50
    tags: true

pipeline:
  testing:
    image: golang:1.10.0
    commands:
      - go test -v .
      - go vet

  build_linux_amd64:
    image: golang:1.10.0
    group: build
    commands:
      - make build_linux_amd64

  build_linux_i386:
    image: golang:1.10.0
    group: build
    commands:
      - make build_linux_i386

  publish_linux_amd64:
    image: plugins/docker:17.05
    pull: true
    secrets: [ docker_username, docker_password ]
    group: release
    repo: appleboy/test
    auto_tag: true
    dockerfile: Dockerfile
    when:
      event: [ push, tag ]
      local: false

  publish_alpine:
    image: plugins/docker
    group: release
    pull: true
    dockerfile: Dockerfile.alpine
    secrets: [ docker_username, docker_password ]
    default_tags: true
    default_suffix: alpine
    repo: appleboy/test
    when:
      event: [ push, tag ]
      local: false
验证镜像是否上传成功
- 登录官方镜像仓库
https://hub.docker.com/r/kikajack/first,可以看到镜像上传成功了。
- 执行一下,会成功的输出“hello world”:

[root@VM_139_74_centos ~]# docker run kikajack/first
Unable to find image 'kikajack/first:latest' locally
latest: Pulling from kikajack/first
cc1a78bfd46b: Already exists
6861473222a6: Already exists
7e0b9c3b5ae0: Already exists
3ec98735f56f: Already exists
32ecd1fcfe1a: Already exists
9889d58a42e5: Already exists
337bad6698be: Already exists
831eeb459358: Pull complete
d4438c00f9db: Pull complete
Digest: sha256:9caf567d796deead445606f56892f843f8869aef92d27bb8ff20985cd8a82169
Status: Downloaded newer image for kikajack/first:latest
hello world[root@VM_139_74_centos ~]#