python和java,.net,php web平台交互最好使用web通信方式,不要使用Jypython,IronPython,这样的好处是能够保持程序模块化,解耦性好
python允许使用'''...'''方式来表示多行代码:
>>> print(r'''Hello,
... Lisa!''')
Hello,
Lisa!
>>>
>>> print('''line1
... line2
... line3''')
line1
line2
line3
也可以使用r' xxx '表示xxx内部不做任何转义操作,对于原生输出内容有益
print(r'\	\')
# 输出 \	\
python能够直接处理的数据类型:
整数,浮点数,字符串,布尔值(True,False),
还有list(类似数组),dict(类似js object literal)
常量: PI
两种除法:
/ : 自动使用浮点数,比如10/3=3.33333 9/3=3.0
// : 取整 10//3= 3
%: 10%3=1
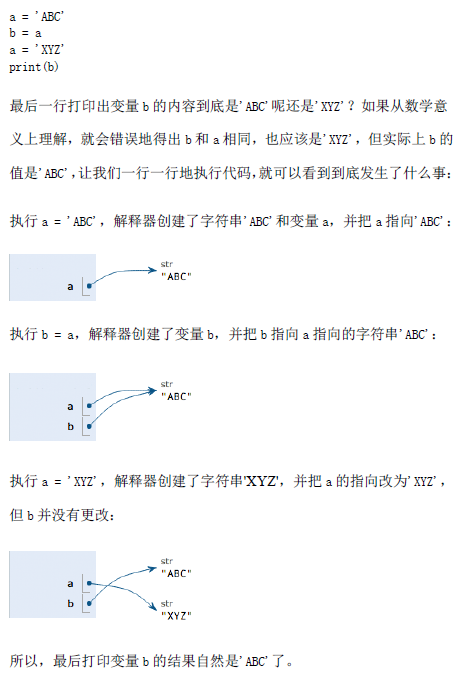
注意:
python支持多种数据类型,而在计算机内部,可以把任何数据都看成一个"对象“,而变量就是在程序中用来指向这些数据对象的,对变量赋值实际上就是把数据和变量给关联起来”
python的整数没有大小的限制
python字符串編碼常用的函数:
ord(‘x’)返回x字符对应的unicode编码,chr(‘hexcode’)则返回unicode编码对应的祖父
>>> ord('A')
65
>>> ord('中')
20013
>>> chr(66)
'B'
>>> chr(25991)
'文'
由于python的字符串类型是str,在内存中以unicode表示,一个字符都会对应着若干个字节,但是如果要在网络上传输,或者保存到磁盘上,则需要把str变为以字节为单位的bytes类型。
python对bytes类型的数据用带b前缀的单引号或者双引号表示:
>>> 'ABC'.encode('ascii')
b'ABC'
>>> '中文'.encode('utf-8')
b'xe4xb8xadxe6x96x87'
反过来,如果从网络或者磁盘上读取了utf-8 byte字节流,那么必须做decode操作成为unicode后才能在代码中使用,需要使用decode方法:
>>> b'ABC'.decode('ascii')
'ABC'
>>> b'xe4xb8xadxe6x96x87'.decode('utf-8')
'中文'

>>> len('abc')
3
>>> len('中')
1
>>> len('中文'.encode('utf-8'))
6
Python解释器读取源代码时,为了让它按UTF-8编码读取,我们通常在文件开头写上这两行:
#!/usr/bin/env python3
# -*- coding: utf-8 -*-
所有python中需要显示的字符串,应该以 u"this is unicode字符串"的方式来定义使用字符串
字符串的格式化输出:
>>> 'Hello, %s' % 'world'
'Hello, world'
>>> 'Hi, %s, you have $%d.' % ('Michael', 1000000)
'Hi, Michael, you have $1000000.'
list类型数据
list类似于js的array,是一种有序的集合,可以随时添加和删除对应的元素
>>> classmates = ['Michael', 'Bob', 'Tracy']
>>> classmates
['Michael', 'Bob', 'Tracy']
>>> len(classmates)
3
>>> classmates[0]
'Michael'
>>> classmates[1]
'Bob'
>>> classmates[2]
'Tracy'
>>> classmates[3]
Traceback (most recent call last):
File "<stdin>", line 1, in <module>
IndexError: list index out of range
>>> classmates[-1]
'Tracy'
>>> classmates[-2]
'Bob'
>>> classmates[-3]
'Michael'
>>> classmates[-4]
Traceback (most recent call last):
File "<stdin>", line 1, in <module>
IndexError: list index out of range
list还有以下常用的操作函数: append,insert,pop
list列表生成式
L = ['Hello', 'World', 18, 'Apple', None]
print([s.lower() if isinstance(s,str) else s for s in  L])
['hello', 'world', 18, 'apple', None]
generator生成式
在科学计算中,如果range为百万,我们没有必要全部先在内存中以list形式生成好,只需在用到的时候再生成,这就是generator,generator本身保存的是算法,generator本身也是iteratable可递归访问的(用在for循环中)
>>> L = [x * x for x in range(10)]
>>> L
[0, 1, 4, 9, 16, 25, 36, 49, 64, 81]
>>> g = (x * x for x in range(10))
>>> g
<generator object <genexpr> at 0x1022ef630>
>>> next(g)
0
>>> next(g)
1
>>> next(g)
4
>>> next(g)
9
>>> next(g)
16
>>> g = (x * x for x in range(10))
>>> for n in g:
... print(n)
...
0
1
4
9
如果是复杂的generator算法逻辑,则可以通过类似函数来定义。
相对比较复杂的generator
gougu = {z: (x,y) for z in [1,2,3,4,5,6,7,8,9,10,11,12,13,14,15,16,17,18,19,20,21,22,23,24,25,26] for y in range(1, z) for x in range(1, y) if x*x + y*y == z*z}

gougu
Out[17]:
{5: (3, 4),
 10: (6, 8),
 13: (5, 12),
 15: (9, 12),
 17: (8, 15),
 20: (12, 16),
 25: (7, 24),
 26: (10, 24)}
gougu = [[x, y, z] for z in [1,2,3,4,5,6,7,8,9,10,11,12,13,14,15,16,17,18,19,20,21,22,23,24,25,26] for y in range(1, z) for x in range(1, y) if x*x + y*y == z*z]
gougu
Out[19]:
[[3, 4, 5],
 [6, 8, 10],
 [5, 12, 13],
 [9, 12, 15],

pyt = ((x, y, z) for z in [1,2,3,4,5,6,7,8,9,10,11,12,13,14,15,16,17,18,19,20,21,22,23,24,25,26] for y in range(1, z) for x in range(1, y) if x*x + y*y == z*z)
#这里pyt就是一个generator,注意最外面的括号!随后可以使用for来调用生成式
print([m for m in pyt])
[(3, 4, 5), (6, 8, 10), (5, 12, 13), (9, 12, 15), (8, 15, 17), (12, 16, 20), (15, 20, 25), (7, 24, 25), (10, 24, 26)]
import jieba
documents = [u'我来到北京清华大学',
             u'假如当前的单词表有10个不同的单词',
             u'我是中华人民共和国的公民,来自上海,老家是湖北襄阳']

documents_after = []
documents_after = [[w for w in jieba.cut(s)] for s in documents]
documents_after2 = [' '.join(s) for s in documents_after]
print(documents_after)
print(documents_after2)
[['我', '来到', '北京', '清华大学'], ['假如', '当前', '的', '单词表', '有', '10', '个', '不同', '的', '单词'], ['我', '是', '中华人民共和国', '的', '公民', ',', '来自', '上海', ',', '老家', '是', '湖北', '襄阳']]
['我 来到 北京 清华大学', '假如 当前 的 单词表 有 10 个 不同 的 单词', '我 是 中华人民共和国 的 公民 , 来自 上海 , 老家 是 湖北 襄阳']
generator(yield)函数:
def fib(max):
    n,a,b = 0,0,1
    while n < max:
        yield b
        a,b = b,a+b
        n = n+1
    return  'done'
f = fib(6)
for n in fib(6):
    print(n)

1
1
2
3
5
8
Generator in-depth
generator是一个产生一系列结果的一个函数(注意不是只产生一个value的函数哦!)
def countdown(n):
    print("counting down from ",n)
    while n > 0:
        yield n
        n -=1
x = countdown(10)
print(x)
# 注意并未打印出 counting down from 10的信息哦
<generator object countdown at 0x0000026385694468>

print(x.__next__())
# counting down from  10
# 10
print(x.__next__())
#Out[17]:
#9
generator和普通函数的行为是完全不同的。调用一个generator functionjiang chuangjian yige generator object.但是注意这时并不会调用函数本身!!
当generator return时,iteration就将stop.
当调用__next__()时yield一个value出来,但是并不会继续往下执行,function挂起pending,直到下一次next()调用时才往下执行,但是却记录着相应的状态.
generator虽然行为和iterator非常类似,但是也有一点差别:generator是一个one-time operation
generator还有一个无与伦比的优点:由于generator并不会一次性把所有序列加载到内存处理后返回,而是一轮一轮地加载一轮一轮地处理并返回,因此再大的文件,generator也可以处理!

generator expression
a = [1,2,3,4]
b = (2*x for x in a)
b
Out[19]:
<generator object <genexpr> at 0x0000023EDA2C6CA8>
for i in b:
    print(i)
2
4
6
8
generator表达式语法:
(expression for i in s if condition)
# 等价于
for i in s:
    if condition:
        yield expression
注意:如果generator expression仅仅用于作为唯一的函数形参时,可以省略()
a = [1,2,3,4]
sum(x*x for x in a)
Out[21]:
30
迭代器iterator
我们知道可以用于for循环中不断迭代的数据有:list,tuple,dict,set,str等集合类数据类型,或者是generator(包括带yield的generator function)。所有这些类型的数据我们都称之为可迭代的数据类型(iterable),可以使用isinstance()来具体判断:
>>> from collections import Iterable
>>> isinstance([], Iterable)
True
>>> isinstance({}, Iterable)
True
>>> isinstance('abc', Iterable)
True
>>> isinstance((x for x in range(10)), Iterable)
True
>>> isinstance(100, Iterable)
False
而generator不仅可以用于for循环,还可以被next()函数所调用,并且返回下一个值,直到抛出StopIteration异常。
所有可以被next()函数调用并不断返回下一个值的对象成为迭代器Iterator
同样可以使用isinstance()来判断是否Iterator对象:
>>> from collections import Iterator
>>> isinstance((x for x in range(10)), Iterator)
True
>>> isinstance([], Iterator)
False
>>> isinstance({}, Iterator)
False
>>> isinstance('abc', Iterator)
False
从上面可以看到,虽然list,dict,set,str是Iterable,但是却不是Iterator,而generator是Iterator
但是我们可以通过iter()函数将dist,list等iterable对象转变为iterator,比如:
>>> isinstance(iter([]), Iterator)
True
>>> isinstance(iter('abc'), Iterator)
True
iterable小结
凡是可作用于for循环的对象都是Iterable类型;
凡是可作用于next()函数的对象都是Iterator类型,它们表示一个惰性计算的序列;
集合数据类型如list、dict、str等是Iterable但不是Iterator,不过可以通过iter()函数获得一个Iterator对象。
Python的for循环本质上就是通过不断调用next()函数实现的,例如:
for x in [1, 2, 3, 4, 5]:
    pass
#完全等价于:
# 首先获得Iterator对象:
it = iter([1, 2, 3, 4, 5])
# 循环:
while True:
    try:
        # 获得下一个值:
        x = next(it)
    except StopIteration:
        # 遇到StopIteration就退出循环
        break
tuple:
tuple是特殊的list,用()来定义,他一旦定义就不能变更
>>> classmates = ('Michael', 'Bob', 'Tracy')
只有一个元素的tuple必须用,分开以免歧义,否则会被认为是一个元素本身,而非只含一个元素的tuple,
>>> t = (1,)
>>> t
(1,)
python切片slice
https://stackoverflow.com/questions/509211/understanding-pythons-slice-notation
a[start:end] # items start through end-1
a[start:]    # items start through the rest of the array
a[:end]      # items from the beginning through end-1
a[:]         # a copy of the whole array
a[start:end:step] # start through not past end, by step
a[-1]    # last item in the array
a[-2:]   # last two items in the array
a[:-2]   # everything except the last two items
a[::-1]    # all items in the array, reversed
a[1::-1]   # the first two items, reversed
a[:-3:-1]  # the last two items, reversed
a[-3::-1]  # everything except the last two items, reversed
numpy ndarray indexing/slice
https://docs.scipy.org/doc/numpy/reference/arrays.indexing.html
ndarray可以使用标准的python $x[obj]$方式来访问和切片,这里$x$是数组本身,而$obj$是相应的选择表达式。ndarray支持3中不同的index方式:field access, basic slicing, advanced indexing,具体使用哪一种取决于$obj$本身。
注意:
$x[(exp1, exp2, ..., expN)] 等价于 x[exp1, exp2, ..., expN]$
basic slicing and indexing
ndarray的basic slicing将python仅能针对一维数组的基础index和slicing概念拓展到N维。当前面的$x[obj]$ slice形式中的obj为一个slice对象($[start:stop:step]$格式),或者一个整数,或者$(slice obj,int)$时,这就是basic slicing。basic slicing的标准规则在每个纬度上分别应用。
所有basic slicing产生的数组实际上是原始数组的view,数据本身并不会复制。
以下是抽象出来的基础顺序切片规则
$i:j:k$,$i = start:end:step$,其中,如果$i,j$为负数,则可以理解为$n+i,n+j$,n是相应维度上元素的个数。如果$k<0$,则表示走向到更小的indices.
>>> x = np.array([0, 1, 2, 3, 4, 5, 6, 7, 8, 9])
>>> x[1:7:2]
array([1, 3, 5])
>>> x[-2:10]
array([8, 9])
>>> x[-3:3:-1]
array([7, 6, 5, 4])
>>> x[5:]
array([5, 6, 7, 8, 9])
>>> x = np.array([[[1],[2],[3]], [[4],[5],[6]]])
>>> x.shape
(2, 3, 1)
>>> x[1:2]
array([[[4],
        [5],
        [6]]])
>>> x[...,0]
array([[1, 2, 3],
       [4, 5, 6]])
>>> x[:,np.newaxis,:,:].shape
(2, 1, 3, 1)
advanced indexing
如果selction obj不是一个sequence obj的tuple,而是一个值为int或者bool的ndarray,或者是至少包含一个start:end:step或int/bool性ndarray的tuple,则就会应用advanced indexing.有两种模式:integer和boolean
高级index总会返回数据的一份copy(基础slicing只返回一个view,而未做copy!)
注意:
- $x[(1,2,3),]$: 高级slicing
- $x[(1,2,3)] = x[1,2,3]$: basic slicing
advanced integer array indexing
>>> x = array([[ 0,  1,  2],
...            [ 3,  4,  5],
...            [ 6,  7,  8],
...            [ 9, 10, 11]])
>>> rows = np.array([[0, 0],
...                  [3, 3]], dtype=np.intp)
>>> columns = np.array([[0, 2],
...                     [0, 2]], dtype=np.intp)
>>> x[rows, columns]
array([[ 0,  2],
       [ 9, 11]])
>>> x = np.array([[1, 2], [3, 4], [5, 6]])
>>> x[[0, 1, 2], [0, 1, 0]]
array([1, 4, 5])
Boolean array indexing
如果obj是一个boolean值的数组,则使用该slicing策略。
>>> x = np.array([[1., 2.], [np.nan, 3.], [np.nan, np.nan]])
>>> x[~np.isnan(x)]
array([ 1.,  2.,  3.])
>>> x = np.array([1., -1., -2., 3])
>>> x[x < 0] += 20
>>> x
array([  1.,  19.,  18.,   3.])
>>> x = np.array([[0, 1], [1, 1], [2, 2]])
>>> rowsum = x.sum(-1)
>>> x[rowsum <= 2, :]
array([[0, 1],
       [1, 1]])
>>> rowsum = x.sum(-1, keepdims=True)
>>> rowsum.shape
(3, 1)
>>> x[rowsum <= 2, :]    # fails
IndexError: too many indices
>>> x[rowsum <= 2]
array([0, 1])
>>> x = array([[ 0,  1,  2],
...            [ 3,  4,  5],
...            [ 6,  7,  8],
...            [ 9, 10, 11]])
>>> rows = (x.sum(-1) % 2) == 0
>>> rows
array([False,  True, False,  True])
>>> columns = [0, 2]
>>> x[np.ix_(rows, columns)]
array([[ 3,  5],
       [ 9, 11]])
>>> rows = rows.nonzero()[0]
>>> x[rows[:, np.newaxis], columns]
array([[ 3,  5],
       [ 9, 11]])
pandas indexing and slicing
https://pandas.pydata.org/pandas-docs/stable/indexing.html
假设我们有以下数据集,我们来练习使用pandas做数据检索和切片:
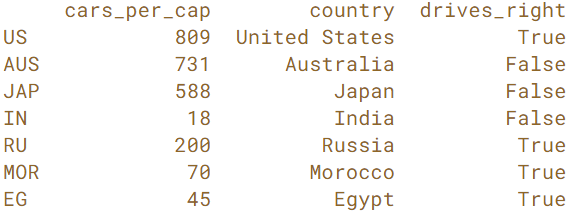
# Import cars data
import pandas as pd
cars = pd.read_csv('cars.csv', index_col = 0)
# Print out country column as Pandas Series
print(cars['country'])
In [4]: cars['country']
Out[4]:
US     United States
AUS        Australia
JAP            Japan
IN             India
RU            Russia
MOR          Morocco
EG             Egypt
Name: country, dtype: object: Pandas Series
# Print out country column as Pandas DataFrame
print(cars[['country']])
In [5]: cars[['country']]
Out[5]:
           country
US   United States
AUS      Australia
JAP          Japan
IN           India
RU          Russia
MOR        Morocco
EG           Egypt
# Print out DataFrame with country and drives_right columns
print(cars[['country','drives_right']])
In [6]: cars[['country','drives_right']]
Out[6]:
           country  drives_right
US   United States          True
AUS      Australia         False
JAP          Japan         False
IN           India         False
RU          Russia          True
MOR        Morocco          True
EG           Egypt          True
# Print out first 3 observations
print(cars[0:4])

# Print out fourth, fifth and sixth observation
print(cars[4:7])

# Print out first 3 observations
print(cars[0:4])

# Print out fourth, fifth and sixth observation
print(cars[4:7])
In [14]: cars
Out[14]:
     cars_per_cap        country  drives_right
US            809  United States          True
AUS           731      Australia         False
JAP           588          Japan         False
IN             18          India         False
RU            200         Russia          True
MOR            70        Morocco          True
EG             45          Egypt          True

In [15]: cars.loc['RU']
Out[15]:
cars_per_cap       200
country         Russia
drives_right      True
Name: RU, dtype: object

In [16]: cars.iloc[4]
Out[16]:
cars_per_cap       200
country         Russia
drives_right      True
Name: RU, dtype: object

In [17]: cars.loc[['RU']]
Out[17]:
    cars_per_cap country  drives_right
RU           200  Russia          True

In [18]: cars.iloc[[4]]
Out[18]:
    cars_per_cap country  drives_right
RU           200  Russia          True

In [19]: cars.loc[['RU','AUS']]
Out[19]:
     cars_per_cap    country  drives_right
RU            200     Russia          True
AUS           731  Australia         False

In [20]: cars.iloc[[4,1]]
Out[20]:
     cars_per_cap    country  drives_right
RU            200     Russia          True
AUS           731  Australia         False
In [3]: cars.loc['IN','cars_per_cap']
Out[3]: 18

In [4]: cars.iloc[3,0]
Out[4]: 18

In [5]: cars.loc[['IN','RU'],'cars_per_cap']
Out[5]:
IN     18
RU    200
Name: cars_per_cap, dtype: int64

In [6]: cars.iloc[[3,4],0]
Out[6]:
IN     18
RU    200
Name: cars_per_cap, dtype: int64

In [7]: cars.loc[['IN','RU'],['cars_per_cap','country']]
Out[7]:
    cars_per_cap country
IN            18   India
RU           200  Russia

In [8]: cars.iloc[[3,4],[0,1]]
Out[8]:
    cars_per_cap country
IN            18   India
RU           200  Russia
print(cars.loc['MOR','drives_right'])
True
In [1]: cars.loc[:,'country']
Out[1]:
US     United States
AUS        Australia
JAP            Japan
IN             India
RU            Russia
MOR          Morocco
EG             Egypt
Name: country, dtype: object

In [2]: cars.iloc[:,1]
Out[2]:
US     United States
AUS        Australia
JAP            Japan
IN             India
RU            Russia
MOR          Morocco
EG             Egypt
Name: country, dtype: object

In [3]: cars.loc[:,['country','drives_right']]
Out[3]:
           country  drives_right
US   United States          True
AUS      Australia         False
JAP          Japan         False
IN           India         False
RU          Russia          True
MOR        Morocco          True
EG           Egypt          True

In [4]: cars.iloc[:,[1,2]]
Out[4]:
           country  drives_right
US   United States          True
AUS      Australia         False
JAP          Japan         False
IN           India         False
RU          Russia          True
MOR        Morocco          True
EG           Egypt          True
if判断:
age = 3
if age >= 18:
  print('adult')
elif age >= 6:
  print('teenager')
else:
  print('kid')
循环:
names = ['Michael', 'Bob', 'Tracy']
for name in names:
  print(name)
>>> list(range(5))
[0, 1, 2, 3, 4]
sum =0
for x in range(101):
    sum = sum+x
print(sum)
dist字典
dist数据类似于javascript的object,由key-value来定义的对象
>>> d = {'Michael': 95, 'Bob': 75, 'Tracy': 85}
>>> d['Michael']
95
set(集合)
set和dist类似,但是它只保存key,不存value,就像是js中literal对象{1,2,3,'a','b'},可以看成数学意义上的无序和无重复元素的集和,支持交集,并集等集合操作,由一个list输入传给set()函数来生成
>>> s = set([1, 2, 3])
>>> s
{1, 2, 3}
>>> s1 = set([1, 2, 3])
>>> s2 = set([2, 3, 4])
>>> s1 & s2
{2, 3}
>>> s1 | s2
{1, 2, 3, 4}
str,int,None是不可变对象,而List,dict是可变对象
帮助资源查询:
https://docs.python.org/3/library/functions.html#abs
函数:
函数有def来定义,可以返回多个值
import math
def move(x, y, step, angle=0):
    nx = x + step * math.cos(angle)
    ny = y - step * math.sin(angle)
    return nx, ny
>>> x, y = move(100, 100, 60, math.pi / 6)
>>> print(x, y)
151.96152422706632 70.0
>>> r = move(100, 100, 60, math.pi / 6)
>>> print(r)
#本质上函数返回的是一个tuple,而这个tuple的对应元素的值分别赋值给了左变量
(151.96152422706632, 70.0)
函数支持默认参数:
def enroll(name, gender, age=6, city='Beijing'):
    print('name:', name)
    print('gender:', gender)
    print('age:', age)
    print('city:', city)
enroll('Bob', 'M', 7)
enroll('Adam', 'M', city='Tianjin')
函数可变参数:
def calc(*numbers):
    sum = 0
   print(type(numbers))
# 注意这里的numbers是tuple数据<class 'tuple'>
for n in numbers:
    sum = sum + n * n
    return sum
>>> nums = [1, 2, 3]
>>> calc(*nums) #加一个*把list或者tuple变成可变参数传进去*nums表示把nums这个list的所有元素作为可变参数传进去
14
函数关键字参数:
def person(name, age, **kw):
    print('name:', name, 'age:', age, 'other:', kw)
   print(type(kw)) # 注意kw是dict数据类型: <class 'dict'>
>>> person('Michael', 30)
name: Michael age: 30 other: {}
>>> person('Bob', 35, city='Beijing')
name: Bob age: 35 other: {'city': 'Beijing'}
>>> person('Adam', 45, gender='M', job='Engineer')
name: Adam age: 45 other: {'gender': 'M', 'job': 'Engineer'}
>>> extra = {'city': 'Beijing', 'job': 'Engineer'}
>>> person('Jack', 24, **extra)
name: Jack age: 24 other: {'city': 'Beijing', 'job': 'Engineer'}
**extra表示把extra这个dict的所有key-value用关键字参数传入到函数的**kw参数,kw将获得一个dict,注意kw获得的dict是extra的一份拷贝,对kw的改动不会影响到函数外的extra
命名关键字参数:
def person(name, age, *, city='Beijing', job):  #含默认值的命名关键字参数,city默认就为'beijing'
    print(name, age, city, job)
>>> person('Jack', 24, city='Beijing', job='Engineer')
Jack 24 Beijing Engineer
关键字参数有什么用?它可以扩展函数的功能。比如,在person函数里,我们保证能接收到name和age这两个参数,但是,如果调用者愿意提供更多的参数,我们也能收到。试想你正在做一个用户注册的功能,除了用户名和年龄是必填项外,其他都是可选项,利用关键字参数来定义这个函数就能满足注册的需求
map
很多高级语言都提供类似的功能,其作用是对于list里面的每一个元素都执行相同的函数,并且返回一个iterator,进而可以使用list()函数来生成新的list
def f(x):
    return x*x
r = map(f,[1,2,3,4,5])
print(r)
print(isinstance(r, Iterator)) # True
print(list(r)) #结果如下 #<map object at 0x000000000072B9B0>, 返回结果是一个Iterator,因此必须通过list()调用才能生成list #[1, 4, 9, 16, 25]
Modules:
https://pypi.python.org/pypi/mysql-connector-python/2.0.4
image module code example:
from PIL import  Image
im = Image.open(r'C:UsersAdministratorDesktopjj.png')
print(im.format,im.size,im.mode)
im.thumbnail((100,50))
im.save('thumb.jpg','png')
Python网络服务编程
服务端:
import  socket
import threading
import time
def tcplink(sock,addr):
    print(('Accept new connection from %s:%s...' % addr))
    sock.send(b'Welcome, client!')
    while True:
        data = sock.recv(1024)
        time.sleep(1)
        if not data or data.decode('utf-8') == 'exit':
            break
        sock.send(('Hello, %s!' % data).encode('utf-8'))
    sock.close()
    print('Connection from %s:%s closed.' %addr)
s = socket.socket(socket.AF_INET,socket.SOCK_STREAM)
s.bind(('127.0.0.1',9999))
s.listen(5)
print('waiting for connection coming on server...')
while True:
    sock, addr = s.accept()
    t = threading.Thread(target=tcplink,args=(sock,addr))
    t.start()
#下面是server端的打印信息:
waiting for connection coming on server...
Accept new connection from 127.0.0.1:64891...
Connection from 127.0.0.1:64891 closed.
Accept new connection from 127.0.0.1:65304...
Connection from 127.0.0.1:65304 closed.
Accept new connection from 127.0.0.1:65408...
Connection from 127.0.0.1:65408 closed.
Accept new connection from 127.0.0.1:65435...
Connection from 127.0.0.1:65435 closed.
Accept new connection from 127.0.0.1:65505...
Connection from 127.0.0.1:65505 closed.
测试客户端
import  socket
import threading
import time
s = socket.socket(socket.AF_INET,socket.SOCK_STREAM)
s.connect(('127.0.0.1',9999))
print((s.recv(1024).decode('utf-8')))
for data in [b'Michael',b'Tracy',b'Sarah']:
    s.send(data)
    print(s.recv(1024).decode('utf-8'))
s.send(b'exit')
s.close()
#下面是客户端的打印信息:
Welcome, client!
Hello, b'Michael'!
Hello, b'Tracy'!
Hello, b'Sarah'!
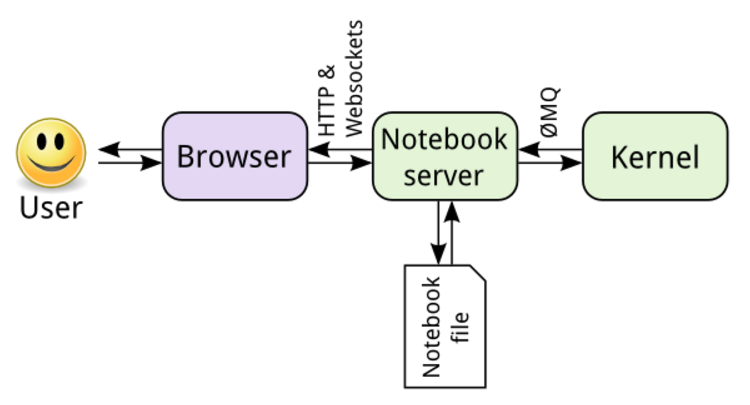
python vs. iPython. vs jupyter notebooks以及演进路线架构
ipython notebook->jupyter notebooks演进
总的来说分为interface level和kernel level两个领域,接口这一层可以有notebooks,ipython console, qt console,直接通过一个MQ over socket和kernel level通信,该通信接口负责传输要执行的python code以及code执行完成后返回的data。
而jupyter将notebooks的这种模式扩展到多种语言,比如R, bash,在kernel层分别增加对应语言的kernel组件,负责对应语言的执行和返回结果。

https://plot.ly/python/ipython-vs-python/
jupyter notebooks的工作原理架构
到底什么是IPython?
IPython是一个增强交互能力的python console环境,它提供了很多有用的feature:
和标准的python console相比,它提供: Tab completion的功能,exlporing your objects,比如通过object_name?就将列出所有关于对象的细节。Magic functions, 比如%timeit这个magic常常可以用来检查代码执行的效率, %run这个magic可以允许你执行任何python scirpt并且将其所有的data直接加载到交互环境中。执行系统shell commands,比如!ping www.xxx.com, 也可以获取到系统脚本命令输出的内容:
files = !ls
!grep -rF $pattern ipython/*.
将python的变量$pattern传入上面的grep系统命令
http://ipython.org/ipython-doc/dev/interactive/tutorial.html#magic-functions
如何在ipython下直接运行 <<<的例子代码?
答案是在ipython下执行以下命令
%doctest_mode
如何使用notebooks学习和开发python?
Jupyter notebook软件在至少以下两种场景中非常好用:
1. 希望针对已经存在的notebook做进一步实验或者纯粹的学习;
2. 希望自己开发一个notebook用于辅助教学或者生成学术文章
在这两种场景下,你可能都希望在一个特定的目录下运行Jupyter notebook:
cd到你的目录中,执行以下命令:
jupyter notebook
即可打开notebook,并且列出该目录下的所有文件: http://localhost:8888/tree

some python debug study tips:
1. dir(obj) 列出对象的所有属性和方法
y=[x*x for x in range(1,11)]
print(dir(y))
# 输出:
['__add__', '__class__', '__contains__', '__delattr__', '__delitem__', '__dir__', '__doc__', '__eq__', '__format__', '__ge__', '__getattribute__', '__getitem__', '__gt__', '__hash__', '__iadd__', '__imul__', '__init__', '__iter__', '__le__', '__len__', '__lt__', '__mul__', '__ne__', '__new__', '__reduce__', '__reduce_ex__', '__repr__', '__reversed__', '__rmul__', '__setattr__', '__setitem__', '__sizeof__', '__str__', '__subclasshook__', 'append', 'clear', 'copy', 'count', 'extend', 'index', 'insert', 'pop', 'remove', 'reverse', 'sort']
2. 在notebook ipython环境中,使用%who magic 命令列出命名空间中所有global变量
%who Series
#列出所有Series类型的变量
s     temp_diffs     temps1     temps2
%who
#列出所有global
DataFrame     Series     dates     np     pd     plt     s     temp_diffs     temps1
temps2
%whos
#列出所有global及其详细的type:
Variable     Type             Data/Info
---------------------------------------
DataFrame    type             <class 'pandas.core.frame.DataFrame'>
Series       type             <class 'pandas.core.series.Series'>
dates        DatetimeIndex    DatetimeIndex(['2014-07-0<...>atetime64[ns]', freq='D')
my_func      function         <function my_func at 0x00000211211B7C80>
np           module           <module 'numpy' from 'C:<...>ges\numpy\__init__.py'>
pd           module           <module 'pandas' from 'C:<...>es\pandas\__init__.py'>
plt          module           <module 'matplotlib.pyplo<...>\matplotlib\pyplot.py'>
s            Series           a    1
b    2
c    3
d    4
dtype: int64
temp_diffs   Series           2014-07-01    10
2014-07<...>10
Freq: D, dtype: int64
temps1       Series           2014-07-01    80
2014-07<...>87
Freq: D, dtype: int64
temps2       Series           2014-07-01    70
2014-07<...>77
Freq: D, dtype: int64
3. 检视一个module定义的方法以及方法的详细用法
import pandas as pd
print(dir(pd))
print(help(pd.Series))
['Categorical', 'CategoricalIndex', 'DataFrame', 'DateOffset', 'DatetimeIndex', 'ExcelFile', 'ExcelWriter', 'Expr', 'Float64Index', 'Grouper', 'HDFStore', 'Index', 'IndexSlice', 'Int64Index', 'MultiIndex', 'NaT', 'Panel', 'Panel4D', 'Period', 'PeriodIndex', 'RangeIndex', 'Series', 'SparseArray', 'SparseDataFrame', 'SparseList', 'SparsePanel', 'SparseSeries', 'SparseTimeSeries', 'Term', 'TimeGrouper', 'TimeSeries', 'Timedelta', 'TimedeltaIndex', 'Timestamp', 'WidePanel', '__builtins__', '__cached__', '__doc__', '__docformat__', '__file__', '__loader__', '__name__', '__package__', '__path__', '__spec__', '__version__', '_np_version_under1p10', '_np_version_under1p11', '_np_version_under1p12', '_np_version_under1p8', '_np_version_under1p9', '_period', '_sparse', '_testing', '_version', 'algos', 'bdate_range', 'compat', 'computation', 'concat', 'core', 'crosstab', 'cut', 'date_range', 'datetime', 'datetools', 'dependency', 'describe_option', 'eval', 'ewma', 'ewmcorr', 'ewmcov', 'ewmstd', 'ewmvar', 'ewmvol', 'expanding_apply', 'expanding_corr', 'expanding_count', 'expanding_cov', 'expanding_kurt', 'expanding_max', 'expanding_mean', 'expanding_median', 'expanding_min', 'expanding_quantile', 'expanding_skew', 'expanding_std', 'expanding_sum', 'expanding_var', 'factorize', 'fama_macbeth', 'formats', 'get_dummies', 'get_option', 'get_store', 'groupby', 'hard_dependencies', 'hashtable', 'index', 'indexes', 'infer_freq', 'info', 'io', 'isnull', 'json', 'lib', 'lreshape', 'match', 'melt', 'merge', 'missing_dependencies', 'msgpack', 'notnull', 'np', 'offsets', 'ols', 'option_context', 'options', 'ordered_merge', 'pandas', 'parser', 'period_range', 'pivot', 'pivot_table', 'plot_params', 'pnow', 'qcut', 'read_clipboard', 'read_csv', 'read_excel', 'read_fwf', 'read_gbq', 'read_hdf', 'read_html', 'read_json', 'read_msgpack', 'read_pickle', 'read_sas', 'read_sql', 'read_sql_query', 'read_sql_table', 'read_stata', 'read_table', 'reset_option', 'rolling_apply', 'rolling_corr', 'rolling_count', 'rolling_cov', 'rolling_kurt', 'rolling_max', 'rolling_mean', 'rolling_median', 'rolling_min', 'rolling_quantile', 'rolling_skew', 'rolling_std', 'rolling_sum', 'rolling_var', 'rolling_window', 'scatter_matrix', 'set_eng_float_format', 'set_option', 'show_versions', 'sparse', 'stats', 'test', 'timedelta_range', 'to_datetime', 'to_msgpack', 'to_numeric', 'to_pickle', 'to_timedelta', 'tools', 'tseries', 'tslib', 'types', 'unique', 'util', 'value_counts', 'wide_to_long']

Help on class Series in module pandas.core.series:

class Series(pandas.core.base.IndexOpsMixin, pandas.core.strings.StringAccessorMixin, pandas.core.generic.NDFrame)
 |  One-dimensional ndarray with axis labels (including time series).
 |
 |  Labels need not be unique but must be any hashable type. The object
4. notebooks中的命令模式和编辑模式相关命令:
Numpy
为何要引入Numpy?
由于标准的python list中保存的是对象的指针,因此必须二次寻址才能访问到list中的元素。显然这是低效并且浪费空间的。。
并且标准python list或者array不支持二纬数组,也不支持对数组数据做一些复杂适合数字运算的函数。
numpy为了提高性能,并且支持二纬数组的复杂运算使用C语言编写底层的实现并且以python obj方式给python调用。
其核心实现了以下两个东西:
- ndarray :它是存储单一数据类型的多纬数组,并且基于该数组能够支持多种复杂的运算函数
- ufunc:如果numpy提供的标准运算函数不满足需求,你可以使用这种机制定义自己的函数
- 应用在ndarray数组中的数字上做数值运算时,都将是element wise的,也就是逐元素计算的!
import numpy as np
from matplotlib import pyplot as plt
x = np.linspace(0,2 * np.pi,100)
y = np.sin(x) // y是对x中的所有元素执行sin计算
plt.plot(x,y,'r-',linewidth=3,label='sin function')
plt.xlabel('x')
plt.ylabel('sin(x)')
plt.show()
上面的代码先产生0到$2pi$的等差数组,然后传递给np.sin()函数,逐个计算其sin值。由于np.sin()是一个ufunc函数,因此其内部对数组x的每个元素进行循环,分别计算他们的正弦值,将结果保存为一个数组并返回。
numpy高级特性(broadcasting, ufunc详解)
https://www.jianshu.com/p/3c3f7da88516
参看<<利用Python进行数据分析·第2版>>
Pandas
为何需要pandas
numpy的2d数组虽然可以模拟pandas提供的功能,但是主要numpy原生的2d数组必须使用相同的数据类型,而在现实的数据分析任务中很多是不同类型的。
pandas在numpy之上又提供了类似于sql数据处理机制,提供Series和Dataframe两种数据类型。 每个Series实际上包含index和values两个ndarray.其中index保存创建series时传入的index信息,values则是保存对应值的ndarray数组。numpy的ufunc函数都对该values数组来执行.
pandas dataframe图解
http://www.tetraph.com/blog/machine-learning/jupyter-notebook-keyboard-shortcut-command-mode-edit-mode/
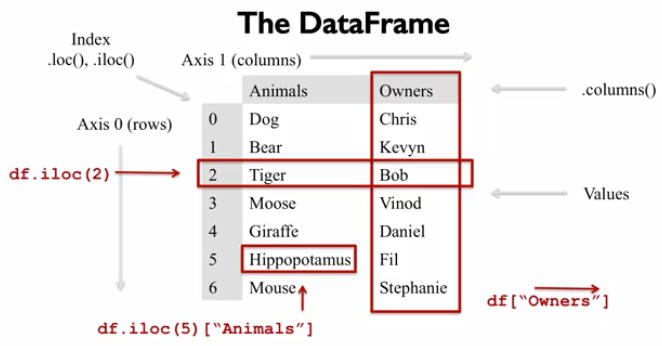
dataframe.loc/iloc vs []index operator
.oc/iloc都是指的row,而[]则默认给column selection, column总归会有一个name,因此column selection总是label based
df.loc[:,['Name','cost']]
#返回所有store的name和cost value
如何复制而不是引用相同的list?
shoplist = ['apple','mango','carrot','banana']
mylist = shoplist
del shoplist[0]
print('shoplist is:',shoplist)
print('mylist is:',mylist)
# 上面是相同的输出
print('copy via slice and asignment')
mycopiedlist = shoplist[:] # make a copy by doing a full slice
del(mycopiedlist[0])
print('shoplist is: ',shoplist)
print('mycopiedlist is:',mycopiedlist)
从字符串直接创建单字母的list
list('ABCD')
# 输出 ['A', 'B', 'C', 'D']
python list .vs. numpy .vs. pandas

如何在ipython shell中查看已经load进namespace的函数源代码?
有的时候,我们通过ipython shell做探索式编程,有一些函数已经做了定义和运行,随后想再查看一下这个函数的代码,并且准备调用它,这时你就需要想办法“重现”该函数的代码。
方法是:通过inspect模块
import inspect
source_DF = inspect.getsource(pandas.DataFrame)
print(type(source_DF))
print(source_DF[:200]) #打印源程序代码
source_file_DF = inspect.getsourcefile(pandas.DataFrame)
print(source_file_DF)
# D:UsersdengdongAppDataLocalContinuumanaconda3libsite-packagespandascoreframe.py
如何得到python变量的地址address?
a = [0,1,2,3,4,5,6,7,8,9]
b = a[:]
print(id(a))
# 54749320
print(id(b))
# 54749340