Eclise Rcp 系列一 第一个SWT程序
写在开始:
由于工作须要,做了一周时间的Rcp开发,发现由于Eclipse开发方面的中文资料较少,对入门者来说有些困难,
所以把自己一周的内容放上,共享给开始学习Eclipse开发的人
Eclipse开发中有很多名词: 插件开发 ,RCP ,SWT,Jface很容易让人迷糊
做个大概的比喻,如果说SWT是C++的话 那么JFace就像STL对SWT做了简单的封装 Rcp就像MFC封装更多
而插件开发和Rcp唯一不同就使导出不同,一个导出成plug in,另一个导出成独立运行的程序。其实没有什么区别
好了,开始第一个程序,从Hello world开始。写到这个地方,再次崇拜一下第一个写Hello world的人。
真应改给他搬个什么普及教育之类的奖项。
import org.eclipse.swt.SWT;
import org.eclipse.swt.widgets.Display;
import org.eclipse.swt.widgets.Label;
import org.eclipse.swt.widgets.Shell;
public class HelloSWT {
public static void main(String[] args) {
Display display = new Display();
Shell shell = new Shell(display);
Label label = new Label(shell, SWT.CENTER);
label.setText("Hello, World");
label.setBounds(shell.getClientArea());
shell.open();
while (!shell.isDisposed()){
if (!display.readAndDispatch()){
display.sleep();
}
}
display.dispose();
}
}
首先介绍Display,打家都知到Swt是基于操做系统的,多大部分的控、 窗口都是调用系统的,所以得有一个东西
负责把java的消息转变成系统消息,Display就是。
Shell可以简单理解成就是窗口
Label就是一个标签了。
shell.open()显视窗口
while (!shell.isDisposed()){
if (!display.readAndDispatch()){
display.sleep();
}
}
熟悉Windows下编程的人大概都知到,Windows的消息循环机制。
好了试着运行一下这个程序,修改一下,找找感觉吧。
写到这里忽然想起自己没有写如何配制SWT的开发环境,对于新手来说这个是重要的。
这里有一篇文章http://dev.yesky.com/409/2620409.shtml
如果链接失效的话google一下吧
说明:
这个系列的文章是基于eclipse 3.2.1的,另外推荐一些学习的资料或者网站
首先:http://www.eclipseworld.org/bbs/
然後:在上边的论坛里边有一些前辈们写的教程,有些不错值得一看
最后:当然不可少的是ibm的网站和eclipse的官方网站
======================================================================
Eclipse Rcp系列 二 第一个Rcp程序
第一个 Rcp 程序
新建 ->project->plug-in Development->plug-in project
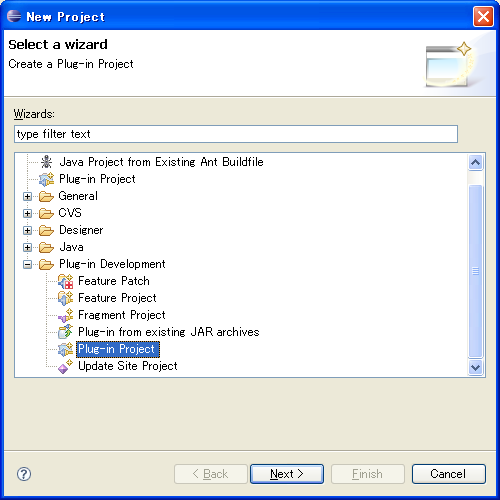
点击 next
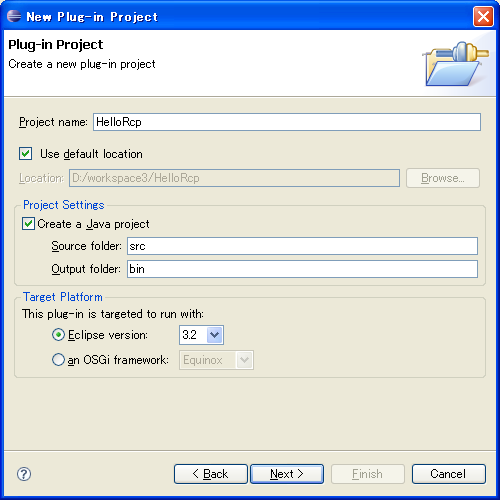
输入工程名 HelloRcp à next
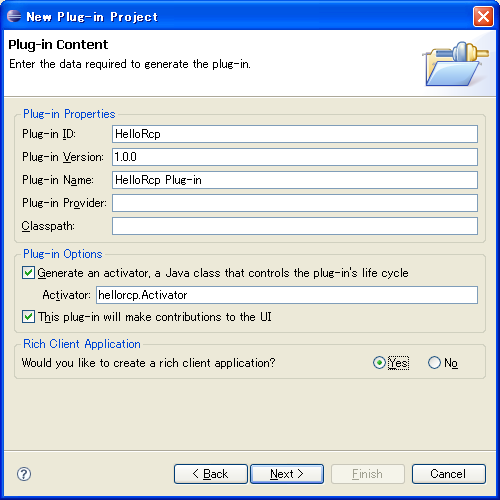
其它采取默认,Rich Client Application部分选择 yes
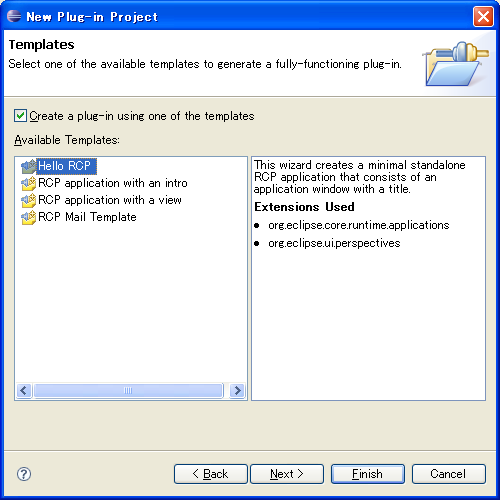
选择 Hello Rcp à Finish
工程建立完毕,下边选择 MANIFEST.MF
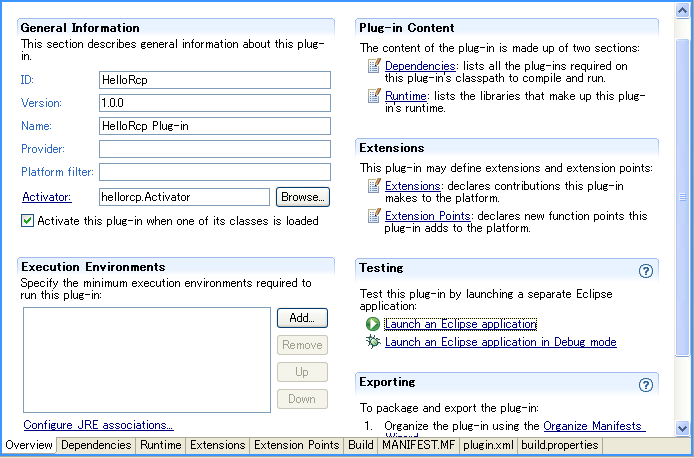
点击下边的 overview 进入 overview 视图,点击 Launch an Eclipse application
就可以看到运行起来的界面了。就使一个简单的窗口。
好,下边如何导出能类似 Eclipse 的程序
在 HelloRcp 工程上点击右键 à new à other
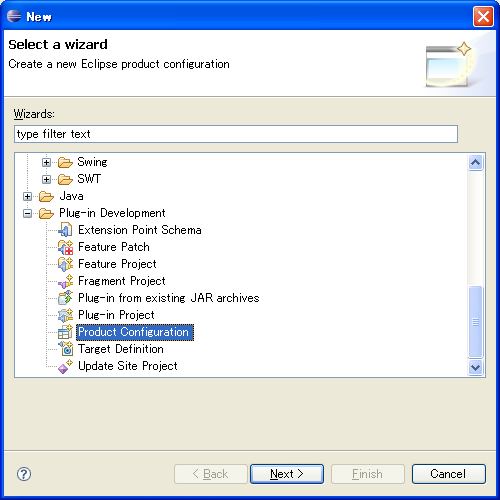
选择 Product Configuration
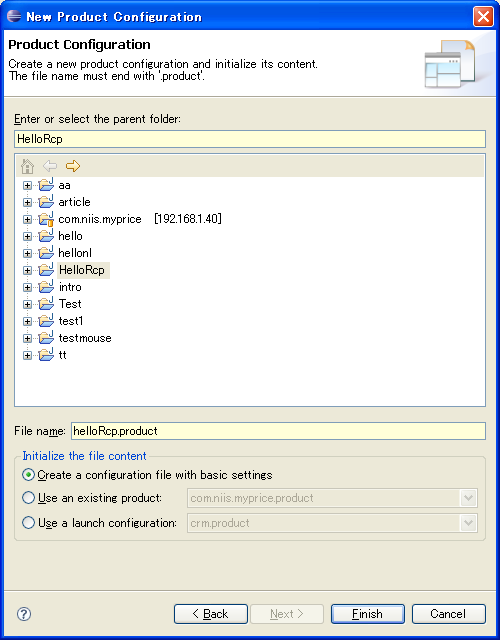
在划线部分填入 helloRcp , Finish
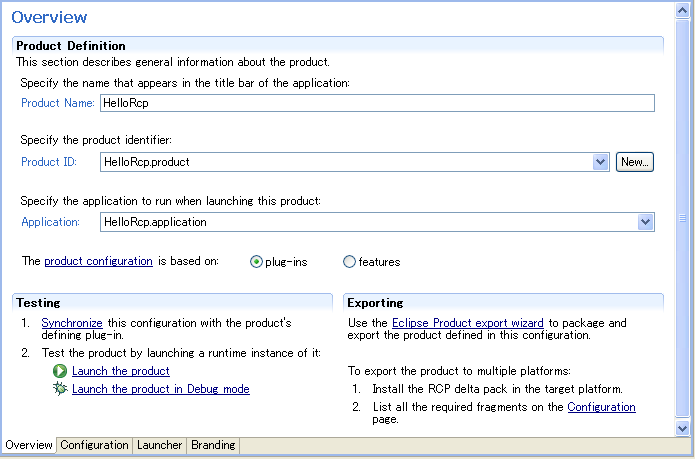
在三处分辨填入对应的内容,然後点击 Configuration 进入 configuration 视图
add à 选择 HelloRcp
点击 Add Required Plug-ins
然後点击划线部分,按照向导,导出成一个 Exe 工程。双击运行一下看看吧。
另外导出的这个工程和 eclipse 一样,比如语言啦 -nl 参数,比如 jre 的设置啦 -vm
最大最小内存了,都和 eclipse 是一样的。
好了,这个就是一个工程的过程。前两篇文章内容很少,都是配制方面的,下边的文章开始真的多一些内容了。
===============================================================
Eclipse Rcp系列三 进一步了解Viewer
好在二的基础上,继续,这个时候我们须要增加一个Viewer.在这里我须要说一下,在eclipse的开发中用到的很多
的是Viewer(视图)这个概念,而不像Vb等开发中经常用到的window(窗口),并不是说Rcp中没有窗口,而是使用
频率较低,所以分别说一下如何添加窗口和Viewer
一,添加一个对话框窗口:添加一个类如下,然後在须要显视的地方调用一下open()方法
不一定非要继承自Dialog,这里为了渐少一些代码,而且我使用中也多继承自Dialog
package hellorcp;
import org.eclipse.swt.SWT;
import org.eclipse.swt.widgets.Dialog;
import org.eclipse.swt.widgets.Display;
import org.eclipse.swt.widgets.Shell;
public class HelloDialog extends Dialog {
protected Object result;
protected Shell shell;
public HelloDialog(Shell parent, int style) {
super(parent, style);
}
public HelloDialog(Shell parent) {
this(parent, SWT.NONE);
}
public Object open() {
createContents();
shell.open();
shell.layout();
Display display = getParent().getDisplay();
while (!shell.isDisposed()) {
if (!display.readAndDispatch())
display.sleep();
}
return result;
}
protected void createContents() {
shell = new Shell(getParent(), SWT.DIALOG_TRIM | SWT.APPLICATION_MODAL);
shell.setSize(500, 375);
shell.setText("SWT Dialog");
//
}
}
二,添加一个viewer,首先建立一个viewer,下边是Designer(一个很好用的插件)自动生成的一个viewer,
也就是一个Viewer的大概结构
package hellorcp;
import org.eclipse.jface.action.IMenuManager;
import org.eclipse.jface.action.IToolBarManager;
import org.eclipse.swt.SWT;
import org.eclipse.swt.widgets.Composite;
import org.eclipse.ui.part.ViewPart;
public class HelloView extends ViewPart {
public static final String ID = "hellorcp.HelloView"; //$NON-NLS-1$
public void createPartControl(Composite parent) {
Composite container = new Composite(parent, SWT.NONE);
//
createActions();
initializeToolBar();
initializeMenu();
}
private void createActions() {
// Create the actions
}
private void initializeToolBar() {
IToolBarManager toolbarManager = getViewSite().getActionBars()
.getToolBarManager();
}
private void initializeMenu() {
IMenuManager menuManager = getViewSite().getActionBars()
.getMenuManager();
}
public void setFocus() {
// Set the focus
}
}
显视这个viewer,每个viewer须要加载到perspective上才能显视,所以在Perspective.java中加入如下代码
public void createInitialLayout(IPageLayout layout) {
layout.setEditorAreaVisible(false);//不显视edit窗口
String editorArea = layout.getEditorArea();
//下边两句的不同是,一个显视的是单页窗口,一个显视的是多页窗口
layout.addStandaloneView(HelloViewer.ID,false, IPageLayout.LEFT, 0.25f, editorArea);
layout.addView(HelloViewer.ID, IPageLayout.RIGHT, 0.75f, editorArea);
}
三,在viewer或者dialog上添加控件,如果装有Designer可以直接拖放,如果没有编程实现也可以
大部份添加到下边这样的函数中
viewer:
public void createPartControl(Composite parent) {
Composite container = new Composite(parent, SWT.NONE);
//添加一个button
final Button delBtn = new Button(container, SWT.NONE);
delBtn.setText("删除");
delBtn.setBounds(10, 83, 44, 22);
addListener2DelBtn(delBtn);
createActions();
initializeToolBar();
initializeMenu();
}
dialog:
protected void createContents() {
shell = new Shell(getParent(), SWT.DIALOG_TRIM | SWT.APPLICATION_MODAL);
shell.setSize(500, 375);
shell.setText("SWT Dialog");
}
四,响应事件,SWT的事件响应和Swing是一样的,添加listener
delBtn.addSelectionListener(new SelectionAdapter() {
public void widgetSelected(SelectionEvent e) {
//加入你响应事件要做的事情
}
});
五,布局
布局方面swt没有什么新的地方,发个简单使用布局的例子,参考吧.另外布局还有很多搭配,但不是本文的
重点,暂时带过
import org.eclipse.swt.SWT;
import org.eclipse.swt.events.SelectionEvent;
import org.eclipse.swt.events.SelectionListener;
import org.eclipse.swt.graphics.Font;
import org.eclipse.swt.graphics.Point;
import org.eclipse.swt.graphics.Rectangle;
import org.eclipse.swt.layout.FormAttachment;
import org.eclipse.swt.layout.FormData;
import org.eclipse.swt.layout.FormLayout;
import org.eclipse.swt.widgets.Button;
import org.eclipse.swt.widgets.Display;
import org.eclipse.swt.widgets.Shell;
import org.eclipse.swt.widgets.Table;
import org.eclipse.swt.widgets.TableColumn;
import org.eclipse.swt.widgets.TableItem;
public class TableDemo {
/**
* @param args
*/
public static void main(String[] args) {
Display dispMain = new Display ();
final Shell shellMain = new Shell (dispMain, SWT.TITLE | SWT.MIN | SWT.BORDER);
shellMain.setText("Table Demo");
FormLayout formLayout = new FormLayout();
formLayout.marginLeft = 10;
formLayout.marginRight = 10;
formLayout.marginTop = 10;
formLayout.marginBottom = 10;
formLayout.spacing = 10;
shellMain.setLayout(formLayout);
shellMain.setSize(800, 600);
Point size = shellMain.getSize();
Rectangle rect = dispMain.getBounds();
shellMain.setLocation(rect.x + (rect.width-size.x)/2, rect.y + (rect.height-size.y)/2);
Table demoTable = (Table)createContents(shellMain);
FormData formData = new FormData();
formData.left = new FormAttachment(0, 0);
formData.top = new FormAttachment(0, 0);
formData.right = new FormAttachment(100, 0);
formData.bottom = new FormAttachment(100, -34);
demoTable.setLayoutData(formData);
Button btnClose = new Button(shellMain, SWT.PUSH | SWT.FLAT);
btnClose.setText("close");
formData = new FormData();
formData.right = new FormAttachment(100, 0);
formData.top = new FormAttachment(demoTable, 0);
formData.width = 100;
formData.bottom = new FormAttachment(100, 0);
btnClose.setLayoutData(formData);
btnClose.addSelectionListener(
new SelectionListener() {
public void widgetDefaultSelected(SelectionEvent e) {
this.widgetSelected(e);
}
public void widgetSelected(SelectionEvent e) {
shellMain.close();
}
}
);
shellMain.open ();
while (!shellMain.isDisposed ()) {
if (!dispMain.readAndDispatch ()) {
dispMain.sleep ();
}
}
dispMain.dispose ();
dispMain = null;
}
/**
*
* @param shellMain
* @return
*/
private static Table createContents(Shell shellMain) {
Table table = new Table(shellMain, SWT.H_SCROLL | SWT.V_SCROLL | SWT.BORDER);
table.setHeaderVisible(true);
table.setLinesVisible(true);
table.setFont(new Font(shellMain.getDisplay(), "Arial", 11, SWT.BOLD));
TableColumn colNumber = new TableColumn(table, SWT.NONE);
TableColumn colMedName = new TableColumn(table, SWT.CENTER);
TableColumn colPrice = new TableColumn(table, SWT.CENTER);
TableColumn colUnit = new TableColumn(table, SWT.CENTER);
TableColumn colCount = new TableColumn(table, SWT.CENTER);
colNumber.setWidth(25);
colMedName.setWidth(150);
colMedName.setText("Medicine Name");
colPrice.setWidth(150);
colPrice.setText("Medicine Price");
colUnit.setWidth(150);
colUnit.setText("Medicine Unit");
colCount.setWidth(150);
colCount.setText("Medicine Count");
for(int i=0; i<10; i++) {
TableItem item = new TableItem(table, SWT.NONE);
item.setText(new String[]{i+1+"","4/2","4/3","4/4","4/5","4/6","4/7","4/8","4/9"});
}
return table;
}
}
五,加入 右键 ,双击
加入两个listener
//右键
private void hookContextMenu() {
MenuManager menuMgr = new MenuManager("#PopupMenu"); //$NON-NLS-1$
menuMgr.setRemoveAllWhenShown(true);
menuMgr.addMenuListener(new IMenuListener() {
public void menuAboutToShow(IMenuManager manager) {
HelloView.this.fillContextMenu(manager);
}
});
Menu menu = menuMgr.createContextMenu(viewer.getControl());
viewer.getControl().setMenu(menu);
getSite().registerContextMenu(menuMgr, viewer);
}
private void fillContextMenu(IMenuManager manager) {
manager.add(addAction);
manager.add(modifyAction);
manager.add(deleteAction);
manager.add(new Separator(IWorkbenchActionConstants.MB_ADDITIONS));
}
//双击
private void hookDoubleClickAction() {
viewer.addDoubleClickListener(new IDoubleClickListener() {
public void doubleClick(DoubleClickEvent event) {
//doubleClickAction.run();
}
});
}
六,使用TableViewer
Jface中封装了talbeViewer TreeViewer等控件,能简单的实现很多功能,首先说说TableView
//SWT.FULL_SELECTION 可以选中一整行
//SWT.MULTI 可以选中多行
viewer = new TableViewer(wareListGroup, SWT.BORDER | SWT.FULL_SELECTION
| SWT.MULTI);
final Table table = viewer.getTable();
table.setHeaderVisible(true);//显视表头
table.setLinesVisible(true);//显视表格
//实现点击表头自动重新排序
final TableColumn num = new TableColumn(table, SWT.NONE);
num.addSelectionListener(new SelectionAdapter() {
public void widgetSelected(SelectionEvent e) {
resetSort(WareViewerSort.NUM);
//resetSort是自己实现的重新排序的函数,只须要把不通的ViewerSort重新设置给
TableViewer,并刷新
}
});
num.setAlignment(SWT.CENTER);
num.setWidth(50);
//这个地方使用了message,只要做过国际话的大概都能明白
num.setText(Messages.getString("HelloView.warenum")); //$NON-NLS-1$
final TableColumn name = new TableColumn(table, SWT.NONE);
name.addSelectionListener(new SelectionAdapter() {
public void widgetSelected(SelectionEvent e) {
resetSort(WareViewerSort.NAME);//同上
}
});
name.setWidth(80);
name.setText(Messages.getString("WareView.warename")); //$NON-NLS-1$
name.setAlignment(SWT.CENTER);
final TableColumn desc = new TableColumn(table, SWT.NONE);
desc.addSelectionListener(new SelectionAdapter() {
public void widgetSelected(SelectionEvent e) {
resetSort(WareViewerSort.DESC);
}
});
desc.setWidth(110);
desc.setText(Messages.getString("WareView.waredesc")); //$NON-NLS-1$
final TableColumn price = new TableColumn(table, SWT.NONE);
price.addSelectionListener(new SelectionAdapter() {
public void widgetSelected(SelectionEvent e) {
resetSort(WareViewerSort.PRICE);
}
});
price.setWidth(70);
price.setText(Messages.getString("WareView.wareprice")); //$NON-NLS-1$
price.setAlignment(SWT.RIGHT);
final TableColumn updDate = new TableColumn(table, SWT.NONE);
updDate.addSelectionListener(new SelectionAdapter() {
public void widgetSelected(SelectionEvent e) {
resetSort(WareViewerSort.UPDDATE);
}
});
updDate.setWidth(150);
updDate.setText(Messages.getString("WareView.wareupddate")); //$NON-NLS-1$
updDate.setAlignment(SWT.CENTER);
//一个TableViewer里边的数据变动主要取决于下边四句
viewer.setContentProvider(new WareContentProvider()); //表的显视
viewer.setLabelProvider(new WareLabelProvider()); //表的数据提供者
viewer.setInput(//真实的数据来源); //数据来源例如ArrayList等
viewer.setSorter(new WareViewerSort()); //排序
两个provider的实现类似下边的情况
class WareContentProvider implements IStructuredContentProvider {
public Object[] getElements(Object inputElement) {
if (inputElement instanceof Node) {
ArrayList list = new ArrayList();
makeWareList(((Node) inputElement), list);
return list.toArray();
}
if (inputElement instanceof List) {
return ((List) inputElement).toArray();
}
return null;
}
public void dispose() {
// TODO Auto-generated method stub
}
public void inputChanged(Viewer viewer, Object oldInput, Object newInput) {
// TODO Auto-generated method stub
}
}
class WareLabelProvider extends LabelProvider implements
ITableLabelProvider {
public Image getColumnImage(Object element, int columnIndex) {
// TODO Auto-generated method stub
return null;
}
public String getColumnText(Object element, int columnIndex) {
if (element instanceof Ware) {
switch (columnIndex) {
case 0:
return ((Ware) element).getDisplayNum();
case 1:
return ((Ware) element).getDisplayName();
case 2:
return ((Ware) element).getDisplayDesc();
case 3:
return ((Ware) element).getDisplayPrice();
case 4:
return ((Ware) element).getDisplayUpdDate();
default:
break;
}
}
return null;
}
}
===========================================================
Eclipse Rcp系列 四 弹出提示窗口
如何实现各式各样的提示窗口呢,SWT提供了一个类
MessageDialog
只有一个确定
MessageDialog.openInformation(shell, "title", "message");
有是/否
MessageDialog.openConfirm(shell, "title","message");
有是/否/取消
MessageDialog dialog = new MessageDialog(shell, "title", null, "message",
MessageDialog.QUESTION, new String[] {IDialogConstants.YES_LABEL,
IDialogConstants.NO_LABEL,IDialogConstants.CANCEL_LABEL }, 0);
dialog.open();
还可以加入更多的选择项,只需要在数组中加入更多的内容
那如何取得点击了哪个按钮呢,两种方法
直接int result = dialog.open();
或者int result = dialog.getReturnCode();
返回的result的值就是被选中按钮在数组中的index
=======================================================================
Eclipse Rcp系列 5 开发过程中遇到的小问题合集
这些小问题会影响开发,查找这些问题还是比较耗时间的,这里把我在学习过程中遇到的问题,找到答案中比较好的转出来。
1,使用第三方控件,在Rcp开发中使用第三方控件(lib)的方式和一般的开发不太一样,方式如下链接
http://www.javazy.com/contentex/200644225825.shtml
2,使用属性文件,对於属性文件的读取,也稍有不同,使用方法(转自http://blog.csdn.net/explorering/archive/2006/10/11/1330709.aspx)
1。使用java.util.Properties类的load()方法
示例:
InputStream in = lnew BufferedInputStream(new FileInputStream(name));
Properties p = new Properties();
p.load(in);
2。使用java.util.ResourceBundle类的getBundle()方法
示例:
ResourceBundle rb = ResourceBundle.getBundle(name, Locale.getDefault());
3。使用java.util.PropertyResourceBundle类的构造函数
示例:
InputStream in = new BufferedInputStream(new FileInputStream(name));
ResourceBundle rb = new PropertyResourceBundle(in);
4。使用class变量的getResourceAsStream()方法
示例:
InputStream in = JProperties.class.getResourceAsStream(name);
Properties p = new Properties();
p.load(in);
5。使用class.getClassLoader()所得到的java.lang.ClassLoader的getResourceAsStream()方法
示例:
InputStream in = JProperties.class.getClassLoader().getResourceAsStream(name);
Properties p = new Properties();
p.load(in);
6。使用java.lang.ClassLoader类的getSystemResourceAsStream()静态方法
示例:
InputStream in = ClassLoader.getSystemResourceAsStream(name);
Properties p = new Properties();
p.load(in);
补充
Servlet中可以使用javax.servlet.ServletContext的getResourceAsStream()方法
示例:
InputStream in = context.getResourceAsStream(path);
Properties p = new Properties();
p.load(in);
3,国际化,在国际化界面的同时,记得国际化plug-in,国际话的方法 不同于程序中的Message.getString()方法,是使用的%,这样
<view
class="com.niis.myprice.views.KindView"
id="com.niis.myprice.views.KindView"
name="%plugin.kindmanager"/>
然後对应各种语言建立一个plugin.properties,记着发布的时候不要忘记加入这些配制文件。
===========================================================================
Eclipse Rcp系列 六 TreeView
treeView的使用和TableView差不多,不同的是ContentProvider和LabelProvider的实现接口不同了。下边是个例子,看一下相信你就,明白了
class KindLabelProvider extends LabelProvider {
public String getText(Object obj) {
if (obj instanceof Kind) {
return obj.toString();
}
return null;
}
public Image getImage(Object obj) {
// String imageKey = ISharedImages.IMG_OBJ_ELEMENT;
if (obj instanceof Kind) {
String imageKey = ISharedImages.IMG_OBJ_FOLDER;
PlatformUI.getWorkbench().getSharedImages().getImage(imageKey);
}
return null;
}
}
class KindContentProvider implements IStructuredContentProvider,
ITreeContentProvider {
public Object[] getElements(Object parent) {
if(parent instanceof Kind){
return getChildren(parent);
}
return null;
}
public Object getParent(Object child) {
if (child instanceof Node) {
return ((Node) child).getParent();
}
return null;
}
public Object[] getChildren(Object parent) {
if (parent instanceof Kind) {
ArrayList children = ((Kind) parent).getChildren();
return children.toArray(new Node[children.size()]);
}
return new Object[0];
}
public boolean hasChildren(Object parent) {
if (parent instanceof Kind)
return ((Kind) parent).hasChildren();
return false;
}
public void dispose() {
// TODO Auto-generated method stub
}
public void inputChanged(Viewer viewer, Object oldInput, Object newInput) {
// TODO Auto-generated method stub
}
}
====================================================================
Eclipse Rcp系列 七 多线程
Eclipse中多线程的实现,类似这样
Job job = new Job("job1") {
protected IStatus run(IProgressMonitor monitor) {
//-----你自定义的东西
Job1 job1 = new Job1();
job1.run();
//-----------------
return Status.OK_STATUS;
}
};
job.setPriority(Job.SHORT);
job.schedule(); //start as soon as possible
================================================
Eclipse Rcp 系列八 中更改状态条的信息
Eclipse Rcp中更改状态条的信息
private void showStatusMessage(String msg) {
WorkbenchWindow workbenchWindow = (WorkbenchWindow) PlatformUI
.getWorkbench().getActiveWorkbenchWindow();
workbenchWindow.setStatus(msg);
}
=====================================================
前一段时间学习eclipse rcp开发写的一个学习用的工程。涉及了我当时学到的一些方面。
当时想找一个可以用来学习的简单的源代码真难,有的都是复杂的。
这里提供一个简单的工程。设计初学者接触的各种问题。有时通一件事情使用了两种方式来实现。
使用了treeview ,tableview
tableview的排序
加入了javamail
使用了jobs后台进程
加入了log4j
国际化
设置了部署工程
右键、菜单、双击等事件
Source CODE