转自:http://www.wxappclub.com/topic/536
A:数据改变,导致重新渲染的两种情况:
1:有wx:key的情况(不重新创建,仅改变顺序)
添加元素或改变元素顺序导致数据改变时,
会校正带有Key的组件(可通过key识别各组件),
框架会根据“目前数据”,重新排序各组件,而不是重新创建,
使组件保持自身的状态,列表渲染效率高。
2:无wx:key的情况(重新创建)
添加元素或改变元素顺序导致数据改变时,
此时各组件没有key(无法识别各组件)
框架会被迫根据“目前数据”重新创建各组件,
使组件重置初始状态(原有状态自然被清空),列表渲染效率低。
B:两种情况的对比
wk:key | 组件识别 | 渲染情况 | 状态情况 | for效率 |
|---|---|---|---|---|
| 有 | 各组件可识别 | 渲染时仅改变组件顺序 | 保持组件之前原来状态 | 效率高 |
| 无 | 组件无法识别 | 渲染时重新创建各组件 | 重置组件的初始状态 | 效率低 |
C:什么时候需要wx:key
1.需要wx:key的情况
- 列表中项目的位置会动态改变或者有新的项目添加到列表中
- 希望列表中的项目保持自己的特征和状态
(如 <input/> 中的输入内容,<switch/> 的选中状态)
需要使用 wx:key 来指定列表中项目的唯一的标识符。
2.可不需要wx:key的情况
如果明确知道该列表是静态,或者不必关注其顺序,可以不用加wx:key,忽略如下的警告。
不提供 wx:key的警告: 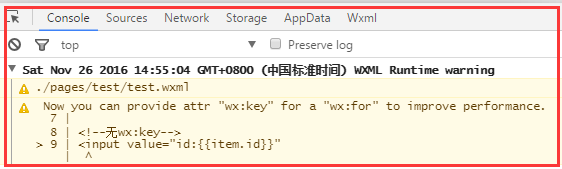
D:wx:key的使用及wx:key的值
1:wx:key="字符串"
这个”字符串”代表在 for 循环的 array 中 item 的某个“属性”
该“属性” 的值需要是列表中唯一的字符串或数字,且不能动态改变。
用于被遍历的组件需要多个属性的时候。
//test.jsdata: {input_data: [{ id: 1, unique: "unique1" },{ id: 2, unique: "unique2" },{ id: 3, unique: "unique3" },{ id: 4, unique: "unique4" },]}//test.wxml<input value="id:{{item.id}}" wx:for="{{input_data}}" wx:key="unique" />
2:wx:key="*this"
保留关键字”*this”代表在 for 循环中的 item 本身,
这种表示需要 item 本身是一个唯一的字符串或者数字
用于组件仅需要一个属性,且属性值唯一。
//test.jsdata: {numberArray: [1, 2, 3, 4],stringArray:['aaa','ccc','fff','good']}//test.wxml<input value="id:{{ item }}" wx:for="{{numberArray}}" wx:key="*this" /><input value="id:{{ item }}" wx:for="{{stringArray}}" wx:key="*this" />},
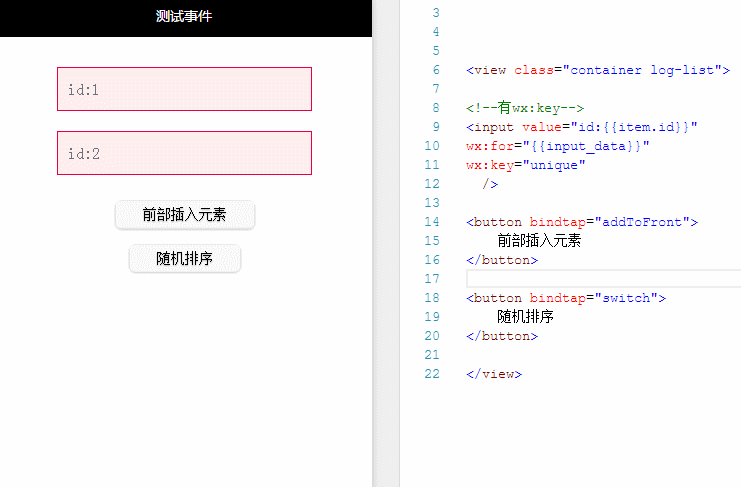
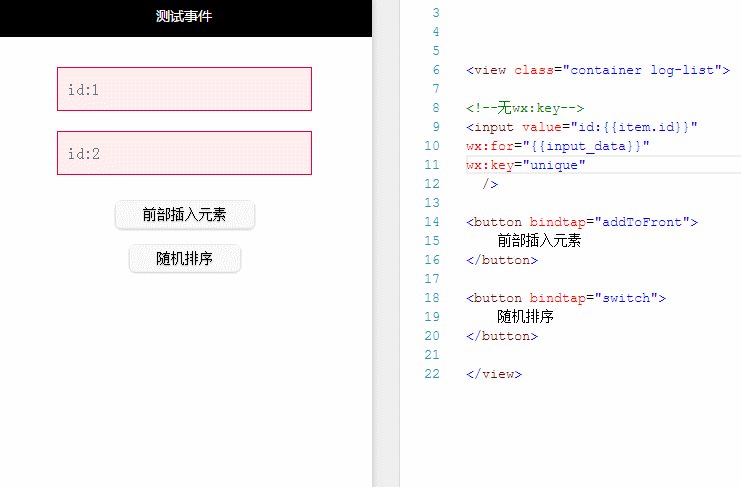
E:2个动态图的源码
//test.wxml<view class="container log-list"><!--有wx:key--><input value="id:{{item.id}}" wx:for="{{input_data}}" wx:key="unique" /><button bindtap="addToFront">前部插入元素</button><button bindtap="switch">随机排序</button></view>
//test.jsPage({data: {input_data: [{ id: 1, unique: "unique1" },{ id: 2, unique: "unique2" },]},//前部插入元素函数addToFront: function (e) {const length = this.data.input_data.length + 1;this.data.input_data = [{ id: length, unique: 'unique_' + length }].concat(this.data.input_data)this.setData({input_data: this.data.input_data})},//随机排序函数switch: function (e) {const length = this.data.input_data.lengthfor (let i = 0; i < length; ++i) {const x = Math.floor(Math.random() * length)const y = Math.floor(Math.random() * length)const temp = this.data.input_data[x]this.data.input_data[x] = this.data.input_data[y]this.data.input_data[y] = temp}this.setData({input_data: this.data.input_data})}})
//test.wxss.log-list {display: flex;flex-direction: column;padding: 40rpx;}input {background: none repeat scroll 0 0 #FFEEEE;float: left;width: 240px;padding: 0 3px;padding-left:10px;height: 42px;color: #69737d;font-size: 16px;line-height: 42px;border: 1px solid #E70047;margin: 20rpx;}button{display: inline-block;vertical-align: baseline;margin: 0 2px;margin-top:30rpx;outline: none;text-align: center;text-decoration: none;font: 14px/100% Arial, Helvetica, sans-serif;padding: .5em 2em .55em;text-shadow: 0 1px 1px rgba(0,0,0,.3);border-radius: .5em;box-shadow: 0 1px 2px rgba(0,0,0,.2);}