写在前面
接着上一篇文章 从源码分析 ContextLoaderListener 的加载过程(带时序图),我们为了解决定时任务执行两次的问题,我们继续 DispatcherServlet 初始化过程的研究。
Servlet 初始化概述
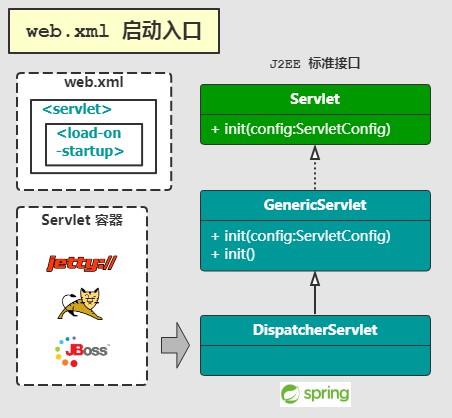
在说 DispatcherServlet 之前,我们先要知道一个 Java J2EE Servlet 的接口的 init(ServletConfig config) 方法。Servlet 容器调用 Servlet # init(ServletConfig config) 方法来指示正在初始化某一个具体的 Servlet 实例对象。
Servlet 容器读取到 webapp/WEB-INF/web.xml 文件中的 <servlet /> 标签时,会根据其中的 <load-on-startup > 的值做不同的处理。如下图所示:
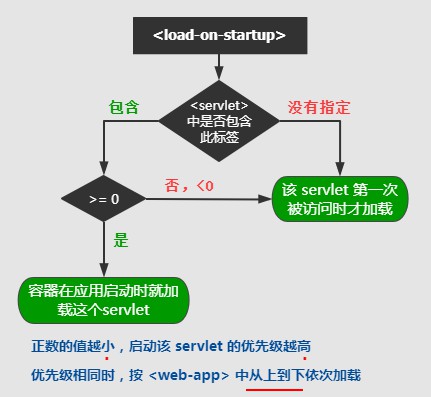
关于容器加载某个 servlet 时机的选择:
A. 如果没有指定 <load-on-startup /> 容器在该 servlet 被选择时才加载。
B. 如果指定值 < 0, 情况同 A
C. 如果指定值 >= 0, 容器在 Web 应用启动时就加载该 servlet
容器在启动时,初始化多个 servlet 的优先级顺序:
1.首先加载 Servlet 容器自带的 servlet
2.然后优先加载 <load-on-startup> 为较小自然数的 servlet
3.相同 <load-on-startup> 值,优先加载 <web-app> 标签中更靠前的 servlet
FrameworkServlet 初始化过程
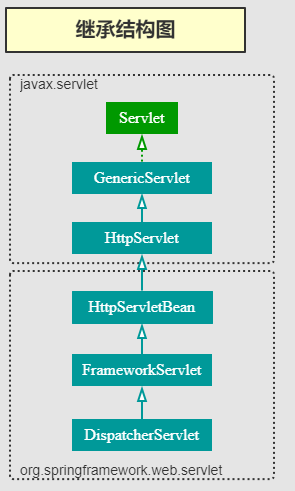
第一,从继承关系上来看,GenericServlet 是 FrameworkServlet 的超类,FrameworkServlet 是 DispatcherServlet 超类。
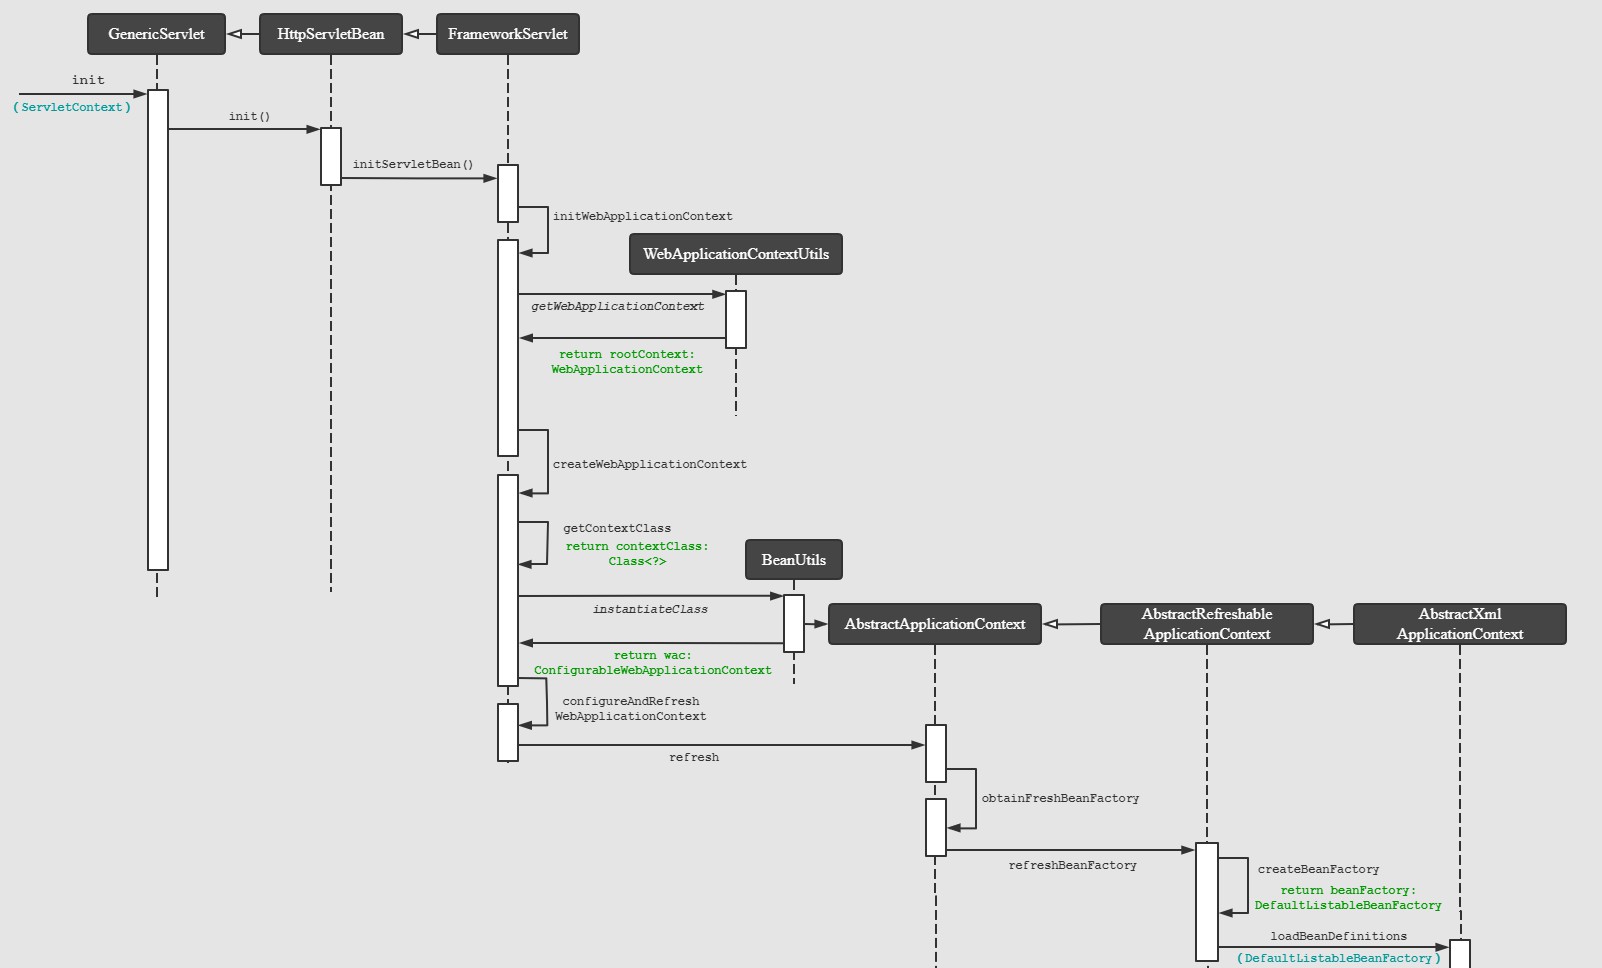
1. Servlet 容器主动调用 Servlet 实现类 GenericServlet 的 init 方法:
public abstract class GenericServlet implements Servlet {
      /**
       * Called by the servlet container to indicate to a servlet that the
       * servlet is being placed into service.
       */
      public void init(ServletConfig config) throws ServletException {
            this.config = config;
            this.init();
      }
}
2. 调用 HttpServletBean 的 init 方法
public abstract class HttpServletBean extends HttpServlet {
        /**
         * 覆写了父类 GenericServlet#init() 方法
         */
	@Override
	public final void init() throws ServletException {
		// Set bean properties from init parameters.
		PropertyValues pvs = new ServletConfigPropertyValues(getServletConfig(), this.requiredProperties);
		if (!pvs.isEmpty()) {
			try {
				BeanWrapper bw = PropertyAccessorFactory.forBeanPropertyAccess(this);
				ResourceLoader resourceLoader = new ServletContextResourceLoader(getServletContext());
				bw.registerCustomEditor(Resource.class, new ResourceEditor(resourceLoader, getEnvironment()));
				initBeanWrapper(bw);
                                /**
                                 * 如果你有设置 init-param 'contextConfigLocation',那么就会调用 DispatcherServlet#setContextConfigLocation 方法
                                 * 如果你有设置 init-param 'contextClass',就会调用 DispatcherServlet#setContextClass 方法
                                 * 如果你有设置 init-param 'contextInitializerClasses',就会调用 DispatcherServlet#setContextInitializerClasses 方法
                                 */
				bw.setPropertyValues(pvs, true);
			}
			catch (BeansException ex) {
				if (logger.isErrorEnabled()) {
					logger.error("Failed to set bean properties on servlet '" + getServletName() + "'", ex);
				}
				throw ex;
			}
		}
		// Let subclasses do whatever initialization they like.
		initServletBean();
	}
}
3.FrameworkServlet # initWebApplicationContext
了解过 ContextLoaderListener 的朋友,应该熟悉 <context-param /> + <listener /> 的这套常规“组合拳”。
<web-app ....(此处省略命名空间)>
    <!--配置多个上下文会导致多次执行-->
    <context-param>
        <param-name>contextConfigLocation</param-name>
        <param-value>classpath:spring/spring-mvc.xml</param-value>
    </context-param>

    <!-- ================================== listener ================================== -->
    <listener>
        <listener-class>org.springframework.web.context.ContextLoaderListener</listener-class>
    </listener>
</web-app>
他们将为我们的 Web 应用程序创建一个“根”应用上下文。
设置 Web 应用“根”上下文的地方: ContextLoader # initWebApplicationContext
在 ContextLoader # initWebApplicationContext(ServletContext servletContext) 方法中,
把创建好的 WebApplicationContext 实例,通过调用 servletContext.setAttribute(WebApplicationContext.ROOT_WEB_APPLICATION_CONTEXT_ATTRIBUTE, this.context) 设置到 Servlet 容器上下文中。
键值为 org.springframework.web.context.WebApplicationContext.ROOT
获取 Web 应用“根”上下文的地方: FrameworkServlet # initWebApplicationContext
在 FrameworkServlet # initWebApplicationContext() 方法中, 调用 WebApplicationContext rootContext = WebApplicationContextUtils.getWebApplicationContext(getServletContext()) 获取 Web 应用“根”上下文
4.为当前 DispatcherServlet 创建一个应用上下文
在 FrameworkServlet # initWebApplicationContext 方法中,
假如当前的 DispatcherServlet 还没有一个 webApplicationContext 成员变量,
调用 createWebApplicationContext 给自己创建一个 WebApplicationContext 实例。
5.实例化应用上下文对象
- 选择应用上下文的类对象
// 获取需要实例化的应用上下文的类对象
Class<?> contextClass = getContextClass();
- 这个类对象默认是 XmlWebApplicationContext.class,也可以通过 <init-param> 进行自定义指定。
<init-param>
    <param-name>contextClass</param-name>
    <param-value>org.springframework.web.context.support.XmlWebApplicationContext</param-value>
</init-param>
- 类似的,还可以配置 contextConfigLocation
<init-param>
    <param-name>contextConfigLocation</param-name>
    <param-value>classpath:spring/spring-mvc.xml</param-value>
</init-param>
6.配置和初始化应用上下文对象
- 但是如果你选择不填入路径,那么不会影响应用上下文的创建,但是无法加载 Bean。
<init-param>
    <param-name>contextConfigLocation</param-name>
    <param-value></param-value>
</init-param>
因为 FrameworkServlet # createWebApplicationContext 对 contextConfigLocation 的判断是非 null
String configLocation = getContextConfigLocation();
// 值为空字符"",但不是 null,所以可以设置进去
if (configLocation != null) {
      wac.setConfigLocation(configLocation);
}
AbstractRefreshableConfigApplicationContext # setConfigLocation
// 传入空字符串"",得到的是长度为0的String数组
public void setConfigLocations(@Nullable String... locations) {
    if (locations != null) {
        Assert.noNullElements(locations, "Config locations must not be null");
        this.configLocations = new String[locations.length];
        for(int i = 0; i < locations.length; ++i) {
            this.configLocations[i] = this.resolvePath(locations[i]).trim();
        }
    } else {
        this.configLocations = null;
    }
}
XmlWebApplicationContext # loadBeanDefinitions
protected void loadBeanDefinitions(XmlBeanDefinitionReader reader) throws IOException {
	String[] configLocations = getConfigLocations();
	if (configLocations != null) {
                // 配置数组长度为0时,不会进入函数体内部,就不会执行 reader.loadBeanDefinitions
		for (String configLocation : configLocations) {
			reader.loadBeanDefinitions(configLocation);
		}
	}
}
7.刷新上下文
AbstractApplicationContext # refresh
public void refresh() throws BeansException, IllegalStateException {
	synchronized (this.startupShutdownMonitor) {
		// Prepare this context for refreshing.
		prepareRefresh();
		// Tell the subclass to refresh the internal bean factory.
		ConfigurableListableBeanFactory beanFactory = obtainFreshBeanFactory();
		// Prepare the bean factory for use in this context.
		prepareBeanFactory(beanFactory);
		try {
			// Allows post-processing of the bean factory in context subclasses.
			postProcessBeanFactory(beanFactory);
			// Invoke factory processors registered as beans in the context.
			invokeBeanFactoryPostProcessors(beanFactory);
			// Register bean processors that intercept bean creation.
			registerBeanPostProcessors(beanFactory);
			// Initialize message source for this context.
			initMessageSource();
			// Initialize event multicaster for this context.
			initApplicationEventMulticaster();
			// Initialize other special beans in specific context subclasses.
			onRefresh();
			// Check for listener beans and register them.
			registerListeners();
			// Instantiate all remaining (non-lazy-init) singletons.
			finishBeanFactoryInitialization(beanFactory);
			// Last step: publish corresponding event.
			finishRefresh();
		}
		catch (BeansException ex) {
			if (logger.isWarnEnabled()) {
				logger.warn("Exception encountered during context initialization - " +
						"cancelling refresh attempt: " + ex);
			}
			// Destroy already created singletons to avoid dangling resources.
			destroyBeans();
			// Reset 'active' flag.
			cancelRefresh(ex);
			// Propagate exception to caller.
			throw ex;
		}
		finally {
			// Reset common introspection caches in Spring's core, since we
			// might not ever need metadata for singleton beans anymore...
			resetCommonCaches();
		}
	}
}
8.完成刷新发布事件
AbstractApplicationContext # finishRefresh
protected void finishRefresh() {
	// Clear context-level resource caches (such as ASM metadata from scanni
	clearResourceCaches();
	// Initialize lifecycle processor for this context.
	initLifecycleProcessor();
	// Propagate refresh to lifecycle processor first.
	getLifecycleProcessor().onRefresh();
        // 这个事件会被 FrameworkServlet 接收和处理
	// Publish the final event.
	publishEvent(new ContextRefreshedEvent(this));
	// Participate in LiveBeansView MBean, if active.
	LiveBeansView.registerApplicationContext(this);
}
注册事件的位置:FrameworkServlet # configureAndRefreshWebApplicationContext
wac.addApplicationListener(new SourceFilteringListener(wac, new ContextRefreshListener()));
接收和处理事件的位置:FrameworkServlet.ContextRefreshListener
private class ContextRefreshListener implements ApplicationListener {
	@Override
	public void onApplicationEvent(ContextRefreshedEvent event) {
		FrameworkServlet.this.onApplicationEvent(event);
	}
}
到此为止,上半篇就算结束了,通过最后一步的事件接收,我们将进入 DispatcherServlet # initStrategies
DispatcherServlet 初始化过程
DispatcherServlet # initStrategies
protected void initStrategies(ApplicationContext context) {
	initMultipartResolver(context);
	initLocaleResolver(context);
	initThemeResolver(context);
	initHandlerMappings(context);
	initHandlerAdapters(context);
	initHandlerExceptionResolvers(context);
	initRequestToViewNameTranslator(context);
	initViewResolvers(context);
	initFlashMapManager(context);
}
首先了解一下默认配置 defaultStrategies:
public class DispatcherServlet extends FrameworkServlet {
      private static final String DEFAULT_STRATEGIES_PATH = "DispatcherServlet.properties";

      private static final Properties defaultStrategies;

      static {
            // Load default strategy implementations from properties file.
            // This is currently strictly internal and not meant to be customized
            // by application developers.
            try {
                  ClassPathResource resource = new ClassPathResource(DEFAULT_STRATEGIES_PATH, DispatcherServlet.class);
                  defaultStrategies = PropertiesLoaderUtils.loadProperties(resource);
            }
            catch (IOException ex) {
                  throw new IllegalStateException("Could not load '" + DEFAULT_STRATEGIES_PATH + "': " + ex.getMessage());
            }
      }
}
DispatcherServlet.properties
该配置文件和 DispatcherServlet.class 在同一文件夹下,key 为接口类名称,value 为逗号分隔的实现类名称

我简单说一下常用的几个初始化方法:
- initHandlerMappings url模式和“Handler”的映射关系。
- initHandlerAdapters 初始化“Handler”适配器
- initHandlerExceptionResolvers “Handler”执行发生异常的异常解析器
- initViewResolvers 解析 View 对象的视图解析器
结语
- 如果配置了监听器 ContextLoaderListener ,那么会创建一个 “root WebApplicationContext”。
- 如果配置了多个 FrameworkServlet 及其子类,会为它们中的每一个创建一个 “local WebApplicationContext”
- <context-param> 和 <init-param>(<servlet>标签的子标签)分别可以设置不同范围的 WebApplicationContext 的 contextId,contextClass,contextConfigLocation 属性。
- ContextLoader 和 FrameworkServlet 的 initWebApplicationContext 方法,都是主要分为 “选择类对象与实例化” 和 “配置与刷新” 两部分
在整理本文的过程中,又带出了 ApplicationListener 是如何工作的?以及 BeanWrapper 是如何工作的?DispatcherServlet 初始化的这些 HandlerMapping,HandlerAdapter,HandlerExceptionResolves,ViewResolvers 是怎么串起来?等等这些疑问,待以后再继续分析。
参考文献
【Spring MVC】DispatcherServlet详解(容器初始化超详细过程源码分析)
servlet的init方法初始化方式:“Servlet 初始化概述”参考了这篇文章