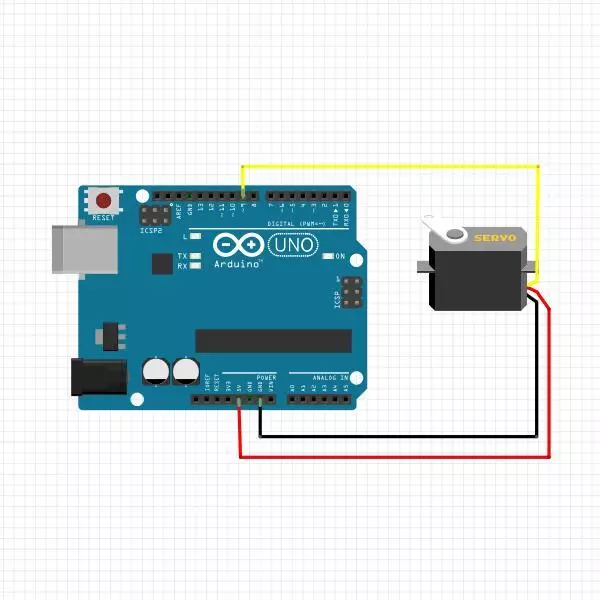
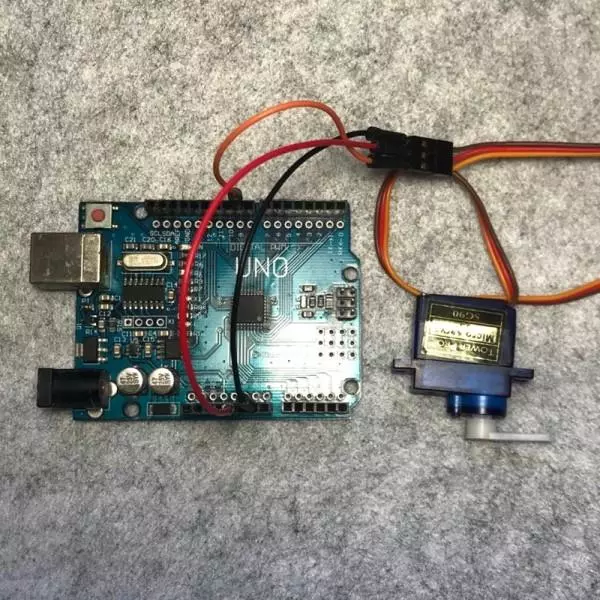
单路电机
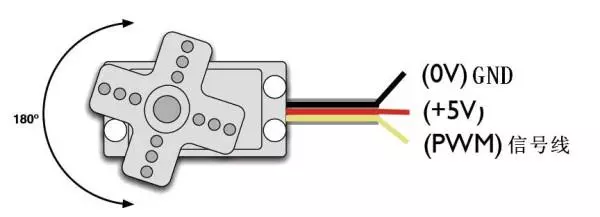
#include <Servo.h>

Servo myservo;  // 定义Servo对象来控制
int pos = 0;    // 角度存储变量

void setup() {
  myservo.attach(9);  // 控制线连接数字9
}

void loop() {
  for (pos = 0; pos <= 180; pos ++) { // 0°到180°
    // in steps of 1 degree
    myservo.write(pos);              // 舵机角度写入
    delay(5);                       // 等待转动到指定角度
  }
  for (pos = 180; pos >= 0; pos --) { // 从180°到0°
    myservo.write(pos);              // 舵机角度写入
    delay(5);                       // 等待转动到指定角度
  }
}
额外说明: 对于360度舵机 不再是 0-180控制角度,90度停止 0一个方向最大速度转,180另一个方向最大速度转
 myservo.write(80);  //前转

myservo.write(90);  //停止

 myservo.write(90);  //后转
串口获取消息
#include <Servo.h>

Servo myservo4;
Servo myservo5;
Servo myservo6;

void go4(){

   myservo4.write(0);
   delay(2000);
   myservo4.write(90);
   delay(1000);

  }

 void go5(){

   myservo5.write(0);
   delay(1000);
   myservo5.write(90);
   delay(1000);
   myservo5.write(180);
   delay(1000);
   myservo5.write(90);
   delay(1000);
   myservo5.write(0);
   delay(1000);


  }
 void go6(){

   myservo6.write(0);
   delay(1000);
   myservo6.write(90);
   delay(1000);
   myservo6.write(180);
   delay(1000);
   myservo6.write(90);
   delay(1000);
   myservo6.write(0);
   delay(1000);


  }

void do_motor(String comdata){

  if(comdata=="motor1"){
     go4();
    }
  else  if(comdata=="motor2"){
     go5();
     }
  else  if(comdata=="motor3"){
     go6();
     }
  else{}


  }


void setup() {
  //硬串口
  Serial.begin(9600);
  myservo4.attach(4);
  myservo5.attach(5);
  myservo6.attach(6);
  myservo4.write(90);//S舵机不一样  90代表停止
  myservo5.write(0);//普通舵机 初始化0位置
  myservo6.write(0);//普通舵机 初始化0位置
}

String  comdata;
void loop() {

 if(Serial.available()>0){
     comdata = Serial.readString();
     Serial.println(comdata);
     do_motor(comdata);
     comdata = "";
   }


}
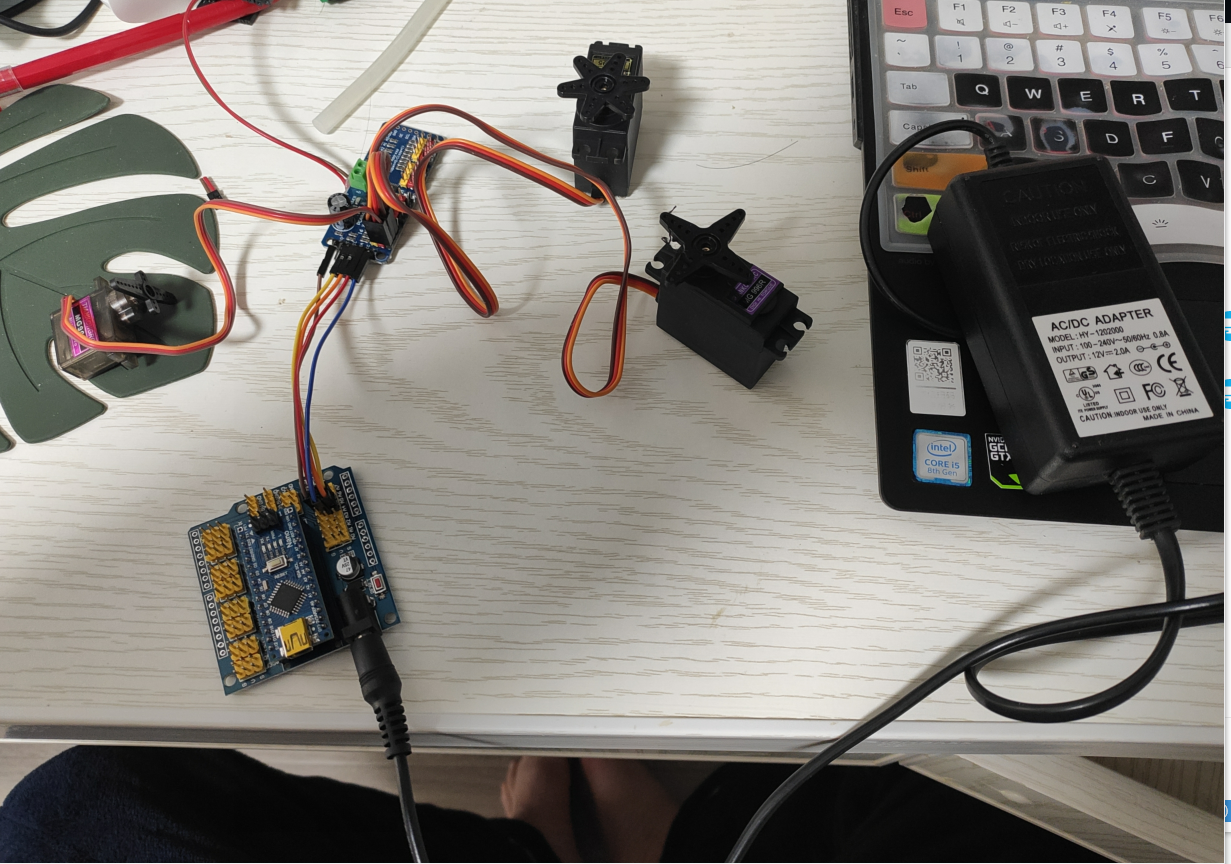
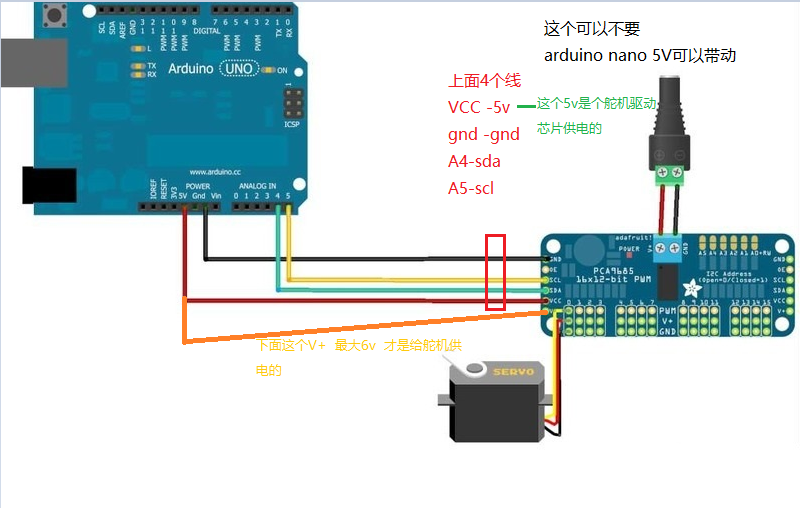
16路电机
由于Arduino的驱动能力有限,当需要控制多个舵机时,需要外接电源以及使用专用的舵机控制板。
https://item.taobao.com/item.htm?spm=a1z09.2.0.0.435e2e8dKDHquW&id=536890985912&_u=21qf7bf5b2a1
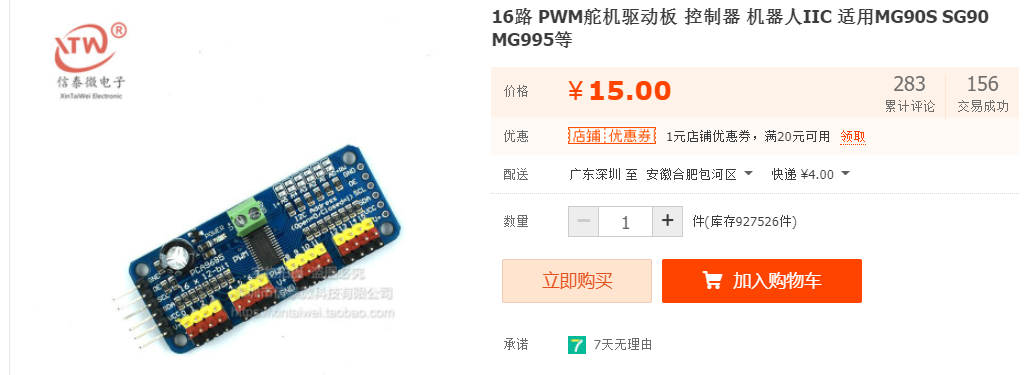
无论是电脑USB供电还是专门12v-2A供电 都可以
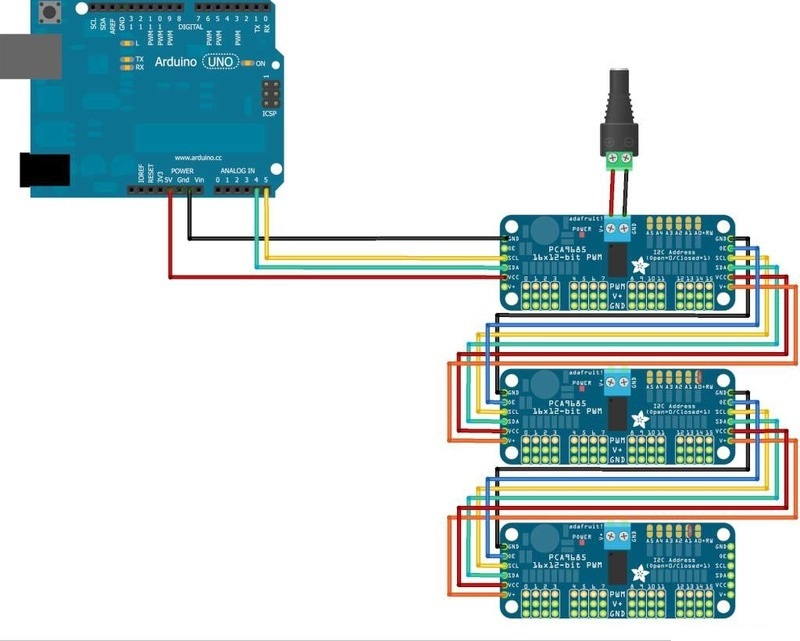
板子可以级练控制多个
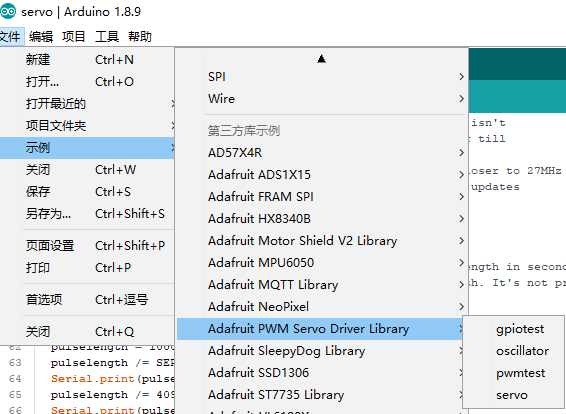
安装库
/***************************************************
  This is an example for our Adafruit 16-channel PWM & Servo driver
  Servo test - this will drive 8 servos, one after the other on the
  first 8 pins of the PCA9685

  Pick one up today in the adafruit shop!
  ------> http://www.adafruit.com/products/815

  These drivers use I2C to communicate, 2 pins are required to
  interface.

  Adafruit invests time and resources providing this open source code,
  please support Adafruit and open-source hardware by purchasing
  products from Adafruit!

  Written by Limor Fried/Ladyada for Adafruit Industries.
  BSD license, all text above must be included in any redistribution
 ****************************************************/

#include <Wire.h>
#include <Adafruit_PWMServoDriver.h>

// called this way, it uses the default address 0x40
Adafruit_PWMServoDriver pwm = Adafruit_PWMServoDriver();
// you can also call it with a different address you want
//Adafruit_PWMServoDriver pwm = Adafruit_PWMServoDriver(0x41);
// you can also call it with a different address and I2C interface
//Adafruit_PWMServoDriver pwm = Adafruit_PWMServoDriver(0x40, Wire);

//根据您的伺服品牌,最小和最大脉冲宽度可能会有所不同 调整它
#define SERVOMIN  150 // This is the 'minimum' pulse length count (out of 4096)
#define SERVOMAX  600 // This is the 'maximum' pulse length count (out of 4096)

#define SERVO_FREQ 50 // Analog servos run at ~50 Hz updates

// our servo # counter
uint8_t servonum = 0;

void setup() {
  Serial.begin(9600);
  Serial.println("8 channel Servo test!");

  pwm.begin();
//理论上内部振荡器是25MHz,但实际上不是
//非常精确。你可以调整这个数字直到
//你得到了你期望的频率!
  pwm.setOscillatorFrequency(27000000);  // The int.osc. is closer to 27MHz
  pwm.setPWMFreq(SERVO_FREQ);  // Analog servos run at ~50 Hz updates

  delay(10);
}

void loop() {

  Serial.println(servonum);
  for (uint16_t pulselen = SERVOMIN; pulselen < SERVOMAX; pulselen++) {
    pwm.setPWM(servonum, 0, pulselen);
  }

  delay(500);
  for (uint16_t pulselen = SERVOMAX; pulselen > SERVOMIN; pulselen--) {
    pwm.setPWM(servonum, 0, pulselen);
  }

  delay(500);

  servonum++;
  if (servonum > 3) servonum = 0; // Testing the first 8 servo channels
}
/***************************************************
  This is an example for our Adafruit 16-channel PWM & Servo driver
  Servo test - this will drive 8 servos, one after the other on the
  first 8 pins of the PCA9685

  Pick one up today in the adafruit shop!
  ------> http://www.adafruit.com/products/815

  These drivers use I2C to communicate, 2 pins are required to
  interface.

  Adafruit invests time and resources providing this open source code,
  please support Adafruit and open-source hardware by purchasing
  products from Adafruit!

  Written by Limor Fried/Ladyada for Adafruit Industries.
  BSD license, all text above must be included in any redistribution
 ****************************************************/

#include <Wire.h>
#include <Adafruit_PWMServoDriver.h>

// called this way, it uses the default address 0x40
Adafruit_PWMServoDriver pwm = Adafruit_PWMServoDriver();
// you can also call it with a different address you want
//Adafruit_PWMServoDriver pwm = Adafruit_PWMServoDriver(0x41);
// you can also call it with a different address and I2C interface
//Adafruit_PWMServoDriver pwm = Adafruit_PWMServoDriver(0x40, Wire);

// Depending on your servo make, the pulse width min and max may vary, you
// want these to be as small/large as possible without hitting the hard stop
// for max range. You'll have to tweak them as necessary to match the servos you
// have!
#define SERVOMIN  150 // This is the 'minimum' pulse length count (out of 4096)
#define SERVOMAX  600 // This is the 'maximum' pulse length count (out of 4096)
#define USMIN  600 // This is the rounded 'minimum' microsecond length based on the minimum pulse of 150
#define USMAX  2400 // This is the rounded 'maximum' microsecond length based on the maximum pulse of 600
#define SERVO_FREQ 50 // Analog servos run at ~50 Hz updates

// our servo # counter
uint8_t servonum = 0;

void setup() {
  Serial.begin(9600);
  Serial.println("8 channel Servo test!");

  pwm.begin();
  // In theory the internal oscillator is 25MHz but it really isn't
  // that precise. You can 'calibrate' by tweaking this number till
  // you get the frequency you're expecting!
  pwm.setOscillatorFrequency(27000000);  // The int.osc. is closer to 27MHz
  pwm.setPWMFreq(SERVO_FREQ);  // Analog servos run at ~50 Hz updates

  delay(10);
}

// You can use this function if you'd like to set the pulse length in seconds
// e.g. setServoPulse(0, 0.001) is a ~1 millisecond pulse width. It's not precise!
void setServoPulse(uint8_t n, double pulse) {
  double pulselength;

  pulselength = 1000000;   // 1,000,000 us per second
  pulselength /= SERVO_FREQ;   // Analog servos run at ~60 Hz updates
  Serial.print(pulselength); Serial.println(" us per period");
  pulselength /= 4096;  // 12 bits of resolution
  Serial.print(pulselength); Serial.println(" us per bit");
  pulse *= 1000000;  // convert input seconds to us
  pulse /= pulselength;
  Serial.println(pulse);
  pwm.setPWM(n, 0, pulse);
}

void loop() {
  // Drive each servo one at a time using setPWM()
  Serial.println(servonum);
  for (uint16_t pulselen = SERVOMIN; pulselen < SERVOMAX; pulselen++) {
    pwm.setPWM(servonum, 0, pulselen);
  }

  delay(500);
  for (uint16_t pulselen = SERVOMAX; pulselen > SERVOMIN; pulselen--) {
    pwm.setPWM(servonum, 0, pulselen);
  }

  delay(500);

  // Drive each servo one at a time using writeMicroseconds(), it's not precise due to calculation rounding!
  // The writeMicroseconds() function is used to mimic the Arduino Servo library writeMicroseconds() behavior.
  for (uint16_t microsec = USMIN; microsec < USMAX; microsec++) {
    pwm.writeMicroseconds(servonum, microsec);
  }

  delay(500);
  for (uint16_t microsec = USMAX; microsec > USMIN; microsec--) {
    pwm.writeMicroseconds(servonum, microsec);
  }

  delay(500);

  servonum++;
  if (servonum > 3) servonum = 0; // Testing the first 8 servo channels
}
不使用扩展版
#include <Servo.h>

Servo myservo;  // create servo object to control a servo
Servo myservo1;
int pos = 0;    // variable to store the servo position

void setup()
{
   Serial.begin(9600);
   myservo.attach(9);  // attaches the servo on pin 9 to the servo object
   myservo.write(90);
    myservo1.attach(7);

   delay(15);
}


void loop()
{

  char ch = Serial.read();
  switch(ch){
      case 's':
      {
        myservo.write(80);
        delay(1000);
        Serial.println("N is inputed");
        myservo.write(90);
         myservo1.write(0);
        delay(1000);
        break;
      }
      case 'n':
      {
        myservo.write(100);
        delay(1000);
        Serial.println("S is inputed");
        myservo.write(90);
         myservo1.write(180);
        delay(1000);
        break;
      }
  }
}