1开启端口
https://blog.csdn.net/a497785609/article/details/77944327
安装方法
sudo apt-get install ufw
使用方法
1.启用
sudo ufw enable
sudo ufw default deny
作用:开启了防火墙并随系统启动同时关闭所有外部对本机的访问(本机访问外部正常)。
2.关闭
sudo ufw disable
3.查看防火墙状态
sudo ufw status
4.开启/禁用相应端口
sudo ufw allow 80 允许外部访问80端口
sudo ufw delete allow 80 禁止外部访问80 端口
sudo ufw allow from 192.168.1.1 允许此IP访问所有的本机端口
sudo ufw deny smtp 禁止外部访问smtp服务
sudo ufw delete allow smtp 删除上面建立的某条规则
ufw deny proto tcp from 10.0.0.0/8 to 192.168.0.1 port要拒绝所有的流量从TCP的10.0.0.0/8 到端口22的地址192.168.0.1
可以允许所有RFC1918网络(局域网/无线局域网的)访问这个主机(/8,/16,/12是一种网络分级):
sudo ufw allow from 10.0.0.0/8
sudo ufw allow from 172.16.0.0/12
sudo ufw allow from 192.168.0.0/16
推荐设置
sudo apt-get install ufw
sudo ufw enable
sudo ufw default deny
这样设置已经很安全,如果有特殊需要,可以使用sudo ufw allow开启相应服务
但是必须关闭防护墙,不让远程界面就用不了了
如果是SSH或者VNC登录,就别试这个功能了。不然就不能远程登录了。
还要连上屏幕,关闭防火墙才能,继续玩耍。
sudo ufw disable
2搭建flask服务器
https://segmentfault.com/a/1190000017330435
安装Flask
使用pip安装Flask:
pip install flask
1运行简单例程
现在,让我们完整地看一下app.py的整个代码:
from flask import *
app = Flask(__name__)

@app.route('/')
def hello_world():
    return 'Hello, World!'

if __name__ =="__main__":
    app.run((host=’0.0.0.0’,port=8080)
然后运行起来:
* Serving Flask app "app" (lazy loading)
* Environment: production
* Debug mode: on
* Running on http://127.0.0.1:8080/ (Press CTRL+C to quit)
* Restarting with stat
* Debugger is active!
* Debugger PIN: 770-937-705
现在就可以打开浏览器访问http://127.0.0.1:8080/了:
 2 运行网页版本
同目录创建templates文件夹,所有网页放进去
我们将模板文件按如下路径放置:
Apps folder
/app.py
templates
   |-/index.html
使用模板时,视图函数应当返回render_template()的调用结果。例如下面的代码片段渲染模板index.html,并将渲染结果作为视图函数的返回值:
from flask import Flask, render_template
app = Flask(__name__)

@app.route('/hello')
def hello():
    return render_template('index.html', name="Alex")

if __name__ == '__main__':
    app.run(debug = True)
在上面的代码中,模板文件index.html依赖于变量name,其内容如下:
<html>
<body>
  {% if name %}
    <h2>Hello {{ name }}.</h2>
  {% else %}
    <h2>Hello.</h2>
  {% endif %}
 </body>
</html>
模板文件的语法扩充了HTML,因此可以使用变量和逻辑。
在浏览器中访问http://127.0.0.1:8080/hello/alex:

3 使用表单
每个web应用都需要使用表单来采集用户数据。现在让我们使用Flask框架创建一个简单的表单来收集用户的基本信息,例如名称、年龄、邮件、兴趣爱好等,我们将这个模板文件命名为bio_form.html
<!DOCTYPE html>
<html>
<head>
    <title></title>
</head>
<body>
    <h1>Bio Data Form</h1>
    <form action="showbio">
        <label>Username</label>
        <input type="name" name="username"><br>
        <label>Email</label>
        <input type="email" name="email"><br>
        <label>Hobbies</label>
        <input type="name" name="hobbies"><br>
        <input type="submit" name="">
    </form>
</body>
</html>
视图函数bio_data_form同时支持POST和GET请求。GET请求将渲染bio_form.html模板,而POST请求将重定向到showbio:
@app.route('/form', methods=['POST', 'GET'])
def bio_data_form():
    if request.method == "POST":
        username = request.form['username']
        age = request.form['age']
        email = request.form['email']
        hobbies = request.form['hobbies']
        return redirect(url_for('showbio',
                                username=username,
                                age=age,
                                email=email,
                                hobbies=hobbies))
    return render_template("bio_form.html")
下面是showbio的实现:
@app.route('/showbio', methods=['GET'])
def showbio():
    username = request.args.get('username')
    age = request.args.get('age')
    email = request.args.get('email')
    hobbies = request.args.get('hobbies')
    return render_template("show_bio.html",
                           username=username,
                           age=age,
                           email=email,
                           hobbies=hobbies)
以及show_bio.html的内容:
<!DOCTYPE html>
<html>
<head>
    <title>Bio-Data Details</title>
</head>
<body>
    <h1>Bio-Data Details</h1>
    <hr>
    <h1>Username: {{ username }}</h1>
    <h1>Email: {{ email }}</h1>
    <h1>Hobbies: {{ hobbies }}</h1>
</body>
</html>
from flask import *
app = Flask(__name__)

#测试1 根目录简单
@app.route('/')
def hello_world():
    return 'Hello, World!'

#测试2 指定目录 携带参数
@app.route('/hello')
def hello():
    return render_template('index.html', name="Alex")


#测试3 指定目录 获取请求参数+动态生成网页
@app.route('/showbio', methods=['GET'])
def showbio():
    username = request.args.get('username')
    age = request.args.get('age')
    email = request.args.get('email')
    hobbies = request.args.get('hobbies')
    return render_template("show_bio.html",
                           username=username,
                           age=age,
                           email=email,
                           )

#测试4 指定目录 获取请求post表单参数+重定向到测试3
@app.route('/form', methods=['POST', 'GET'])
def bio_data_form():
    #第一次获取网页后,网页里面有post请求处理
    if request.method == "POST":
        username = request.form['username']
        age = request.form['age']
        email = request.form['email']
        #网页重新定向
        return redirect(url_for('showbio',
                                username=username,
                                age=age,
                                email=email,
                                ))
    #第一次访问 直接返回网页
    return render_template("bio_form.html")

#
if __name__ =="__main__":
    app.run(host="0.0.0.0",port=8080)
网页开启管教口
import RPi.GPIO as GPIO
from flask import Flask, render_template, request
app = Flask(__name__)
GPIO.setmode(GPIO.BCM)
pins = {
     24 : {'name' : 'TV', 'state' : GPIO.LOW},
     25 : {'name' : 'Light', 'state' : GPIO.LOW}
    }
for pin in pins:
    GPIO.setup(pin, GPIO.OUT)
    GPIO.output(pin, GPIO.LOW)
@app.route("/")
def main():
     for pin in pins:
         pins[pin]['state'] = GPIO.input(pin)
     templateData = {
        'pins' : pins
      }
     return render_template('main.html', **templateData)
@app.route("/<changePin>/<action>")
def action(changePin, action):
     changePin = int(changePin)
     deviceName = pins[changePin]['name']
     if action == "on":
        GPIO.output(changePin, GPIO.HIGH)
        message = "Turned " + deviceName + " on."
     if action == "off":
        GPIO.output(changePin, GPIO.LOW)
        message = "Turned " + deviceName + " off."
     if action == "toggle":
        GPIO.output(changePin, not GPIO.input(changePin))
        message = "Toggled " + deviceName + "."
     for pin in pins:
        pins[pin]['state'] = GPIO.input(pin)
     templateData = {
        'message' : message,
        'pins' : pins
        }
     return render_template('main.html', **templateData)
if __name__ == "__main__":
app.run(host='0.0.0.0', port=80, debug=True)
如何开启局域网
flask默认开启的网站是本地的127.0.0.1:5000
现在把已经有的本机访问改成局域网访问
app.run(host=’0.0.0.0’,port=8080)
port可以不配置,默认还是5000,如果修改则是修改后的内容
局域网访问采用 主机IP地址+端口号
在windows下搭建后需要开启防火墙的入站规则,指定端口号
3具体开发示例
动态折线
https://blog.csdn.net/weixin_39561473/article/details/86608661
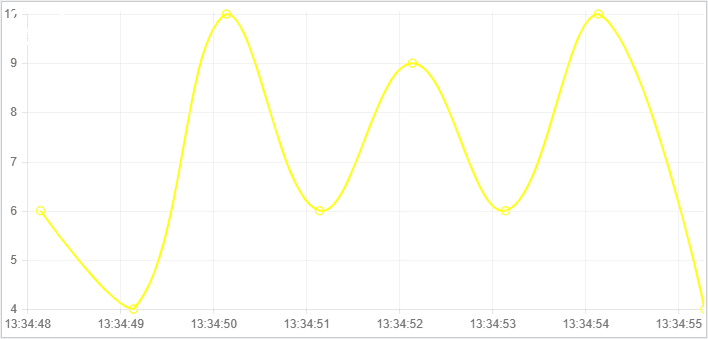
python文件
from flask import Flask,render_template
from flask import jsonify #数据转为json,并以字典的形式传回前端
import datetime,random #导入时间和随机数模块

app = Flask(__name__)  #绑定app

#函数一:关联页面
@app.route('/')  #路由
def image():
    return render_template('image.html')

#函数二:生成数据

@app.route('/setData/') #路由
def setData():
    now = datetime.datetime.now().strftime('%H:%M:%S')
    data = {'time':now,'data':random.randint(1,10)}
    #print(data)
    return jsonify(data) #将数据以字典的形式传回

if __name__ =="__main__":
    app.run(host="0.0.0.0",port=8080)
网页代码
<!DOCTYPE html>
<html lang="en">
<head>
    <meta charset="UTF-8">
    <title>Title</title>
</head>
<body>
<canvas id="panel" height="330px" width="700px"> </canvas>  <!--折线图位置-->

<script src="https://code.jquery.com/jquery-3.3.1.min.js"></script> <!--导入jQuery-->
<script src="https://cdnjs.cloudflare.com/ajax/libs/Chart.js/1.0.2/Chart.min.js"></script> <!--导入jQuery-->
<script>
    $(function () {
        var can = $('#panel').get(0).getContext('2d'); /*绘制类型*/
        //定义图标的数据
        var canData = {
            labels:["a","b","c","d","e","f"], /*初始x轴数据*/
            datasets : [
                {
                    //折线的填充颜色
                    fillColor:"rgba(255,255,255,0.1)",
                    //线条颜色:
                    strokeColor:"rgba(255,255,0,1)",
                    //y轴初始数据:
                    data:[1,3,2,1,5,4]
                }
            ]
        };
        //绘制图片
        var line = new Chart(can).Line(canData);
        var int = setInterval(function () {  //设置定时器
           $.ajax(
               {
                   url:"/setData/", //从setData函数中获取数据
                   type:"get",
                   data:"",
                   success:function (data) {
                       line.addData(
                           [data["data"]], //y轴,因为同一个x轴可以有多个折线
                           data["time"]  //x轴
                       );
                       //保持x轴只有8个数据,要不随着时间推移x轴会越来越长
                       var len = line.datasets[0].points.length;
                       if(len>8){
                           line.removeData()
                       }
                   }
               }
           )
        },1000)
    })

</script>
</body>
</html>
https://blog.csdn.net/qq_34803821/article/details/86240096
如果你想在网页上点击按钮,并且让树莓派接收到响应,并做响应的处理,实现网页上与树莓派进行数据交互以及一些数据渲染,那么希望这篇文章对你有所帮助:
源码放在git:https://github.com/StarFishing/ardunio/tree/master
树莓派与Arduino进行通信可以参考另一篇文章:https://blog.csdn.net/qq_34803821/article/details/86238387
首先先看效果图,总体效果我会放在文章末尾
这是已经写好的HTML页面,我截取了其中一部分,当我们点击蓝色按钮,树莓派打开Arduino板上的风扇,点击红色按钮关闭风扇
百度网盘工程:
链接:https://pan.baidu.com/s/1JIh-XsiJI5PbGt9G7pOjWQ
提取码:zu5x
复制这段内容后打开百度网盘手机App,操作更方便哦


环境配置
准备材料:
树莓派上安装flask:sudo pip install flask
python 串口读取:sudo pip insall pyserial
我们针对树莓派进行讲解,我们如何实现点击的相应,让树莓派接收到事件呢?
树莓派服务器
# codinf:utf-8
from flask import Flask, render_template, Response, request
import serial
port = "/dev/ttyACM0"
app = Flask(__name__)
single = serial.Serial(port, 9600)
single.flushInput()


@app.route('/')
def index():
    single.flushOutput()
    single.flushInput()
    single.write('8')
    response = str(single.readline().decode())
    if response.startswith('hum:'):
        # cut int num
        hum = response[5:7]
        tem = response[-6:-3]
        templateData = {
            'tem': tem,
            'hum': hum
        }
        print(response.strip('
'))
        return render_template('index.html', **templateData)


@app.route('/fopen', methods=['POST', 'GET'])
def fopen():
    if request.method == 'GET':
        return render_template('index.html')
    else:
        single.flushOutput()
        single.write('1')
        return "Open OK"


@app.route('/fclose', methods=['POST'])
def fclose():
    single.flushOutput()
    single.write('2')
    return "Close OK"


@app.route('/lclose', methods=['POST'])
def lclose():
    # single.flushOutput()
    # single.write('3')
    return "LED Close OK"


@app.route('/lopen', methods=['POST'])
def lopen():
    # single.flushOutput()
    # single.write('4')
    return "LED Open OK"


if __name__ == '__main__':
    app.run(host='0.0.0.0', port=8080, debug=True, threaded=True)
© 2019 GitHub, Inc.
在HTML里面,我们做这样一件事情:
将我们的点击事件异步提交到相应的路由下
<div class="open">
        <span class="warning">高温警告:</span>
        <span class="text">已自动为您打开风扇</span>
        <span class="close">关/开风扇:</span> <i id="close"></i
        ><i id="open"></i>
      </div>
$('.open i').click(function() {
    if (this.id == 'close') {
      $.post('/fclose', this.id, function(data, status) {})
    }
    if (this.id == 'open') {
      $.post('/fopen', this.id, function(data, status) {})
    }
  })