前言
用 Webpack 蛮久的了, 2.0, 3.0, 4.0, 5.0 但由于学的比较杂乱, 所以也没有系统的记入一下.
这次升级到 5.0 比较有系统的把一些资源记入了起来. 既然走了第一步, 那就顺便写一个简单的学习笔记吧.
内容会涵盖我目前用到的所有东西. Webpack, Sass, Typescript, ESLint, Stylelint, Prettier, Tailwind CSS
另外我的开发环节是 ASP.NET Core 开发的项目是网站. 所以这些配置不适合用于单页面等等.
Why We Need Webpack?
在没有 Webpack 之前, 网站要导入 Javascript 和 CSS 都是直接通过 <script> <link> 导入的. 如果只是几个 file 还好.
但如果是开发类似电子商务网站的话, 它的 Javascript 和 CSS 代码会非常多, 一旦多管理上就会拆分成多个 file, 彼此依赖.
一旦进入这样情况, 通过 <script> 导入就不太好使了. 而且随着代码多了 CSS, Javascript 就不好维护了. 所以会用到 Sass 和 Typescript.
Webpack 这个时候就派上用场了, 它可以解决 file 依赖的问题, 也可以翻译 Sass 和 Typescript.
Webpack Process Flow and Structure
Webpack 的 process flow 大概是 entry -> loader -> plugin -> output
entry 通常是一个 ts, scss file, Webpack 会通过 import 去找它们的依赖,
然后通过 loader 去翻译 (比如, Typescript -> Javascript)
再通过 plugin 做一些而外的加工 (比如, 把做好的 js file 通过 <script> 导入到最终的 html),
最后生成各种 file (比如 .html, .js)
跑起来
先来一个最简单的跑起来.
创建一个 folder > yarn init > create index.js

安装 webpack
yarn add webpack --dev
yarn add webpack-cli --dev
package.json 添加 start
"scripts": {
  "start": "webpack --config webpack.config.js --node-env production"
},
--node-env production | development 是为了方便在 1 个 webpack config 下做 conditional 配置 (因为我最终是跑 ASP.NET Core IIS 而不是用 Webpack server), webpack 其实有一个 multiple enviroment config 的概念. 后面也会讲到.
webpack.config.js
const pathHelper = require("path");

module.exports = {
  mode: "production",
  entry: {
    index: "./index.js",
  },
  output: {
    path: pathHelper.resolve(__dirname, "dist"),
  },
};
然后 npm start 就会出现打包好的 dist folder 了.
Typescript
刚才用的是 Javascript, 我们来试试换成 Typescript
安装 typescript 和 ts-loader
yarn add typescript --dev
yarn add ts-loader --dev
tsconfig.json (这个可以依据大家的 Typescript 配置, 这里只是我的 example)
{
  "compilerOptions": {
    "outDir": "./dist/",
    "module": "es6",
    "target": "es5",
    "allowJs": true,
    "strict": true,
    "sourceMap": true,
    // note: 解忧
    // 目前是 flatpickr 需要到
    // refer : https://stackoverflow.com/questions/53885107/typescript-cant-find-module-flatpickr-even-though-it-includes-typescript-types
    "moduleResolution": "node"
  },
  "exclude": ["wwwroot/assets", "dist"]
}
把刚才的 index.js 换成 index.ts
在 webpack.config.js 添加 loader

所有 Loader 的配置大概就是这样, 通过一个正则表达匹配到文件, 然后使用 loader 去翻译.
现在 npm start 就可以看到效果了.
ESLint
ESLint 是约束 Typescript 代码风格规范的工具. 它的用法是这样的, 安装 ESLint, 安装/自己写一个代码规范 (比如 follow Google Style Guide)
安装
yarn add eslint --dev
yarn add eslint-config-standard --dev
yarn add @typescript-eslint/eslint-plugin --dev
yarn add @typescript-eslint/parser --dev
yarn add eslint-plugin-import --dev
yarn add eslint-plugin-node --dev
yarn add eslint-plugin-promise --dev
.eslintrc.json 配置文件


{
  "env": {
    "browser": true,
    "es2021": true
  },
  // 参考: https://github.com/typescript-eslint/typescript-eslint/blob/master/docs/getting-started/linting/README.md
  // note 提醒: 下面这些顺序是有讲究的哦
  "extends": [
    "eslint:recommended",
    "standard",
    "plugin:@typescript-eslint/recommended"
    // "plugin:prettier/recommended"
  ],
  "parser": "@typescript-eslint/parser",
  "parserOptions": {
    "ecmaVersion": 12,
    "sourceType": "module"
  },
  "plugins": [
    "@typescript-eslint"
  ],
  "rules": {
    "space-before-function-paren": "off",
    "no-multiple-empty-lines": "off",
    "no-new": "off",
    "@typescript-eslint/no-non-null-assertion": "off",
    "@typescript-eslint/explicit-function-return-type": ["error", {
      "allowExpressions": true
    }]
    // "prettier/prettier": ["error", {
    //   "singleQuote": true,
    //   "arrowParens": "avoid",
    //   "printWidth": 100,
    //   "endOfLine": "auto" // refer: https://stackoverflow.com/questions/53516594/why-do-i-keep-getting-delete-cr-prettier-prettier
    // }]
  },
  "globals": {
    "gtag": "readonly"
  }
}
prettier 的部分可以之后再打开.
extends 的部分就是使用人家的代码风格, 这里的顺序是 override 的, 下面会覆盖上面
"extends": [
  "eslint:recommended",
  "standard",
  "plugin:@typescript-eslint/recommended",
  // "plugin:prettier/recommended"
],
rules 的部分就是我们自己的一些 override
"rules": {
  "space-before-function-paren": "off",
  "no-multiple-empty-lines": "off",
  "no-new": "off",
  "@typescript-eslint/no-non-null-assertion": "off",
  "@typescript-eslint/explicit-function-return-type": ["error", {
    "allowExpressions": true
  }],
  // "prettier/prettier": ["error", {
  //   "singleQuote": true,
  //   "arrowParens": "avoid",
  //   "printWidth": 100,
  //   "endOfLine": "auto" // refer: https://stackoverflow.com/questions/53516594/why-do-i-keep-getting-delete-cr-prettier-prettier
  // }]
},
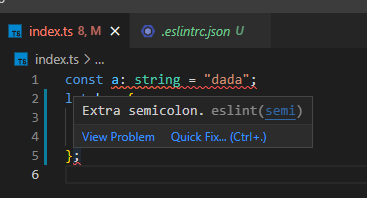
安装 VS Code ESLint 插件
然后就会显示错误了
Webpack ESLint Plugin
虽然 IDE 会显示错误了, 但是 webpack 打包时还是会顺利通过的. 如果我们希望它在打包的时候报错, 那么我们就需要安装 Webpack ESLint Plugin.
yarn add eslint-webpack-plugin --dev
webpack.config.js 添加

这时 npm start 就会看见报错了.
Prettier and Prettier ESLint
Prettier 和 webpack 没有什么关系, 但是和 ESLint 蛮有关系的,所以也就一起写在这一篇了.
Prettier 的主要工作是代码风格和格式化文档. 有了它以后, 保存文档时会同时格式化, 而格式化又会会 auto fix ESLint.
安装 VS Code Prettier 插件
到 VS Code settings.json, 选择 prettier 作为格式化文档工具,
"editor.defaultFormatter": "esbenp.prettier-vscode" (你也可以各别选择文档类似来指定, 我这里是 default 所有文档)
添加一个 prettier.config.js, VS Code 插件有 2 个方法配置, 1 是通过 settings.json 配置 prettier, 另一个就是通过 prettier.config.js.
module.exports = {
  singleQuote: true,
  arrowParens: 'avoid',
  printWidth: 100,
  overrides: [
    {
      files: '**/*.cshtml',
      options: {
        // note issue:
        // https://github.com/prettier/prettier/issues/10918#issuecomment-851049185
        // https://github.com/heybourn/headwind/issues/127
        // 暂时关掉, 等 issue
        printWidth: Number.MAX_VALUE,
      },
    },
  ],
};
安装 prettier 和 ESLint prettier 插件 (因为我喜欢它的代码风格)
yarn add prettier --dev
yarn add eslint-config-prettier --dev
yarn add eslint-plugin-prettier --dev
在 .eslintrc.json 添加 extends 和 rules

rules

Sass
先说说 CSS 怎样打包.
安装 Loader, mini-css-extract-plugin 是在 production 情况下取代 style-loader 用的
yarn add style-loader --dev
yarn add css-loader --dev
yarn add mini-css-extract-plugin --dev
webpack.config.js

直接在 .js 里头 import .css 文档

在 development 阶段, CSS 代码会被写入 .js 里, 渲染的速度会慢半拍, 在 production 阶段会生产 .css 文档. 渲染是正常的.
接着是 Sass 打包
把 .css file 换成 .scss, 安装
yarn add sass --dev
yarn add sass-loader --dev
添加 loader

这样就可以了, 另外还需要一个 url-resolve-loader, 因为 webpack 和 Sass loader 对引入 asset 路径不太聪明, 具体什么问题看这里.
安装
yarn add resolve-url-loader --dev
添加 loader

Tailwind CSS and PostCSS
我没有独立使用 PostCSS, 我是因为 Tailwind CSS 才接触到 PostCSS 的. 所以这里就一起上呗.
这里随便讲一下 Tailwind 的机制. 所以它需要一个 config file 也只能有一个 (这对我是个问题),
Tailwind 有一个很大的 utilities code, 但它可以 purge 来优化 (有点向 js 的 tree shaking)
通过 config file 会声明要扫描的 html, js 文档, 文档里面有使用到的 Tailwind class 最终才会被打包出来.
它的过程大概是, 扫描以后, 把没有用到的 utilities code 清楚掉, 然后当 scss file 内有 @import 'tailwindcss/utilities', 它就会把所有用到的 ultilities code 丢进去.
注意: 不要到处 import utilities 哦, 不然你的 css file 会非常大, 合理的做法是做一个 shared.scss 由它负责 import, 然后其余的 file 再使用这个 shared. 这样 webpack 就可以通过 common 的概念共享这些代码了.
安装
yarn add postcss --dev
yarn add postcss-import --dev
yarn add postcss-loader --dev
yarn add postcss-preset-env --dev
yarn add tailwindcss --dev
yarn add glob --dev
最后一个 glob 是为了解决 Tailwind 只能用一个 config, 而我需要多个 config (去控制扫描的文档), 才需要安装的.
postcss-preset-env 是比 autoprefixer 更好的东西, 它里面包含了 autoprefixer 了, 所以就不需要装 autoprefixer 了 (不安装的话, yarn 会有 warning 哦, 因为 Tailwind has unmet peer dependency, 不过不要紧 preset-env 有包含了)
webpack.config.js
const glob = require('glob');

直接把 Tailwind 的 config 搬进来 webpack.config.js 里, 通过 loader 来实现 multiple 区域 purge. 我面对的问题是, email template 我也想使用 Tailwind, 但是不可能把 email 需要的 style 也和网站的 style 一起打包.
这样无端端就增加了网站的 style 代码量丫.
随便介绍一个 prettier-plugin-tailwind, 它的功能和 headwind 类似, 但它非常慢

这里有一些我遇到 Tailwind 的问题也记入在这里吧.
1. Tailwind CSS class, prettier, headwind 打架, issue1, issue2
2. prettier-plugin-tailwind formating 非常慢 issue
2. Tailwind CSS intellisense 一定要 tailwindcss.config.js. issue (这个是我把 config 放入 webpack.config.js 之后引起的)
3. Tailwindcss jit infinity compile. issue 这个也是因为我要 multiple config 才遇到的. workaround 是使用 glob.sync 把抽象路径变成具体 (也就是我上面给的例子)

postcss-font-magician
这个是我用的一个下插件, 顺便介绍一下, 它的功能是帮写 font 的代码. 我们只要再 config 设置好所有我们需要用到的 font 然后只要我们 scss 里头有写到. 那么它就会把我们补上 css import 代码.
它有一些 build-in 的 download 路径 (直接连 cdn 那种), 但是非常有限. 所以最好还是把需要的字体加载到本地,然后在 config 写好对应路径.
安装
yarn add postcss-font-magician --dev
添加 config

Stylelint
安装
yarn add stylelint --dev
yarn add stylelint-config-prettier --dev
yarn add stylelint-config-recommended --dev
yarn add stylelint-prettier --dev
yarn add stylelint-scss --dev
stylelint.config.js
module.exports = {
  extends: ['stylelint-config-recommended', 'stylelint-prettier/recommended'],
  ignoreFiles: ['dist/*', 'wwwroot/assets/*'],
  plugins: ['stylelint-scss'],
  rules: {
    'at-rule-no-unknown': null,
    'scss/at-rule-no-unknown': [
      true,
      {
        // note 解忧: 之前需要,现在好像不需要了
        // ignoreAtRules: ['tailwind', 'apply', 'variants', 'responsive', 'screen'],
      },
    ],
    'declaration-block-trailing-semicolon': null,
    'no-descending-specificity': null,
    'prettier/prettier': [
      true,
      {
        singleQuote: true,
        endOfLine: 'auto', // refer: https://stackoverflow.com/questions/53516594/why-do-i-keep-getting-delete-cr-prettier-prettier
      },
    ],
  },
};
clean-webpack-plugin
它的功能是每次打包的时候会自动 clear 掉 dist folder 里面的所有文档, 如果没有它的话, 文档是被覆盖而已.
安装
yarn add clean-webpack-plugin --dev
webpack.config.js

html-webpack-plugin
上边我们都是打包 ts, scss, 最终还需要导入到 index.html 里头.
html-webpack-plugin 就是负责这个 part 的.
安装
yarn add html-webpack-plugin --dev
webpack.config.js

一个 new HtmlWebpackPlugin 代表一个 page. 要多个 page, new 多个就行了.
Output 的 js production 情况要加上 hash 哦.
上面这个 config 就表示, 拿 index.html 放入 chunks index (还有它所有连接到的 scss, ts 等等) 最后输出 index.html
效果

自定义 append script 的地方
有时候我们会需要自己控制 append 的位置, 比如 ASP.NET Core 一般是要放去 layout 的
配置 inject = false

在 chtml 页面
@section Css{
<% for (key in htmlWebpackPlugin.files.css) { %>
  <link href="<%= htmlWebpackPlugin.files.css[key] %>" rel="stylesheet">
  <% } %>
    }

@section Script{
    <% for (key in htmlWebpackPlugin.files.js) { %>
      <script defer src="<%= htmlWebpackPlugin.files.js[key] %>"></script>
      <% } %>
        }
如果是 AMP page 的话还需要直接把 code 打在 style 里
@section Css{
<style amp-custom>
  <%=htmlWebpackPlugin.files.css.map(cssFile=> compilation.assets[cssFile.substr(htmlWebpackPlugin.files.publicPath.length)].source().replace(new RegExp('@@'.substring(1), 'g'), '@@')).join('') %>
</style>
}
Webpack resolve extensions
这个的功能是让我们在 import 的时候可以省略掉写 extensions
本来是 import 'index.ts' 变成 import 'index' 就可以了. 我一般上只是放 ts,js 而已, 如果遇到同名字,它会匹配最前的一个

Asset
Webpack 4.x 的时候需要一些 plugin 来搞 asset (image 等). 5.0 以后有 build-in 的了.
在 output 加多一个 assetModuleFilename
output: {
  path: pathHelper.resolve(__dirname, './dist'),
  filename: isProduction ? '[name].[contenthash].js' : '[name].js',
  assetModuleFilename: 'assets/[name]-[hash]-[ext][query]', // 加入这个
},
在 module 加入 2 个 loader
module: {
  rules: [
    // ...
    {
      test: /.(svg|gif|jpe?g|png|webp)$/i,
      type: 'asset/resource',
    },
    {
      test: /.(woff|woff2|eot|ttf|otf)$/i,
      type: 'asset/resource',
    },
  ],
},
html 引入 image
<img src="<%= require('./images/yangmi.jpg') %>" />
效果
<img src="assets/yangmi-12a261793f70b6685335-.jpg" />
Gulp for inline style email template
通常 email template 是需要 inline style 的, 而已不建议使用 Tailwind CSS, 因为 email client 兼容性很差的. 新的 CSS 都不太支持, 而 Tailwind CSS 一般上会用到 modern 的 CSS style
做法是这样, 通过 webpack 打包好 style 然后使用 gulp 变成 inline (之前 webpack 是有 plugin 的, 但后来没有维护了)
安装
yarn add gulp --dev
yarn add gulp-inline-css --dev
gulpfile.js
const gulp = require('gulp');
const inlineCss = require('gulp-inline-css');

gulp.task('inlineCss', () => {
  return gulp
    .src('./EmailTemplate/**/Index.cshtml')
    .pipe(
      inlineCss({
        removeHtmlSelectors: true,
      })
    )
    .pipe(gulp.dest('./EmailTemplate'));
});
package.json
"scripts": {
  "start": "webpack --config webpack.config.js --node-env production & gulp inlineCss"
},
Optimization
Optimization 是做 common.js 的. 因为我们有很多 js file 会互相 import. 虽然说每一个页面最好只加载当前页面所需要的 js 代码.
但是有些 js 代码可能每一页都需要, 如果把这些 js 代码分别打包进去每一页的 script, 那么每一页的 script 就大了, 每一页的加载就慢.
所以就有了 optimization 去做这些 trade off.
它可以依据, 多少地方重复使用, 多大的 file, 去决定是否要被抽出来当作 common.js.
还有一个叫 vendor.js, 就是负责把 js library (比如 jQuery) 分出来服用的.
我这里就不细谈了, 参考链接吧
安装
yarn add css-minimizer-webpack-plugin --dev
这是我 ASP.NET Core 项目的配置. webpack.config.js
const TerserPlugin = require('terser-webpack-plugin');
const CssMinimizerPlugin = require('css-minimizer-webpack-plugin');
  resolve: {
    extensions: ['.ts', '.js'],
  },
  ...(isProduction
    ? {
        optimization: {
          moduleIds: 'deterministic',
          runtimeChunk: 'single',
          minimize: true,
          minimizer: [
            new TerserPlugin({
              terserOptions: {
                format: {
                  comments: false,
                },
              },
              extractComments: false,
            }),
            new CssMinimizerPlugin(),
          ],
          splitChunks: {
            chunks: 'all',
            cacheGroups: {
              webCommons: {
                name: 'webCommons',
                chunks: chunk =>
                  !chunk.name.includes('-Account-') &&
                  !(
                    chunk.name.startsWith('EmailTemplate-') && chunk.name.startsWith('PdfTemplate-')
                  ),
                minChunks: 2,
                minSize: 1,
              },
              webVendors: {
                name: 'webVendors',
                chunks: chunk =>
                  !chunk.name.includes('-Account-') &&
                  !(
                    chunk.name.startsWith('EmailTemplate-') && chunk.name.startsWith('PdfTemplate-')
                  ),
                test: /[\/]node_modules[\/]/,
              },
              accountCommons: {
                name: 'accountCommons',
                chunks: chunk =>
                  chunk.name.includes('-Account-') &&
                  !(
                    chunk.name.startsWith('EmailTemplate-') && chunk.name.startsWith('PdfTemplate-')
                  ),
                minChunks: 2,
                minSize: 1,
              },
              accountVendors: {
                name: 'accountVendors',
                chunks: chunk =>
                  chunk.name.includes('-Account-') &&
                  !(
                    chunk.name.startsWith('EmailTemplate-') && chunk.name.startsWith('PdfTemplate-')
                  ),
                test: /[\/]node_modules[\/]/,
              },
            },
          },
        },
      }
    : undefined),
account 是 login 界面, 是 control panel, 所以我刻意把它和一般的网页分开了.
Webpack server 单侧的配置 webpack.config.js
  ...(isProduction
    ? {
        optimization: {
          moduleIds: 'deterministic',
          runtimeChunk: 'single',
          minimize: true,
          minimizer: [
            new TerserPlugin({
              terserOptions: {
                format: {
                  comments: false,
                },
              },
              extractComments: false,
            }),
            ...(isProduction ? [new CssMinimizerPlugin()] : []),
          ],
          splitChunks: {
            chunks: 'all',
            cacheGroups: {
              commons: {
                name: 'commons',
                chunks: 'all',
                minChunks: 2,
                minSize: 1,
              },
              vendors: {
                name: 'vendors',
                test: /[\/]node_modules[\/]/,
                chunks: 'all',
              },
            },
          },
        },
      }
    : undefined),
Webpack Server
如果是用 ASP.NET Core IIS 的话,就不可能用 Webpack server 了, 但有时候只是要做一些小测试的话, 还是不错用的. 毕竟 Build 不是很快呀.
安装
yarn add webpack-dev-server
yarn add webpack-merge
做 3 个 webpack config, 1 个是抽象, 1 个是 dev (跑 webpack server, 它会把 build 好的 file 放在 ram 里), 1 个是 production (build file 出来)

webpack.dev.js, 我这里还附上了 IP 和 SSL 版本, 这样手机也方便跑
/* eslint-disable @typescript-eslint/no-var-requires */
const fs = require('fs');
const { merge } = require('webpack-merge');
const common = require('./webpack.common.js');
const webpack = require('webpack');

module.exports = merge(common, {
  devtool: 'inline-source-map',
  devServer: {
    open: 'about-page.html',
    host: '192.168.1.152',
    port: 44301,
    https: {
      key: fs.readFileSync('C:\self-signed-certificate\192.168.1.152.key'),
      cert: fs.readFileSync('C:\self-signed-certificate\192.168.1.152.crt'),
    },
    hot: true,
  },
  plugins: [
    new webpack.DefinePlugin({
      // 'process.env.NODE_ENV': 'development'
    }),
  ],
});
webpack.prod.js
/* eslint-disable @typescript-eslint/no-var-requires */
const { merge } = require('webpack-merge');
const common = require('./webpack.common.js');
const webpack = require('webpack');

module.exports = merge(common, {
  // devtool: 'source-map',
  plugins: [
    new webpack.DefinePlugin({
      // 'process.env.NODE_ENV': JSON.stringify('production')
    }),
  ],
});
package.json
"scripts": {
  "start": "webpack serve --config webpack.dev.js --node-env development",
  "build": "webpack --config webpack.prod.js --node-env production & gulp inlineCss"
},
参考:
缓存
Optimization
Plugin:
Loader:
Prettier, ESLint, Stylelint
How to use Prettier with ESLint and TypeScript in VSCode
Email Inline Style
HTMLWebpackInlineStylePlugin (no maintain any more, only support < v4)
AMP Style Source
html-webpack-plugin inject false
html-webpack-plugin find "inline template example"