认证是Shiro最基本的工作!
先从代码开始,运行后再慢慢研究。 以下是我添加的dependecies:
<!-- shiro -->
<dependency>
    <groupId>org.apache.shiro</groupId>
    <artifactId>shiro-core</artifactId>
    <version>${shiro.version}</version>
</dependency>
<dependency>
    <groupId>org.apache.shiro</groupId>
    <artifactId>shiro-spring</artifactId>
    <version>${shiro.version}</version>
</dependency>
<dependency>
    <groupId>org.apache.shiro</groupId>
    <artifactId>shiro-web</artifactId>
    <version>${shiro.version}</version>
</dependency>
在资源目录下创建shiro.ini,文件内容为:
[users]
king=t;stmdtkg
写一个main方法:
package pac.testcase.shiro;
import org.apache.shiro.SecurityUtils;
import org.apache.shiro.authc.ExcessiveAttemptsException;
import org.apache.shiro.authc.IncorrectCredentialsException;
import org.apache.shiro.authc.LockedAccountException;
import org.apache.shiro.authc.UnknownAccountException;
import org.apache.shiro.authc.UsernamePasswordToken;
import org.apache.shiro.config.IniSecurityManagerFactory;
import org.apache.shiro.mgt.SecurityManager;
import org.apache.shiro.subject.Subject;
import org.apache.shiro.util.Factory;

public class TestAuthen {
    public static void main(String[] args) {

        Factory<SecurityManager> factory = new IniSecurityManagerFactory();
        SecurityManager manager = factory.getInstance();
        SecurityUtils.setSecurityManager(manager);

        UsernamePasswordToken token = new UsernamePasswordToken("king", "t;stmdtkg");
        token.setRememberMe(true);

        Subject currentUser = SecurityUtils.getSubject();
        try {
            currentUser.login(token);
        } catch ( UnknownAccountException e ) {
            System.out.println("你是谁?");
        } catch ( IncorrectCredentialsException e ) {
            System.out.println("密码错误!!");
        } catch ( LockedAccountException e ) {
            System.out.println("该账户不可用~");
        } catch ( ExcessiveAttemptsException e ) {
            System.out.println("别再试了!!");
        }

        currentUser.logout();

    }
}
代码非常好懂。 如果IniSecurityManagerFactory没有指定配置文件,则
DEFAULT_INI_RESOURCE_PATH = "classpath:shiro.ini"。
另外,SecurityUtils.setSecurityManager(manager);
该方法是一个全局设置,设置整个VM单例的SecurityManager,一般开发中很少用到该方法。
另外,Shiro提供了丰富的Exception,我们可以根据不同的catch响应不同的提示。
关于身份验证,有两个重要的概念需要解释:
- Principals:身份(暂且这样翻译吧),Subject的唯一标识,可以是任何东西,比如用户名或者e-mail地址。
- Credentials:凭证,用于证明身份的东西,可以简单理解为密码。
一些类和方法的命名中如果出现这些词汇不至于太陌生。
记录一下身份验证的具体步骤,用5个步骤简单概括一下:
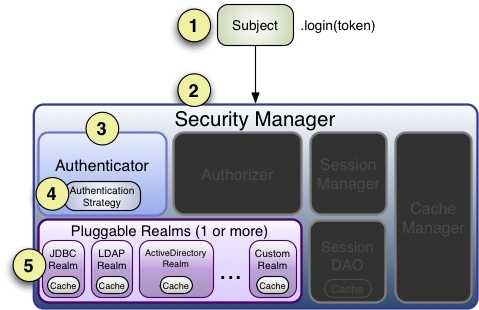
Step 1.
将代表用户身份和凭证的token对象作为参数调用login方法。
Step 2.
在上面的代码中Subject对象实际上是作为一个用于委派(delegate)任务的对象——DelegatingSubject,以调用login(token)将验证的任务委托给SecurityManager。 SecurityManager调用
Subject login(Subject subject, AuthenticationToken authenticationToken)
这里是验证真正开始的地方。
Step 3.
SecurityManager作为一个'umbrella'组件(这个比喻很流行吗...),接收token并将任务委托给内部的 Authenticator(ps:SecurityManager extends Authenticator, Authorizer, SessionManager)并调用
public AuthenticationInfo authenticate(AuthenticationToken authenticationToken)
        throws AuthenticationException;
通常情况下,这个authenticator是ModularRealmAuthenticator,ModularRealmAuthenticator可以在验证时与多个realm进行交流(ModularRealmAuthenticator实现AuthenticationInfo doAuthenticate(AuthenticationToken token),上级AbstractAuthenticator在authenticate(token)中调用doAuthenticate(token))。
Step 4.
如果配置了多个Realm,ModularRealmAuthenticator会用配置的验证策略(AuthenticationStrategy)去进行多Realm验证。
验证策略与每一个Realm的结果交互。
如果只配置了一个Realm,验证策略则没有任何意义。
Step 5.
调用Realm的boolean supports(AuthenticationToken token)确认Realm是否支持提交过来的token。
如果Realm支持提交过来的token,token将作为参数并调用:
AuthenticationInfo getAuthenticationInfo(AuthenticationToken token) throws AuthenticationException;
根据不同的token响应特定的验证信息(AuthenticationInfo)。
当一个应用配置了多个Realm,ModularRealmAuthenticator通过其内部的AuthenticationStrategy去定义验证策略(好像说了句废话....命名确实很棒...)。
举个例子: 如果一个Realm成功验证了一个token,而其他的Realm全部失败了,此时我们应该如何认定验证是成功还是失败?
是全部通过才算成功?还是说其中一个通过即可?或者说其中特定几个通过后是否有必要继续考虑其他?
接下来,试着用代码体验 multi-Realm与AuthenticationStrategy
Step 1.
实现org.apache.shiro.realm.Realm来自定义几个Realm。
在getAuthenticationInfo方法中直接返回验证信息根本看不出验证策略是否生效,于是我在一个Realm里抛出一个异常。
package pac.testcase.shiro.realm;

import org.apache.shiro.authc.AuthenticationException;
import org.apache.shiro.authc.AuthenticationInfo;
import org.apache.shiro.authc.AuthenticationToken;
import org.apache.shiro.authc.IncorrectCredentialsException;
import org.apache.shiro.authc.SimpleAuthenticationInfo;
import org.apache.shiro.realm.Realm;

public class MyRealm1 implements Realm {

    public String getName() {
        return this.getClass().getName();
    }

    public boolean supports(AuthenticationToken token) {
        return true;
    }

    public AuthenticationInfo getAuthenticationInfo(AuthenticationToken token)
            throws AuthenticationException {
        if(!new String((char[])token.getCredentials()).equals("t;stmdtkg"))
            throw new IncorrectCredentialsException();

        return new SimpleAuthenticationInfo(token.getPrincipal(),token.getCredentials(),this.getName());
    }
}
Step 2.
继续使用本文开始时的代码,将自定义的几个Realm配置到shiro.ini中。
realm0=pac.testcase.shiro.realm.MyRealm0
realm1=pac.testcase.shiro.realm.MyRealm1
Step 3.
在shiro.ini中配置验证策略。
realm0=pac.testcase.shiro.realm.MyRealm0
realm1=pac.testcase.shiro.realm.MyRealm1

authcStrategy = org.apache.shiro.authc.pam.AllSuccessfulStrategy
securityManager.authenticator.authenticationStrategy = $authcStrategy
Step 4.
运行程序,输出"密码错误!!"
AuthenticationStrategy是无状态的,处理一个验证请求时AuthenticationStrategy会一共交互4次。
分别是:
- 任何一个Realm执行之前。
- 每个Realm的getAuthenticationInfo方法被调用之前。
- 每个Realm的getAuthenticationInfo方法被调用之后。
- 所有的Realm执行之后。
另外,从所有成功的Realm中聚集结果并将其绑定到一个AuthenticationInfo也是AuthenticationStrategy的工作。
这个最后聚集起来的验证信息则是Shiro用来表示Subject的标志,也就是所谓Principal。
具体体现在org.apache.shiro.authc.pam.ModularRealmAuthenticator中:
protected AuthenticationInfo doMultiRealmAuthentication(Collection<Realm> realms, AuthenticationToken token) {

    AuthenticationStrategy strategy = getAuthenticationStrategy();

    AuthenticationInfo aggregate = strategy.beforeAllAttempts(realms, token);

    if (log.isTraceEnabled()) {
        log.trace("Iterating through {} realms for PAM authentication", realms.size());
    }

    for (Realm realm : realms) {

        aggregate = strategy.beforeAttempt(realm, token, aggregate);

        if (realm.supports(token)) {

            log.trace("Attempting to authenticate token [{}] using realm [{}]", token, realm);

            AuthenticationInfo info = null;
            Throwable t = null;
            try {
                info = realm.getAuthenticationInfo(token);
            } catch (Throwable throwable) {
                t = throwable;
                if (log.isDebugEnabled()) {
                    String msg = "Realm [" + realm + "] threw an exception during a multi-realm authentication attempt:";
                    log.debug(msg, t);
                }
            }

            aggregate = strategy.afterAttempt(realm, token, info, aggregate, t);

        } else {
            log.debug("Realm [{}] does not support token {}.  Skipping realm.", realm, token);
        }
    }

    aggregate = strategy.afterAllAttempts(token, aggregate);

    return aggregate;
}
Shiro默认提供了三种AuthenticationStrategy实现:
- AtLeastOneSuccessfulStrategy:其中一个通过则成功。
- FirstSuccessfulStrategy:其中一个通过则成功,但只返回第一个通过的Realm提供的验证信息。
- AllSuccessfulStrategy:凡是配置到应用中的Realm都必须全部通过。
ModularRealmAuthenticator默认采用AtLeastOneSuccessfulStrategy,如果想用其他的验证策略则需要自行配置。
需要指出的是ModularRealmAuthenticator是按照某种顺序与每个Realm进行交互的。
ModularRealmAuthenticator访问配置于SecurityManager的Realm。
当处理一个验证请求时会迭代Realm集合,调用所有支持当前token的Realm。
如果使用ini配置则会按照配置的顺序去执行。
如果想要显示定义Realm的顺序,则在securityManager的属性中按喜欢的顺序设置一下即可。
比如:
securityManager.realms=$myRealm2,$myRealm1