继上一帖给esp32刷入micropython之后,忍不住给以esp12e也刷了micropython
这里先说一下webrepl:
通过wifi可以和esp8266交互,以及便携的传输文件
首次使用:
1 import webrepl
2 webrepl.start()
中间可能让你import 一个配置模块来设置密码具体即执行上两句就知道了.
WebREPL - a prompt over WiFi
WebREPL allows you to use the Python prompt over WiFi, connecting through a browser. The latest versions of Firefox and Chrome are supported.

For your convenience, WebREPL client is hosted at http://micropython.org/webrepl . Alternatively, you can install it locally from the the GitHub repository https://github.com/micropython/webrepl .

Before connecting to WebREPL, you should set a password and enable it via a normal serial connection. Initial versions of MicroPython for ESP8266 came with WebREPL automatically enabled on the boot and with the ability to set a password via WiFi on the first connection, but as WebREPL was becoming more widely known and popular, the initial setup has switched to a wired connection for improved security:

import webrepl_setup
Follow the on-screen instructions and prompts. To make any changes active, you will need to reboot your device.

To use WebREPL connect your computer to the ESP8266’s access point (MicroPython-xxxxxx, see the previous section about this). If you have already reconfigured your ESP8266 to connect to a router then you can skip this part.

Once you are on the same network as the ESP8266 you click the “Connect” button (if you are connecting via a router then you may need to change the IP address, by default the IP address is correct when connected to the ESP8266’s access point). If the connection succeeds then you should see a password prompt.

Once you type the password configured at the setup step above, press Enter once more and you should get a prompt looking like >>>. You can now start typing Python commands!
以上参见micropython docs
初次设置好会提示重启,然后电脑就可以通过serial或者浏览器http://micropython.org/webrepl/和micropython交互了,贴张图:
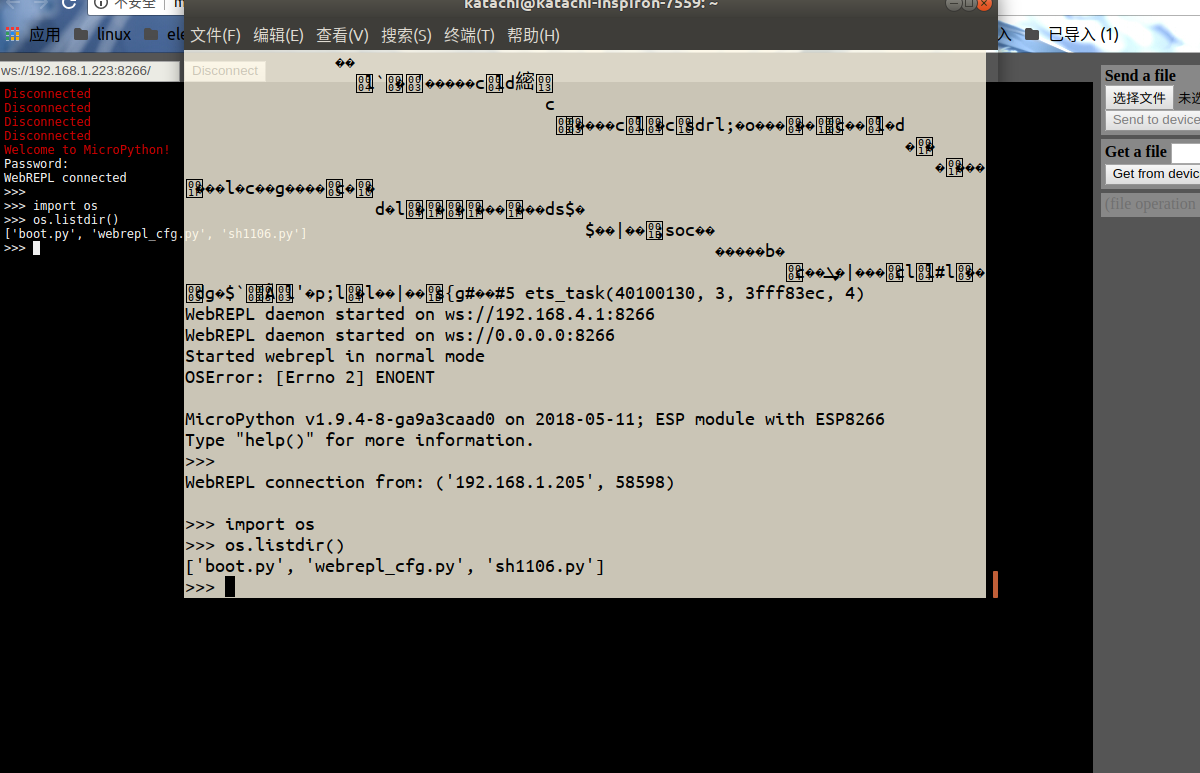
先通过repl交互,如果之前设置好网络的话,esp8266开机之后会自动连接,这一点很方便,
这里通过可以通过.ifconfig()查看IP或者进入路由器后台查看也行,然后把地址填入webrepl点击连接,输入密码即可.
可以看到两侧的信息交互是同步的,在一端输入另一端自动跟随.右侧可以上传或者下载文件.
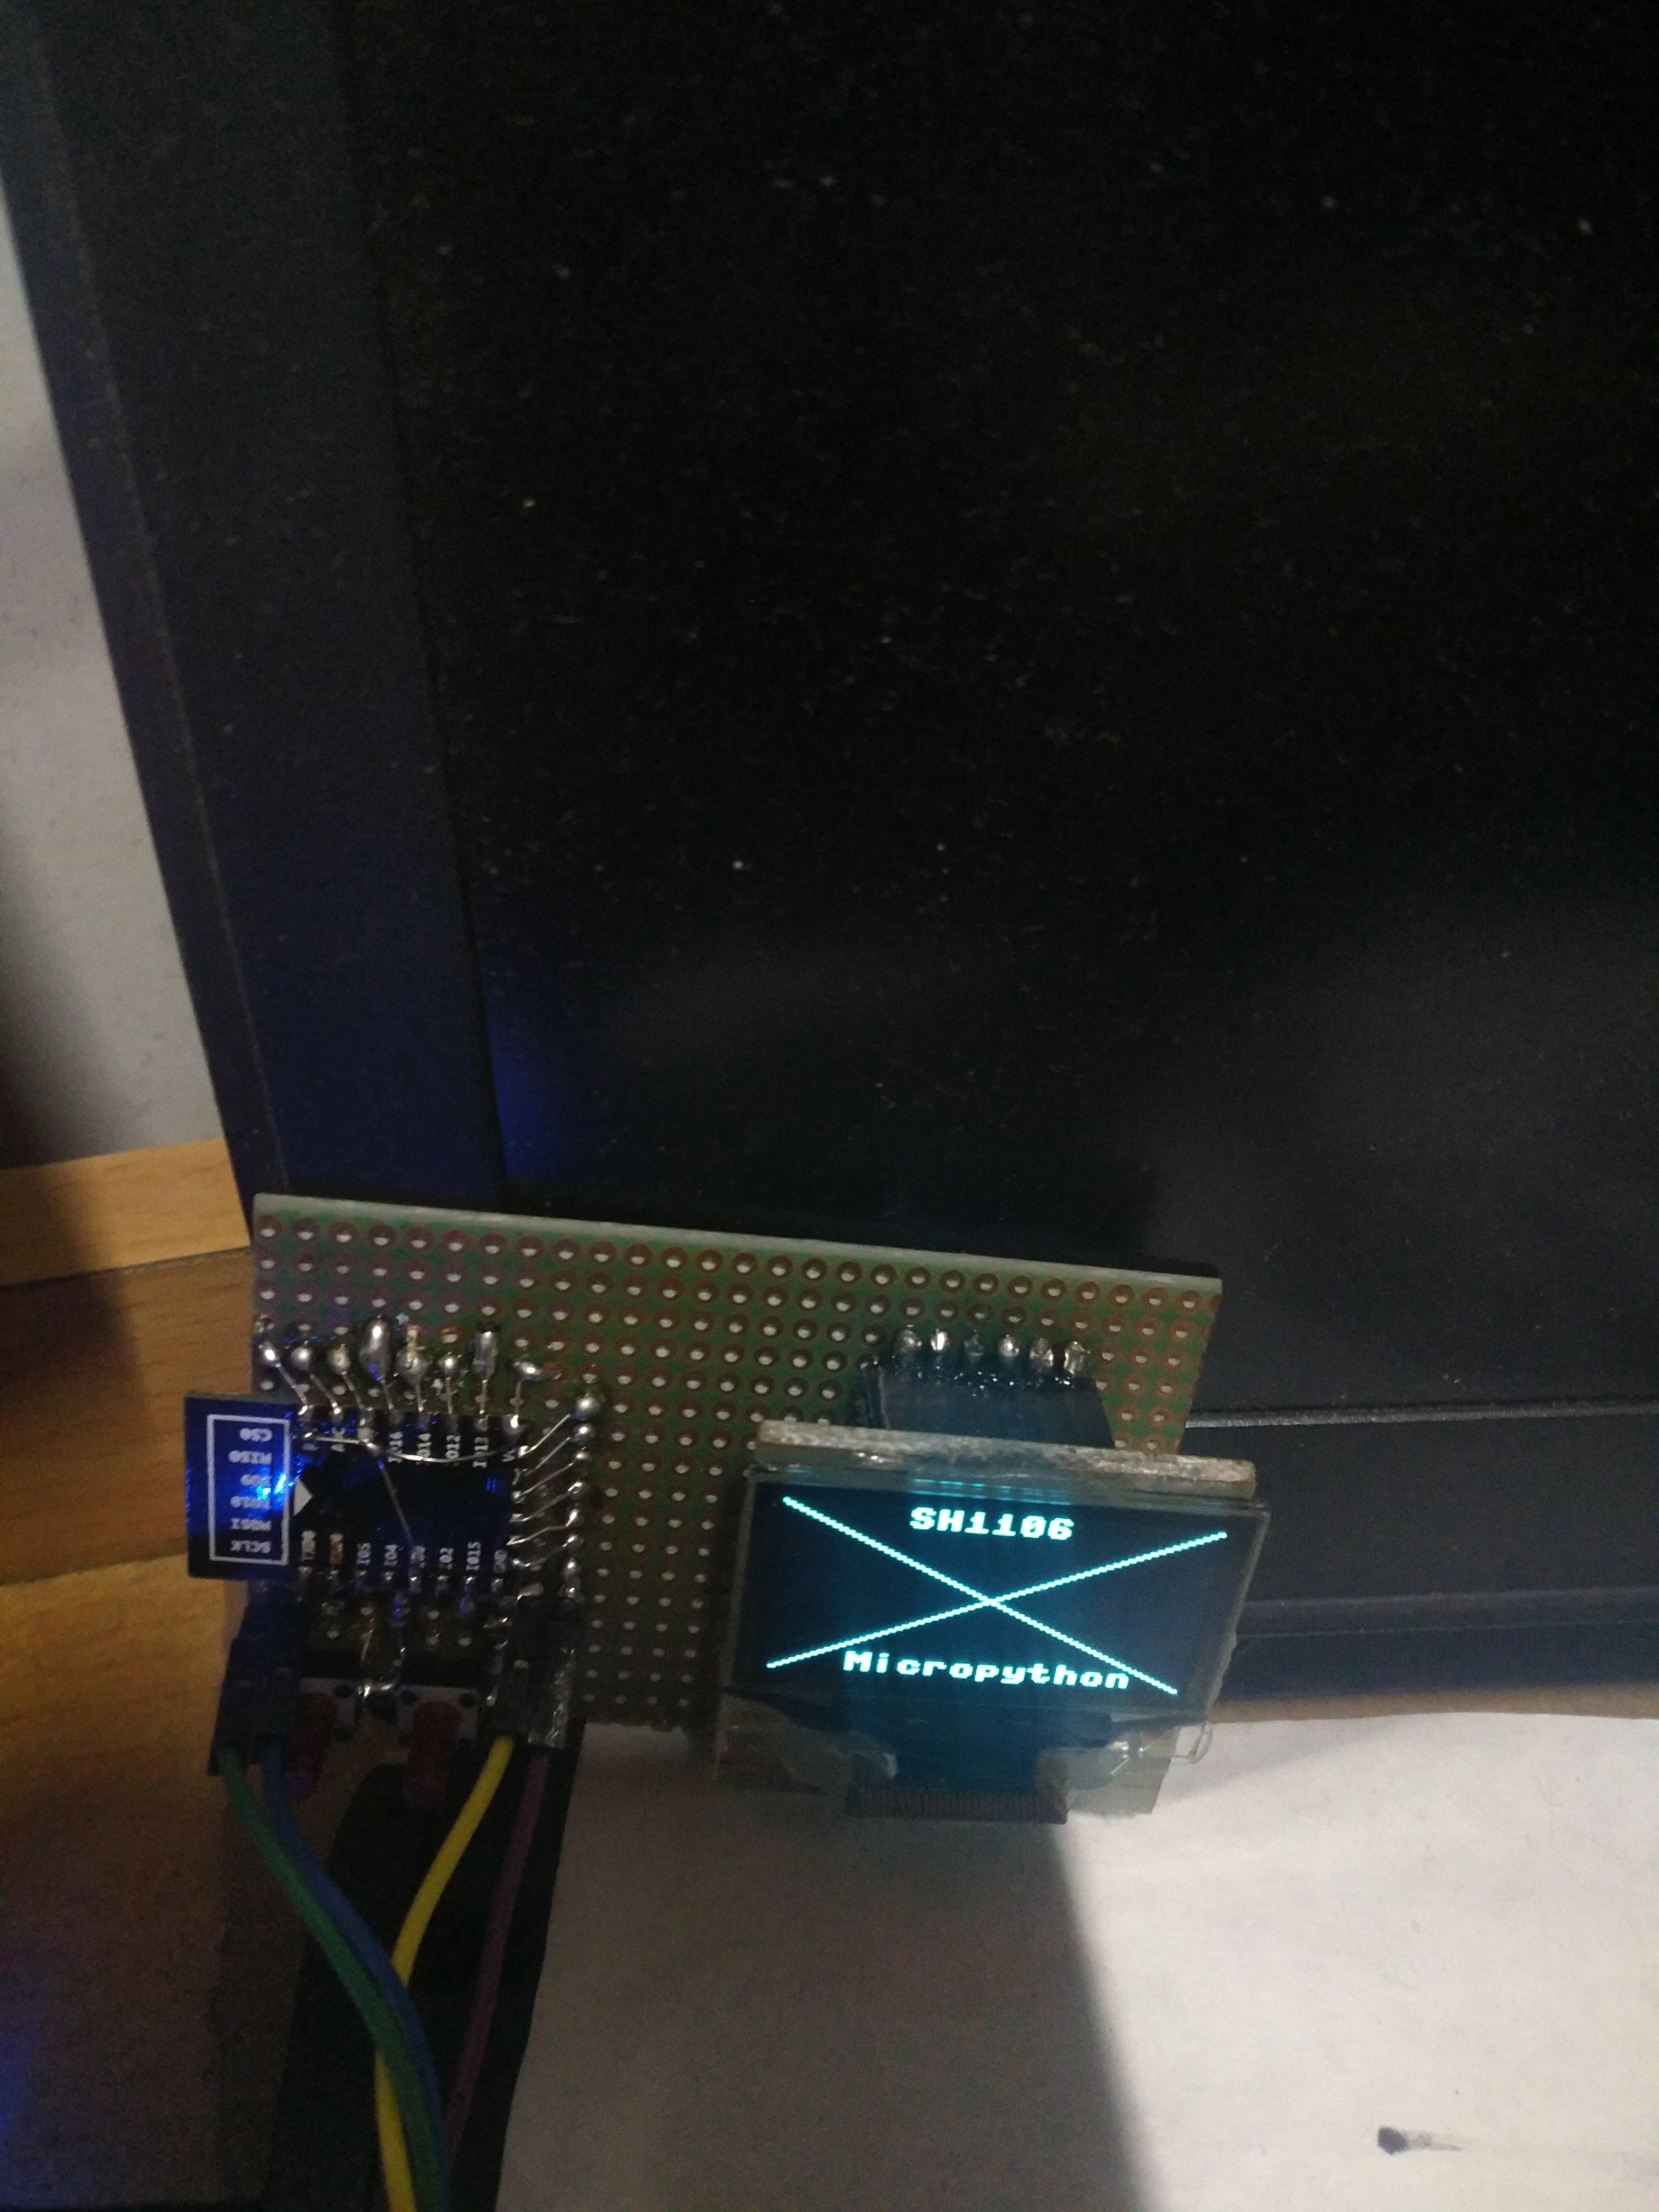
现在进入正题,micropython实现了spi iic等接口,还写了ssd1306,但是看过我之前的博文可以知道,我自己做过1.3寸oled的转接板,这用的是sh1106.
然后查了查好像micropython还没有实现,可能没工夫管这么小的地方吧,毕竟.96的ssd1306广为人知.
然后之前自己也改过ssh1306的程序,就是有偏移而已,正寻思着要不要自己改改用?百度了一下,国内好像没有,打梯子google一下,发现页首两个好像靠谱:
贴上地址吧:
https://github.com/robert-hh/SH1106 这个项目里面好像说是基于别人的,然后由于看到另一个更为直观
https://blog.boochow.com/article/453949310.html这个是个日本佬的博客,直接放出代码,我采用了这个,效果不错!
当然啦,它用的SPI那会的和现在的有点区别可能,根据traceback删掉第一个参数(你进这个地址去看,和我下面贴的程序就知道哪个参数了,就是哪个1),之后ctrl e进去 ctrl d屏幕竟然就直接点亮了,(当然这里还稍微改了改pin)
贴上我的代码:
from micropython import const
from ssd1306 import SSD1306_SPI

SET_LOW_COLUMN      = const(0x00)
SET_HIGH_COLUMN     = const(0x10)
SET_PAGE_ADDR       = const(0xb0)
SET_DISP_START_LINE = const(0x40)

class SH1106_SPI(SSD1306_SPI):
    def show(self):
        for pg in range(0, self.pages):
            for cmd in (
                SET_PAGE_ADDR | pg,
                SET_LOW_COLUMN | 2,
                SET_HIGH_COLUMN | 0,
                ):
                self.write_cmd(cmd)
            self.write_data(self.buffer[pg * 0x80:(pg + 1) * 0x80])

#sh1106_spi.py

from sh1106 import SH1106_SPI
from machine import Pin, SPI
spi = SPI(baudrate=8000000, polarity=0, phase=0, sck=Pin(14), mosi=Pin(13), miso=Pin(12))
oled = SH1106_SPI(128, 64, spi, dc=Pin(16), res=Pin(15), cs=Pin(5))
oled.line(0,0,128,64,1);oled.show()
oled.line(128,0,0,64,1);oled.show()
oled.text('SH1106',36,0);oled.show()
oled.text('Micropython',24,56);oled.show()
注释之前的保存为sh1106.py 然后上传到esp,然后下面的直接ctrl e,效果很好!
这里可以体现出前人栽树后人乘凉的好处了,也意识到梯子很有用.
这里这块板子直接用esp12e,左侧两个按键,一个复位一个io0,背面飞线接spi,就不贴图了,
我给出引脚定义:
GND VCC D0 D1 RES DC CS(我做的板子cs直接接地了)
D0接sck D1接mosi res接的io15 dc接的io16 至于程序里面dc我分配了引脚,是因为现在还没搞清楚怎样丢给它一个None,我直接赋值None不行,直接丢个空的io给它吧,之后再研究...
本来是想做个时钟,数码管io占用太多,然后想到了oled,我有两种.66和1.3,.66的太小了,也想过两块拼一起,emmm太麻烦了.
先进行到这一步吧!
ADDED:
对上面括号参数的附加解释:(仅仅是那个1)
上地址:
class machine.SPI(id, ...)
Construct an SPI object on the given bus, id. Values of id depend on a particular port and its hardware. Values 0, 1, etc. are commonly used to select hardware SPI block #0, #1, etc. Value -1 can be used for bitbanging (software) implementation of SPI (if supported by a port).
SPI.init(baudrate=1000000, *, polarity=0, phase=0, bits=8, firstbit=SPI.MSB, sck=None, mosi=None, miso=None, pins=(SCK, MOSI, MISO))
Initialise the SPI bus with the given parameters:

baudrate is the SCK clock rate.
polarity can be 0 or 1, and is the level the idle clock line sits at.
phase can be 0 or 1 to sample data on the first or second clock edge respectively.
bits is the width in bits of each transfer. Only 8 is guaranteed to be supported by all hardware.
firstbit can be SPI.MSB or SPI.LSB.
sck, mosi, miso are pins (machine.Pin) objects to use for bus signals. For most hardware SPI blocks (as selected by id parameter to the constructor), pins are fixed and cannot be changed. In some cases, hardware blocks allow 2-3 alternative pin sets for a hardware SPI block. Arbitrary pin assignments are possible only for a bitbanging SPI driver (id = -1).
pins - WiPy port doesn’t sck, mosi, miso arguments, and instead allows to specify them as a tuple of pins parameter.
也就是说,在SPI的构造里面如果给定了id那么后面的sck ,mosi, miso就不需要指定啦,反之如果没有指定id就需要了.
像这样:
1 from sh1106 import SH1106_SPI
2 from machine import Pin, SPI
3 #spi = SPI(baudrate=8000000, polarity=0, phase=0, sck=Pin(14), mosi=Pin(13), miso=Pin(12))
4 spi = SPI(1,baudrate=8000000, polarity=0, phase=0)
5 oled = SH1106_SPI(128, 64, spi, dc=Pin(16), res=Pin(15), cs=Pin(5))
6 oled.line(0,0,128,64,1);oled.show()
7 oled.line(128,0,0,64,1);oled.show()
8 oled.text('SH1106',36,0);oled.show()
9 oled.text('Micropython',24,56);oled.show()
至于cs引脚,
class SSD1306_SPI(SSD1306):
    def __init__(self, width, height, spi, dc, res, cs, external_vcc=False):
        self.rate = 10 * 1024 * 1024
        dc.init(dc.OUT, value=0)
        res.init(res.OUT, value=0)
        cs.init(cs.OUT, value=1)
        self.spi = spi
        self.dc = dc
        self.res = res
        self.cs = cs
        import time
        self.res(1)
        time.sleep_ms(1)
        self.res(0)
        time.sleep_ms(10)
        self.res(1)
        super().__init__(width, height, external_vcc)
可以看到cs被传入构造,作为时序中的一个动作,不能省略啊!暂时就赋值给不用的io吧