本文为上海交大 ipads 研究所陈海波老师等人所著的《现代操作系统:原理与实现》的课程实验(LAB)的学习笔记的第三篇:用户进程与异常处理。所有章节的笔记可在此处查看:chcore | 康宇PL's Blog
实现用户进程
进程结构
ChCore 中每个进程都对应一个 process 结构体。slot_table 是一个进程占有的内核对象数组和元信息组成的结构体。thread_list 是连接该进程所有线程的链表。如何通过 list_head 的得到对应的对象我们在 Lab 2 里已经学习过了。
struct process {
	struct slot_table slot_table; // 所占有的内核对象
	struct list_head thread_list; // 所包含的线程
};
每个线程对应一个 thread 结构体,其中 node 是连接了同属一个进程的所有线程的链表。thread_ctx 是线程的上下文(context),源码里对他的注释为“线程控制块”,这倒和我的理解不大相同。vmspace 管理了线程的虚拟地址空间。process 指向了线程所属的进程。
struct thread {
	struct list_head node;	// link threads in a same process
	struct thread_ctx *thread_ctx;	// thread control block
	struct vmspace *vmspace;	// memory mapping
	struct process *process;
};
每个上下文中都包含了若干个寄存器,包含从 X1 ~ X30 的所有通用寄存器,以及 SP_EL0、 ELR_RL1、 SPSR_EL1、 TPIDR_EL0 这四个特殊的寄存器。
struct thread_ctx {
	/* Executing Context */
	arch_exec_cont_t ec;
	/* Thread Type */
	u32 type;
};

/* size in registers.h (to be used in asm) */
typedef struct arch_exec_cont {
	u64 reg[REG_NUM];
} arch_exec_cont_t;

/* Types of the registers */
enum reg_type {
	X0 = 0,			/* 0x00 */
	X1 = 1,			/* 0x08 */
	X2 = 2,			/* 0x10 */

    //.....
	X30 = 30,		/* 0xf0 */
	SP_EL0 = 31,		/* 0xf8 */
	ELR_EL1 = 32,		/* 0x100 NEXT PC */
	SPSR_EL1 = 33,		/* 0x108 */
	TPIDR_EL0 = 34
};
Capability
Capability 可以理解为 Linux 下的文件描述符。它把一个资源对象和访问权限封装到了一起,并对外提供一个整形 cap 做访问的句柄(句柄就是对资源对象的指针或者引用的一种抽象)。
ChCore 中每个 capability 都属于一个进程。cap 的值实际上就是对象在所属的 process 的 slot_table 中的下标。
来点示例代码
// 仅为演示,删掉了部分异常处理的代码
// 分配 cap
int sys_create_pmo(u64 size, u64 type)
{
	int cap;
	struct pmobject *pmo;

	pmo = obj_alloc(TYPE_PMO, sizeof(*pmo)); // 分配对象
	pmo_init(pmo, type, size, 0); // 初始化
	cap = cap_alloc(current_process, pmo, 0); // 挂载到进程上,分配 cap 编号
    return cap;
}

// 使用 cap
int sys_map_pmo(u64 target_process_cap, u64 pmo_cap, u64 addr, u64 perm)
{
	struct pmobject *pmo;

	// 根据 cap 获取对象的指针
    pmo = obj_get(current_process, pmo_cap, TYPE_PMO);

    // 操作对象,省略之
    // ......

    // 声明自己操作结束,为了并发安全准备的。
    obj_put(pmo);
}
用户进程的创建流程
process_create_root()
main
├── uart_init
├── mm_init
├── exception_init
├── process_create_root
│   ├── ramdisk_read_file
│   ├── process_create
│   └── thread_create_main
└── eret_to_thread
    └── switch_context
ChCore 启动后会依次初始化 uart 模块、内存管理模块、中断模块,而后调用 process_create_root 创建一个根进程,当前 Lab 中也只有这一个进程。
process_create_root 具有以下行为
1)从磁盘中载入 ELF 文件。
2)创建进程的 process 结构体并初始化,包括 slot_table 的初始化和分配一块虚拟地址空间 vmspace。vmspace 的初始化包括申请一个空白的物理页做 L0 页表,将 user_current_heap 制定为一个常量。
3)为进程创建一个主线程。ChCore 中每个进程至少包含一个线程。
/* process_create_root: create the root process */
void process_create_root(char *bin_name)
{
	struct process *root_process;
	int thread_cap;
	struct thread *root_thread;
	char *binary = NULL;
	int ret;

    // 从磁盘中载入 ELF 文件。
	ret = ramdisk_read_file(bin_name, &binary);
	BUG_ON(ret < 0);
	BUG_ON(binary == NULL);

    // 创建进程的 process 结构体并初始化
	root_process = process_create();

    // 为进程创建一个主线程
	thread_cap = thread_create_main(root_process, ROOT_THREAD_STACK_BASE,
					ROOT_THREAD_STACK_SIZE,
					ROOT_THREAD_PRIO, TYPE_ROOT,
					0, binary, bin_name);

    // get 是为了得到指针,get 完就 put 是为了让引用计数器恢复原值
	root_thread = obj_get(root_process, thread_cap, TYPE_THREAD);
	/* Enqueue: put init thread into the ready queue */
	obj_put(root_thread);
	current_thread = root_thread;
}
thread_create_main()
thread_create_main 负责给一个进程创建主线程
int thread_create_main(struct process *process, u64 stack_base,
		       u64 stack_size, u32 prio, u32 type, s32 aff,
		       const char *bin_start, char *bin_name)
{
	int ret, thread_cap, stack_pmo_cap;
	struct thread *thread;
	struct pmobject *stack_pmo;
	struct vmspace *init_vmspace;
	struct process_metadata meta;
	u64 stack;
	u64 pc;

	init_vmspace = obj_get(process, VMSPACE_OBJ_ID, TYPE_VMSPACE);
	obj_put(init_vmspace);

	/* 分配一个栈并挂载到进程中 */
	stack_pmo = obj_alloc(TYPE_PMO, sizeof(*stack_pmo));
	pmo_init(stack_pmo, PMO_DATA, stack_size, 0);
	stack_pmo_cap = cap_alloc(process, stack_pmo, 0);

    /* 将分配好的栈映射到下虚拟地址空间里 */
	ret = vmspace_map_range(init_vmspace, stack_base, stack_size,
				VMR_READ | VMR_WRITE, stack_pmo);

	/* init thread */
	thread = obj_alloc(TYPE_THREAD, sizeof(*thread));

	/* 栈自高向低生长,初始化时将栈指针挪到高地址处 */
	stack = stack_base + stack_size;

    /* 解析并载入 ELF 文件 */
	pc = load_binary(process, init_vmspace, bin_start, &meta);

    /* 把部分环境变量存入栈中 */
	prepare_env((char *)phys_to_virt(stack_pmo->start) + stack_size,
		    stack, &meta, bin_name);
	stack -= ENV_SIZE_ON_STACK;

    /* 线程初始化 */
	ret = thread_init(thread, process, stack, pc, prio, type, aff);

    /* 把线程挂载到进程上 */
	thread_cap = cap_alloc(process, thread, 0);

	/* L1 icache(instruction cache) & dcache(data cache) have no coherence */
	flush_idcache();

	// return thread;
	return thread_cap;
}
thread_init 里指定了线程的 vmspace 和 process,并将 context (线程上下文)初始化。
static
int thread_init(struct thread *thread, struct process *process,
		u64 stack, u64 pc, u32 prio, u32 type, s32 aff)
{
	thread->process = obj_get(process, PROCESS_OBJ_ID, TYPE_PROCESS);
	thread->vmspace = obj_get(process, VMSPACE_OBJ_ID, TYPE_VMSPACE);
	obj_put(thread->process);
	obj_put(thread->vmspace);
	/* Thread context is used as the kernel stack for that thread */
	thread->thread_ctx = create_thread_ctx();
	if (!thread->thread_ctx)
		return -ENOMEM;
	init_thread_ctx(thread, stack, pc, prio, type, aff);
	/* add to process */
	list_add(&thread->node, &process->thread_list);

	return 0;
}
load_binary()
load_binary:解析 ELF 文件,并将其内容加载到新线程的用户内存空间中。
大部分代码已经给出了,我们的任务是根据解析好的 ELF 文件,把程序段从读入的那块内存区域拷贝到程序运行时应使用的那块内存区域上,并且需要考虑内存对其的情况。可讲义里并没有提及 ELF 头中各个域的含义,参考前人资料后得知维基百科上有:Executable and Linkable Format - Wikipedia
关键内容就是下面这个表了。
| Field | Purpose |
|---|---|
| p_flags | Segment-dependent flags (position for 64-bit structure). |
| p_offset | Offset of the segment in the file image. |
| p_vaddr | Virtual address of the segment in memory. |
| p_paddr | On systems where physical address is relevant, reserved for segment's physical address. |
| p_filesz | Size in bytes of the segment in the file image. May be 0. |
| p_memsz | Size in bytes of the segment in memory. May be 0. |
| p_flags | Segment-dependent flags (position for 32-bit structure). |
| p_align | 0 and 1 specify no alignment. Otherwise should be a positive, integral power of 2, with p_vaddr equating p_offset modulus p_align. |
我们要关注的有:
p_vaddr:程序段在虚拟内存中的起始地址
p_memsz:程序段在虚拟内存里的长度
p_offset:程序段在文件中相对于文件开头位置的偏移量
p_filesz:程序段在文件中的长度
这里解释下为什么程序段在内存里和在文件里长度不一定相同。比如我定义了一个长度 100000 的未初始化的 int 数组,如果我们在程序文件里真的写 100000 个空数据就有点浪费了,所以此时我只在文件里记录下 int 数组的定义,而不会真的占这么大的空间。当读到内存后再把这一部分数据展开。
实际分配内存时我们要将 p_memsz 转换成页对齐的 seg_map_sz。如下图所示,p_memsz 开头要扩展到前一个页的交界处,结尾要扩展到后一个页的交界处。按页对齐的原因是为了保证 p_vddr 在虚拟页里的便宜和物理页里的便宜相等,进而提高寻址速度。
┌──────┬──────┬──────┬──────┬──────┬──────┐
│ PAGE │ PAGE │ PAGE │ PAGE │ PAGE │ PAGE │
└──────┴──────┴──────┴──────┴──────┴──────┘
       |   |-------p_memsz------|  |
       |   p_vddr                  |
       |----------seg_map_sz-------|
用代码描述就是:
seg_sz = elf->p_headers->p_memsz;
p_vaddr = elf->p_headers->p_vaddr;
u64 vaddr_start = ROUND_DOWN(p_vaddr, PAGE_SIZE);
u64 vaddr_end = ROUND_UP(p_vaddr + seg_sz, PAGE_SIZE);
seg_map_sz = vaddr_end - vaddr_start;
在拷贝操作时则是按照 p_filesz 来复制的。
u64 start_offset = p_vaddr - vaddr_start;
char * pmo_start = (char *) phys_to_virt(pmo->start) + start_offset;
char * seg_start = bin + elf->p_headers[i].p_offset;
u64 copy_size = elf->p_headers[i].p_filesz;
for(u64 i = 0; i < copy_size; i++) {
    pmo_start[i] = seg_start[i];
}
总的来看 load_binary 的作用就是将 ELF 文件的各个段拷贝到他们应该存在的内存地址处。
/* load binary into some process (process) */
static u64 load_binary(struct process *process,
		       struct vmspace *vmspace,
		       const char *bin, struct process_metadata *metadata)
{
	struct elf_file *elf;
	vmr_prop_t flags;
	int i, r;
	size_t seg_sz, seg_map_sz;
	u64 p_vaddr;

	int *pmo_cap;
	struct pmobject *pmo;
	u64 ret;

	elf = elf_parse_file(bin);
	pmo_cap = kmalloc(elf->header.e_phnum * sizeof(*pmo_cap));
	if (!pmo_cap) {
		r = -ENOMEM;
		goto out_fail;
	}

	/* load each segment in the elf binary */
	for (i = 0; i < elf->header.e_phnum; ++i) {
		pmo_cap[i] = -1;
		if (elf->p_headers[i].p_type == PT_LOAD) {
			seg_sz = elf->p_headers[i].p_memsz;
			p_vaddr = elf->p_headers[i].p_vaddr;
			u64 vaddr_start = ROUND_DOWN(p_vaddr, PAGE_SIZE);
			u64 vaddr_end = ROUND_UP(p_vaddr + seg_sz, PAGE_SIZE);
			seg_map_sz = vaddr_end - vaddr_start;

			pmo = obj_alloc(TYPE_PMO, sizeof(*pmo));
			if (!pmo) {
				r = -ENOMEM;
				goto out_free_cap;
			}
			pmo_init(pmo, PMO_DATA, seg_map_sz, 0);
			pmo_cap[i] = cap_alloc(process, pmo, 0);
			if (pmo_cap[i] < 0) {
				r = pmo_cap[i];
				goto out_free_obj;
			}

			u64 start_offset = p_vaddr - vaddr_start;
			char * pmo_start = (char *) phys_to_virt(pmo->start) + start_offset;
			char * seg_start = bin + elf->p_headers[i].p_offset;
			u64 copy_size = elf->p_headers[i].p_filesz;
			for(u64 i = 0; i < copy_size; i++) {
				pmo_start[i] = seg_start[i];
			}

			flags = PFLAGS2VMRFLAGS(elf->p_headers[i].p_flags);

			ret = vmspace_map_range(vmspace,
						ROUND_DOWN(p_vaddr, PAGE_SIZE),
						seg_map_sz, flags, pmo);

			BUG_ON(ret != 0);
		}
	}

	/* return binary metadata */
	if (metadata != NULL) {
		metadata->phdr_addr = elf->p_headers[0].p_vaddr +
		    elf->header.e_phoff;
		metadata->phentsize = elf->header.e_phentsize;
		metadata->phnum = elf->header.e_phnum;
		metadata->flags = elf->header.e_flags;
		metadata->entry = elf->header.e_entry;
	}

	kfree((void *)bin);

	/* PC: the entry point */
	return elf->header.e_entry;
}
context 的创建与初始化
创建 context 就是申请一块内存。初始化 context 就是指定 SP_EL0、ELR_EL1、SPSR_EL1。
SP 作为栈顶指针寄存器,存的就是栈的虚拟地址。(Lab 2 学过了,虚拟内存机制启动后都是自动用虚拟地址寻址)
ELR 和 SPSR 成对存在,前者记录的从当前特权级返回到之前特权级时的返回地址,这里为程序入口函数的地址。后者记录程序的各种状态,这里只需要更改下特权级标志位, 因为要跳到用户态相应的低四位全设为 0 就行,有个现成的宏就是 SPSR_EL1_USER 。设置好后用 eret 指令就会根据当前特权级的 ELR 和 SPSR 自动跳到另一个异常级别。
因为线程创建好,切换到它的时候是直接执行用户态的代码。所以 SP 是用户态的 EL0,而 ELR 和 SPSR 都是内核态的 EL1,为返回到用户态做准备。
struct thread_ctx *create_thread_ctx(void)
{
	void *kernel_stack;
	kernel_stack = kzalloc(DEFAULT_KERNEL_STACK_SZ);
	return kernel_stack + DEFAULT_KERNEL_STACK_SZ -
	    sizeof(struct thread_ctx);
}

void init_thread_ctx(struct thread *thread, u64 stack, u64 func, u32 prio,
		     u32 type, s32 aff)
{
	/* Fill the context of the thread */
	thread->thread_ctx->ec.reg[SP_EL0] = stack;
	thread->thread_ctx->ec.reg[ELR_EL1] = func;
	thread->thread_ctx->ec.reg[SPSR_EL1] = SPSR_EL1_USER;

	/* Set thread type */
	thread->thread_ctx->type = type;
}
switch_context()
switch_context 是为了完成上下文切换,为线程或者进程的切换做准备。
代码里只做了两件事:
1)切换到当前线程的地址空间上。实际上只是更新了 TTBR0_EL1
2)返回当前线程的上下文。
我们要做的也只是在已有代码上加一句返回上下文里的寄存器。
/*
 * Switch vmspace and arch-related stuff
 * Return the context pointer which should be set to stack pointer register
 */
u64 switch_context(void)
{
	struct thread *target_thread;
	struct thread_ctx *target_ctx;

	target_thread = current_thread;
	BUG_ON(!target_thread);
	BUG_ON(!target_thread->thread_ctx);

	target_ctx = target_thread->thread_ctx;

	/* These 3 types of thread do not have vmspace */
	if (target_thread->thread_ctx->type != TYPE_IDLE &&
	    target_thread->thread_ctx->type != TYPE_KERNEL &&
	    target_thread->thread_ctx->type != TYPE_TESTS) {
		BUG_ON(!target_thread->vmspace);
		switch_thread_vmspace_to(target_thread);
	}
	/*
	 * Lab3: Your code here
	 * Return the correct value in order to make eret_to_thread work correctly
	 * in main.c
	 */
	return (u64) target_ctx->ec.reg;
}
在当前 Lab 中只有 eret_to_thread 调用了 switch_context,我们稍微研究下。
// 简化版的 kernel 的 main 函数
void main(void *addr)
{
    uart_init();
    mm_init();
	exception_init();
	process_create_root(TEST);
	eret_to_thread(switch_context());
}

/* void eret_to_thread(u64 sp) */
BEGIN_FUNC(eret_to_thread)
	mov	sp, x0
	exception_exit
END_FUNC(eret_to_thread)

.macro	exception_exit
	ldp	x11, x12, [sp, #16 * 16]
	ldp	x30, x10, [sp, #16 * 15]
	msr	sp_el0, x10
	msr	elr_el1, x11
	msr	spsr_el1, x12
	ldp	x0, x1, [sp, #16 * 0]
	ldp	x2, x3, [sp, #16 * 1]
	ldp	x4, x5, [sp, #16 * 2]
	ldp	x6, x7, [sp, #16 * 3]
	ldp	x8, x9, [sp, #16 * 4]
	ldp	x10, x11, [sp, #16 * 5]
	ldp	x12, x13, [sp, #16 * 6]
	ldp	x14, x15, [sp, #16 * 7]
	ldp	x16, x17, [sp, #16 * 8]
	ldp	x18, x19, [sp, #16 * 9]
	ldp	x20, x21, [sp, #16 * 10]
	ldp	x22, x23, [sp, #16 * 11]
	ldp	x24, x25, [sp, #16 * 12]
	ldp	x26, x27, [sp, #16 * 13]
	ldp	x28, x29, [sp, #16 * 14]
	add	sp, sp, #ARCH_EXEC_CONT_SIZE
	eret
.endm
可以发现 eret_to_thread 将 SP 设置为给定的 context 的寄存器域后,进而调用了 exception_exit。在这个过程中 context 里存储的数据都被读取到了寄存器中,最后使用 eret 命令,根据当前特权级的 ELR 和 SPSR 跳转到另一个线程中。
异常处理
AArch64 里的异常分为同步异常和异步异常。异步异常包括 SError、FIQ、IRQ,但我们都不会在 ChCore 中涉及到。同步异常就是我们平时学操作系统时了解的陷入、硬件中断、异常那几种,也是我们要在 ChCore 中研究的重点。
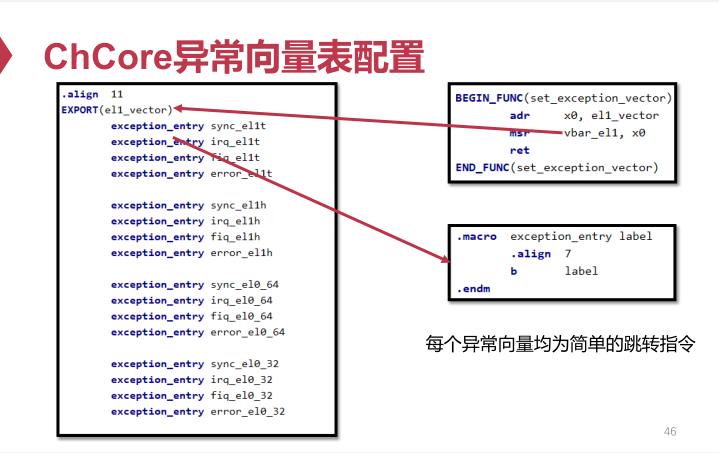
异常向量表
AArch64 里有三个异常向量基址寄存器 VBAR_EL1、VBAR_EL2、VBAR_EL3 。
异常向量表的本体放在 exception_table.S 中。名义上是要我们自己填写,但看过配套视频的话会发现课程里已经讲过了,这里直接挪过来贴上就行。
.align	11
EXPORT(el1_vector)
	exception_entry sync_el1t
	exception_entry irq_el1t
	exception_entry fiq_el1t
	exception_entry error_el1t

	exception_entry sync_el1h
	exception_entry irq_el1h
	exception_entry fiq_el1h
	exception_entry error_el1h

	exception_entry sync_el0_64
	exception_entry irq_el0_64
	exception_entry fiq_el0_64
	exception_entry error_el0_64

	exception_entry sync_el0_32
	exception_entry irq_el0_32
	exception_entry fiq_el0_32
	exception_entry error_el0_32
异常向量表的初始化
启用向量表的代码是 set_exception_vector 这个函数,只是简单的将上面 el1_vector 的地址放入 VBAR_EL1 寄存器中。
BEGIN_FUNC(set_exception_vector)
	adr	x0, el1_vector
	msr	vbar_el1, x0
	ret
END_FUNC(set_exception_vector)
ChCore 是在 main 函数中调用 excpetion_init 来间接完成这一过程的,我们要在 exception_init_per_cpu 中加一句调用语句来补全这一过程。
void exception_init_per_cpu(void)
{
	/**
	 * Lab3: Your code here
	 * Setup the exception vector with the asm function written in exception.S
	 */
	set_exception_vector();
	disable_irq();
}

void exception_init(void)
{
	exception_init_per_cpu();
}
异常处理流程
假设程序执行时发现了一条不在指令集里的指令,此时会触发一个未定义指令异常。主要操作有:
1)处理器将异常原因保存到 ESR_EL1 中,将返回地址保存到 ELR_EL1 中。
2)处理器从 VBAR_EL1 中获取异常向量表基址,并根据当前各种状态信息确定要调用的异常处理程序的地址。
3)处理器自动将特权级切换到 EL1,在这期间自动完成了保存 PSTATE、启用 SP_EL1 作为栈指针等操作,完成了从用户态到内核态的切换。
4)执行异常处理程序。
异常向量表里每一条的具体含义不需要深究,目前只需要知道每一项里的 exception_entry 是一个宏,展开来就是直接跳到后面参数对应的函数处。而这些函数几乎都指向了 handle_entry 这个函数。
引用课程讲义里的图:

handle_entry 中主要干了三件事:
1)保存上下文
2)调用 C 语言中的异常处理器 handle_entry_c,实现具体的异常处理逻辑
3)恢复上下文
再次引用讲义中的图:

添加对未知指令异常的处理逻辑
按照实验手册说的输出一条信息,然后调用 sys_exit 就行。make grade 时我还挺疑惑 sys_exit 的参数为啥是 -12,看了看知乎网友羊男的笔记后才明白这一参数定义在 errno.h 中,含义正是未支持的指令。
void handle_entry_c(int type, u64 esr, u64 address)
{
	/* ec: exception class */
	u32 esr_ec = GET_ESR_EL1_EC(esr);

	kdebug
	    ("Interrupt type: %d, ESR: 0x%lx, Fault address: 0x%lx, EC 0b%b
",
	     type, esr, address, esr_ec);
	/* Dispatch exception according to EC */
	switch (esr_ec) {
		/*
		 * Lab3: Your code here
		 * Handle exceptions as required in the lab document. Checking exception codes in
		 * esr.h may help.
		 */
	case ESR_EL1_EC_UNKNOWN:
		kinfo("%s", UNKNOWN);
		sys_exit(-ESUPPORT);	// Indicate this is a ESR_EL1_EC_UNKNOWN
		break;
	default:
		kdebug("Unsupported Exception ESR %lx
", esr);
		break;
	}
}
系统调用和缺页异常
从异常向量到系统调用表
系统调用异常是通过 SVC 指令触发的,使用该指令后 ESR 将被设为一个特殊值,然后按照正常的异常处理流程定位到 sync_el0_64 这个函数中。
因为很多其他的异常都会走这个函数处理,所以此时要检查下是否是通过 SVC 指令触发的异常。是的话走一下 el0_syscall 函数,根据 x8 寄存器里记录的系统调用号跳转到 syscall_table 中对应的函数里。
sync_el0_64:
	/* Since we cannot touch x0-x7, we need some extra work here */
	exception_enter
	mrs	x25, esr_el1
	lsr	x24, x25, #ESR_EL1_EC_SHIFT
	cmp	x24, #ESR_EL1_EC_SVC_64
	b.eq	el0_syscall
	/* Not supported exception */
	mov	x0, SYNC_EL0_64
	mrs	x1, esr_el1
	mrs	x2, elr_el1
	bl	handle_entry_c
	exception_exit

el0_syscall:
	sub	sp, sp, #16 * 8
	stp	x0, x1, [sp, #16 * 0]
	stp	x2, x3, [sp, #16 * 1]
	stp	x4, x5, [sp, #16 * 2]
	stp	x6, x7, [sp, #16 * 3]
	stp	x8, x9, [sp, #16 * 4]
	stp	x10, x11, [sp, #16 * 5]
	stp	x12, x13, [sp, #16 * 6]
	stp	x14, x15, [sp, #16 * 7]
	ldp	x0, x1, [sp, #16 * 0]
	ldp	x2, x3, [sp, #16 * 1]
	ldp	x4, x5, [sp, #16 * 2]
	ldp	x6, x7, [sp, #16 * 3]
	ldp	x8, x9, [sp, #16 * 4]
	ldp	x10, x11, [sp, #16 * 5]
	ldp	x12, x13, [sp, #16 * 6]
	ldp	x14, x15, [sp, #16 * 7]
	add	sp, sp, #16 * 8

	adr	x27, syscall_table		// syscall table in x27
	uxtw	x16, w8				// syscall number in x16
	ldr	x16, [x27, x16, lsl #3]		// find the syscall entry
	blr	x16

	/* Ret from syscall */
	// bl	disable_irq
	str	x0, [sp] /* set the return value of the syscall */
	exception_exit
系统调用表需要我们手动完善下几个函数与系统调用号间的关系
/*
 * Lab3: Your code here
 * Update the syscall table as you like to redirect syscalls
 * to functions accordingly
 */
const void *syscall_table[NR_SYSCALL] = {
	[0 ... NR_SYSCALL - 1] = sys_debug,
	[SYS_putc] = sys_putc,
	[SYS_exit] = sys_exit,
	[SYS_create_pmo] = sys_create_pmo,
	[SYS_map_pmo] = sys_map_pmo,
	[SYS_handle_brk] = sys_handle_brk,
	/* lab3 syscalls finished */
};
用户态使用系统调用
用户态提供的系统调用比如 usys_putc 、usys_exit 等等都是对 syscall 函数的封装。在 syscall 里我们需要将系统调用号存入 x8 寄存器,并将函数的 0 ~ 7 号参数依次存入 x0 ~ x7 的寄存器中,最后使用 SVC 指令触发异常进入系统调用的处理流程。
void usys_putc(char ch)
{
	syscall(SYS_putc, ch, 0, 0, 0, 0, 0, 0, 0, 0);
}

u64 syscall(u64 sys_no, u64 arg0, u64 arg1, u64 arg2, u64 arg3, u64 arg4,
	    u64 arg5, u64 arg6, u64 arg7, u64 arg8)
{

	u64 ret = 0;
	/*
	 * Lab3: Your code here
	 * Use inline assembly to store arguments into x0 to x7, store syscall number to x8,
	 * And finally use svc to execute the system call. After syscall returned, don't forget
	 * to move return value from x0 to the ret variable of this function
	 */
	asm volatile ("mov x8, %1
"
				"mov x0, %2
"
				"mov x1, %3
"
				"mov x2, %4
"
				"mov x3, %5
"
				"mov x4, %6
"
				"mov x5, %7
"
				"mov x6, %8
"
				"svc #0
"
				"mov %0, x0
"
				:"=r" (ret)
				:"r"(sys_no), "r"(arg0), "r"(arg1), "r"(arg2), "r"(arg3), "r"(arg4), "r"(arg5),
				"r"(arg6), "r"(arg7), "r"(arg8)
				:"x0", "x1", "x2", "x3", "x4", "x5", "x6", "x7", "x8"
	);
	return ret;
}
sys_handle_brk() 的实现
为了实现这个函数我们得复习下 vmspace 的结构。
struct vmspace {
	/* list of vmregion */
	struct list_head vmr_list;
	/* root page table */
	vaddr_t *pgtbl;
	struct vmregion *heap_vmr;
	vaddr_t user_current_heap;
};

struct vmregion {
	struct list_head node;	// vmr_list
	vaddr_t start;
	size_t size;
	vmr_prop_t perm;
	struct pmobject *pmo;
};
每个进程都有一个 vmspace 记录了它的地址空间、页表、堆。
vmspace->user_current_heap 记录了堆的起始地址。
vmspace->heap_vmr->size 记录了堆的长度。
vmspace->heap_vmr->pmo 则是堆关联的物理内存对象 PMO,PMO 内部可能是好多个内存块所组成的一个链表。
/*
 * User process heap start: 0x600000000000
 *
 * defined in mm/vmregion.c
 */

u64 sys_handle_brk(u64 addr)
{
	struct vmspace *vmspace;
	struct pmobject *pmo;
	struct vmregion *vmr;
	size_t len;
	u64 retval;
	int ret;

	vmspace = obj_get(current_process, VMSPACE_OBJ_ID, TYPE_VMSPACE);

	retval = vmspace->user_current_heap;

    // 地址为零,表明要初始化堆
	if (addr == 0) {
		pmo = obj_alloc(TYPE_PMO, sizeof(*pmo));
		if (!pmo) {
			retval = -ENOMEM;
			goto error_return;
		}
		pmo_init(pmo, PMO_ANONYM, 0, 0);
		int pmo_cap = cap_alloc(current_process, pmo, 0);
		if (pmo_cap < 0) {
			retval = pmo_cap;
			goto free_obj;
		}

		vmr = init_heap_vmr(vmspace, vmspace->user_current_heap, pmo);
		if (vmr == NULL) {
			retval = -ENOMAPPING;
			goto free_obj;
		}
		vmspace->heap_vmr = vmr;

		retval = vmspace->user_current_heap;
	}

    // vmspace->user_current_heap + vmspace->heap_vmr->size 为堆顶的地址
	else if (addr > vmspace->user_current_heap + vmspace->heap_vmr->size) {
        // 计算扩容后的堆的尺寸。
        // 不按页对齐也行,这里对齐主要是考虑到每次多分配点内存,这样连续分配小对象时扩容次数更少
		size_t siz = ROUND_UP(addr - vmspace->user_current_heap, PAGE_SIZE);

        // 更新 headp_vmr 和 pmo 的 size,但只是更新了可用的地址范围
        // 实际的内存分配操作将在首次访问新扩充的地址空间触发缺页异常时分配
		vmspace->heap_vmr->size = siz;
		vmspace->heap_vmr->pmo->size = siz;
		retval = addr;
	}

    // 目前不支持缩容操作
	else if (addr < vmspace->user_current_heap + vmspace->heap_vmr->size) {
		retval = -EINVAL;
		goto error_return;
	}


	/*
	 * return origin heap addr on failure;
	 * return new heap addr on success.
	 */
	obj_put(vmspace);
	return retval;

free_obj:
    // 遇到异常记得释放掉已分配但未使用的对象,否则会内存泄漏
	obj_free(pmo);
error_return:
	obj_put(vmspace);
	return retval;
}
用户程序执行流程
所有用户程序的入口都在 user/lib/libmain.S 里的 START 函数中,该函数负责调用 _start_c 函数。_start_c 负责指定程序参数数组 argv 的地址和程序的环境变量数组 envp 的地址,然后调用用户定义的 main 函数。我们需要在这之后添加一句 usys_exit(ret) 保证程序正常退出。
BEGIN_FUNC(START)
	mov x29, #0
	mov x30, #0
	mov x0, sp
	and sp, x0, #-16
	b _start_c
END_FUNC(START)

void _start_c(long *p)
{
	int argc = p[0];
	char **argv = (void *)(p + 1);
	char **envp = (void *)(p + 3);

	int ret = main(argc, argv, envp);
	/*
	 * Lab3: Your code here
	 * Complete the main function
	 */
	usys_exit(ret);
	return;
}
处理缺页异常
先在 handle_entry_c 里添加几条跳转语句。
void handle_entry_c(int type, u64 esr, u64 address)
{
	/* ec: exception class */
	u32 esr_ec = GET_ESR_EL1_EC(esr);

	/* Dispatch exception according to EC */
	switch (esr_ec) {
	case ESR_EL1_EC_UNKNOWN:
		kinfo("%s", UNKNOWN);
		sys_exit(-ESUPPORT);	// Indicate this is a ESR_EL1_EC_UNKNOWN
		break;
	case ESR_EL1_EC_DABT_LEL:
	case ESR_EL1_EC_DABT_CEL:
		do_page_fault(esr, address);
		break;
	default:
		kdebug("Unsupported Exception ESR %lx
", esr);
		break;
	}
}
do_page_fault 里做一下预处理跳转到 handle_trans_fault。
void do_page_fault(u64 esr, u64 fault_ins_addr)
{
	vaddr_t fault_addr;
	int fsc;		// fault status code

	fault_addr = get_fault_addr();
	fsc = GET_ESR_EL1_FSC(esr);
	switch (fsc) {
	case DFSC_TRANS_FAULT_L0:
	case DFSC_TRANS_FAULT_L1:
	case DFSC_TRANS_FAULT_L2:
	case DFSC_TRANS_FAULT_L3:{
			int ret;

			ret =
			    handle_trans_fault(current_thread->vmspace,
					       fault_addr);
			if (ret != 0) {
				kinfo("pgfault at 0x%p failed
", fault_addr);
				sys_exit(ret);
			}
			break;
		}
	default:
		kinfo("do_page_fault: fsc is unsupported (0x%b) now
", fsc);
		BUG_ON(1);
		break;
	}
}
handle_trans_fault 里干三件事
1)检查下 PMO 合法性
2)分配一个页
3)把页映射到发生缺页异常的地址处。
一个容易迷惑的地方:如果分配一个的新页,再给它映射到别处,那岂不是两个虚拟地址指向同一个页了?这里要注意我们申请页时是从直接 buddy system 里申请的空闲的物理页,此时它只有物理地址。能在 ChCore 里访问态是因为内核态下所有的物理地址与虚拟地址都可以通过一个偏移量相互转换。在申请完后手动把它映射到指定进程的地址空间里才算是给它分配了虚拟地址。
注意在 make grade 前请保证 CMakeLists.txt 里的 set(CMAKE_BUILD_TYPE "Release") 为 Release 模式,用 Debug 模式评测会输出冗余的 debug 信息导致评判结果出错。
int handle_trans_fault(struct vmspace *vmspace, vaddr_t fault_addr)
{
	struct vmregion *vmr;
	struct pmobject *pmo;
	paddr_t pa;
	u64 offset;

	vmr = find_vmr_for_va(vmspace, fault_addr);
	if (vmr == NULL) {
		kdebug("Couldn't found vmr for va
");
		return -ENOMAPPING;
	}
	if (vmr->pmo->type != PMO_ANONYM) {
		kdebug("PMO type isn't PMO_ANONYM
");
		return -ENOMAPPING;
	}
	void *page = get_pages(0);
	if (page == NULL) {
		kdebug("Coundn't get a new page
");
		return -ENOMAPPING;
	}
    // 这个虚拟地址是内核态的虚拟地址,我们要用它的物理地址做映射
	pa = (paddr_t)virt_to_phys(page);
    // 缺页异常代表 fault_addr 所在的那整个页都不存在,所以向下取整得到页的起始地址
	offset = ROUND_DOWN(fault_addr, PAGE_SIZE);
	int ret = map_range_in_pgtbl(vmspace->pgtbl, offset, pa, PAGE_SIZE, vmr->perm);
	if (ret < 0) {
		free_pages(page);
		kdebug("Map range in pgtbl fault
");
		return -ENOMAPPING;
	}
	kdebug("page fault success
");

	return 0;
}
参考资料
Chcore -- 上交IPADS操作系统银杏书配套Lab实验笔记 - Lab3进程与异常(二) - 知乎 羊男
后记
上次做 ChCore 已经是块两周前的事情了,最近睡眠质量不好导致老犯困,工作效率提不起来,这几天得调整下作息加把劲儿把剩下两个 Lab 做完才行。