1. pytest
安装: pip install pytest
导入: import pytest
1.1 pytest 命名规则
1.1.1 默认命名规则
python文件 : 除非在使用 pytest -v test_file.py 指定测试文件, 否则测试文件应该以 test_ 开头 或 _test 结尾
测试类 : 以 Test 开头
测试函数、方法 : 以 test_ 开头
import pytest

def add(a, b):
    return a+b

class TestAdd:

    def test_add(self):
        assert add(1,2) == 3

def test_add_():
    assert add(1,2) == 3
执行方式:1. cmd中运行 pytest
2. 在代码中加入 pytest.main() #自动查找执行当前目录下符合命名规则的测试文件(默认 or 自定义)
pytest.main(['--alluredir=./report.html',"pytest_file.py"]) # 执行pytest_file.py 文件,生成allure report , 此时再使用 allure generate . eport.html -c -o . eport 生成html格式报告
pytest.main(['DirName']) # 执行目录下所有用例
pytest.main(['pytest_file.py']) #执行指定文件测试用例
pytest.main(['pytest_file.py::TestAdd]) # 执行指定测试类
pytest.main(['pytest_file.py::TestAdd::test_add']) #执行指定测试类中的测试方法
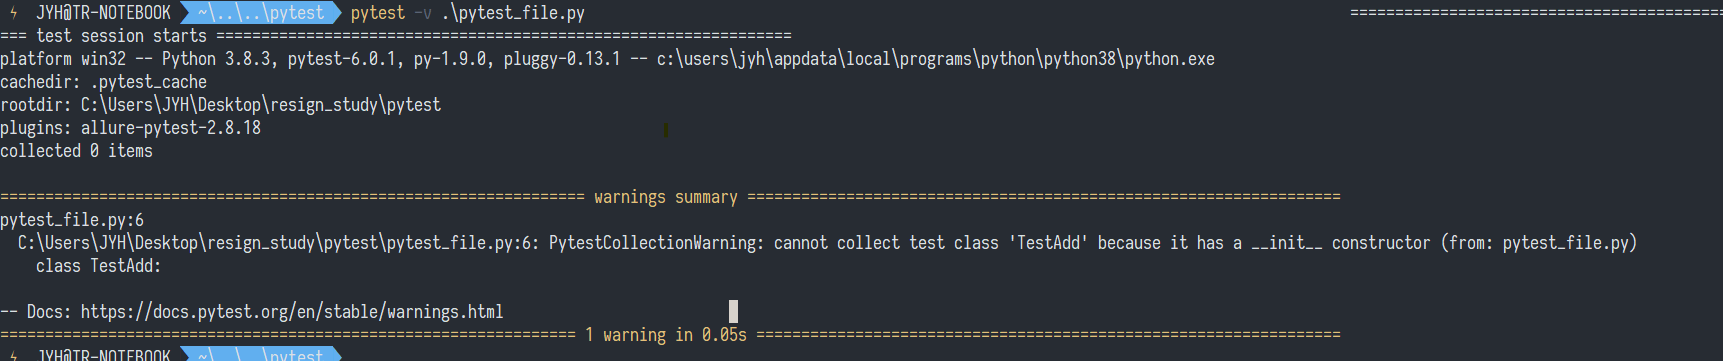
注意 :测试函数中不能有 构造函数 Constructor,否则将会有如下的warning,不能完成测试
PytestCollectionWarning: cannot collect test class 'TestAdd' because it has a __init__ constructor
1.1.2 自定义命名规则
新建 pytest.ini 文件 (不能包含中文字符, pytest.ini 还有其他用法, 使用pytest --help 查看)
[pytest]
python_files = TC_Test*
python_classes = TC_Test*
python_functions = TC_Test*
1.2 pytest 参数化
把测试的数据提取出来,通过参数传递不同的数据来驱动用例运行
将为每一条测试数据生成一个结果
使用装饰器 @pytest.mark.parametrize(argnames, argvalues)
简单示例
import pytest

def add(a, b):
    return a+b

@pytest.mark.parametrize("a,b,c",
                        [(1,2,3),
                        (1,0,1),
                        (0,0,0),
                        (-1,-2,-3),
                        (-2,0,-2),
                        (-2,9,7)])
class TestAdd:

    def test_add(self,a,b,c):
        assert add(a,b) == c
运行结果

1.2 pytest 的setup 和 teardown
-
模块级(setup_module/teardown_module)开始于模块始末,全局的
-
函数级(setup_function/teardown_function)只对函数用例生效(不在类中)
-
类级(setup_class/teardown_class)只在类中前后运行一次(在类中)
-
方法级(setup_method/teardown_method)开始于方法始末(在类中)
-
类里面的(setup/teardown)运行在调用方法的前后
2. allure
allure 生成报告直接打开显示 loading -- 解决
Firefox: about:config --> privacy.file_unique_origin --> false (可能存在安全性问题)