前面已经介绍过,垂直分库是指按照业务将表进行分类,分布到不同的数据库上面,每个库可以放在不同的服务器上,它的核心理念是专库专用。接下来看一下如何使用Sharding-JDBC实现垂直分库。
(1)创建数据库
创建数据库user_db
CREATE DATABASE `user_db` CHARACTER SET 'utf8' COLLATE 'utf8_general_ci';
在user_db中创建t_user表
CREATE TABLE `t_user`  (
  `user_id` bigint(20) NOT NULL COMMENT '用户id',
  `fullname` varchar(255) CHARACTER SET utf8 COLLATE utf8_general_ci DEFAULT NULL COMMENT '用户姓名',
  `user_type` char(1) CHARACTER SET utf8 COLLATE utf8_general_ci DEFAULT NULL COMMENT '用户类型',
  PRIMARY KEY (`user_id`) USING BTREE
) ENGINE = InnoDB CHARACTER SET = utf8 COLLATE = utf8_general_ci ROW_FORMAT = Dynamic;
(2)在Sharding-JDBC规则中修改
spring.main.allow-bean-definition-overriding=true
mybatis.configuration.map-underscore-to-camel-case=true

#sharding-jdbc分片规则配置
#数据源
spring.shardingsphere.datasource.names=m0,m1,m2
spring.shardingsphere.datasource.m0.type=com.alibaba.druid.pool.DruidDataSource
spring.shardingsphere.datasource.m0.driver-class-name=com.mysql.jdbc.Driver
spring.shardingsphere.datasource.m0.url=jdbc:mysql://localhost:3306/user_db?useUnicode=true
spring.shardingsphere.datasource.m0.username=root
spring.shardingsphere.datasource.m0.password=123456

spring.shardingsphere.datasource.m1.type=com.alibaba.druid.pool.DruidDataSource
spring.shardingsphere.datasource.m1.driver-class-name=com.mysql.jdbc.Driver
spring.shardingsphere.datasource.m1.url=jdbc:mysql://localhost:3306/order_db_1?useUnicode=true
spring.shardingsphere.datasource.m1.username=root
spring.shardingsphere.datasource.m1.password=123456

spring.shardingsphere.datasource.m2.type=com.alibaba.druid.pool.DruidDataSource
spring.shardingsphere.datasource.m2.driver-class-name=com.mysql.jdbc.Driver
spring.shardingsphere.datasource.m2.url=jdbc:mysql://localhost:3306/order_db_2?useUnicode=true
spring.shardingsphere.datasource.m2.username=root
spring.shardingsphere.datasource.m2.password=123456

# 分库策略,以user_id为分片键,分片策略为user_id % 2 + 1,user_id为偶数操作m1数据源,否则操作m2。
spring.shardingsphere.sharding.tables.t_order.database-strategy.inline.sharding-column=user_id
spring.shardingsphere.sharding.tables.t_order.database-strategy.inline.algorithm-expression=m$->{user_id % 2 + 1}

# 指定t_order表的数据分布情况,配置数据节点 m1.t_order_1,m1.t_order_2
spring.shardingsphere.sharding.tables.t_order.actual-data-nodes=m1.t_order_$->{1..2}

# 指定t_user表的数据分布情况,配置数据节点 m0.t_user
spring.shardingsphere.sharding.tables.t_user.actual-data-nodes=m0.t_user

# 指定t_order表的主键生成策略为SNOWFLAKE
spring.shardingsphere.sharding.tables.t_order.key-generator.column=order_id
spring.shardingsphere.sharding.tables.t_order.key-generator.type=SNOWFLAKE

# 指定t_order表的分片策略,分片策略包括分片键和分片算法
spring.shardingsphere.sharding.tables.t_order.table-strategy.inline.sharding-column=order_id
spring.shardingsphere.sharding.tables.t_order.table-strategy.inline.algorithm-expression=t_order_$->{order_id % 2 + 1}

spring.shardingsphere.sharding.tables.t_user.table-strategy.inline.sharding-column=user_id
spring.shardingsphere.sharding.tables.t_user.table-strategy.inline.algorithm-expression=t_user

# 打开sql输出日志
spring.shardingsphere.props.sql.show=true
(3)数据操作
新增UserDao:
package com.example.demo.dao;

import org.apache.ibatis.annotations.Insert;
import org.apache.ibatis.annotations.Mapper;
import org.apache.ibatis.annotations.Param;
import org.apache.ibatis.annotations.Select;
import org.springframework.stereotype.Component;

import java.util.List;
import java.util.Map;

@Mapper
@Component
public interface UserDao {
    /**
     * 新增用户
     *
     * @param userId   用户id
     * @param fullname 用户姓名
     * @return
     */
    @Insert("insert into t_user(user_id, fullname) value(#{userId},#{fullname})")
    int insertUser(@Param("userId") Long userId, @Param("fullname") String fullname);

    /**
     * 根据id列表查询多个用户
     *
     * @param userIds 用户id列表
     * @return
     */
    @Select({"<script>",
            " select",
            " * ",
            " from t_user t ",
            " where t.user_id in",
            "<foreach collection='userIds' item='id' open='(' separator=',' close=')'>",
            "#{id}",
            "</foreach>",
            "</script>"
    })
    List<Map> selectUserbyIds(@Param("userIds") List<Long> userIds);
}
(4)测试
新增单元测试方法:
@Test
public void testInsertUser() {
    for (int i = 0; i < 10; i++) {
        Long id = i + 1L;
        userDao.insertUser(id, "姓名" + id);
    }
}

@Test
public void testSelectUserbyIds() {
    List<Long> userIds = new ArrayList<>();
    userIds.add(1L);
    userIds.add(2L);
    List<Map> users = userDao.selectUserbyIds(userIds);
    System.out.println(users);
}
执行testInsertUser:

通过日志可以看出t_user表的数据被落在了m0数据源,达到目标。
执行testSelectUserbyIds:
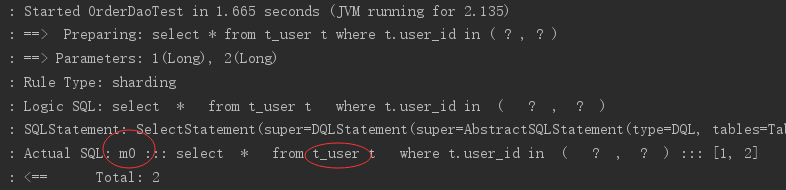
通过日志可以看出t_user表的查询操作被落在了m0数据源,达到目标。