多线程(单例设计模式)(掌握)
多线程(Runtime类)
多线程(Timer)(掌握)
多线程(两个线程间的通信)(掌握)
多线程(三个或三个以上间的线程通信)
多线程(线程间的通信注意的问题)
多线程(JDK1.5的新特性互斥锁)(掌握)
多线程(线程组的概述和使用)(了解)
多线程(线程的五种状态)
多线程(线程池的概述和使用)(了解)
多线程(多线程程序实现的方式3)
设计模式(简单工厂模式概述和使用)
设计模式(工厂方法模式的概述和使用)
GUI(如何创建一个窗口并显示)
GUI(布局管理器)
GUI(窗体监听)
GUI(鼠标监听)
GUI(键盘监听和键盘事件)
GUI(动作监听)
设计模式(适配器设计模式)
GUI(需要知道的)
###25.01_多线程(单例设计模式)(掌握)
单例设计模式:保证类在内存中只有一个对象。
步骤:
1,私有构造方法,其他类不能访问该构造方法了
2,创建本类对象
3,对外提供公共的访问方法
如何保证类在内存中只有一个对象呢?
(1)控制类的创建,不让其他类来创建本类的对象。private
(2)在本类中定义一个本类的对象。Singleton s;
(3)提供公共的访问方式。 public static Singleton getInstance(){return s}
单例写法两种:
(1)饿汉式 开发用这种方式。
|
/* * 饿汉式 */ class Singleton { //1,私有构造方法,其他类不能访问该构造方法了 private Singleton(){} //2,创建本类对象 private static Singleton s = new Singleton(); //3,对外提供公共的访问方法 public static Singleton getInstance() {//获取实例 return s; } } |
|
Singleton s1 = Singleton.getInstance(); Singleton s2 = Singleton.getInstance(); System.out.println(s1 == s2);//true |
(2)懒汉式 面试写这种方式。多线程的问题?
多条线程的情况下可能产生多个对象
|
/* * 懒汉式,单例的延迟加载模式 */ class Singleton { //1,私有构造方法,其他类不能访问该构造方法了 private Singleton(){} //2,声明一个引用 private static Singleton s ; //3,对外提供公共的访问方法 public static Singleton getInstance() {//获取实例 if(s == null) { //线程1等待,线程2等待 s = new Singleton(); } return s; } } |
|
Singleton s1 = Singleton.getInstance(); Singleton s2 = Singleton.getInstance(); System.out.println(s1 == s2);//true |
(3)第三种格式
|
class Singleton { //1,私有构造方法,其他类不能访问该构造方法了 private Singleton(){} //2,声明一个引用 public static final Singleton s = new Singleton(); } |
|
Singleton s1 = Singleton.s;//成员变量被私有,不能通过类名.调用 //Singleton.s = null;//被final修饰后不能修改了 Singleton s2 = Singleton.s; System.out.println(s1 == s2);//true |
* 饿汉式和懒汉式的区别
* 1,饿汉式是空间换时间,懒汉式是时间换空间
* 2,在多线程访问时,饿汉式不会创建多个对象,而懒汉式有可能会创建多个对象
###25.02_多线程(Runtime类)
Runtime类是一个单例类
|
Runtime r = Runtime.getRuntime();//获取运行时对象 //r.exec("shutdown -s -t 300");//设置关闭前的超时为XXX秒 r.exec("shutdown -a");//取消关机 |
###25.03_多线程(Timer)(掌握)
Timer类:计时器
|
public class Demo3_Timer { public static void main(String[] args) throws InterruptedException { Timer t = new Timer(); //在指定时间安排指定任务 //第一个参数,是安排的任务,第二个参数是执行的时间,第三个参数是过多长时间再重复执行 t.schedule(new MyTimerTask(), new while(true) { Thread.sleep(1000); System.out.println(new Date()); } } } class MyTimerTask extends TimerTask { @Override public void run() { System.out.println("起床背英语单词"); } } |
###25.04_多线程(两个线程间的通信)(掌握)
1.什么时候需要通信
多个线程并发执行时, 在默认情况下CPU是随机切换线程的
如果我们希望他们有规律的执行, 就可以使用通信, 例如每个线程执行一次打印
2.怎么通信
如果希望线程等待, 就调用wait()
如果希望唤醒等待的线程, 就调用notify();
这两个方法必须在同步代码中执行, 并且使用同步锁对象来调用
|
public class Demo1_Notify { public static void main(String[] args) { final Printer p = new Printer(); new Thread() { public void run() { while(true) { try { p.print1(); } catch (InterruptedException e) { e.printStackTrace(); } } } }.start(); new Thread() { public void run() { while(true) { try { p.print2(); } catch (InterruptedException e) { e.printStackTrace(); } } } }.start(); } } //等待唤醒机制 class Printer { private int flag = 1; public void print1() throws InterruptedException { synchronized(this) { if(flag != 1) { this.wait();//当前线程等待 } System.out.print("黑"); System.out.print("马"); System.out.print("程"); System.out.print("序"); System.out.print("员"); System.out.print(" "); flag = 2; this.notify();//随机唤醒单个等待的线程 } } public void print2() throws InterruptedException { synchronized(this) { if(flag != 2) { this.wait(); } System.out.print("传"); System.out.print("智"); System.out.print("播"); System.out.print("客"); System.out.print(" "); flag = 1; this.notify(); } } } |
|
黑马程序员 传智播客 黑马程序员 传智播客 黑马程序员 |
###25.05_多线程(三个或三个以上间的线程通信)
多个线程通信的问题
notify()方法是随机唤醒一个线程
notifyAll()方法是唤醒所有线程
JDK5之前无法唤醒指定的一个线程
如果多个线程之间通信, 需要使用notifyAll()通知所有线程, 用while来反复判断条件
|
public class Demo2_NotifyAll { public static void main(String[] args) { final Printer2 p = new Printer2(); new Thread() { public void run() { while(true) { try { p.print1(); } catch (InterruptedException e) { e.printStackTrace(); } } } }.start(); new Thread() { public void run() { while(true) { try { p.print2(); } catch (InterruptedException e) { e.printStackTrace(); } } } }.start(); new Thread() { public void run() { while(true) { try { p.print3(); } catch (InterruptedException e) { e.printStackTrace(); } } } }.start(); } } /* 1,在同步代码块中,用哪个对象锁,就用哪个对象调用wait方法 * 2,为什么wait方法和notify方法定义在Object这类中? * 因为锁对象可以是任意对象,Object是所有的类的基类,所以wait方法和notify方法需要定义在Object这个类中 * 3,sleep方法和wait方法的区别? * a,sleep方法必须传入参数,参数就是时间,时间到了自动醒来 * wait方法可以传入参数也可以不传入参数,传入参数就是在参数的时间结束后等待,不传入参数就是直接等待 * b,sleep方法在同步函数或同步代码块中,不释放锁,睡着了也抱着锁睡 * wait方法在同步函数或者同步代码块中,释放锁 */ class Printer2 { private int flag = 1; public void print1() throws InterruptedException { synchronized(this) { while(flag != 1) { this.wait();//当前线程等待 } System.out.print("黑"); System.out.print("马"); System.out.print("程"); System.out.print("序"); System.out.print("员"); System.out.print(" "); flag = 2; //this.notify();//随机唤醒单个等待的线程 this.notifyAll(); } } public void print2() throws InterruptedException { synchronized(this) { while(flag != 2) { this.wait();//线程2在此等待 } System.out.print("传"); System.out.print("智"); System.out.print("播"); System.out.print("客"); System.out.print(" "); flag = 3; //this.notify(); this.notifyAll(); } } public void print3() throws InterruptedException { synchronized(this) { while(flag != 3) { this.wait();//线程3在此等待,if语句是在哪里等待,就在哪里起来 //while循环是循环判断,每次都会判断标记 } System.out.print("i"); System.out.print("t"); System.out.print("h"); System.out.print("e"); System.out.print("i"); System.out.print("m"); System.out.print("a"); System.out.print(" "); flag = 1; //this.notify(); this.notifyAll(); } } } |
###25.06_多线程(JDK1.5的新特性互斥锁)(掌握)
1.同步
使用ReentrantLock类的lock()和unlock()方法进行同步
2.通信
使用ReentrantLock类的newCondition()方法可以获取Condition对象
需要等待的时候使用Condition的await()方法, 唤醒的时候用signal()方法
不同的线程使用不同的Condition, 这样就能区分唤醒的时候找哪个线程了
|
public class Demo3_ReentrantLock { public static void main(String[] args) { final Printer3 p = new Printer3(); new Thread() { public void run() { while (true) { try { p.print1(); } catch (InterruptedException e) { e.printStackTrace(); } } } }.start(); new Thread() { public void run() { while (true) { try { p.print2(); } catch (InterruptedException e) { e.printStackTrace(); } } } }.start(); new Thread() { public void run() { while (true) { try { p.print3(); } catch (InterruptedException e) { e.printStackTrace(); } } } }.start(); } } class Printer3 { private ReentrantLock r = new ReentrantLock(); private Condition c1 = r.newCondition(); private Condition c2 = r.newCondition(); private Condition c3 = r.newCondition();//创建3个监视器 private int flag = 1; public void print1() throws InterruptedException {//一个线程上放一个监视器 r.lock(); // 获取锁 if (flag != 1) { c1.await(); } System.out.print("黑"); System.out.print("马"); System.out.print("程"); System.out.print("序"); System.out.print("员"); System.out.print(" "); flag = 2; c2.signal();//唤醒下一个线程 r.unlock(); // 释放锁 } public void print2() throws InterruptedException { r.lock(); if (flag != 2) { c2.await(); } System.out.print("传"); System.out.print("智"); System.out.print("播"); System.out.print("客"); System.out.print(" "); flag = 3; // this.notify(); c3.signal(); r.unlock(); } public void print3() throws InterruptedException { r.lock(); if (flag != 3) { c3.await(); } System.out.print("i"); System.out.print("t"); System.out.print("h"); System.out.print("e"); System.out.print("i"); System.out.print("m"); System.out.print("a"); System.out.print(" "); flag = 1; c1.signal(); r.unlock(); } } |
###25.07_多线程(线程组的概述和使用)(了解)
A:线程组概述
Java中使用ThreadGroup来表示线程组,它可以对一批线程进行分类管理,Java允许程序直接对线程组进行控制。
默认情况下,所有的线程都属于主线程组。
public final ThreadGroup getThreadGroup()//通过线程对象获取他所属于的组
public final String getName()//通过线程组对象获取他组的名字
我们也可以给线程设置分组
1,ThreadGroup(String name) 创建线程组对象并给其赋值名字
2,创建线程对象
3,Thread(ThreadGroup?group, Runnable?target, String?name)
4,设置整组的优先级或者守护线程
B:案例演示
线程组的使用,默认是主线程组
|
public class Demo4_ThreadGroup { public static void main(String[] args) { //demo1(); ThreadGroup tg = new ThreadGroup("我是一个新的线程组");//创建新的线程组 MyRunnable mr = new MyRunnable();//创建Runnable的子类对象 Thread t1 = new Thread(tg, mr, "张三");//将线程t1放在组中 Thread t2 = new Thread(tg, mr, "李四");//将线程t2放在组中 System.out.println(t1.getThreadGroup().getName());//获取组名 System.out.println(t2.getThreadGroup().getName());//我是一个新的线程组 tg.setDaemon(true);//变成守护线程。//通过组名称设置后台线程,表示该组的线程都是后台线程 } public static void demo1() { MyRunnable mr = new MyRunnable(); Thread t1 = new Thread(mr, "张三"); Thread t2 = new Thread(mr, "李四"); ThreadGroup tg1 = t1.getThreadGroup(); ThreadGroup tg2 = t2.getThreadGroup(); System.out.println(tg1.getName());//默认的是主线程main System.out.println(tg2.getName()); } } class MyRunnable implements Runnable { @Override public void run() { for(int i = 0; i < 1000; i++) { System.out.println(Thread.currentThread().getName() + "...." + i); } } } |
###25.08_多线程(线程的五种状态)(掌握)
新建,就绪,运行,阻塞,死亡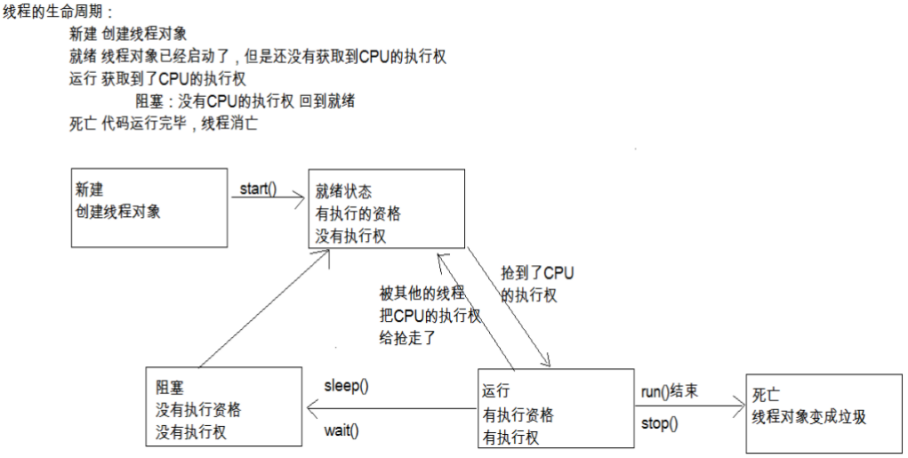
###25.09_多线程(线程池的概述和使用)(了解)
A:线程池概述
程序启动一个新线程成本是比较高的,因为它涉及到要与操作系统进行交互。而使用线程池可以很好的提高性能,尤其是当程序中要创建大量生存期很短的线程时,更应该考虑使用线程池。线程池里的每一个线程代码结束后,并不会死亡,而是再次回到线程池中成为空闲状态,等待下一个对象来使用。在JDK5之前,我们必须手动实现自己的线程池,从JDK5开始,Java内置支持线程池
B:内置线程池的使用概述
JDK5新增了一个Executors工厂类来产生线程池,有如下几个方法
public static ExecutorService newFixedThreadPool(int nThreads)
public static ExecutorService newSingleThreadExecutor()
这些方法的返回值是ExecutorService对象,该对象表示一个线程池,可以执行Runnable对象或者Callable对象代表的线程。它提供了如下方法
Future<?> submit(Runnable task)
<T> Future<T> submit(Callable<T> task)
使用步骤:
创建线程池对象
创建Runnable实例
提交Runnable实例
关闭线程池
C:案例演示
提交的是Runnable
|
public class Demo5_Executors { public static void main(String[] args) { ExecutorService pool = Executors.newFixedThreadPool(2);//创建线程池,能放2个 // 可以执行Runnable对象或者Callable对象代表的线程 pool.submit(new MyRunnable());//将线程放进池子里并执行 pool.submit(new MyRunnable()); pool.shutdown();//关闭线程池 } } class MyRunnable implements Runnable { @Override public void run() { for(int i = 0; i < 1000; i++) { System.out.println(Thread.currentThread().getName() + "...." + i); } } } |
###25.10_多线程(多线程程序实现的方式3)(了解)
提交的是Callable
自定义类实现Callable接口,重写里面的call()方法,call()方法有返回值,能抛异常
|
public class Demo6_Callable { public static void main(String[] args) throws InterruptedException, ExecutionException { ExecutorService pool = Executors.newFixedThreadPool(2);//创建线程池 // 可以执行Runnable对象或者Callable对象代表的线程 Future<Integer> f1 = pool.submit(new MyCallable(100));//将线程放进池子里并执行 Future<Integer> f2 = pool.submit(new MyCallable(50)); System.out.println(f1.get());//5050 System.out.println(f2.get());//1275 pool.shutdown();//关闭线程池 } } class MyCallable implements Callable<Integer> { private int num; public MyCallable(int num) { this.num = num; } @Override public Integer call() throws Exception { int sum = 0; for(int i = 1; i <= num; i++) { sum += i; } return sum; } } |
多线程程序实现的方式3的好处和弊端
好处:
可以有返回值
可以抛出异常
弊端:
代码比较复杂,所以一般不用
###25.11_设计模式(简单工厂模式概述和使用)(了解)
A:简单工厂模式概述
又叫静态工厂方法模式,它定义一个具体的工厂类负责创建一些类的实例
B:优点
客户端不需要在负责对象的创建,从而明确了各个类的职责
C:缺点
这个静态工厂类负责所有对象的创建,如果有新的对象增加,或者某些对象的创建方式不同,就需要不断的修改工厂类,不利于后期的维护
D:案例演示
动物抽象类:public abstract Animal { public abstract void eat(); }
具体狗类:public class Dog extends Animal {}
具体猫类:public class Cat extends Animal {}
开始,在测试类中每个具体的内容自己创建对象,但是,创建对象的工作如果比较麻烦,就需要有人专门做这个事情,所以就知道了一个专门的类来创建对象。
Animal.java
|
public abstract class Animal { public abstract void eat(); } |
Dog.java
|
public class Dog extends Animal { @Override public void eat() { System.out.println("狗吃肉"); } } |
Cat.java
|
public class Cat extends Animal { @Override public void eat() { System.out.println("猫吃鱼"); } } |
AnimalFactory .java
|
public class AnimalFactory { /*public static Dog createDog() { return new Dog(); } public static Cat createCat() { return new Cat(); }*/ //发现方法会定义很多,复用性太差 //改进 public static Animal createAnimal(String name) { if("dog".equals(name)) { return new Dog(); }else if("cat".equals(name)) { return new Cat(); }else { return null; } } } |
Test.java
|
public class Test { public static void main(String[] args) { //Dog d = AnimalFactory.createDog(); Dog d = (Dog) AnimalFactory.createAnimal("dog"); d.eat(); Cat c = (Cat) AnimalFactory.createAnimal("cat"); c.eat(); } } |
###25.12_设计模式(工厂方法模式的概述和使用)(了解)
A:工厂方法模式概述
工厂方法模式中抽象工厂类负责定义创建对象的接口,具体对象的创建工作由继承抽象工厂的具体类实现。
B:优点
客户端不需要在负责对象的创建,从而明确了各个类的职责,如果有新的对象增加,只需要增加一个具体的类和具体的工厂类即可,不影响已有的代码,后期维护容易,增强了系统的扩展性
C:缺点
需要额外的编写代码,增加了工作量
D:案例演示
动物抽象类:public abstract Animal { public abstract void eat(); }
工厂接口:public interface Factory {public abstract Animal createAnimal();}
具体狗类:public class Dog extends Animal {}
具体猫类:public class Cat extends Animal {}
开始,在测试类中每个具体的内容自己创建对象,但是,创建对象的工作如果比较麻烦,就需要有人专门做这个事情,所以就知道了一个专门的类来创建对象。发现每次修改代码太麻烦,用工厂方法改进,针对每一个具体的实现提供一个具体工厂。
狗工厂:public class DogFactory implements Factory {
public Animal createAnimal() {…}
}
猫工厂:public class CatFactory implements Factory {
public Animal createAnimal() {…}
}
|
public abstract class Animal { public abstract void eat(); } |
|
public class Cat extends Animal { @Override public void eat() { System.out.println("猫吃鱼"); } } |
|
public class Dog extends Animal { @Override public void eat() { System.out.println("狗吃肉"); } } |
|
public class CatFactory implements Factory { @Override public Animal createAnimal() { return new Cat(); } } |
|
public class DogFactory implements Factory { @Override public Animal createAnimal() { return new Dog(); } } |
|
public interface Factory { public Animal createAnimal(); } |
|
public class Test { public static void main(String[] args) { DogFactory df = new DogFactory(); Dog d = (Dog) df.createAnimal(); d.eat(); } } |
###25.13_GUI(如何创建一个窗口并显示)
Graphical User Interface(图形用户接口)。一次编译到处调试
Frame f = new Frame(“my window”);
f.setLayout(new FlowLayout());//设置布局管理器
f.setSize(500,400);//设置窗体大小
f.setLocation(300,200);//设置窗体出现在屏幕的位置
f.setIconImage(Toolkit.getDefaultToolkit().createImage("qq.png"));
f.setVisible(true);
###25.14_GUI(布局管理器)
FlowLayout(流式布局管理器)
从左到右的顺序排列。
Panel默认的布局管理器。
BorderLayout(边界布局管理器)
东,南,西,北,中
Frame默认的布局管理器。
GridLayout(网格布局管理器)
规则的矩阵
CardLayout(卡片布局管理器)
选项卡
GridBagLayout(网格包布局管理器)
非规则的矩阵
###25.15_GUI(窗体监听)
Frame f = new Frame("我的窗体");
//事件源是窗体,把监听器注册到事件源上
//事件对象传递给监听器
f.addWindowListener(new WindowAdapter() {
public void windowClosing(WindowEvent e) {
//退出虚拟机,关闭窗口
System.exit(0);
}
});
###25.16_GUI(鼠标监听)
###25.17_GUI(键盘监听和键盘事件)
###25.18_GUI(动作监听)
|
public class Demo1_Frame { public static void main(String[] args) { Frame f = new Frame("我的第一个窗口"); f.setSize(400, 600);//设置窗体大小 f.setLocation(500, 50);//设置窗体位置 f.setIconImage(Toolkit.getDefaultToolkit().createImage("qq.png"));//图标 Button b1 = new Button("按钮一"); Button b2 = new Button("按钮二"); f.add(b1); f.add(b2); f.setLayout(new FlowLayout());//设置为流式布局管理器 //f.addWindowListener(new MyWindowAdapter()); //窗体监听 f.addWindowListener(new WindowAdapter() {//匿名内部类 @Override public void windowClosing(WindowEvent e) { System.exit(0); } }); //鼠标监听 b1.addMouseListener(new MouseAdapter() { /*@Override public void mouseClicked(MouseEvent e) {//单击 System.exit(0); }*/ @Override public void mouseReleased(MouseEvent e) {//释放 System.exit(0); } }); //键盘监听 b1.addKeyListener(new KeyAdapter() { @Override public void keyReleased(KeyEvent e) {//释放 //System.exit(0); System.out.println(e.getKeyCode()); //if(e.getKeyCode() == 27) {//相当于Esc键 if(e.getKeyCode() == KeyEvent.VK_ESCAPE){ System.exit(0); } } }); //动作监听 b2.addActionListener(new ActionListener() {//添加动作监听,应用场景就是暂停视频和播放视频 @Override public void actionPerformed(ActionEvent e) { System.exit(0); } }); f.setVisible(true);//设置窗体可见 } } /*class MyWindowListener implements WindowListener { @Override public void windowOpened(WindowEvent e) { } @Override public void windowClosing(WindowEvent e) { System.exit(0); } @Override public void windowClosed(WindowEvent e) { System.out.println("Closed"); } @Override public void windowIconified(WindowEvent e) { } @Override public void windowDeiconified(WindowEvent e) { } @Override public void windowActivated(WindowEvent e) { } @Override public void windowDeactivated(WindowEvent e) { } } */ /*class MyWindowAdapter extends WindowAdapter {//用哪个重写哪个方法 @Override public void windowClosing(WindowEvent e) { System.exit(0); } }*/ |
###25.19_设计模式(适配器设计模式)(掌握)
a.什么是适配器
在使用监听器的时候, 需要定义一个类事件监听器接口.
通常接口中有多个方法, 而程序中不一定所有的都用到, 但又必须重写, 这很繁琐.
适配器简化了这些操作, 我们定义监听器时只要继承适配器, 然后重写需要的方法即可.
b.适配器原理
适配器就是一个类, 实现了监听器接口, 所有抽象方法都重写了, 但是方法全是空的.
适配器类需要定义成抽象的,因为创建该类对象,调用空方法是没有意义的
目的就是为了简化程序员的操作, 定义监听器时继承适配器, 只重写需要的方法就可以了.
|
public class Demo1_Adapter { public static void main(String[] args) { } } interface 和尚 { public void 打坐(); public void 念经(); public void 撞钟(); public void 习武(); } abstract class 天罡星 implements 和尚 {//声明成抽象的原因是,不想让其他类创建本类对象,因为创建也没有意义,方法都是空的 @Override public void 打坐() { } @Override public void 念经() { } @Override public void 撞钟() { } @Override public void 习武() { } } class 鲁智深 extends 天罡星 { public void 习武() { System.out.println("倒拔垂杨柳"); System.out.println("拳打镇关西"); System.out.println("大闹野猪林"); System.out.println("......"); } } |
###25.20_GUI(需要知道的)
事件处理
事件: 用户的一个操作
事件源: 被操作的组件
监听器: 一个自定义类的对象, 实现了监听器接口, 包含事件处理方法,把监听器添加在事件源上, 当事件发生的时候虚拟机就会自动调用监听器中的事件处理方法
###25.21_day25总结
把今天的知识点总结一遍。
###25.22_day25作业
1,熟练掌握单例设计模式,适配器设计模式
2,饿汉式和懒汉式的区别
3,单例的延迟加载模式
4,熟练掌握Timer类
5,wait和sleep的区别