很郁闷,这个查了很多资料,就是put与delete还是不好用。
但是看了一个文档后解决了,有些感谢这篇文档:http://blog.csdn.net/tiberroot/article/details/76615727
一:程序
1.配置过滤器
 1 <?xml version="1.0" encoding="UTF-8"?>
 2 <web-app xmlns:xsi="http://www.w3.org/2001/XMLSchema-instance"
 3     xmlns="http://xmlns.jcp.org/xml/ns/javaee"
 4     xsi:schemaLocation="http://xmlns.jcp.org/xml/ns/javaee http://xmlns.jcp.org/xml/ns/javaee/web-app_3_1.xsd"
 5     id="WebApp_ID" version="3.1">
 6
 7
 8     <!-- 配置过滤器 -->
 9     <filter>
10         <filter-name>HiddenHttpMethodFilter</filter-name>
11         <filter-class>org.springframework.web.filter.HiddenHttpMethodFilter</filter-class>
12     </filter>
13     <filter-mapping>
14         <filter-name>HiddenHttpMethodFilter</filter-name>
15         <url-pattern>/*</url-pattern>
16     </filter-mapping>
17
18     <!-- 配置DispatchServlet -->
19     <servlet>
20         <servlet-name>DispatchServlet</servlet-name>
21         <servlet-class>org.springframework.web.servlet.DispatcherServlet</servlet-class>
22         <init-param>
23             <param-name>contextConfigLocation</param-name>
24             <param-value>classpath:springmcv.xml</param-value>
25         </init-param>
26         <load-on-startup>1</load-on-startup>
27     </servlet>
28     <servlet-mapping>
29         <servlet-name>DispatchServlet</servlet-name>
30         <url-pattern>/</url-pattern>
31     </servlet-mapping>
32
33 </web-app>
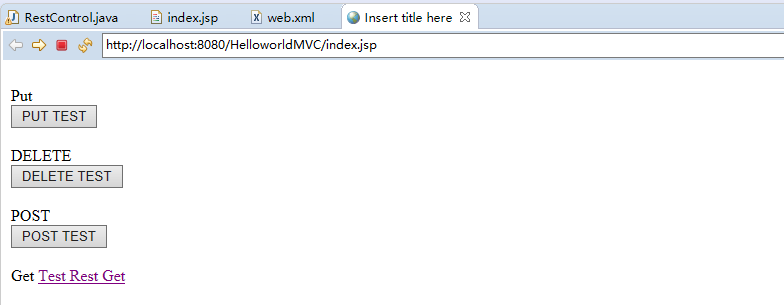
2.index.jsp
 1 <%@ page language="java" contentType="text/html; charset=utf-8"
 2     pageEncoding="utf-8"%>
 3 <!DOCTYPE html PUBLIC "-//W3C//DTD HTML 4.01 Transitional//EN" "http://www.w3.org/TR/html4/loose.dtd">
 4 <html>
 5 <head>
 6 <meta http-equiv="Content-Type" content="text/html; charset=utf-8">
 7 <title>Insert title here</title>
 8 </head>
 9 <body>
10     <!-- Rest URL Test -->
11     <br>
12     Put
13     <form action="helloworld4/1" method="post">
14         <input type="hidden" name="_method" value="PUT"/>
15         <input type="submit" value="PUT TEST">
16     </form>
17     <br>
18     DELETE
19     <form action="helloworld3/1" method="post">
20         <input type="hidden" name="_method" value="DELETE"/>
21         <input type="submit" value="DELETE TEST">
22     </form>
23     <br>
24     POST
25     <form action="helloworld2" method="post">
26         <input type="submit" value="POST TEST">
27     </form>
28     <br>
29     Get
30     <a href="helloworld2/1">Test Rest Get</a>
31     <br><br>
32 </body>
33 </html>
3.RestController.java
注意点,是需要将put与delete加上注解@ResponseBody
 1 package com.spring.it;
 2
 3 import org.springframework.stereotype.Controller;
 4 import org.springframework.validation.BindingResult;
 5 import org.springframework.web.bind.annotation.PathVariable;
 6 import org.springframework.web.bind.annotation.RequestMapping;
 7 import org.springframework.web.bind.annotation.RequestMethod;
 8 import org.springframework.web.bind.annotation.ResponseBody;
 9
10 @Controller
11 public class RestControl {
12     //Get
13     @RequestMapping(value="/helloworld2/{id}",method=RequestMethod.GET)
14     public String hello1(@PathVariable(value="id") Integer id) {
15         System.out.println("id="+id);
16         return "success";
17     }
18     //post
19     @RequestMapping(value="/helloworld2",method=RequestMethod.POST)
20     public String hello2() {
21         System.out.println("post method");
22         return "success";
23     }
24     //Delete
25     @ResponseBody
26     @RequestMapping(value="/helloworld3/{id}",method=RequestMethod.DELETE)
27     public String hello3(@PathVariable(value="id") Integer id) {
28         System.out.println("DELETE id="+id);
29         return "success";
30     }
31     //Put
32     @ResponseBody
33     @RequestMapping(value="/helloworld4/{id}",method=RequestMethod.PUT)
34     public String hello4(@PathVariable(value="id") Integer id) {
35         System.out.println("PUT id="+id);
36         return "success";
37     }
38 }
4.效果
1.介绍
这个注解表示该方法的返回结果直接写入HTTP response body中,一般在异步获取数据时使用。
在使用@RequestMapping后,返回值通常解析为跳转路径。加上@responsebody后,返回结果直接写入HTTP response body中,不会被解析为跳转路径。比如异步请求,希望响应的结果是json数据,那么加上@responsebody后,就会直接返回json数据。
@responseBody注解的作用是将controller的方法返回的对象通过适当的转换器转换为指定的格式之后,写入到response对象的body区,通常用来返回JSON数据或者是XML数据,需要注意的呢,在使用此注解之后不会再走试图处理器,而是直接将数据写入到输入流中,他的效果等同于通过response对象输出指定格式的数据。
@RequestMapping("/login")
@ResponseBody
public User login(User user){
return user;
}
User字段:userName pwd
那么在前台接收到的数据为:'{"userName":"xxx","pwd":"xxx"}'