1.大纲
aqs的思路
为什么要学aqs
aqs的作用
aqs的重要性
aqs的原理
应用实例,源码解析
aqs实现自己的门闩
一:AQS的思路
1.
先从应用层面理解为什么需要他,如何使用
了解使用场景
再去分析它的结构
二:为什么要学习
1.锁与协作类的共同点
闸门
2.协作同步功能
类似的还有CountDownLatch
他们的底层都有一个共同的基类,就是AQS
三:为什么要学AQS
1.
很多工作都是类似的,如果能提起一个工具类,对于一些类而言,就可以屏蔽很多细节,只要关注业务逻辑了
四:AQS的重要性
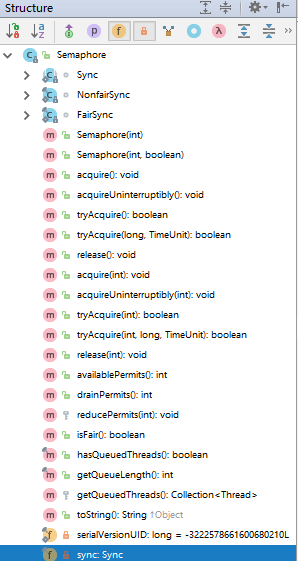
1.Semaphore与AQS的关系
Semaphore内部有一个Sync类,Sync类继承了AQS
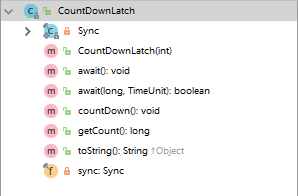
2.CountDownLatch与AQS的关系
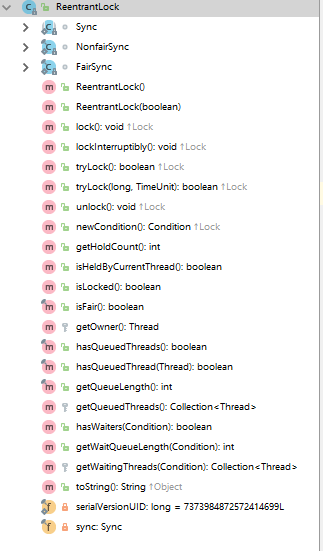
3.ReenTractLock与AQS
4.AQS的作用
是一个用于构建锁,同步器,协作工具类的工具类。有了AQS,很多协作工具类都可以被方便的写出来
五:AQS原理
1.核心三大部分
state
控制线程抢锁和配合的FIFO队列
协作工具类去实现的获取与释放的重要方法
2.state
根据具体的实现类的不同而不同,例如在信号量中,表示剩余的许可证的数量,而countDownLatch里,它表示还需要倒数的数量
state是volatile修饰的,会被并发的修改,所以都需要保证线程安全。getState,setState,compareAndSetState操作读取更新,都是依赖于atomic的支持。
其中,在AbstractQueueSynchronizer中的方法:
    protected final boolean compareAndSetState(int expect, int update) {
        // See below for intrinsics setup to support this
        return unsafe.compareAndSwapInt(this, stateOffset, expect, update);
    }
可以发现,底层是保证线程安全的。
在ReentractLock中,state是锁的占有情况,包括可重入计数,当state是0的时候,表示lock不被任何线程占有
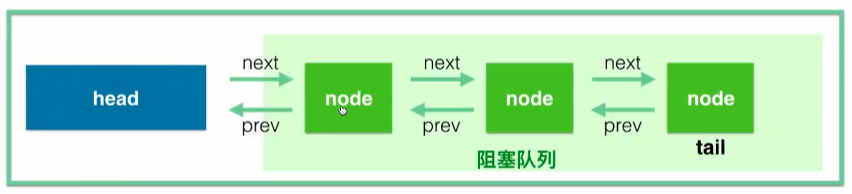
2.FIFO队列
这个队列是存在等待的线程,AQS就是排队管理器。
当多个线程用同一个锁时,必须有排队机制将没能拿到锁的线程串在一起。当锁释放的时候,锁管理器就会挑选一个合适的线程来占有这个刚刚释放的锁
是一个双向队列
3.需要实现的释放获取的方法
获取方法:
会依赖state变量,经常会阻塞
在Semaphore中,获取就是acquire方法,作用是获取许可证
在CountDownLatch中,获取就是await方法,作用是等待,知道结束
释放方法:
释放不会阻塞
4.需要重写tryAcquire和tryRelease方法
5.Aqs用法
六:AQS在CountDownLatch中的应用
1.构造函数
    public CountDownLatch(int count) {
        if (count < 0) throw new IllegalArgumentException("count < 0");
        this.sync = new Sync(count);
    }
然后,进入Sync:
private static final class Sync extends AbstractQueuedSynchronizer {
        private static final long serialVersionUID = 4982264981922014374L;

        Sync(int count) {
            setState(count);
        }

        int getCount() {
            return getState();
        }

        protected int tryAcquireShared(int acquires) {
            return (getState() == 0) ? 1 : -1;
        }

        protected boolean tryReleaseShared(int releases) {
            // Decrement count; signal when transition to zero
            for (;;) {
                int c = getState();
                if (c == 0)
                    return false;
                int nextc = c-1;
                if (compareAndSetState(c, nextc))
                    return nextc == 0;
            }
        }
    }
然后进入的是aqs的setState方法:
protected final void setState(int newState) {
        state = newState;
    }
2.getCount方法
public long getCount() {
        return sync.getCount();
    }
进入getCount:
private static final class Sync extends AbstractQueuedSynchronizer {
        private static final long serialVersionUID = 4982264981922014374L;

        Sync(int count) {
            setState(count);
        }

        int getCount() {
            return getState();
        }

        protected int tryAcquireShared(int acquires) {
            return (getState() == 0) ? 1 : -1;
        }
进入aqs中:
    /**
     * The synchronization state.
     */
    private volatile int state;

    /**
     * Returns the current value of synchronization state.
     * This operation has memory semantics of a {@code volatile} read.
     * @return current state value
     */
    protected final int getState() {
        return state;
    }
3.await方法
public void await() throws InterruptedException {
        sync.acquireSharedInterruptibly(1);
    }
然后进入acquireSharedInterruptibly
public final void acquireSharedInterruptibly(int arg)
            throws InterruptedException {
        if (Thread.interrupted())
            throw new InterruptedException();
        if (tryAcquireShared(arg) < 0)
            doAcquireSharedInterruptibly(arg);
    }
然后,进入tryAcquireShared方法,在CountDownLatch里已经实现了:
protected int tryAcquireShared(int acquires) {
            return (getState() == 0) ? 1 : -1;
        }
当不等于0的时候,表示需要进行等待,具体的doAcquireSharedInterruptibly,在aqs中:
  /**
     * Acquires in shared interruptible mode.
     * @param arg the acquire argument
     */
    private void doAcquireSharedInterruptibly(int arg)
        throws InterruptedException {
        final Node node = addWaiter(Node.SHARED);
        boolean failed = true;
        try {
            for (;;) {
                final Node p = node.predecessor();
                if (p == head) {
                    int r = tryAcquireShared(arg);
                    if (r >= 0) {
                        setHeadAndPropagate(node, r);
                        p.next = null; // help GC
                        failed = false;
                        return;
                    }
                }
                if (shouldParkAfterFailedAcquire(p, node) &&
                    parkAndCheckInterrupt())
                    throw new InterruptedException();
            }
        } finally {
            if (failed)
                cancelAcquire(node);
        }
    }
这个方法是入队列进行等待,然后进行阻塞。
先对当前的线程包装成Node节点,如下:
阻塞是parkAndCheckInterrupt方法做的,进入看一下源码:
private final boolean parkAndCheckInterrupt() {
        LockSupport.park(this);
        return Thread.interrupted();
    }
再进入park方法:
public static void park(Object blocker) {
        Thread t = Thread.currentThread();
        setBlocker(t, blocker);
        UNSAFE.park(false, 0L);
        setBlocker(t, null);
    }
在上面可以知道UNSAFE.park是一个native方法,就是讲当前线程进行挂起。
总结:
doAcquireSharedInterruptibly就是讲当前的线程进行挂起
4.countDown方法
public void countDown() {
        sync.releaseShared(1);
    }
进入releaseShared方法:
public final boolean releaseShared(int arg) {
        if (tryReleaseShared(arg)) {
            doReleaseShared();
            return true;
        }
        return false;
    }
分析tryReleaseShared方法
protected boolean tryReleaseShared(int releases) {
            // Decrement count; signal when transition to zero
            for (;;) {
                int c = getState();
                if (c == 0)
                    return false;
                int nextc = c-1;
                if (compareAndSetState(c, nextc))
                    return nextc == 0;
            }
        }
返回false,表示这次不需要进行释放,已经被释放过了。进行state-1,使用cas进行更新;如果不成功,再进行for循环,进行更新,一旦等于0,则返回true
然后,在返回true的时候,会进行doReleaseShared方法,这个方法是唤醒等待的线程
七::AQS在Semaphore中的应用
1.state
表示许可证的剩余数量
2.acquire方法
public void acquire() throws InterruptedException {
        sync.acquireSharedInterruptibly(1);
    }
进入acqiureSharedInterruptibly:
    public final void acquireSharedInterruptibly(int arg)
            throws InterruptedException {
        if (Thread.interrupted())
            throw new InterruptedException();
        if (tryAcquireShared(arg) < 0)
            doAcquireSharedInterruptibly(arg);
    }
发现和上面的countDownLatch使用的一样
针对参数不同,有公平与不公平两种方式:
    /**
     * NonFair version
     */
    static final class NonfairSync extends Sync {
        private static final long serialVersionUID = -2694183684443567898L;

        NonfairSync(int permits) {
            super(permits);
        }

        protected int tryAcquireShared(int acquires) {
            return nonfairTryAcquireShared(acquires);
        }
    }
这个是不公平的方式,进入nonfairTryAcquireShared
    abstract static class Sync extends AbstractQueuedSynchronizer {
        private static final long serialVersionUID = 1192457210091910933L;

        Sync(int permits) {
            setState(permits);
        }

        final int getPermits() {
            return getState();
        }

        final int nonfairTryAcquireShared(int acquires) {
            for (;;) {
                int available = getState();
                int remaining = available - acquires;
                if (remaining < 0 ||
                    compareAndSetState(available, remaining))
                    return remaining;
            }
        }
获取当前可用许可证,然后进行计算。如果小于0,则返回一个负数,外面的方法就是进行等待阻塞;如果不小于0,则使用cas将剩余的许可证给设置进去,如果成功,同时返回一个正数,说明有可用的许可证;如果cas失败,则新一轮的循环
八:AQS在ReenTrantLock中的应用
1.unlock方法
public void unlock() {
        sync.release(1);
    }
进入release方法
public final boolean release(int arg) {
        if (tryRelease(arg)) {
            Node h = head;
            if (h != null && h.waitStatus != 0)
                unparkSuccessor(h);
            return true;
        }
        return false;
    }
进入tryRelease方法:
protected final boolean tryRelease(int releases) {
            int c = getState() - releases;
            if (Thread.currentThread() != getExclusiveOwnerThread())
                throw new IllegalMonitorStateException();
            boolean free = false;
            if (c == 0) {
                free = true;
                setExclusiveOwnerThread(null);
            }
            setState(c);
            return free;
        }
如果,当前线程没有持有锁,则抛出异常
计算一个c,其中getState是已经重入的次数
如果不等于0,则将c设置
如果等于0,则要释放锁,让free为true,同时,将当前的线程不再持有锁,null即可
再回到上面的代码。
unparkSuccessor方法,后面的节点会被唤醒
2.lock方法
public void lock() {
        sync.lock();
    }
然后进行lock
    public ReentrantLock(boolean fair) {
        sync = fair ? new FairSync() : new NonfairSync();
    }

    /**
     * Acquires the lock.
     *
     * <p>Acquires the lock if it is not held by another thread and returns
     * immediately, setting the lock hold count to one.
     *
     * <p>If the current thread already holds the lock then the hold
     * count is incremented by one and the method returns immediately.
     *
     * <p>If the lock is held by another thread then the
     * current thread becomes disabled for thread scheduling
     * purposes and lies dormant until the lock has been acquired,
     * at which time the lock hold count is set to one.
     */
    public void lock() {
        sync.lock();
    }
因为有公平与非公平的不同实现方式,具体是那一个,可以看到上面有一个sync的判断
先看不公平的实现:
final void lock() {
            if (compareAndSetState(0, 1))
                setExclusiveOwnerThread(Thread.currentThread());
            else
                acquire(1);
        }
进行cas操作,如果是0,表示没有锁,将当前的线程进行加锁
如果失败,则进入else:
  public final void acquire(int arg) {
        if (!tryAcquire(arg) &&
            acquireQueued(addWaiter(Node.EXCLUSIVE), arg))
            selfInterrupt();
    }
然后看非公平的tryAcquire
protected final boolean tryAcquire(int acquires) {
            return nonfairTryAcquire(acquires);
        }
在sync中,看nobfairTryAcquire:
final boolean nonfairTryAcquire(int acquires) {
            final Thread current = Thread.currentThread();
            int c = getState();
            if (c == 0) {
                if (compareAndSetState(0, acquires)) {
                    setExclusiveOwnerThread(current);
                    return true;
                }
            }
            else if (current == getExclusiveOwnerThread()) {
                int nextc = c + acquires;
                if (nextc < 0) // overflow
                    throw new Error("Maximum lock count exceeded");
                setState(nextc);
                return true;
            }
            return false;
        }
如果是0,表示没有线程持有锁,则加锁就行
否则,如果线程恰好是这个锁的持有者,就是一个重入的操作,在当前的基础上加上acquire,如果小于0,表示溢出了。不然就setState。
· 再继续,如果又不是当前持有的锁,返回false。
所以,返回上一层,tryAcquire表示获取锁失败,因为是取非,则执行acquireQueued,当前的线程被包装,放入等待队列进行等待
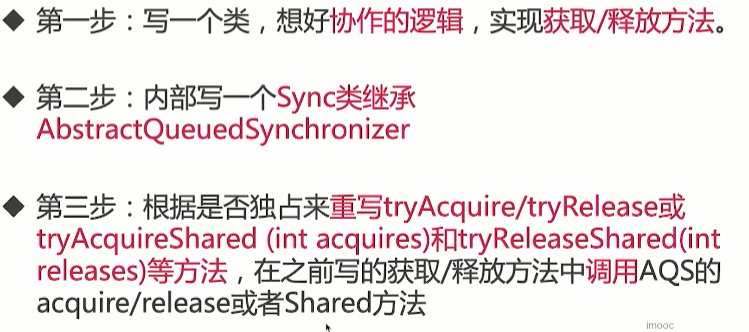
九:实现一个自己的门闩
1.程序
package com.jun.juc.aqs;

import java.util.concurrent.locks.AbstractQueuedSynchronizer;

/**
 * 使用aqs实现一个简单的门闩
 */
public class OneShotLatch {
    // 不知道是使用独占的还是共享的,所以,不强制重写
    private class Sync extends AbstractQueuedSynchronizer{
        @Override
        protected int tryAcquireShared(int arg) {
            return (getState()==1) ? 1 : -1;
        }

        @Override
        protected boolean tryReleaseShared(int arg) {
            setState(1);
            return true;
        }
    }

    private final Sync sync = new Sync();

    /**
     * 等待
     */
    public void await(){
        sync.acquireShared(0);
    }

    public void signal(){
        sync.releaseShared(0);
    }

    public static void main(String[] args) throws Exception{
        OneShotLatch oneShotLatch = new OneShotLatch();
        for (int i=0; i<10; i++){
            new Thread(new Runnable() {
                @Override
                public void run() {
                    System.out.println("尝试获取");
                    oneShotLatch.await();
                    System.out.println("门闩开了");
                }
            }).start();
        }
        Thread.sleep(5000);
        oneShotLatch.signal();
        new Thread(new Runnable() {
            @Override
            public void run() {
                System.out.println("尝试获取");
                oneShotLatch.await();
                System.out.println("门闩开了");
            }
        }).start();
    }
}
效果:
Connected to the target VM, address: '127.0.0.1:64474', transport: 'socket'
尝试获取
尝试获取
尝试获取
尝试获取
尝试获取
尝试获取
尝试获取
尝试获取
尝试获取
尝试获取
Disconnected from the target VM, address: '127.0.0.1:64474', transport: 'socket'
门闩开了
门闩开了
门闩开了
门闩开了
门闩开了
门闩开了
门闩开了
门闩开了
门闩开了
门闩开了
尝试获取
门闩开了

Process finished with exit code 0