在虚拟机了安装没有什么好说的。
在本地安装还是参考官网安装教程才好
官网教程:https://tutorials.ubuntu.com/tutorial/tutorial-install-ubuntu-desktop?_ga=2.67812564.411769183.1579400364-1421501689.1579400364#0
1. Overview
The Ubuntu desktop is easy to use, easy to install and includes everything you need to run your organisation, school, home or enterprise. It's also open source, secure, accessible and free to download.

In this tutorial, we're going to install Ubuntu desktop onto your computer, using either your computer's DVD drive or a USB flash drive.
2. Requirements
You'll need to consider the following before starting the installation:
- Connect your laptop to a power source.
- Ensure you have at least 25GB of free storage space, or 5GB for a minimal installation.
- Have access to either a DVD or a USB flash drive containing the version of Ubuntu you want to install.
- Make sure you have a recent backup of your data. While it's unlikely that anything will go wrong, you can never be too prepared.
See Installation/System Requirements for more specific details on hardware requirements. We also have several tutorials that explain how to create an Ubuntu DVD or USB flash drive.
3. Boot from DVD(一般都用USB,此处略过)
4. Boot from USB flash drive
Most computers will boot from USB automatically. Simply insert the USB flash drive and either power on your computer or restart it. You should see the same welcome window we saw in the previous ‘Install from DVD' step, prompting you to choose your language and either install or try the Ubuntu desktop.
If your computer doesn't automatically boot from USB, try holding F12 when your computer first starts. With most machines, this will allow you to select the USB device from a system-specific boot menu.
F12 is the most common key for bringing up your system's boot menu, but Escape, F2 and F10 are common alternatives. If you're unsure, look for a brief message when your system starts - this will often inform you of which key to press to bring up the boot menu.
5. Prepare to install Ubuntu
You will first be asked to select your keyboard layout. If the installer doesn't guess the default layout correctly, use the ‘Detect Keyboard Layout' button to run through a brief configuration procedure.
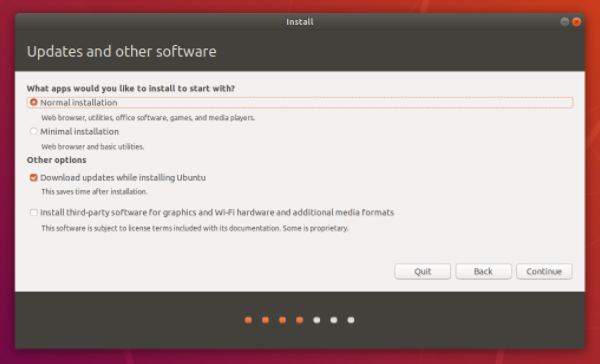
After selecting Continue you will be asked What apps would you like to install to start with? The two options are ‘Normal installation' and ‘Minimal installation'. The first is the equivalent to the old default bundle of utilities, applications, games and media players - a great launchpad for any Linux installation. The second takes considerably less storage space and allows you to install only what you need.
Beneath the installation-type question are two checkboxes; one to enable updates while installing and another to enable third-party software.
- We advise enabling both
Download updatesandInstall third-party software. - Stay connected to the internet so you can get the latest updates while you install Ubuntu.
- If you are not connected to the internet, you will be asked to select a wireless network, if available. We advise you to connect during the installation so we can ensure your machine is up to date
6. Allocate drive space
Use the checkboxes to choose whether you'd like to install Ubuntu alongside another operating system, delete your existing operating system and replace it with Ubuntu, or — if you're an advanced user — choose the 'Something else' option.

Options related to side-by-side installation or erasing a previous installation are only offered when pre-existing installations are detected.
7. Begin installation
After configuring storage, click on the ‘Install Now' button. A small pane will appear with an overview of the storage options you've chosen, with the chance to go back if the details are incorrect.
Click Continue to fix those changes in place and start the installation process.

后面的步骤基本上都是下一步下一步的问题了,不赘述。