neutron组件安装分为控制节点和计算节点,还是先从控制节点安装
1、前提条件,数据库为nova创建库和账户密码来连接数据库
# mysql -u root -p
MariaDB [(none)]> CREATE DATABASE neutron;
MariaDB [(none)]> GRANT ALL PRIVILEGES ON neutron.* TO 'neutron'@'localhost' IDENTIFIED BY 'neutron';
MariaDB [(none)]> GRANT ALL PRIVILEGES ON neutron.* TO 'neutron'@'%' IDENTIFIED BY 'neutron';
2、向keystone验明身份
# source admin-openrc
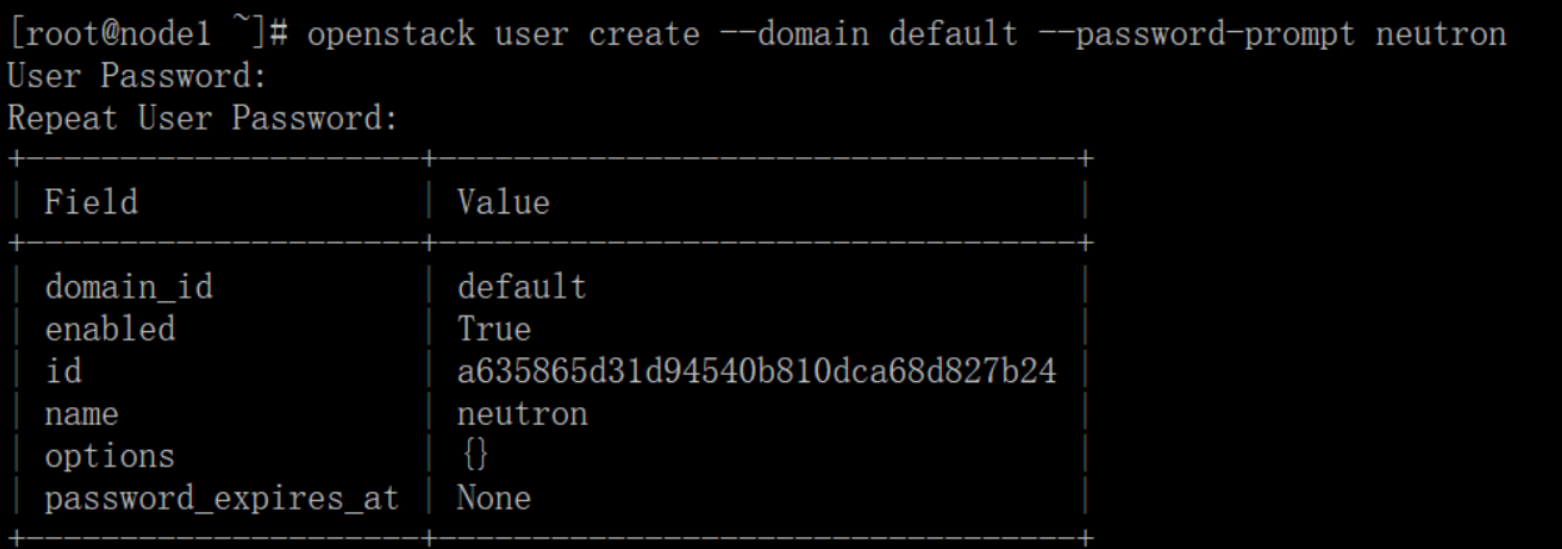
3、创建neutron用户:
# openstack user create --domain default --password-prompt neutron
    设定密码:neutron
将admin角色添加到neutron用户上:
# openstack role add --project service --user neutron admin
创建neutron服务实体:
# openstack service create --name neutron --description "OpenStack Networking" network

创建网络服务API endpoints:
# openstack endpoint create --region RegionOne network public http://192.168.101.10:9696
# openstack endpoint create --region RegionOne network internal http://192.168.101.10:9696
# openstack endpoint create --region RegionOne network admin http://192.168.101.10:9696
配置网络选项:
有两种网络选项:
1、provider (external) networks(供应商网络)
2、self-service networks(私有自助网络)
这里以provider networks作为示例演示,以后会推出第二种网络模式
开始进行安装网络组件:
# yum install openstack-neutron openstack-neutron-ml2 openstack-neutron-linuxbridge ebtables
然后进行配置数据库、认证、消息队列等信息:编辑配置文件/etc/neutron/neutron.conf
[database]
connection = mysql+pymysql://neutron:neutron@192.168.101.10/neutron

[DEFAULT]
core_plugin = ml2
service_plugins =
transport_url = rabbit://openstack:openstack@192.168.101.10
auth_strategy = keystone
notify_nova_on_port_status_changes = true
notify_nova_on_port_data_changes = true
    启用ml2插件并disable additional plug-ins


[keystone_authtoken]
auth_uri = http://192.168.101.10:5000
auth_url = http://192.168.101.10:35357
memcached_servers = 192.168.101.10:11211
auth_type = password
project_domain_name = default
user_domain_name = default
project_name = service
username = neutron
password = neutron


[nova]
auth_url = http://192.168.101.10:35357
auth_type = password
project_domain_name = default
user_domain_name = default
region_name = RegionOne
project_name = service
username = nova
password = nova

[oslo_concurrency]
lock_path = /var/lib/neutron/tmp
配置模块layer2 插件信息:修改配置文件/etc/neutron/plugins/ml2/ml2_conf.ini
[ml2]
type_drivers = flat,vlan
tenant_network_types =            取消self-service networks
mechanism_drivers = linuxbridge      启用Linux bridge mechanism
extension_drivers = port_security     启用the port security extension driver


[ml2_type_flat]
flat_networks = provider

[securitygroup]
enable_ipset = true
配置Linux桥接agent:修改/etc/neutron/plugins/ml2/linuxbridge_agent.ini
[linux_bridge]
physical_interface_mappings = provider:PROVIDER_INTERFACE_NAME
    Replace PROVIDER_INTERFACE_NAME with the name of the underlying provider physical network interface(底层提供商物理网络接口的名称也就是ens33)
node1的底层物理网卡设备为ens33,所以这里设置为这个


[vxlan]
enable_vxlan = false

[securitygroup]
enable_security_group = true
firewall_driver = neutron.agent.linux.iptables_firewall.IptablesFirewallDriver
配置dhcp agent:修改/etc/neutron/dhcp_agent.ini
[DEFAULT]
interface_driver = linuxbridge
dhcp_driver = neutron.agent.linux.dhcp.Dnsmasq
enable_isolated_metadata = true
上面总共修改了下面四种配置文件:
# vim /etc/neutron/neutron.conf
# vim /etc/neutron/plugins/ml2/ml2_conf.ini
# vim /etc/neutron/plugins/ml2/linuxbridge_agent.ini
# vim /etc/neutron/dhcp_agent.ini
配置完了网络服务后,然后开启配置metadata agent:
修改配置文件:/etc/neutron/metadata_agent.ini
[DEFAULT]
nova_metadata_ip = 192.168.101.10
metadata_proxy_shared_secret = METADATA_SECRET
    (使用neutron或者matadata或者其他都可以,保持和下面一直,这是自定义的密钥),这里采用neutron,Replace METADATA_SECRET with a suitable secret for the metadata proxy.
配置计算服务能够使用网络服务:修改/etc/nova/nova.conf
[neutron]
url = http://192.168.101.10:9696
auth_url = http://192.168.101.10:35357
auth_type = password
project_domain_name = default
user_domain_name = default
region_name = RegionOne
project_name = service
username = neutron
password = neutron
service_metadata_proxy = true
metadata_proxy_shared_secret = METADATA_SECRET(使用neutron或者matadata都可以,保持和上面一直),由于上面设置的neutron,这里也是neutron
进行链接:
# ln -s /etc/neutron/plugins/ml2/ml2_conf.ini /etc/neutron/plugin.ini
向数据库填充数据:
# su -s /bin/sh -c "neutron-db-manage --config-file /etc/neutron/neutron.conf --config-file /etc/neutron/plugins/ml2/ml2_conf.ini upgrade head" neutron


Restart the Compute API service:
# systemctl restart openstack-nova-api.service
开启网络服务:
# systemctl enable neutron-server.service  neutron-linuxbridge-agent.service neutron-dhcp-agent.service neutron-metadata-agent.service
# systemctl start neutron-server.service neutron-linuxbridge-agent.service neutron-dhcp-agent.service neutron-metadata-agent.service
2、在计算节点上安装网络服务:
1、安装组件:
# yum install openstack-neutron-linuxbridge ebtables ipset
2、配置通用组件:修改/etc/neutron/neutron.conf
[DEFAULT]
transport_url = rabbit://openstack:openstack@192.168.101.10
auth_strategy = keystone

[keystone_authtoken]
auth_uri = http://192.168.101.10:5000
auth_url = http://192.168.101.10:35357
memcached_servers = 192.168.101.10:11211
auth_type = password
project_domain_name = default
user_domain_name = default
project_name = service
username = neutron
password = neutron

[oslo_concurrency]
lock_path = /var/lib/neutron/tmp
和控制节点一样,配置网络服务(两种网络服务选择其中一个,以provider networks为例)
3、配置provider networks
配置桥接agent:修改文件/etc/neutron/plugins/ml2/linuxbridge_agent.ini
[linux_bridge]
physical_interface_mappings = provider:PROVIDER_INTERFACE_NAME
    Replace PROVIDER_INTERFACE_NAME with the name of the underlying provider physical network interface.(底层提供商物理网络接口的名称也就是ens33)node2的底层物理网卡设备为ens33,所以这里设置为这个
在[vxlan]配置如下:
[vxlan]
enable_vxlan = false

[securitygroup]
enable_security_group = true
firewall_driver = neutron.agent.linux.iptables_firewall.IptablesFirewallDriver
4、配置计算服务去使用网络服务:/etc/nova/nova.conf
[neutron]
url = http://192.168.101.10:9696
auth_url = http://192.168.101.10:35357
auth_type = password
project_domain_name = default
user_domain_name = default
region_name = RegionOne
project_name = service
username = neutron
password = neutron
然后重启计算服务:
# systemctl restart openstack-nova-compute.service
开启bridge agent:
# systemctl enable neutron-linuxbridge-agent.service
# systemctl start neutron-linuxbridge-agent.service
以上操作完成后,网络服务neutron就安装完成了
校验neutron的安装:在控制节点上执行
# source admin-openrc
    List loaded extensions to verify successful launch of the neutron-server process:

# openstack extension list --network
针对网络:provider networks的校验:
List agents to verify successful launch of the neutron agents:
# openstack network agent list
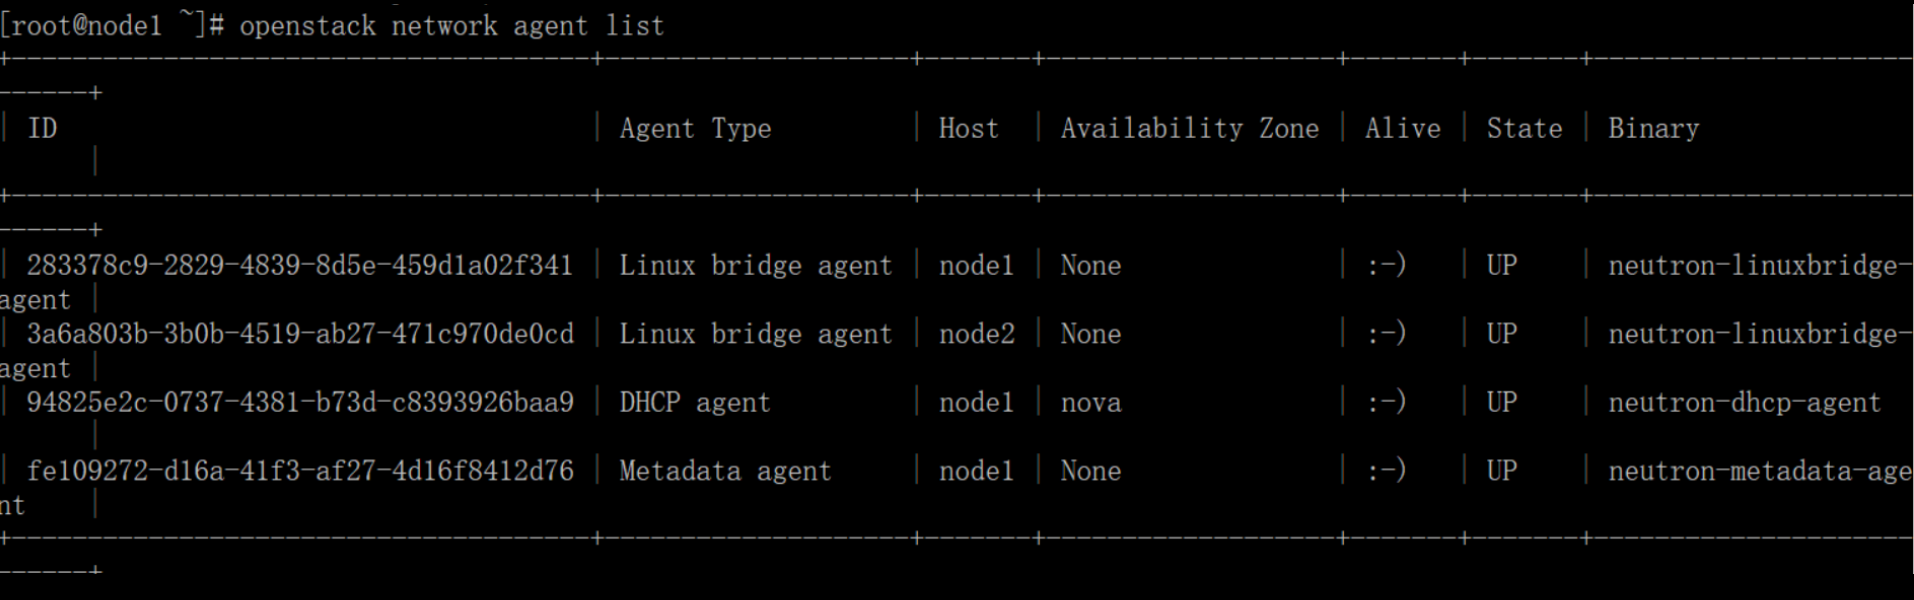
至此neutron基于provider networks这样的网络服务就搭建成功了
安装neutron修改了哪些配置文件:
控制节点:
/etc/neutron/neutron.conf
/etc/neutron/plugins/ml2/ml2_conf.ini
/etc/neutron/plugins/ml2/linuxbridge_agent.ini
/etc/neutron/dhcp_agent.ini
/etc/neutron/metadata_agent.ini
/etc/nova/nova.conf
计算节点:
/etc/neutron/neutron.conf
/etc/neutron/plugins/ml2/linuxbridge_agent.ini
/etc/nova/nova.conf