原文地址:http://www.cnblogs.com/zuoxiaolong/p/spring6.html
自己整理后,供自己学习方便:
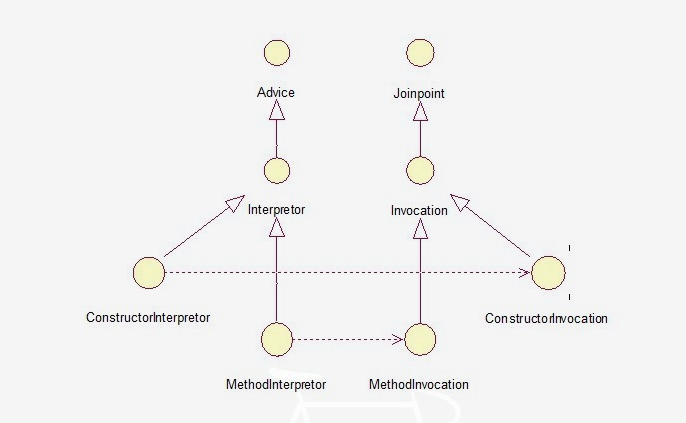
目前由AOP联盟给出了AOP的标准,AOP联盟的规范只是提供了几个接口定义,为了统一AOP的标准,下面来看看主要的几个接口。
Advice接口:
这是一个空接口,里面没有任何方法,只是用来标识一个通知,在spring中,所有的advice都是此接口的扩展,比如BeforeAdvice,AfterAdvice等。
Interceptor接口:
Advice的子接口,这个接口和advice都不直接使用,一般是要扩展以后去实现特殊的拦截。
Joinpoint接口:
代表了一个运行时的连接点。
Invocation接口:
代表了程序中的一个调用,可以被拦截器Interceptor拦截。
下面还有几个接口,不再一一介绍,从下一层继承开始,interpretor的继承体系已经开始依赖于invocation。这从某种意义上来说,advice是依赖于joinpoint的,但这并非绝对。
下面给出这几个接口的UML图,关系比较清晰。
下面介绍下spring中的AOP核心接口。
Advice体系:
Spring采用AOP联盟的Advice作为超级接口,扩展了很多子接口,比如BeforeAdvice,AfterAdvice等等,稍后以AfterReturningAdvice为例,讨论下spring的通知体系。
Pointcut接口:
spring采用Pointcut作为切点的抽象,其中有一个方法返回一个MethodMatcher,作用很明显,就是说切点决定了要切入哪些方法。这里其实是定义了一个匹配规则。比如正则匹配,可以只匹配前缀为save的方法等等。
Advisor:
通知器或者说通知者,我们从现实角度来说,通知者当然需要知道要通知什么。所以Advisor依赖于Advice,而Advisor旗下的子接口 PointAdvisor还依赖于Pointcut,也就是说这个接口更确切的定位应该是包含了要通知谁和要通知什么,也就是说要能获得Advice和 Pointcut。
下面我们先用一个例子说明spring的AOP 是如何工作的,在spring的bean中有一种特殊的bean,叫FactoryBean。这并不是一个普通的bean,而是用来产生bean的一个 bean。这样说起来有点绕口,但这个接口就是用来做这个事的,它是为了实现一系列特殊加工过的bean而产生的接口。
比如AOP中,我们其实就是要对一个bean进行增强,进行加工,让它在运行的过程中可以做一些特殊的事情。
ProxyFactoryBean就是一个为了AOP实现的特殊的FactoryBean,它的作用很明显就是产生proxy的bean,也就是被我们增强过的bean,在这里给出它的源码。
 1 public class ProxyFactoryBean extends ProxyCreatorSupport
 2         implements FactoryBean<Object>, BeanClassLoaderAware, BeanFactoryAware {
 3
 4     /**
 5      * This suffix in a value in an interceptor list indicates to expand globals.
 6      */
 7     public static final String GLOBAL_SUFFIX = "*";
 8
 9
10     protected final Log logger = LogFactory.getLog(getClass());
11
12     private String[] interceptorNames;
13
14     private String targetName;
15
16     private boolean autodetectInterfaces = true;
17
18     private boolean singleton = true;
19
20     private AdvisorAdapterRegistry advisorAdapterRegistry = GlobalAdvisorAdapterRegistry.getInstance();
21
22     private boolean freezeProxy = false;
23
24     private transient ClassLoader proxyClassLoader = ClassUtils.getDefaultClassLoader();
25
26     private transient boolean classLoaderConfigured = false;
27
28     private transient BeanFactory beanFactory;
29
30     /** Whether the advisor chain has already been initialized */
31     private boolean advisorChainInitialized = false;
32
33     /** If this is a singleton, the cached singleton proxy instance */
34     private Object singletonInstance;
在这里,一样没有贴出全部的源码,我们主要关心它的属性,其中interpretorNames和targetName就是这个类最主要的属性,前者代表 的是需要加强哪些东西以及需要怎样加强,也就是advice和pointcut。而后者代表的则是我们针对谁来做这些加强,即我们的目标对象。
这里面的增强比较灵活,我来说一下需要的属性。
1.首先interpretorNames是必须赋予的属性,这个属性指定了通知器或者是通知的名字。如果传入的是通知Advice,则会被自动包装为通知器。
2.targetName是我们要增强的目标对象,这个对象如果有实现的接口,则会采用JDK的动态代理实现,否则将需要第三方的jar包cglib。
下面给出一段代码,来测试一下这种增强方式。首先我们需要一个bean.xml的配置文件,去配置这些属性。这样就将IOC和AOP结合起来使用了。
<?xml version="1.0" encoding="UTF-8"?>
<beans xmlns="http://www.springframework.org/schema/beans"
 xmlns:xsi="http://www.w3.org/2001/XMLSchema-instance"
 xsi:schemaLocation="http://www.springframework.org/schema/beans http://www.springframework.org/schema/beans/spring-beans-2.5.xsd">
<bean id="testAop" class="org.springframework.aop.framework.ProxyFactoryBean">
    <property name="targetName">
        <value>testTarget</value>
    </property>
    <property name="interceptorNames">
        <value>testAdvisor</value>
    </property>
</bean>
<bean id="testTarget" class="org.mj.springTest.aopTest.TestTarget"></bean>
<bean id="testAdvisor" class="org.mj.springTest.aopTest.TestAdvisor"></bean>
</beans>
下面我们看看目标对象的源码。
 1 /**
 2  * @author jing.ming
 3  * @version 创建时间:2015年10月28日 下午4:35:44
 4  * 程序的简单说明
 5  */
 6 public class TestTarget {
 7
 8     public void test(){
 9         System.out.println("target.test()");
10     }
11     public void test2(){
12         System.out.println("target.test2()") ;
13     }
14 }
15
很简单,只有两个普通的方法,下面我们看通知器的源码。
 1 /**
 2  * @author jing.ming
 3  * @version 创建时间:2015年10月28日 下午4:37:31
 4  * 程序的简单说明
 5  */
 6 public class TestAdvisor implements PointcutAdvisor {
 7
 8     public Advice getAdvice() {
 9         return new TestAfterAdvisor() ;
10     }
11
12     public boolean isPerInstance() {
13         return false;
14     }
15
16     public Pointcut getPointcut() {
17         return new TestPointcut();
18     }
19 }
20
我使用的是包含了切点的通知器,所以在这里我们还要给出通知和切点,我写了两个简单的通知和切点。
 1 /**
 2  * @author jing.ming
 3  * @version 创建时间:2015年10月28日 下午4:39:30
 4  * 程序的简单说明
 5  */
 6 public class TestAfterAdvisor implements AfterReturningAdvice{
 7
 8     public void afterReturning(Object returnValue, Method method,
 9             Object[] args, Object target) throws Throwable {
10         System.out.println("after " + target.getClass().getSimpleName() + "." + method.getName() + "()");
11     }
12 }
下面是切点,切点的描述是我们只增强test方法,不增强test2方法。
 1 package org.mj.springTest.aopTest;
 2
 3 import java.lang.reflect.Method;
 4
 5 import org.springframework.aop.ClassFilter;
 6 import org.springframework.aop.MethodMatcher;
 7 import org.springframework.aop.Pointcut;
 8
 9 /**
10  * @author jing.ming
11  * @version 创建时间:2015年10月28日 下午4:42:07
12  * 程序的简单说明
13  */
14 public class TestPointcut implements Pointcut {
15
16     public ClassFilter getClassFilter() {
17         return ClassFilter.TRUE ;
18     }
19
20     public MethodMatcher getMethodMatcher() {
21         return new MethodMatcher(){
22
23             public boolean isRuntime() {
24                 return true;
25             }
26
27             public boolean matches(Method method, Class<?> targetClass) {
28                 if(method.getName().equals("test")){
29                     return true ;
30                 }
31                 return false;
32             }
33
34             public boolean matches(Method method, Class<?> targetClass, Object[] args) {
35                 if(method.getName().equals("test")){
36                     return true ;
37                 }
38                 return false;
39             }
40
41         };
42     }
43
44 }
45
好了,下面我们的准备工作都已经做好了。来看一下见证奇迹的时刻吧,我们使用IOC容器来帮我们完成增强,以下这段代码的运行需要cglib,测试代码如下:
 1 import org.springframework.context.ApplicationContext;
 2 import org.springframework.context.support.FileSystemXmlApplicationContext;
 3
 4 /**
 5  * @author jing.ming
 6  * @version 创建时间:2015年10月28日 下午4:51:53
 7  * 程序的简单说明
 8  */
 9 public class TestAop {
10
11     @SuppressWarnings("resource")
12     public static void main(String[] args) {
13         ApplicationContext applicationContext = new FileSystemXmlApplicationContext(
14                 "classpath:aopBean.xml");
15         TestTarget target = (TestTarget) applicationContext.getBean("testAop");
16         target.test();
17         System.out.println("------无敌分割线-----");
18         target.test2();
19
20     }
21 }
console输出:
target.test()
after TestTarget.test()
------无敌分割线-----
target.test2()
输入结果会发现,在target.test方法执行后,我们增强的afterReturningAdvice已经起作用了,但是我们将切点定义在了test方法,所以test2方法并没有被增强。