Introduction to Identity
By Pranav Rastogi, Rick Anderson, Tom Dykstra, Jon Galloway and Erik Reitan
ASP.NET Core Identity is a membership system which allows you to add login functionality to your application. Users can create an account and login with a user name and password or they can use an external login providers such as Facebook, Google, Microsoft Account, Twitter and more.
ASP.NET Core身份识别是一个成员身份管理系统,允许向应用中添加登陆功能。用户可创建一个账户并进行登陆,登陆时可使用用户名、密码,或者使用FaceBook, Google, Microsoft Account, Twitter或者其他的外部登陆信息。
You can configure ASP.NET Core Identity to use a SQL Server database to store user names, passwords, and profile data. Alternatively, you can use your own persistent store to store data in another persistent storage, such as Azure Table Storage.
你可以通过配置ASP.NET Core的身份识别,使用SQL Server数据库存储用户名字、密码和配置文件数据。另外,你可使用其他已有的存储空间存储数据,例如Azure Table Storage。
Overview of Identity¶ 身份识别概述
In this topic, you’ll learn how to use ASP.NET Core Identity to add functionality to register, log in, and log out a user. You can follow along step by step or just read the details. For more detailed instructions about creating apps using ASP.NET Core Identity, see the Next Steps section at the end of this article.
本文中,你将学习如何使用ASP.NET Core身份识别技术增加注册、登陆和注销功能。你可以一步一步地跟着学习,也可以仅仅阅读一些细节。更多细节请参看列在本文最后的章节提示。
- Create an ASP.NET Core Web Application project in Visual Studio with Individual User Accounts.
1. 使用Indivdual User Accounts创建应用。
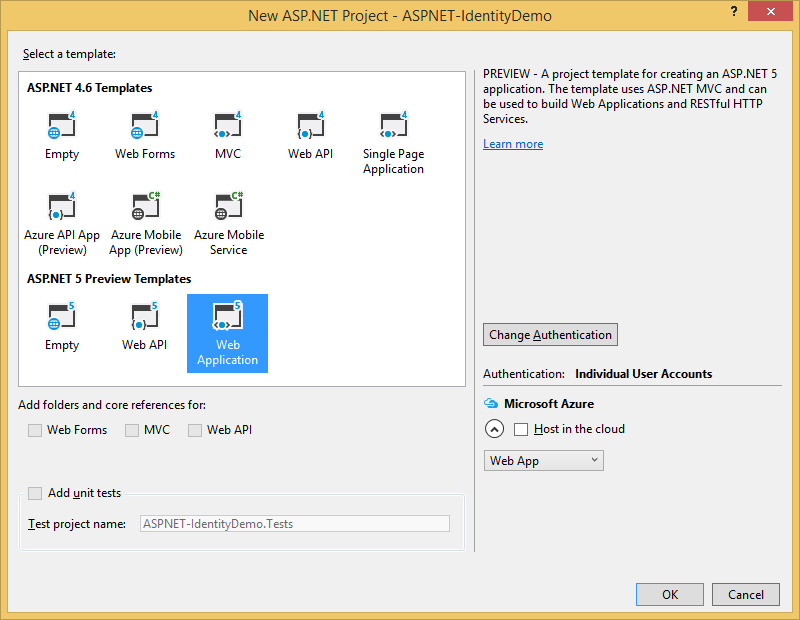
In Visual Studio, select File -> New -> Project. Then, select the ASP.NET Web Application from the New Project dialog box. Continue by selecting an ASP.NET Core Web Application with Individual User Accounts as the authentication method.
在Visual Studio中, 选择 File -> New -> Project。然后, 从New Project对话框中选择 ASP.NET Web Application。接着选择 ASP.NET Core Web Application, 并选择 Individual User Accounts 身份认证功能。
The created project contains the
Microsoft.AspNetCore.Identity.EntityFrameworkCorepackage, which will persist the identity data and schema to SQL Server using Entity创建的项目包含了Microsoft.AspNetCore.Identity.EntityFramewordCore包,这将使用Entity Framework Core通过SQL Server来储存身份识别的数据和表信息。
Note
说明
In Visual Studio, you can view NuGet packages details by selecting Tools -> NuGet Package Manager -> Manage NuGet Packages for Solution. You also see a list of packages in the dependencies section of the project.json file within your project.
在VS中,你可以逐一选择Tools -> NuGet Package Manager -> Manage NuGet Packages for Solution浏览NuGet包的细节。也会看到项目的project.json文件的Dependencies部分看到该包的清单。
The identity services are added to the application in the
ConfigureServicesmethod in theStartupclass:身份识别功能位于Startup类的ConfigureServices方法中。
// This method gets called by the runtime. Use this method to add services to the container.
public void ConfigureServices(IServiceCollection services)
{
    // Add framework services.
    services.AddEntityFramework()
        .AddSqlServer()
        .AddDbContext<ApplicationDbContext>(options =>
            options.UseSqlServer(Configuration["Data:DefaultConnection:ConnectionString"]));

    services.AddIdentity<ApplicationUser, IdentityRole>()
        .AddEntityFrameworkStores<ApplicationDbContext>()
        .AddDefaultTokenProviders();

    services.AddMvc();

    // Add application services.
    services.AddTransient<IEmailSender, AuthMessageSender>();
    services.AddTransient<ISmsSender, AuthMessageSender>();
These services are then made available to the application through dependency injection.
这些服务通过依赖注入起作用。
Identity is enabled for the application by calling
UseIdentityin theConfiguremethod of theStartupclass. This adds cookie-based authentication to the request pipeline.通过调用Startup类Configure方法中的UseIdentity启用身份识别。这样,对于访问请求就可通过cookie实现身份验证了。
    services.Configure<IdentityOptions>(options =>
    {
        // Password settings
        options.Password.RequireDigit = true;
        options.Password.RequiredLength = 8;
        options.Password.RequireNonAlphanumeric = false;
        options.Password.RequireUppercase = true;
        options.Password.RequireLowercase = false;

        // Lockout settings
        options.Lockout.DefaultLockoutTimeSpan = TimeSpan.FromMinutes(30);
        options.Lockout.MaxFailedAccessAttempts = 10;

        // Cookie settings
        options.Cookies.ApplicationCookie.ExpireTimeSpan = TimeSpan.FromDays(150);
        options.Cookies.ApplicationCookie.LoginPath = "/Account/LogIn";
        options.Cookies.ApplicationCookie.LogoutPath = "/Account/LogOff";
    });
}

// This method gets called by the runtime. Use this method to configure the HTTP request pipeline.
public void Configure(IApplicationBuilder app, IHostingEnvironment env, ILoggerFactory loggerFactory)
{
    loggerFactory.AddConsole(Configuration.GetSection("Logging"));
    loggerFactory.AddDebug();

    if (env.IsDevelopment())
    {
        app.UseBrowserLink();
        app.UseDeveloperExceptionPage();
        app.UseDatabaseErrorPage();
    }
For more information about the application start up process, see Application Startup.
- Creating a user.
2. 创建用户
Launch the application from Visual Studio (Debug -> Start Debugging) and then click on the Register link in the browser to create a user. The following image shows the Register page which collects the user name and password.
When the user clicks the Register link, theUserManagerandSignInManagerservices are injected into the Controller:当用户点击Register链接时,UserManager和SignInManager服务就被注入到控制器中:
    public class AccountController : Controller
    {
        private readonly UserManager<ApplicationUser> _userManager;
        private readonly SignInManager<ApplicationUser> _signInManager;
        private readonly IEmailSender _emailSender;
        private readonly ISmsSender _smsSender;
        private static bool _databaseChecked;
        private readonly ILogger _logger;

        public AccountController(
            UserManager<ApplicationUser> userManager,
            SignInManager<ApplicationUser> signInManager,
            IEmailSender emailSender,
            ISmsSender smsSender,
            ILoggerFactory loggerFactory)
        {
            _userManager = userManager;
            _signInManager = signInManager;
            _emailSender = emailSender;
            _smsSender = smsSender;
            _logger = loggerFactory.CreateLogger<AccountController>();
        }

        //
        // GET: /Account/Login
Then, the Register action creates the user by calling
CreateAsyncfunction of theUserManagerobject, as shown below:接着,Register动作通过调用UserManager对象的CreateAsync函数函数创建了用户,具体如下:
[HttpPost]
[AllowAnonymous]
[ValidateAntiForgeryToken]
public async Task<IActionResult> Register(RegisterViewModel model)
{
    if (ModelState.IsValid)
    {
        var user = new ApplicationUser { UserName = model.Email, Email = model.Email };
        var result = await _userManager.CreateAsync(user, model.Password);
        if (result.Succeeded)
        {
            // For more information on how to enable account confirmation and password reset please visit http://go.microsoft.com/fwlink/?LinkID=532713
            // Send an email with this link
            //var code = await _userManager.GenerateEmailConfirmationTokenAsync(user);
            //var callbackUrl = Url.Action("ConfirmEmail", "Account", new { userId = user.Id, code = code }, protocol: HttpContext.Request.Scheme);
            //await _emailSender.SendEmailAsync(model.Email, "Confirm your account",
            //    "Please confirm your account by clicking this link: <a href="" + callbackUrl + "">link</a>");
            await _signInManager.SignInAsync(user, isPersistent: false);
            _logger.LogInformation(3, "User created a new account with password.");
            return RedirectToAction(nameof(HomeController.Index), "Home");
        }
        AddErrors(result);
    }

    // If we got this far, something failed, redisplay form
    return View(model);
}

- Log in.
3.登陆
If the user was successfully created, the user is logged in by the
SignInAsyncmethod, also contained in theRegisteraction. By signing in, theSignInAsyncmethod stores a cookie with the user’s claims.如果成功创建了用户,就会使用SignInAsync方法实现用户登录,该方法同样包含在Register动作中。通过签到后,SignInAsync方法使用用户的登陆信息存储了一个cookie。
[HttpPost]
[AllowAnonymous]
[ValidateAntiForgeryToken]
public async Task<IActionResult> Register(RegisterViewModel model)
{
    if (ModelState.IsValid)
    {
        var user = new ApplicationUser { UserName = model.Email, Email = model.Email };
        var result = await _userManager.CreateAsync(user, model.Password);
        if (result.Succeeded)
        {
            // For more information on how to enable account confirmation and password reset please visit http://go.microsoft.com/fwlink/?LinkID=532713
            // Send an email with this link
            //var code = await _userManager.GenerateEmailConfirmationTokenAsync(user);
            //var callbackUrl = Url.Action("ConfirmEmail", "Account", new { userId = user.Id, code = code }, protocol: HttpContext.Request.Scheme);
            //await _emailSender.SendEmailAsync(model.Email, "Confirm your account",
            //    "Please confirm your account by clicking this link: <a href="" + callbackUrl + "">link</a>");
            await _signInManager.SignInAsync(user, isPersistent: false);
            _logger.LogInformation(3, "User created a new account with password.");
            return RedirectToAction(nameof(HomeController.Index), "Home");
        }
        AddErrors(result);
    }

    // If we got this far, something failed, redisplay form
    return View(model);
}
The above
SignInAsyncmethod calls the belowSignInAsynctask, which is contained in theSignInManagerclass.上面的SignInasync方法调用了下面的SignInAsync任务,该任务包含在SingInManager类中。
If needed, you can access the user’s identity details inside a controller action. For instance, by setting a breakpoint inside the
HomeController.Indexaction method, you can view theUser.claimsdetails. By having the user signed-in, you can make authorization decisions. For more information, see Authorization.如果需要,你可以深入控制器动作中用户身份识别的细节。比如说,通过在HomeController.Index方法中设置断点,就可以浏览User.Claims的细节。通过用户登录,就可以实现权限策略。
As a registered user, you can log in to the web app by clicking the Log in link. When a registered user logs in, the
Loginaction of theAccountControlleris called. Then, the Login action signs in the user using thePasswordSignInAsyncmethod contained in theLoginaction.作为注册用户,你可通过点击Log in链接登陆应用。当注册用户登陆时,就调用AccountController中的Login动作。接着,Login动作使用其中的PasswordSignInAsync方法实现用户签到。
[HttpPost]
[AllowAnonymous]
[ValidateAntiForgeryToken]
public async Task<IActionResult> Login(LoginViewModel model, string returnUrl = null)
{
    ViewData["ReturnUrl"] = returnUrl;
    if (ModelState.IsValid)
    {
        // This doesn't count login failures towards account lockout
        // To enable password failures to trigger account lockout, set lockoutOnFailure: true
        var result = await _signInManager.PasswordSignInAsync(model.Email, model.Password, model.RememberMe, lockoutOnFailure: false);
        if (result.Succeeded)
        {
            _logger.LogInformation(1, "User logged in.");
            return RedirectToLocal(returnUrl);
        }
        if (result.RequiresTwoFactor)
        {
            return RedirectToAction(nameof(SendCode), new { ReturnUrl = returnUrl, RememberMe = model.RememberMe });
        }
        if (result.IsLockedOut)
        {
            _logger.LogWarning(2, "User account locked out.");
            return View("Lockout");
        }
        else
        {
            ModelState.AddModelError(string.Empty, "Invalid login attempt.");
            return View(model);
        }
    }

    // If we got this far, something failed, redisplay form
    return View(model);
}
- Log off.
4.登出
Clicking the Log off link calls the
LogOffaction in the account controller.点击Log off链接调用账户控制其中的Logoff方法。
[HttpPost]
[ValidateAntiForgeryToken]
public async Task<IActionResult> LogOff()
{
    await _signInManager.SignOutAsync();
    _logger.LogInformation(4, "User logged out.");
    return RedirectToAction(nameof(HomeController.Index), "Home");
}
The code above shows the
SignInManager.SignOutAsyncmethod. TheSignOutAsyncmethod clears the users claims stored in a cookie.上面显示了SignInManager.SignOutAsyce方法中的代码。SignOutAsync方法清除存储在cookie中的用户登录信息。
- Configuration.
5.配置
Identity has some default behaviors that you can override in your application’s startup class.
身份识别具有一些默认的行为,你也可以在应用的startup类中将其重写。
    // Configure Identity
    services.Configure<IdentityOptions>(options =>
    {
        // Password settings
        options.Password.RequireDigit = true;
        options.Password.RequiredLength = 8;
        options.Password.RequireNonAlphanumeric = false;
        options.Password.RequireUppercase = true;
        options.Password.RequireLowercase = false;

        // Lockout settings
        options.Lockout.DefaultLockoutTimeSpan = TimeSpan.FromMinutes(30);
        options.Lockout.MaxFailedAccessAttempts = 10;

        // Cookie settings
        options.Cookies.ApplicationCookie.ExpireTimeSpan = TimeSpan.FromDays(150);
        options.Cookies.ApplicationCookie.LoginPath = "/Account/LogIn";
        options.Cookies.ApplicationCookie.LogoutPath = "/Account/LogOff";
    });
- View the database.
6. 浏览数据库
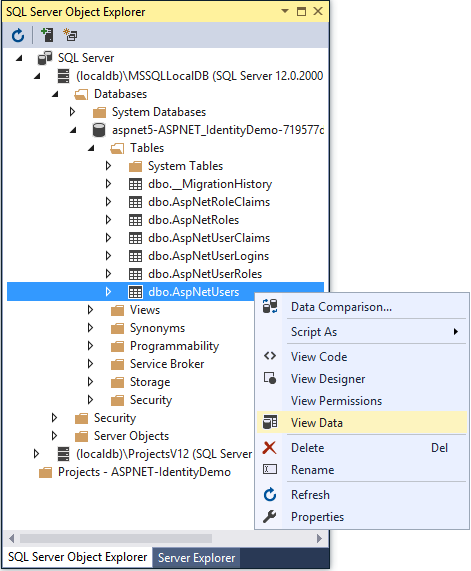
After stopping the application, view the user database from Visual Studio by selecting View -> SQL Server Object Explorer. Then, expand the following within the SQL Server Object Explorer:
- (localdb)MSSQLLocalDB
- Databases
- aspnet5-<the name of your application>
- Tables
Next, right-click the dbo.AspNetUsers table and select View Data to see the properties of the user you created.
Identity Components¶ 身份识别的组成
The primary reference assembly for the identity system is Microsoft.AspNetCore.Identity. This package contains the core set of interfaces for ASP.NET Core Identity.
身份系统主要的引用文件包为Microsoft.AspNetCore.Identity 。其中包含了ASP.NET Core Identity的系列核心界面。
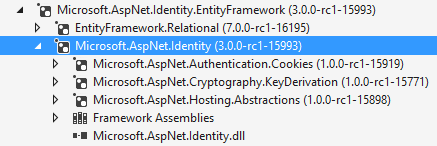
These dependencies are needed to use the identity system in ASP.NET Core applications:
需要引用ASP.NET Core中的identity system来实现这些功能。
EntityFramework.SqlServer- Entity Framework is Microsoft’s recommended data access technology for relational databases.Microsoft.AspNetCore.Authentication.Cookies- Middleware that enables an application to use cookie based authentication, similar to ASP.NET’s Forms Authentication.Microsoft.AspNetCore.Cryptography.KeyDerivation- Utilities for key derivation.密钥导出的实用程序Microsoft.AspNetCore.Hosting.Abstractions- Hosting abstractions.托管逻辑
Migrating to ASP.NET Core Identity
For additional information and guidance on migrating your existing identity store see Migrating Authentication and Identity
关于迁移已有的身份识别数据,请参看Migrating Authentication and Identity