原文地址:https://docs.asp.net/en/latest/data/ef-mvc/intro.html
The Contoso University sample web application demonstrates how to create ASP.NET Core 1.0 MVC web applications using Entity Framework Core 1.0 and Visual Studio 2015.
Contoso University网络应用的案例,演示了如何使用Entity Framework Core 1.0 and Visual Studio 2015来创建ASP.NET Core 1.0 MVC网络应用。
The sample application is a web site for a fictional Contoso University. It includes functionality such as student admission, course creation, and instructor assignments. This tutorial series explains how to build the Contoso University sample application from scratch. You can download the completed application.
EF Core 1.0 is the latest version of EF but does not yet have all the features of EF 6.x. For information about how to choose between EF 6.x and EF Core 1.0, see EF Core vs. EF6.x. If you choose EF 6.x, see the previous version of this tutorial series.
EF Core 1.0是EF的最新版本,但是还没有包括所有EF6.X的所有功能。关于如何在EF 6.x和 EF Core 1.0进行选择的信息,请参看EF Core vs. EF6.x。如果你选择EF 6.X,请参看the previous version of this tutorial series。
Sections:
章节:
- Prerequisites 前提
- Troubleshooting 问题
- The Contoso University Web Application Contoso大学网络应用
- Create an ASP.NET Core MVC web application 创建一个ASP.NET Core MVC网络应用
- Set up the site style 设置网站风格
- Entity Framework Core NuGet packages
- Create the data model 创建数据模型
- Create the Database Context 创建数据库上下文
- Register the context with dependency injection 利用依赖注入注册上下文
- Add code to initialize the database with test data 利用测试数据向初始化数据库增加代码
- Create a controller and views 创建控制器和视图
- View the Database 浏览数据库
- Conventions 约定
- Asynchronous code 异步代码
- Summary 总结
Prerequisites 前提
- Visual Studio 2015 with Update 3 or later. 经Update3或后续更新的Visual Stduio 2015
- .NET Core 1.0 with Visual Studio tools. 带有Visual Studio tools 的.NET Core 1.0
Troubleshooting
If you run into a problem you can’t resolve, you can generally find the solution by comparing your code to the completed project that you can download. For some common errors and how to solve them, see the Troubleshooting section of the last tutorial in the series. If you don’t find what you need there, you can post questions to the ASP.NET Entity Framework forum, the Entity Framework forum, or StackOverflow.com for ASP.NET Core or EF Core.
如果遇到了不能解决的问题,你通常可以通过比较你的代码和你下载的完整项目代码来解决。对于一些普通的错误及其解决方法,请参看the Troubleshooting section of the last tutorial in the series。如果没有发现你所需要的,你可以在ASP.NET Entity Framework forum、Entity Framework forum或者StackOverflow.com for ASP.NET Core or EF Core提出问题。
The Contoso University Web Application
The application you’ll be building in these tutorials is a simple university web site.
Users can view and update student, course, and instructor information. Here are a few of the screens you’ll create.
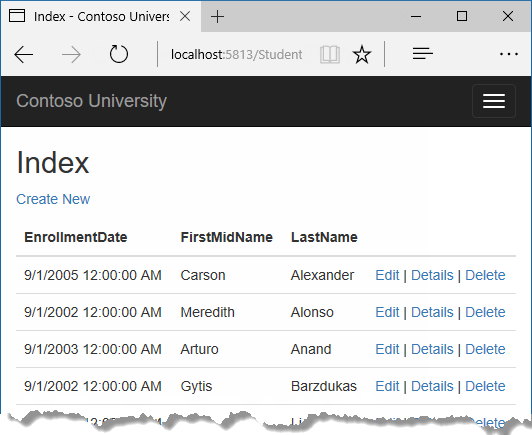
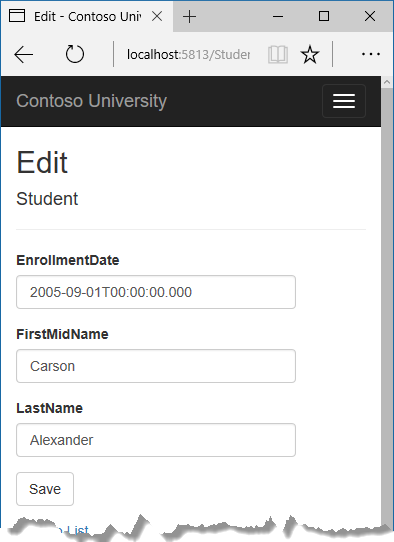
The UI style of this site has been kept close to what’s generated by the built-in templates, so that the tutorial can focus mainly on how to use the Entity Framework.
Create an ASP.NET Core MVC web application
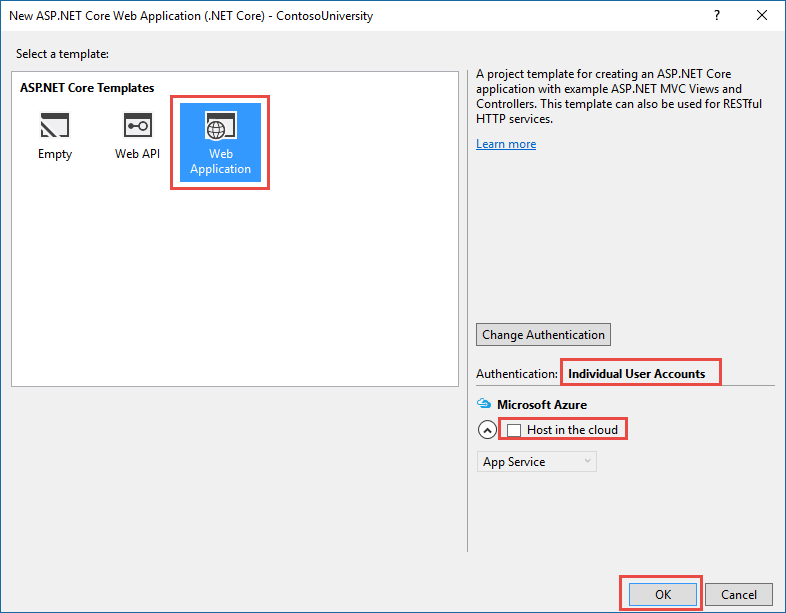
Open Visual Studio 2015 and create a new ASP.NET Core C# web project named “ContosoUniversity”.
- From the File menu, select New > Project.
- From the left pane, select Templates > Visual C# > Web.
- Select the ASP.NET Core Web Application (.NET Core) project template.
- Enter ContosoUniversity as the name and click OK.

- Wait for the New ASP.NET Core Web Application (.NET Core) dialog to appear
- Select the Web Application template and ensure that Authentication is set to Individual User Accounts.
- Clear the Host in the cloud check box.
- Click OK
Note 注意:
Don’t miss setting authentication to Individual User Accounts. You won’t be using authentication in this tutorial, but you need to enable it because of a limitation of .NET Core Preview 2 Visual Studio tooling. Scaffolding for MVC controllers and views only works when Individual User Accounts authentication is enabled.
不要忘记将authentication(身份验证)设置为Individual User Accounts(个人用户账户)。在本教程中你不会用到身份认证,但是你需要启用这个功能,因为.NET Core Preview 2 Visual Studio tooling的限制。MVC控制器和视图基架只有在启用Individual User Accounts时才能工作。
Set up the site style 设置网站的格式
A few simple changes will set up the site menu, layout, and home page.
在网站的菜单、布局和首页中,有少许简单的设置变化。
Open Views/Shared/_Layout.cshtml and make the following changes:
开打Views/Shared/_Layout.cshtml,并作如下变更:
- Change each occurrence of “ContosoUniversity” to “Contoso University”. There are three occurrences.
- Add menu entries for Students, Courses, Instructors, and Departments, and delete the Contact menu entry.
The changes are highlighted.
变更被高亮显示。
1 <!DOCTYPE html> 2 <html> 3 <head> 4 <meta charset="utf-8" /> 5 <meta name="viewport" content="width=device-width, initial-scale=1.0" /> 6 <title>@ViewData["Title"] - Contoso University</title> 7 8 <environment names="Development"> 9 <link rel="stylesheet" href="~/lib/bootstrap/dist/css/bootstrap.css" /> 10 <link rel="stylesheet" href="~/css/site.css" /> 11 </environment> 12 <environment names="Staging,Production"> 13 <link rel="stylesheet" href="https://ajax.aspnetcdn.com/ajax/bootstrap/3.3.6/css/bootstrap.min.css" 14 asp-fallback-href="~/lib/bootstrap/dist/css/bootstrap.min.css" 15 asp-fallback-test-class="sr-only" asp-fallback-test-property="position" asp-fallback-test-value="absolute" /> 16 <link rel="stylesheet" href="~/css/site.min.css" asp-append-version="true" /> 17 </environment> 18 </head> 19 <body> 20 <div class="navbar navbar-inverse navbar-fixed-top"> 21 <div class="container"> 22 <div class="navbar-header"> 23 <button type="button" class="navbar-toggle" data-toggle="collapse" data-target=".navbar-collapse"> 24 <span class="sr-only">Toggle navigation</span> 25 <span class="icon-bar"></span> 26 <span class="icon-bar"></span> 27 <span class="icon-bar"></span> 28 </button> 29 <a asp-area="" asp-controller="Home" asp-action="Index" class="navbar-brand">Contoso University</a> 30 </div> 31 <div class="navbar-collapse collapse"> 32 <ul class="nav navbar-nav"> 33 <li><a asp-area="" asp-controller="Home" asp-action="Index">Home</a></li> 34 <li><a asp-area="" asp-controller="Home" asp-action="About">About</a></li> 35 <li><a asp-area="" asp-controller="Students" asp-action="Index">Students</a></li> 36 <li><a asp-area="" asp-controller="Courses" asp-action="Index">Courses</a></li> 37 <li><a asp-area="" asp-controller="Instructors" asp-action="Index">Instructors</a></li> 38 <li><a asp-area="" asp-controller="Departments" asp-action="Index">Departments</a></li> 39 </ul> 40 @await Html.PartialAsync("_LoginPartial") 41 </div> 42 </div> 43 </div> 44 <div class="container body-content"> 45 @RenderBody() 46 <hr /> 47 <footer> 48 <p>© 2016 - Contoso University</p> 49 </footer> 50 </div> 51 52 <environment names="Development"> 53 <script src="~/lib/jquery/dist/jquery.js"></script> 54 <script src="~/lib/bootstrap/dist/js/bootstrap.js"></script> 55 <script src="~/js/site.js" asp-append-version="true"></script> 56 </environment> 57 <environment names="Staging,Production"> 58 <script src="https://ajax.aspnetcdn.com/ajax/jquery/jquery-2.2.0.min.js" 59 asp-fallback-src="~/lib/jquery/dist/jquery.min.js" 60 asp-fallback-test="window.jQuery"> 61 </script> 62 <script src="https://ajax.aspnetcdn.com/ajax/bootstrap/3.3.6/bootstrap.min.js" 63 asp-fallback-src="~/lib/bootstrap/dist/js/bootstrap.min.js" 64 asp-fallback-test="window.jQuery && window.jQuery.fn && window.jQuery.fn.modal"> 65 </script> 66 <script src="~/js/site.min.js" asp-append-version="true"></script> 67 </environment> 68 69 @RenderSection("scripts", required: false) 70 </body> 71 </html>
In Views/Home/Index.cshtml, replace the contents of the file with the following code to replace the text about ASP.NET and MVC with text about this application:
在Views/Home/Index.cshtml 中,使用下列代码替换文件中关于ASP.NET and MVC的文本:
1 @{ 2 ViewData["Title"] = "Home Page"; 3 } 4 5 <div class="jumbotron"> 6 <h1>Contoso University</h1> 7 </div> 8 <div class="row"> 9 <div class="col-md-4"> 10 <h2>Welcome to Contoso University</h2> 11 <p> 12 Contoso University is a sample application that 13 demonstrates how to use Entity Framework Core 1.0 in an 14 ASP.NET Core MVC 1.0 web application. 15 </p> 16 </div> 17 <div class="col-md-4"> 18 <h2>Build it from scratch</h2> 19 <p>You can build the application by following the steps in a series of tutorials.</p> 20 <p><a class="btn btn-default" href="https://docs.asp.net/en/latest/data/ef-mvc/intro.html">See the tutorial »</a></p> 21 </div> 22 <div class="col-md-4"> 23 <h2>Download it</h2> 24 <p>You can download the completed project from GitHub.</p> 25 <p><a class="btn btn-default" href="https://github.com/aspnet/Docs/tree/master/aspnet/data/ef-mvc/intro/samples/cu-final">See project source code »</a></p> 26 </div> 27 </div>
Press CTRL+F5 to run the project or choose Debug > Start Without Debugging from the menu. You see the home page with tabs for the pages you’ll create in these tutorials.
按CTRL+F5运行项目,或者从菜单中选择Debug > Start Without Debugging。你将看到相关结果。

Entity Framework Core NuGet packages Entity Framework Core NuGet包
Because you used the Individual User Accounts option when you created the project, support for EF Core has already been installed.
因为创建项目时,你使用了个人用户账户选项,对EF Core的支持已经安装好了。
If you want to add EF Core support to a new project that you create without the Individual User Accounts option, install the following NuGet packages:
如果创建的项目没有使用个人用户账户选项,还想增加对EF Core的使用支持,安装一下NuGet包:
- The package for the database provider you want to target. To use SQL Server, the package is Microsoft.EntityFrameworkCore.SqlServer. For a list of available providers see Database Providers.
- The package for the EF command-line tools: Microsoft.EntityFrameworkCore.Tools. This package is a preview release, so to install it you have to enable preview release installation. After installing the package, you also have to add a reference to it in the
toolscollection in the project.json file.
If you open the project.json file, you’ll see that these packages are already installed.
如果打开project.json文件,你将看到这些包已经安装好了。
(译者注:我使用了个人用户账户设置,但仍没有发现7-11行的代码,是不是我使用的是1.0.1版本的.netcore有关?)
 1 {
 2   "dependencies": {
 3     "Microsoft.NETCore.App": {
 4       "version": "1.0.0",
 5       "type": "platform"
 6     },
 7     "Microsoft.EntityFrameworkCore.SqlServer": "1.0.0",
 8     "Microsoft.EntityFrameworkCore.Tools": {
 9       "version": "1.0.0-preview2-final",
10       "type": "build"
11     }
12     // other dependencies not shown
13   },
14
15   "tools": {
16     "Microsoft.EntityFrameworkCore.Tools": "1.0.0-preview2-final"
17     // other tools not shown
18   }
19 }
Create the data model 创建数据模型
Next you’ll create entity classes for the Contoso University application. You’ll start with the following three entities.
接下来,你将创建Contoso大学应用的实体类。你将从以下三个实体开始。
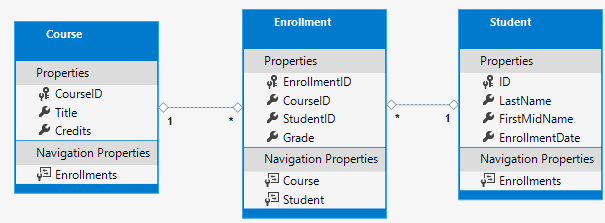
There’s a one-to-many relationship between Student and Enrollment entities, and there’s a one-to-many relationship between Course and Enrollment entities. In other words, a student can be enrolled in any number of courses, and a course can have any number of students enrolled in it.
在Student和Enrollment实体间有一个“一对多”关系,在Course和Enrollment实体间有一个“一对多”关系。话句话说,一个学生可以在任何数量的课程里注册,一门课程可以有任何数量的学生注册。
In the following sections you’ll create a class for each one of these entities.
后面,你将逐一创建这些实体。
The Student entity 学生实体
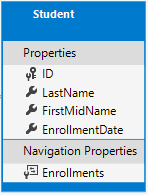
In the Models folder, create a class file named Student.cs and replace the template code with the following code.
在Models文件夹中,创建一个名为Stduent.cs的类文件,再用下面的代码替换模板中的代码。
 1 using System;
 2 using System.Collections.Generic;
 3
 4 namespace ContosoUniversity.Models
 5 {
 6     public class Student
 7     {
 8         public int ID { get; set; }
 9         public string LastName { get; set; }
10         public string FirstMidName { get; set; }
11         public DateTime EnrollmentDate { get; set; }
12
13         public ICollection<Enrollment> Enrollments { get; set; }
14     }
15 }
The ID property will become the primary key column of the database table that corresponds to this class. By default, the Entity Framework interprets a property that’s named ID or classnameID as the primary key.
ID属性将会成为与该类相应的数据库表的主键列。缺省情况下,EF将名称为“ID”或者“类名ID”的属性解释为主键。
The Enrollments property is a navigation property. Navigation properties hold other entities that are related to this entity. In this case, the Enrollments property of a Student entity will hold all of the Enrollment entities that are related to that Student entity. In other words, if a given Student row in the database has two related Enrollment rows (rows that contain that student’s primary key value in their StudentID foreign key column), that Student entity’s Enrollments navigation property will contain those two Enrollment entities.
Enrollments属性是导航属性。导航属性控制着与该类相关的实体。在这种情况下,Student实体的Enrollments属性持有所有与Student实体相关的Enrollment实体。话句话说,如果给定了一个数据库中的Student行,该行与两个Enrollment行相关(),这个Student实体的Enrollments导航属性将会包含两个Enrollment实体。
If a navigation property can hold multiple entities (as in many-to-many or one-to-many relationships), its type must be a list in which entries can be added, deleted, and updated, such as ICollection<T>. You can specify ICollection<T> or a type such as List<T> or HashSet<T>. If you specify ICollection<T>, EF creates a HashSet<T> collection by default.
如果导航属性持有多个实体(如在多对多或者1对多关系中),其类型必须是一个list,以便实现实体的增加、删除和更新,例如ICollection<T>。你可以指定ICollection<T>或者诸如List<T>、HashSet<T>的类型。如果你指定了ICollection<T>,EF会缺省创建一个HashSet<T>集合。
The Enrollment entity Enrollment实体
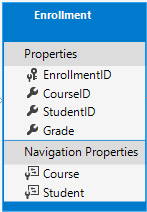
In the Models folder, create Enrollment.cs and replace the existing code with the following code:
namespace ContosoUniversity.Models
{
    public enum Grade
    {
        A, B, C, D, F
    }

    public class Enrollment
    {
        public int EnrollmentID { get; set; }
        public int CourseID { get; set; }
        public int StudentID { get; set; }
        public Grade? Grade { get; set; }

        public Course Course { get; set; }
        public Student Student { get; set; }
    }
}
The EnrollmentID property will be the primary key; this entity uses the classnameID pattern instead of ID by itself as you saw in the Student entity. Ordinarily you would choose one pattern and use it throughout your data model. Here, the variation illustrates that you can use either pattern. In a later tutorial, you’ll see how using ID without classname makes it easier to implement inheritance in the data model.
EnrollmentID属性将会成为主键;该实体使用classnameID属性而不是使用在Student实体中看到的ID。通常,你将选择一个模型,并在整个数据模型中使用。在此,用图解说明遇到的这些变化。在后续的教程中,你将看到如何使用ID而不是类名,这样会使数据模型中更容易实施继承。
The Grade property is an enum. The question mark after the Grade type declaration indicates that the Grade property is nullable. A grade that’s null is different from a zero grade – null means a grade isn’t known or hasn’t been assigned yet.
Grade属性是枚举型。Grade后面的问号表明Grade属性是可为null的。值为Null的Grade与值为0的Grade是不同的,null意味着这个Grade为未知或者还没有指定。
The StudentID property is a foreign key, and the corresponding navigation property is Student. An Enrollment entity is associated with one Student entity, so the property can only hold a single Student entity (unlike the Student.Enrollments navigation property you saw earlier, which can hold multiple Enrollment entities).
StduentID属性是外键,对应的导航属性是Student。Enrollment实体与Stduent实体相关联,所以该属性仅能持有单独的一个Stduent实体(不像前面看到的Stduent.Enrollments导航属性可控制多个Enrollment实体)。
The CourseID property is a foreign key, and the corresponding navigation property is Course. An Enrollment entity is associated with one Course entity.
CourseID属性是一个外键,相应的的导航实体是Course。一个Enrollment实体与一个Course实体项关联。
Entity Framework interprets a property as a foreign key property if it’s named <navigation property name><primary key property name> (for example, StudentID for the Student navigation property since the Student entity’s primary key is ID). Foreign key properties can also be named simply <primary key property name> (for example, CourseID since the Course entity’s primary key is CourseID).
如果一个属性的名称是<导航属性名><主键属性名>(例如:StduentID对于Stduent导航属性,因为Student实体的主键是ID),Entity Framework将这个属性解释为外键属性。外键属性也可被命名为相同的简单的<主键属性名>(例如:CourseID,因为Course实体的主键是CourseID。
The Course entity
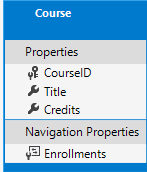
using System.Collections.Generic;
using System.ComponentModel.DataAnnotations.Schema;

namespace ContosoUniversity.Models
{
    public class Course
    {
        [DatabaseGenerated(DatabaseGeneratedOption.None)]
        public int CourseID { get; set; }
        public string Title { get; set; }
        public int Credits { get; set; }

        public ICollection<Enrollment> Enrollments { get; set; }
    }
}
The Enrollments property is a navigation property. A Course entity can be related to any number of Enrollment entities.
Enrollments属性是导航属性。Course实体可与任意数量的Enrollment实体相关联。
We’ll say more about the DatabaseGenerated attribute in a later tutorial in this series. Basically, this attribute lets you enter the primary key for the course rather than having the database generate it.
我们将在后续的课程中讨论更多的DatebaseGenerated属性。基本上,该属性让你为course生成主键而不是让数据库生成它。
Create the Database Context 创建数据库上下文
The main class that coordinates Entity Framework functionality for a given data model is the database context class. You create this class by deriving from the System.Data.Entity.DbContext class. In your code you specify which entities are included in the data model. You can also customize certain Entity Framework behavior. In this project, the class is named SchoolContext.
与给定的数据模型Entity Framework同等的主类是数据库上下文类。通过导出System.Data.Entity.DbContext类可创建该类。在代码中,你可指定哪一个实体包含在数据模型中。你也可客户化某个Entity Framework行为。在该项目中,该类被命名为SchoolContext。
In the Data folder create a new class file named SchoolContext.cs, and replace the template code with the following code:
在Data文件夹中创建一个名为SchoolContext.cs的新类文件,然后用下列代码替换模板代码。
using ContosoUniversity.Models;
using Microsoft.EntityFrameworkCore;

namespace ContosoUniversity.Data
{
    public class SchoolContext : DbContext
    {
        public SchoolContext(DbContextOptions<SchoolContext> options) : base(options)
        {
        }

        public DbSet<Course> Courses { get; set; }
        public DbSet<Enrollment> Enrollments { get; set; }
        public DbSet<Student> Students { get; set; }
    }
}
This code creates a DbSet property for each entity set. In Entity Framework terminology, an entity set typically corresponds to a database table, and an entity corresponds to a row in the table.
代码为每个实体集合创建了一个DbSet。在Entity Framework术语中,一个实体集合通常与一个数据库表相关,一个实体与表中的一个行相关。
You could have omitted the DbSet<Enrollment> and DbSet<Course> statements and it would work the same. The Entity Framework would include them implicitly because the Student entity references the Enrollment entity and the Enrollment entity references the Course entity.
你可以省略DbSet<Enrollment>和DbSet<Course>声明,这仍将同样工作。Entity Framework将暗含他们,因为Student实体引用了Enrollment实体,Enrollment实体引用了Course实体。
When the database is created, EF creates tables that have names the same as the DbSet property names. Property names for collections are typically plural (Students rather than Student), but developers disagree about whether table names should be pluralized or not. For these tutorials you’ll override the default behavior by specifying singular table names in the DbContext. To do that, add the following highlighted code after the last DbSet property.
当创建数据库时,EF创建了与DbSet属性名相同的表。集合的属性名通常使用复数形式(使用Students而不是Student),但是是由开发者同意是否将表名使用复数形式。在本教程中,你将用DbContext中表名的单数形式覆盖缺省的行为。为此,在最新的DbSet属性后增加下列高亮代码。
using ContosoUniversity.Models;
using Microsoft.EntityFrameworkCore;

namespace ContosoUniversity.Data
{
    public class SchoolContext : DbContext
    {
        public SchoolContext(DbContextOptions<SchoolContext> options) : base(options)
        {
        }

        public DbSet<Course> Courses { get; set; }
        public DbSet<Enrollment> Enrollments { get; set; }
        public DbSet<Student> Students { get; set; }

        protected override void OnModelCreating(ModelBuilder modelBuilder)
        {
            modelBuilder.Entity<Course>().ToTable("Course");
            modelBuilder.Entity<Enrollment>().ToTable("Enrollment");
            modelBuilder.Entity<Student>().ToTable("Student");
        }
    }
}
Register the context with dependency injection 利用依赖注入注册上下文
ASP.NET Core implements dependency injection by default. Services (such as the EF database context) are registered with dependency injection during application startup. Components that require these services (such as MVC controllers) are provided these services via constructor parameters. You’ll see the controller constructor code that gets a context instance later in this tutorial.
ASP.NET默认使用依赖注入。在应用启动期间,启动依赖注入等服务(例如EF数据库上下文)。通过构造器参数提供了需要这些服务(例如MVC控制器)的组件。本教程后续内容中,你将看到取得上下文实例的控制器构造代码。
To register SchoolContext as a service, open Startup.cs, and add the highlighted lines to the ConfigureServices method.
要将SchoolContext注册为一项服务,请开打Startup.cs文件,然后向ConfigureServices方法增加高亮行。
services.AddDbContext<SchoolContext>(options =>
    options.UseSqlServer(Configuration.GetConnectionString("DefaultConnection")));

services.AddDbContext<ApplicationDbContext>(options =>
    options.UseSqlServer(Configuration.GetConnectionString("DefaultConnection")));
The name of the connection string is passed in to the context by calling a method on a DbContextOptionsBuilder object. For local development, the ASP.NET Core configuration system reads the connection string from the appsettings.json file. The connection string is highlighted in the following appsettings.json example.
通过调用DbContextAOptionsBuilder对象的一个方法,将连接字符串的名称传递给上下文。本地开发时,ASP.NET Core configuration system从appsettings.json文件读取连接字符串。连接字符串高亮显示于下面的appsettings.json例子中。
{
  "ConnectionStrings": {
    "DefaultConnection": "Server=(localdb)\mssqllocaldb;Database=ContosoUniversity1;Trusted_Connection=True;MultipleActiveResultSets=true"
  },
  "Logging": {
    "IncludeScopes": false,
    "LogLevel": {
      "Default": "Debug",
      "System": "Information",
      "Microsoft": "Information"
    }
  }
}
The connection string created by the Visual Studio new-project template has a generated database name with a numeric suffix to guarantee uniqueness. You don’t have to change that name.
由Visual Studio新建项目模板创建的连接字符串,有与生成的数据库相同的名字,该数据库名字以数字结尾确保不重复。你不必修改这个名字。
SQL Server Express LocalDB SQL Server Express LocalDB(本地数据库)
The connection string specifies a SQL Server LocalDB database. LocalDB is a lightweight version of the SQL Server Express Database Engine and is intended for application development, not production use. LocalDB starts on demand and runs in user mode, so there is no complex configuration. By default, LocalDB creates .mdf database files in the C:/Users/<user> directory.
Add code to initialize the database with test data¶ 添加编码以初始化带有测试数据的数据库
The Entity Framework will create an empty database for you. In this section, you write a method that is called after the database is created in order to populate it with test data.
Here you’ll use the EnsureCreated method to automatically create the database. In a later tutorial you’ll see how to handle model changes by using Code First Migrations to change the database schema instead of dropping and re-creating the database.
Entity Framwork 将为你创建一个空数据库。本节中,你要编写一个方法,以便实现对包含测试数据的数据库的调用。在这里,你将使用EnsureCreated方法自动创建数据库。在后面的教程中,你将看到如何使用Code Frist迁移功能来变更数据库schema,而不是采用删除、再重建数据库的发放,最终实现模型变更的处理。
In the Data folder, create a new class file named DbInitializer.cs and replace the template code with the following code, which causes a database to be created when needed and loads test data into the new database.
在Data文件夹中,创建一个名为DbInitializer.cs的类文件,然后用下面的代码替换模板内容,以便需要时可加载新的数据库。
using System;
using System.Collections.Generic;
using System.Linq;
using Microsoft.EntityFrameworkCore;
using Microsoft.Extensions.DependencyInjection;
using ContosoUniversity.Data;//原文如此,但调试的时候发现该引用应该是ContosoUniversity.Models

namespace ContosoUniversity.Models
{
    public static class DbInitializer
    {
        public static void Initialize(SchoolContext context)
        {
            context.Database.EnsureCreated();

            // Look for any students.
            if (context.Students.Any())
            {
                return;   // DB has been seeded
            }

            var students = new Student[]
            {
            new Student{FirstMidName="Carson",LastName="Alexander",EnrollmentDate=DateTime.Parse("2005-09-01")},
            new Student{FirstMidName="Meredith",LastName="Alonso",EnrollmentDate=DateTime.Parse("2002-09-01")},
            new Student{FirstMidName="Arturo",LastName="Anand",EnrollmentDate=DateTime.Parse("2003-09-01")},
            new Student{FirstMidName="Gytis",LastName="Barzdukas",EnrollmentDate=DateTime.Parse("2002-09-01")},
            new Student{FirstMidName="Yan",LastName="Li",EnrollmentDate=DateTime.Parse("2002-09-01")},
            new Student{FirstMidName="Peggy",LastName="Justice",EnrollmentDate=DateTime.Parse("2001-09-01")},
            new Student{FirstMidName="Laura",LastName="Norman",EnrollmentDate=DateTime.Parse("2003-09-01")},
            new Student{FirstMidName="Nino",LastName="Olivetto",EnrollmentDate=DateTime.Parse("2005-09-01")}
            };
            foreach (Student s in students)
            {
                context.Students.Add(s);
            }
            context.SaveChanges();

            var courses = new Course[]
            {
            new Course{CourseID=1050,Title="Chemistry",Credits=3,},
            new Course{CourseID=4022,Title="Microeconomics",Credits=3,},
            new Course{CourseID=4041,Title="Macroeconomics",Credits=3,},
            new Course{CourseID=1045,Title="Calculus",Credits=4,},
            new Course{CourseID=3141,Title="Trigonometry",Credits=4,},
            new Course{CourseID=2021,Title="Composition",Credits=3,},
            new Course{CourseID=2042,Title="Literature",Credits=4,}
            };
            foreach (Course c in courses)
            {
                context.Courses.Add(c);
            }
            context.SaveChanges();

            var enrollments = new Enrollment[]
            {
            new Enrollment{StudentID=1,CourseID=1050,Grade=Grade.A},
            new Enrollment{StudentID=1,CourseID=4022,Grade=Grade.C},
            new Enrollment{StudentID=1,CourseID=4041,Grade=Grade.B},
            new Enrollment{StudentID=2,CourseID=1045,Grade=Grade.B},
            new Enrollment{StudentID=2,CourseID=3141,Grade=Grade.F},
            new Enrollment{StudentID=2,CourseID=2021,Grade=Grade.F},
            new Enrollment{StudentID=3,CourseID=1050},
            new Enrollment{StudentID=4,CourseID=1050,},
            new Enrollment{StudentID=4,CourseID=4022,Grade=Grade.F},
            new Enrollment{StudentID=5,CourseID=4041,Grade=Grade.C},
            new Enrollment{StudentID=6,CourseID=1045},
            new Enrollment{StudentID=7,CourseID=3141,Grade=Grade.A},
            };
            foreach (Enrollment e in enrollments)
            {
                context.Enrollments.Add(e);
            }
            context.SaveChanges();
        }
    }
}
The code checks if there are any students in the database, and if not, it assumes the database is new and needs to be seeded with test data. It loads test data into arrays rather than List<T> collections to optimize performance.
这段代码检测数据库中是否有学生的记录,如果没有,将假定数据库是新的,后然用测试数据初始化。将测试数据加载到arrays中,而不是List<T>集合中,这可优化性能。
In Startup.cs, modify the Configure method to call this seed method on application startup. First, add the context to the method signature so that ASP.NET dependency injection can provide it to your DbInitializer class.
在Startup.cs中,修改Configure方法,以便应用启动时调用这些初始化方法。首先,向方法中增加上下文,以便ASP.NET依赖注入可向你的DbInitializer类提供该上下文。
public void Configure(IApplicationBuilder app, IHostingEnvironment env, ILoggerFactory loggerFactory, SchoolContext context)
{
    loggerFactory.AddConsole(Configuration.GetSection("Logging"));
    loggerFactory.AddDebug();
Then call your DbInitializer.Initialize method at the end of the Configure method.
接着,在Configure方法结尾处调用DbInitializer.Initialize方法。
    app.UseMvc(routes =>
    {
        routes.MapRoute(
            name: "default",
            template: "{controller=Home}/{action=Index}/{id?}");
    });

    DbInitializer.Initialize(context);
}
Now the first time you run the application the database will be created and seeded with test data. Whenever you change your data model, you can delete the database, update your seed method, and start afresh with a new database the same way. In later tutorials you’ll see how to modify the database when the data model changes, without deleting and re-creating it.
现在第一次运行应用,数据库将被创建,测试数据将被初始化。修改数据模型时,你可删除数据库、更新seed方法,并且用同样的方法开始刷新新的数据库。在后续的教程中,当数据模型变化时,你将看到如何修改数据库,而不是用删除再重建的方法。
Create a controller and views 创建控制器和视图
Next, you’ll use the scaffolding engine in Visual Studio to add an MVC controller and views that will use EF to query and save data.
接下来,你将使用VS的基架引擎来增加MVC的控制器和视图,以实现通过EF进行查询和存储数据。
The automatic creation of CRUD action methods and views is known as scaffolding. Scaffolding differs from code generation in that the scaffolded code is a starting point that you can modify to suit your own requirements, whereas you typically don’t modify generated code. When you need to customize generated code, you use partial classes or you regenerate the code when things change.
自动创建“增删查改”方法和视图的功能被称为基架。基架模式不同于直接编写代码的方式,通过基架生成的代码是一个开端,基于此你可以进一步修改代码以适合自己的应用,然而典型情况下你也可不修改生成的代码。当需要定制生成的代码时,你可使用部分的类,或者当事情变化是重新生成代码。
- Right-click the Controllers folder in Solution Explorer and select Add > New Scaffolded Item.
- In the Add Scaffold dialog box:
- Select MVC controller with views, using Entity Framework.
- Click Add.
- In the Add Controller dialog box:
- In Model class select Student.
- In Data context class select SchoolContext.
- Accept the default StudentsController.cs as the name.
- Click Add.
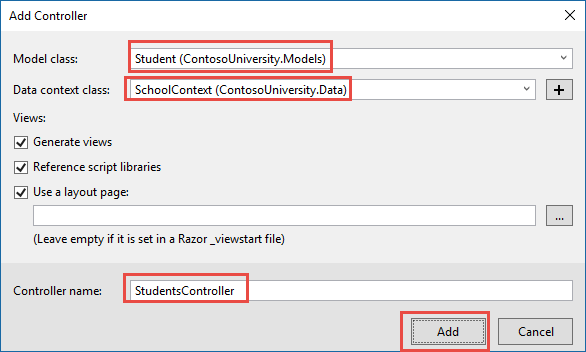
When you click Add, the Visual Studio scaffolding engine creates a StudentsController.cs file and a set of views (.cshtml files) that work with the controller.
当你点击Add时,VS基架引擎创建一个StudentsController.cs文件,并且创建了一套视图(.cshtml/files),该套视图与这个控制器一同工作。
(The scaffolding engine can also create the database context for you if you don’t create it manually first as you did earlier for this tutorial. You can specify a new context class in the Add Controller box by clicking the plus sign to the right of Data context class. Visual Studio will then create your DbContext class as well as the controller and views.)
(如果你没有像该教程前面要求的创建上下文的话,基架引擎也会为你创建一个数据库上下文。你可在Add Controller对话框内点击Data Context class后面的“加号”,从而指定一个新的上下文类。VS然后将会你自己定义的DbContext类,以及控制器和视图)
You’ll notice that the controller takes a SchoolContext as a constructor parameter.
你将注意到控制器将SchoolContext作为一个构造参数。
namespace ContosoUniversity.Controllers
{
    public class StudentsController : Controller
    {
        private readonly SchoolContext _context;

        public StudentsController(SchoolContext context)
        {
            _context = context;
        }
ASP.NET dependency injection will take care of passing an instance of SchoolContext into the controller. You configured that in the Startup.cs file earlier.
ASP.NET依赖注入将会考虑向控制器传递一个SchoolContext实例。前面,你将其配置进Startup.cs。
The controller contains an Index action method, which displays all students in the database. The method gets a list of students from the Students entity set by reading the Students property of the database context instance:
控制器包含了一个Index方法,该方法显示数据库中所有的students数据。通过读取Students属性,该方法从Students实体中得到一个students表。
public async Task<IActionResult> Index()
{
    return View(await _context.Students.ToListAsync());
}
You’ll learn about the asynchronous programming elements in this code later in the tutorial.
你将在该教程的后面,学习异步编程的方法。
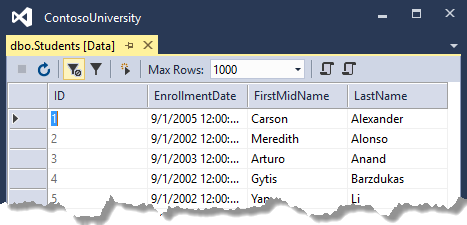
The Views/Students/Index.cshtml view displays this list in a table:
@model IEnumerable<ContosoUniversity.Models.Student>

@{
    ViewData["Title"] = "Index";
}

<h2>Index</h2>

<p>
    <a asp-action="Create">Create New</a>
</p>
<table class="table">
    <thead>
        <tr>
            <th>
                @Html.DisplayNameFor(model => model.EnrollmentDate)
            </th>
            <th>
                @Html.DisplayNameFor(model => model.FirstMidName)
            </th>
            <th>
                @Html.DisplayNameFor(model => model.LastName)
            </th>
            <th></th>
        </tr>
    </thead>
    <tbody>
        @foreach (var item in Model)
        {
            <tr>
                <td>
                    @Html.DisplayFor(modelItem => item.EnrollmentDate)
                </td>
                <td>
                    @Html.DisplayFor(modelItem => item.FirstMidName)
                </td>
                <td>
                    @Html.DisplayFor(modelItem => item.LastName)
                </td>
                <td>
                    <a asp-action="Edit" asp-route-id="@item.ID">Edit</a> |
                    <a asp-action="Details" asp-route-id="@item.ID">Details</a> |
                    <a asp-action="Delete" asp-route-id="@item.ID">Delete</a>
                </td>
            </tr>
        }
    </tbody>
</table>
Press CTRL+F5 to run the project or choose Debug > Start Without Debugging from the menu.
Click the Students tab to see the test data that the DbInitializer.Initialize method inserted. Depending on how narrow your browser window is, you’ll see the Student tab link at the top of the page or you’ll have to click the navigation icon in the upper right corner to see the link.


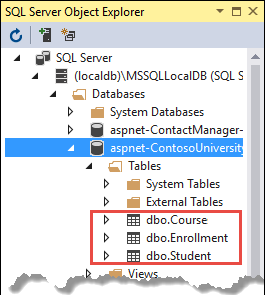
View the Database¶ 纵览数据库
When you started the application, the DbInitializer.Initialize method calls EnsureCreated. EF saw that there was no database and so it created one, then the remainder of the Initialize method code populated the database with data. You can use SQL Server Object Explorer (SSOX) to view the database in Visual Studio.
当启动该应用时,DbInitializer.Initialize方法调用EnsureCreated。EF看到没有数据库,进而创建了一个数据库,接着Initialize方法中剩余的代码使用提供的数据发布了数据库。你可以在VS中使用SQL Server Object Explorer (SSOX)浏览该数据库。
Close the browser.
If the SSOX window isn’t already open, select it from the View menu in Visual Studio.
In SSOX, click (localdb)MSSQLLocalDB > Databases, and then click the entry for the database name that is in the connection string in your appsettings.json file.
Expand the Tables node to see the tables in your database.
The .mdf and .ldf database files are in the C:Users<yourusername> folder.
Because you’re calling EnsureCreated in the initializer method that runs on app start, you could now make a change to the Student class, delete the database, run the application again, and the database would automatically be re-created to match your change. For example, if you add an EmailAddress property to the Student class, you’ll see a new EmailAddress column in the re-created table.
因为在应用启动时调用了initializer方法中的EnsureCreated,你现在可以修改Student类,然后删除数据库,再次运行应用,数据库将按照改动自动再次创建了。例如,如果你向Stduent类中增加了EmailAddress属性,你将看到在重新创建的表中多了EmailAddress列。
Conventions 约定
The amount of code you had to write in order for the Entity Framework to be able to create a complete database for you is minimal because of the use of conventions, or assumptions that the Entity Framework makes.
为了EF能创建一个完整的数据库,你已经写了一定数量的代码,但是这些代码是极少量的,因为用了一些约定,或者说是EF承担了一部分工作。
- The names of
DbSetproperties are used as table names. For entities not referenced by aDbSetproperty, entity class names are used as table names. - DbSet属性的名字被用于表名。因为实体没有引用DbSet属性,实体类名被用于表名。
- Entity property names are used for column names.
- 实体属性名被用于列名。
- Entity properties that are named ID or classnameID are recognized as primary key properties.
- 被命名为ID或者classnameID的实体属性被当作主键属性。
- A property is interpreted as a foreign key property if it’s named <navigation property name><primary key property name> (for example,
StudentIDfor theStudentnavigation property since theStudententity’s primary key isID). Foreign key properties can also be named simply <primary key property name> (for example,EnrollmentIDsince theEnrollmententity’s primary key isEnrollmentID). - 如果一个属性被命名为<navigation property name><primary key property name>,则该属性被当作外键。(例如:例如:StduentID对于Stduent导航属性,因为Student实体的主键是ID)。外键属性也可被命名为相同的简单的<主键属性名>(例如:CourseID,因为Course实体的主键是CourseID。)
Conventional behavior can be overridden. For example, you can explicitly specify table names, as you saw earlier in this tutorial. And you can set column names and set any property as primary key or foreign key, as you’ll see in a later tutorial in this series.
Asynchronous code 异步代码
Asynchronous programming is the default mode for ASP.NET Core and EF Core.
异步编程是Asp.net Core和EF Core的默认模式。
A web server has a limited number of threads available, and in high load situations all of the available threads might be in use. When that happens, the server can’t process new requests until the threads are freed up. With synchronous code, many threads may be tied up while they aren’t actually doing any work because they’re waiting for I/O to complete. With asynchronous code, when a process is waiting for I/O to complete, its thread is freed up for the server to use for processing other requests. As a result, asynchronous code enables server resources to be use more efficiently, and the server is enabled to handle more traffic without delays.
Asynchronous code does introduce a small amount of overhead at run time, but for low traffic situations the performance hit is negligible, while for high traffic situations, the potential performance improvement is substantial.
In the following code, the async keyword, Task<T> return value, await keyword, and ToListAsync method make the code execute asynchronously.
public async Task<IActionResult> Index()
{
    return View(await _context.Students.ToListAsync());
}
The async keyword tells the compiler to generate callbacks for parts of the method body and to automatically create the Task<IActionResult> object that is returned.
- The return type
Task<IActionResult>represents ongoing work with a result of typeIActionResult. - The
awaitkeyword causes the compiler to split the method into two parts. The first part ends with the operation that is started asynchronously. The second part is put into a callback method that is called when the operation completes. - await关键字使编译器将方法分成两个部分。第一个部分以开始异步为结尾。第二个部分被放进一个回调方法,当操作完成时该方法被调用。
ToListAsyncis the asynchronous version of theToListextension method.
Some things to be aware of when you are writing asynchronous code that uses the Entity Framework:
- Only statements that cause queries or commands to be sent to the database are executed asynchronously. That includes, for example,
ToListAsync,SingleOrDefaultAsync, andSaveChangesAsync. It does not include, for example, statements that just change anIQueryable, such asvar students = *context.Students.Where(s => s.LastName = "Davolio"). - An EF context is not thread safe: don’t try to do multiple operations in parallel. When you call any async EF method, always use the
awaitkeyword. - If you want to take advantage of the performance benefits of async code, make sure that any library packages that you’re using (such as for paging), also use async if they call any Entity Framework methods that cause queries to be sent to the database.
For more information about asynchronous programming in .NET, see Async Overview.