钩子(hooks)—webhook
http://fighter.blog.51cto.com/1318618/1670667
https://www.lovelucy.info/auto-deploy-website-by-webhooks-of-github-and-gitlab.html
什么是webhook?
wehook
A webhook is an API concept that's growing(激发) in popularity. As more and more of what we do on the web can be described by events, webhooks are becoming even more applicable. They're incredibly useful and a resource-light way to implement event reactions.
webhook是个在特定情况下触发的一种api. 越来越多在web上的操作被描述为事件.
那个 Payload URL 上填上需要部署到的服务器的网址,比方说 http://dev.lovelucy.info/incoming。然后之后每次有 push 事件 GitHub 都会主动往这个地址发送一个 POST
请求,当然你也可以选择任何事件都发个 POST 通知你。GitHub 还有个 Secret 的设定,就是一个字符串,如果加上的话就在 POST 请求的 HTTP 头中会带一个 Hash 值做验证密文,证明这个 POST 真是来自 GitHub,不然任何人都往那个地址 POST 忽悠你你都不知道谁是谁对吧……
what is events?
Events are at the core of webhooks. These webhooks fire whenever a certain action is taken on the repository, which your server's payload URL intercepts and acts upon.
事件是webhook的核心,当仓库发生特定action会触发webhook,
gitlab中解释: Web 钩子用于在项目发生相关事件时通知外部服务器。
Git是在特定事件发生之前或之后执行特定脚本代码功能(从概念上类比,就与监听事件、触发器之类的东西类似)。
Git Hooks就是那些在Git执行特定事件(如commit、push、receive等)后触发运行的脚本。
gitlab的web hooks跟git hook类似。也是当项目发生提交代码、提交tag等动作会自动去调用url,这个url可以是更新代码。或者其他操作。
配置目的:
由于系统属于后台接口系统,开发提交完git仓库后要实时的部署到测试环境,这时候就需要用到gitlab的web hooks自动更新部署了。
客户端:要自动更新的测试服务器IP:192.168.1.2
服务端:Gitlab服务器IP:192.168.1.1
Gitlab Version: 7.13.0.pre
GitLab-Shell Version: 2.6.3
1、在客户端上面配置apache配置文件,为web hooks添加一个接口访问
- #vim /usr/local/apache/conf/httpd.conf
- listen 81
- <VirtualHost *:81>
- ServerAdmin localhost
- DocumentRoot "/www/gitlab_web"
- <Directory "/www/gitlab_web">
- Options -Indexes +FollowSymLinks
- AllowOverride None
- Order allow,deny
- Allow from all
- </Directory>
- RewriteEngine on
- </VirtualHost>
2、在服务端gitlab上面为客户端添加gitlab新账号,然后将生成好的公钥添加到gitlab好的账号里面(profile setting-->SSH Keys -->add ssh key)
- #su - webuser
- #ssh-keygen -t rsa
- 进入项目目录
- #cd /path/project
- 初始化git仓库
- #git clone git@192.168.1.1:test/test_api.git
3、在客户端上面添加接口文件
- [root@node1 gitlab_web]# pwd
- /www/gitlab_web
- [root@node1 gitlab_web]# cat index.php
- <?php
- //作为接口传输的时候认证的密钥
- $valid_token = 'd49dfa762268687eb2ca59498ce852';
- //调用接口被允许的ip地址
- $valid_ip = array('192.168.14.2','192.168.14.1','192.168.14.128');
- $client_token = $_GET['token'];
- $client_ip = $_SERVER['REMOTE_ADDR'];
- $fs = fopen('./auto_hook.log', 'a');
- fwrite($fs, 'Request on ['.date("Y-m-d H:i:s").'] from ['.$client_ip.']'.PHP_EOL);
- if ($client_token !== $valid_token)
- {
- echo "error 10001";
- fwrite($fs, "Invalid token [{$client_token}]".PHP_EOL);
- exit(0);
- }
- if ( ! in_array($client_ip, $valid_ip))
- {
- echo "error 10002";
- fwrite($fs, "Invalid ip [{$client_ip}]".PHP_EOL);
- exit(0);
- }
- $json = file_get_contents('php://input');
- $data = json_decode($json, true);
- fwrite($fs, 'Data: '.print_r($data, true).PHP_EOL);
- fwrite($fs, '======================================================================='.PHP_EOL);
- $fs and fclose($fs);
- //这里也可以执行自定义的脚本文件update.sh,脚本内容可以自己定义。
- //exec("/bin/sh /root/updategit.sh");
- exec("/bin/echo $valid_ip >>/tmp/webhook.txt");
4、访问接口,测试接口是否成功
http://192.168.14.128:81/?token=d49dfa7622681425fbcbdd687eb2ca59498ce852
当然网页是空白的.
5、查看客户端日志
#cat /www/gitlab_web/auto_hook.log
=======================================================================
Request on [2015-07-03 14:05:02] from [112.122.112.112]
Data:
=======================================================================
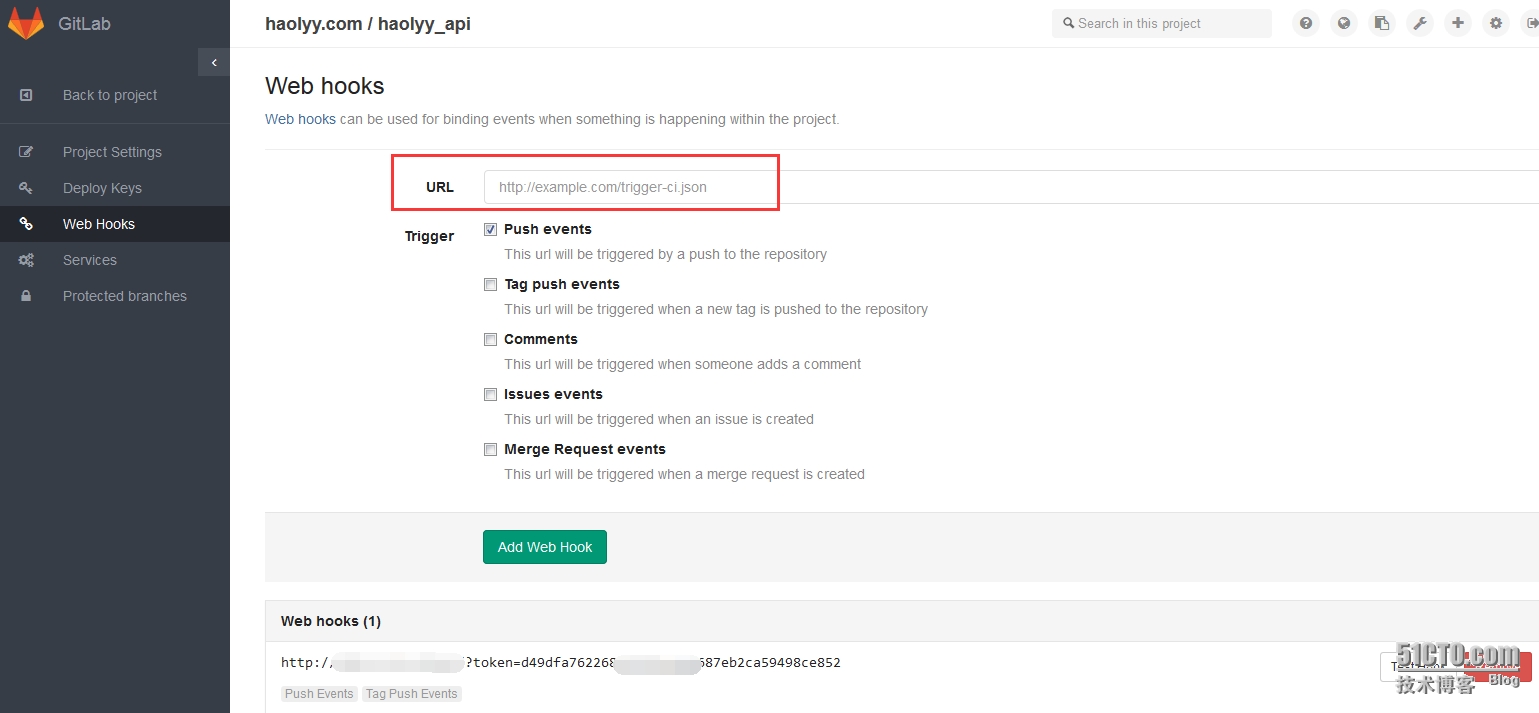
6、在服务端gitlab服务器上面添加web hooks
admin area->projects->test/edit->WEB Hooks->add WEB Hooks
7、提交修改代码到gitlab仓库,然后查看日志、查看测试环境是否更新
#cat /www/gitlab_web/auto_hook.log
Request on [2015-07-03 14:13:37] from [12.123.12.3]
Data: Array
(
[object_kind] => push
[before] => e5988b5dce7a038
[after] => d8ce92ac4ab4ba046dd
[ref] => refs/heads/master
[checkout_sha] => d8ceefd5c4ab4ba046dd
[message] =>
[user_id] => 7
[user_name] => test
[user_email] => test@qq.com
[project_id] => 3
[repository] => Array
(
[name] => test_api
[url] => git@192.168.1.1:test/test.api
[description] => test.com product code
[homepage] => http://xx./test_api
[git_http_url] => http://xx./test_api
[git_ssh_url] => git@112.23.23.1:test.git
[visibility_level] => 10
)
[commits] => Array
(
[0] => Array
(
[id] => d8cec4ab4ba046dd
[message] => 测试gitlab的web hook接口。
[timestamp] => 2015-07-03T14:13:51+08:00
[url] => http://xxxx/test_api/commit/d8ce95c4ab4ba046dd
[author] => Array
(
[name] => test
[email] => test@qq.com
)
)
)
[total_commits_count] => 1
)
注意事项:
1、配置完成后。调用接口的时候没有自动更新到测试环境。可以使用apache的运行用户测试命令是否可以执行成功
#su - webuser
#cd /path/project
#git pull
2、如果apache的用户无法执行命令或者无法更新git代码请检查一下apache用户的shell。
参考资料:
http://blog.ycnets.com/2013/10/19/automatic-update-version-with-gitlab-web-hook/#disqus_thread