按上节继续学习,稍微复杂的业务系统,一般会将数据库按业务拆开,比如产品系统的数据库放在product db中,订单系统的数据库放在order db中...,然后,如果量大了,可能每个库还要考虑做读、写分离,以进一步提高系统性能,下面就来看看如何处理:
核心思路:配置多个数据源,然后利用RoutingDataSource结合AOP来动态切不同的库。
要解决的问题:
1、配置文件中,多数据源的配置节点如何设计?


 1 druid:
 2     type: com.alibaba.druid.pool.DruidDataSource
 3     study:
 4       master: #study库的主库
 5         url: jdbc:mysql://localhost:3306/study?useSSL=false&characterEncoding=UTF-8&autoReconnect=true&zeroDateTimeBehavior=convertToNull&useUnicode=true
 6         driver-class-name: com.mysql.cj.jdbc.Driver
 7         username: root
 8         password: A1b2c3@def.com
 9         initial-size: 5
10         min-idle: 1
11         max-active: 20
12         test-on-borrow: true
13       slave: #study库的从库
14         url: jdbc:mysql://localhost:3306/study_slave?useSSL=false&characterEncoding=UTF-8&autoReconnect=true&zeroDateTimeBehavior=convertToNull&useUnicode=true
15         driver-class-name: com.mysql.cj.jdbc.Driver
16         username: root
17         password: A1b2c3@def.com
18         initial-size: 5
19         min-idle: 1
20         max-active: 20
21         test-on-borrow: true
22     product:
23       master: #product库的主库
24         url: jdbc:mysql://localhost:3306/product?useSSL=false&characterEncoding=UTF-8&autoReconnect=true&zeroDateTimeBehavior=convertToNull&useUnicode=true
25         driver-class-name: com.mysql.cj.jdbc.Driver
26         username: root
27         password: A1b2c3@def.com
28         initial-size: 5
29         min-idle: 1
30         max-active: 20
31         test-on-borrow: true
32       slave: #product库的从库
33         url: jdbc:mysql://localhost:3306/product_slave?useSSL=false&characterEncoding=UTF-8&autoReconnect=true&zeroDateTimeBehavior=convertToNull&useUnicode=true
34         driver-class-name: com.mysql.cj.jdbc.Driver
35         username: root
36         password: A1b2c3@def.com
37         initial-size: 5
38         min-idle: 1
39         max-active: 20
40         test-on-borrow: true
上面的配置写法供参数,如果slave节点数要扩展,按这个格式,改造成slave1,slave2... 自行扩展。
2、配置类如何设计?

 1 package com.cnblogs.yjmyzz.db.config;
 2
 3 /**
 4  * Created by jimmy on 6/18/17.
 5  */
 6
 7 import com.cnblogs.yjmyzz.db.datasource.DbContextHolder;
 8 import com.cnblogs.yjmyzz.db.datasource.MasterSlaveRoutingDataSource;
 9 import org.springframework.beans.factory.annotation.Value;
10 import org.springframework.boot.autoconfigure.jdbc.DataSourceBuilder;
11 import org.springframework.boot.context.properties.ConfigurationProperties;
12 import org.springframework.context.annotation.Bean;
13 import org.springframework.context.annotation.Configuration;
14 import org.springframework.context.annotation.Primary;
15 import org.springframework.jdbc.datasource.lookup.AbstractRoutingDataSource;
16 import org.springframework.transaction.annotation.EnableTransactionManagement;
17
18 import javax.sql.DataSource;
19 import java.util.HashMap;
20 import java.util.Map;
21
22
23 @Configuration
24 @EnableTransactionManagement
25 public class DataSourceConfiguration {
26
27     @Value("${druid.type}")
28     private Class<? extends DataSource> dataSourceType;
29
30     @Bean(name = "studyMasterDataSource")
31     @ConfigurationProperties(prefix = "druid.study.master")
32     public DataSource studyMasterDataSource() {
33         return DataSourceBuilder.create().type(dataSourceType).build();
34     }
35
36     @Bean(name = "studySlaveDataSource")
37     @ConfigurationProperties(prefix = "druid.study.slave")
38     public DataSource studySlaveDataSource1() {
39         return DataSourceBuilder.create().type(dataSourceType).build();
40     }
41
42     @Bean(name = "productMasterDataSource")
43     @ConfigurationProperties(prefix = "druid.product.master")
44     public DataSource productMasterDataSource() {
45         return DataSourceBuilder.create().type(dataSourceType).build();
46     }
47
48     @Bean(name = "productSlaveDataSource")
49     @ConfigurationProperties(prefix = "druid.product.slave")
50     public DataSource productSlaveDataSource1() {
51         return DataSourceBuilder.create().type(dataSourceType).build();
52     }
53
54     @Bean(name = "dataSource")
55     @Primary
56     public AbstractRoutingDataSource dataSource() {
57         MasterSlaveRoutingDataSource proxy = new MasterSlaveRoutingDataSource();
58         Map<Object, Object> targetDataResources = new HashMap<>();
59         targetDataResources.put(DbContextHolder.DbType.PRODUCT_MASTER, productMasterDataSource());
60         targetDataResources.put(DbContextHolder.DbType.PRODUCT_SLAVE, productSlaveDataSource1());
61         targetDataResources.put(DbContextHolder.DbType.STUDY_MASTER, studyMasterDataSource());
62         targetDataResources.put(DbContextHolder.DbType.STUDY_SLAVE, studySlaveDataSource1());
63         proxy.setDefaultTargetDataSource(productMasterDataSource());
64         proxy.setTargetDataSources(targetDataResources);
65         proxy.afterPropertiesSet();
66         return proxy;
67     }
68
69 }
参考这个,一看就明,不说多(注:@Primary一定要在动态数据源上,否则事务回滚无效!)
3、根据什么来切换db?
有很多选择,
a、用约定的方法前缀,比如:get/query/list开头的约定为读从库,其它为主库,但是这样还要考虑不同业务库的切换(即:何时切换到product库,何时切换到order库,可以再用不同的Scanner来处理,略复杂)
b、用自定义注解来处理,比如 @ProductMaster注解,表示切换到product的master库,这样同时把业务库,以及主还是从,一次性解决了,推荐这种。
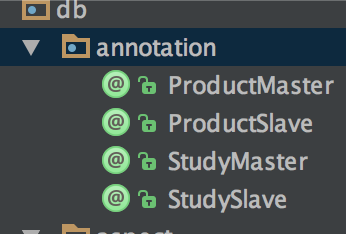
这里,我定义了4个注解,代表product,study二个库的主及从。
4、aop在哪里拦截,如何拦截?
service层和mapper层都可以拦截,推荐在服务层拦截,否则如果一个业务方法里,即有读又有写,还得考虑如果遇到事务,要考虑的东西更多。
当然,如果拦截特定的注解,就不用过多考虑在哪个层,只认注解就行(当然,注解还是建议打在服务层上)。
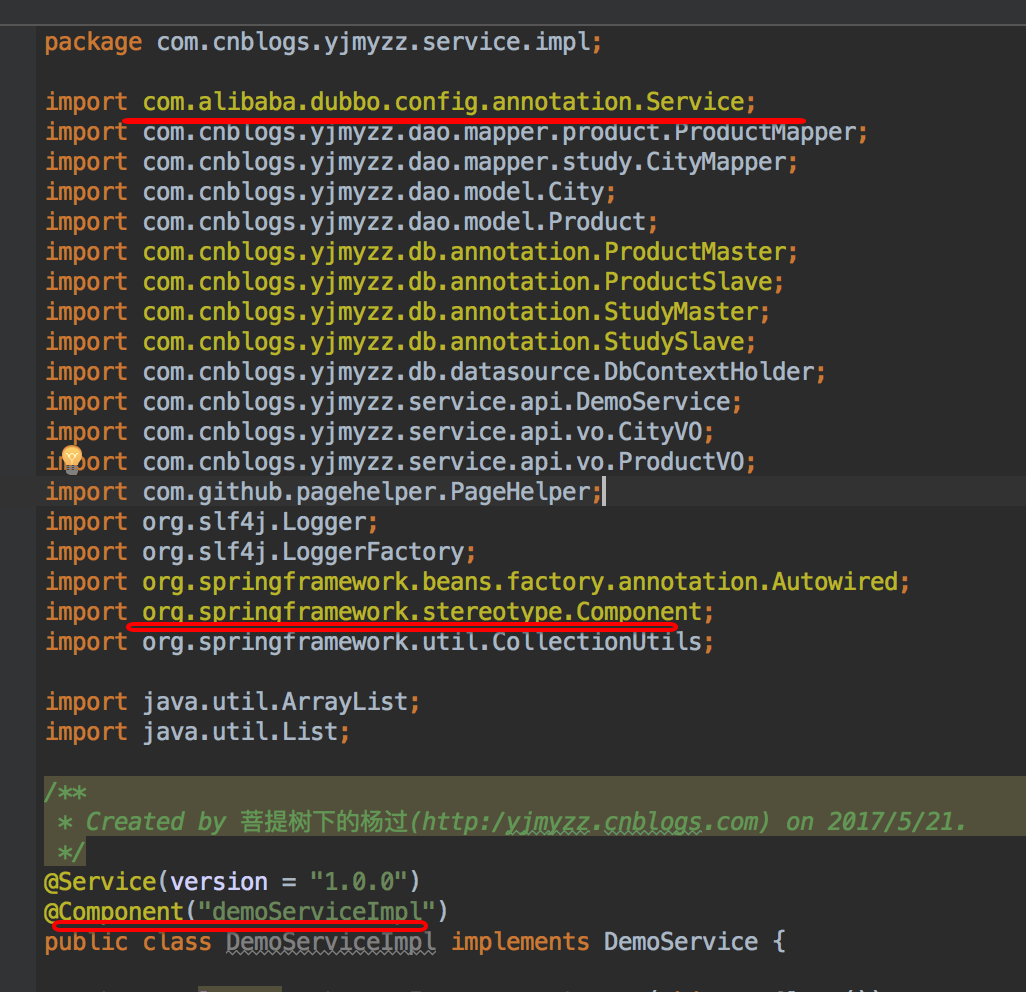
dubbo-starter的一个小坑:spring boot中,只有managed bean才能用aop拦截,而dubbo-starter中的@service注解不是spring中的注解(是阿里package下的自定义注解),生成的service provider实例,aop拦截不到,解决办法,再加一个注解让spring认识它,参考:
Aop拦截类的参考代码如下:
  1 package com.cnblogs.yjmyzz.db.aspect;
  2
  3 import com.cnblogs.yjmyzz.db.annotation.ProductMaster;
  4 import com.cnblogs.yjmyzz.db.annotation.ProductSlave;
  5 import com.cnblogs.yjmyzz.db.annotation.StudyMaster;
  6 import com.cnblogs.yjmyzz.db.annotation.StudySlave;
  7 import com.cnblogs.yjmyzz.db.datasource.DbContextHolder;
  8 import org.aspectj.lang.ProceedingJoinPoint;
  9 import org.aspectj.lang.annotation.Around;
 10 import org.aspectj.lang.annotation.Aspect;
 11 import org.slf4j.Logger;
 12 import org.slf4j.LoggerFactory;
 13 import org.springframework.core.Ordered;
 14 import org.springframework.stereotype.Component;
 15
 16
 17 @Aspect
 18 @Component
 19 public class MasterSlaveAspect implements Ordered {
 20
 21     public static final Logger logger = LoggerFactory.getLogger(MasterSlaveAspect.class);
 22
 23
 24     /**
 25      * 切换到product主库
 26      *
 27      * @param proceedingJoinPoint
 28      * @param productMaster
 29      * @return
 30      * @throws Throwable
 31      */
 32     @Around("@annotation(productMaster)")
 33     public Object proceed(ProceedingJoinPoint proceedingJoinPoint, ProductMaster productMaster) throws Throwable {
 34         try {
 35             logger.info("set database connection to product-master only");
 36             DbContextHolder.setDbType(DbContextHolder.DbType.PRODUCT_MASTER);
 37             Object result = proceedingJoinPoint.proceed();
 38             return result;
 39         } finally {
 40             DbContextHolder.clearDbType();
 41             logger.info("restore database connection");
 42         }
 43     }
 44
 45
 46     /**
 47      * 切换到product从库
 48      *
 49      * @param proceedingJoinPoint
 50      * @param productSlave
 51      * @return
 52      * @throws Throwable
 53      */
 54     @Around("@annotation(productSlave)")
 55     public Object proceed(ProceedingJoinPoint proceedingJoinPoint, ProductSlave productSlave) throws Throwable {
 56         try {
 57             logger.info("set database connection to product-slave only");
 58             DbContextHolder.setDbType(DbContextHolder.DbType.PRODUCT_SLAVE);
 59             Object result = proceedingJoinPoint.proceed();
 60             return result;
 61         } finally {
 62             DbContextHolder.clearDbType();
 63             logger.info("restore database connection");
 64         }
 65     }
 66
 67     /**
 68      * 切换到study主库
 69      *
 70      * @param proceedingJoinPoint
 71      * @param studyMaster
 72      * @return
 73      * @throws Throwable
 74      */
 75     @Around("@annotation(studyMaster)")
 76     public Object proceed(ProceedingJoinPoint proceedingJoinPoint, StudyMaster studyMaster) throws Throwable {
 77         try {
 78             logger.info("set database connection to study-master only");
 79             DbContextHolder.setDbType(DbContextHolder.DbType.STUDY_MASTER);
 80             Object result = proceedingJoinPoint.proceed();
 81             return result;
 82         } finally {
 83             DbContextHolder.clearDbType();
 84             logger.info("restore database connection");
 85         }
 86     }
 87
 88     /**
 89      * 切换到study从库
 90      *
 91      * @param proceedingJoinPoint
 92      * @param studySlave
 93      * @return
 94      * @throws Throwable
 95      */
 96     @Around("@annotation(studySlave)")
 97     public Object proceed(ProceedingJoinPoint proceedingJoinPoint, StudySlave studySlave) throws Throwable {
 98         try {
 99             logger.info("set database connection to study-slave only");
100             DbContextHolder.setDbType(DbContextHolder.DbType.STUDY_SLAVE);
101             Object result = proceedingJoinPoint.proceed();
102             return result;
103         } finally {
104             DbContextHolder.clearDbType();
105             logger.info("restore database connection");
106         }
107     }
108
109     @Override
110     public int getOrder() {
111         return 0;
112     }
113 }
5、其它事项
启用类上,一定要排除spring-boot自带的datasource配置,即:
1 @SpringBootApplication(exclude = {DataSourceAutoConfiguration.class})
2 @EnableAspectJAutoProxy
3 @ComponentScan("com.cnblogs.yjmyzz")
4 @MapperScan(basePackages = "com.cnblogs.yjmyzz.dao.mapper")
5 public class ServiceProvider {
6     public static void main(String[] args) {
7         SpringApplication.run(ServiceProvider.class, args);
8     }
9 }
第1行:@SpringBootApplication(exclude = {DataSourceAutoConfiguration.class})
6、日志中如何输出格式化且带参数值的sql?
一般的sql输出是这样的:

我们可以把它变成下面这样:
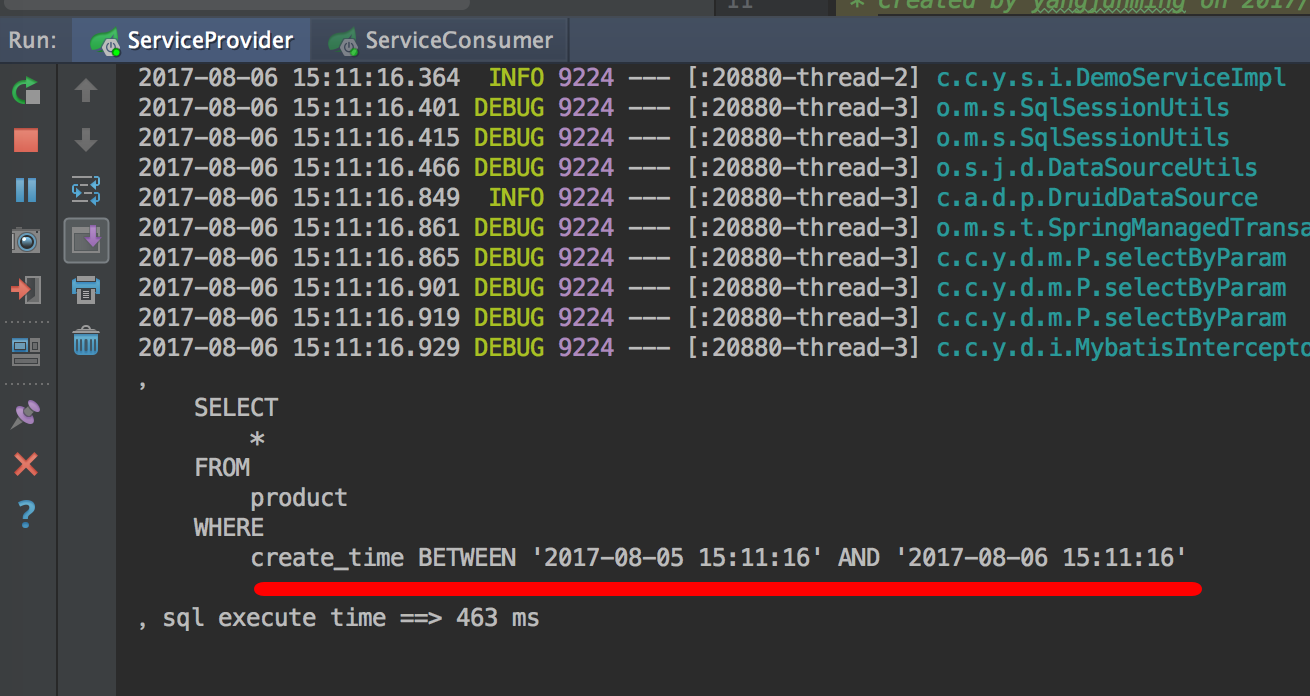
是不是更友好!
方法:加一个mybtais的拦截器即可
1 2 3 4 5 6 7 8 9 10 11 12 13 14 15 16 17 18 19 20 21 22 23 24 25 26 27 28 29 30 31 32 33 34 35 36 37 38 39 40 41 42 43 44 45 46 47 48 49 50 51 52 53 54 55 56 57 58 59 60 61 62 63 64 65 66 67 68 69 70 71 72 73 74 75 76 77 78 79 80 81 82 83 84 85 86 87 88 89 90 91 92 93 94 95 96 97 98 99 100 101 102 103 104 105 106 107 108 109 110 111 112 113 114 115 116 117 118 119 120 121 122 123 124 125 126 127 | package com.cnblogs.yjmyzz.db.interceptor;import com.cnblogs.yjmyzz.util.PrettySQLFormatter;import org.apache.ibatis.cache.CacheKey;import org.apache.ibatis.executor.Executor;import org.apache.ibatis.mapping.BoundSql;import org.apache.ibatis.mapping.MappedStatement;import org.apache.ibatis.mapping.ParameterMapping;import org.apache.ibatis.plugin.*;import org.apache.ibatis.reflection.MetaObject;import org.apache.ibatis.session.Configuration;import org.apache.ibatis.session.ResultHandler;import org.apache.ibatis.session.RowBounds;import org.apache.ibatis.type.TypeHandlerRegistry;import org.slf4j.Logger;import org.slf4j.LoggerFactory;import java.text.SimpleDateFormat;import java.util.Date;import java.util.List;import java.util.Properties;/** * Created by 菩提树下的杨过(http://yjmyzz.cnblogs.com/) on 28/07/2017. */@Intercepts({ @Signature(type = Executor.class, method = "update", args = {MappedStatement.class, Object.class}), @Signature(type = Executor.class, method = "query", args = {MappedStatement.class, Object.class, RowBounds.class, ResultHandler.class}), @Signature(type = Executor.class, method = "query", args = {MappedStatement.class, Object.class, RowBounds.class, ResultHandler.class, CacheKey.class, BoundSql.class})})public class MybatisInterceptor implements Interceptor { private static Logger logger = LoggerFactory.getLogger(MybatisInterceptor.class); private Properties properties; private final static SimpleDateFormat sdt = new SimpleDateFormat("yyyy-MM-dd HH:mm:ss"); @Override public Object intercept(Invocation invocation) throws Throwable { MappedStatement mappedStatement = (MappedStatement) invocation.getArgs()[0]; Object parameter = null; if (invocation.getArgs().length > 1) { parameter = invocation.getArgs()[1]; } String sqlId = mappedStatement.getId(); BoundSql boundSql = mappedStatement.getBoundSql(parameter); Configuration configuration = mappedStatement.getConfiguration(); Object returnValue; long start = System.currentTimeMillis(); returnValue = invocation.proceed(); long end = System.currentTimeMillis(); long time = (end - start); if (time > 1) { String sql = getSql(configuration, boundSql, sqlId, time); logger.debug("mapper method ==> " + sql.split("\^")[0] + "
," + PrettySQLFormatter.getPrettySql(sql.split("\^")[1]) + "
," + "sql execute time ==> " + time + " ms
"); } return returnValue; } @Override public Object plugin(Object target) { return Plugin.wrap(target, this); } @Override public void setProperties(Properties properties) { this.properties = properties; } public static String getSql(Configuration configuration, BoundSql boundSql, String sqlId, long time) { String sql = showSql(configuration, boundSql); StringBuilder str = new StringBuilder(100); str.append(sqlId); str.append("^"); str.append(sql); str.append("^"); str.append(time); str.append("ms"); return str.toString(); } private static String getParameterValue(Object obj) { String value; if (obj instanceof String) { value = "'" + obj.toString() + "'"; } else if (obj instanceof Date) { value = "'" + sdt.format(obj) + "'"; } else { if (obj != null) { value = obj.toString(); } else { value = ""; } } return value; } public static String showSql(Configuration configuration, BoundSql boundSql) { Object parameterObject = boundSql.getParameterObject(); List<ParameterMapping> parameterMappings = boundSql.getParameterMappings(); String sql = boundSql.getSql().replaceAll("[\s]+", " "); if (parameterMappings.size() > 0 && parameterObject != null) { TypeHandlerRegistry typeHandlerRegistry = configuration.getTypeHandlerRegistry(); if (typeHandlerRegistry.hasTypeHandler(parameterObject.getClass())) { sql = sql.replaceFirst("\?", getParameterValue(parameterObject)); } else { MetaObject metaObject = configuration.newMetaObject(parameterObject); for (ParameterMapping parameterMapping : parameterMappings) { String propertyName = parameterMapping.getProperty(); if (metaObject.hasGetter(propertyName)) { Object obj = metaObject.getValue(propertyName); sql = sql.replaceFirst("\?", getParameterValue(obj)); } else if (boundSql.hasAdditionalParameter(propertyName)) { Object obj = boundSql.getAdditionalParameter(propertyName); sql = sql.replaceFirst("\?", getParameterValue(obj)); } } } } return sql; }} |
这里面还用了hibernate的一个小工具,用于格式化sql
1 2 3 4 5 6 7 8 9 10 11 12 13 14 15 16 17 18 19 20 21 22 23 24 25 26 27 28 29 30 | package com.cnblogs.yjmyzz.util;import org.hibernate.engine.jdbc.internal.FormatStyle;public class PrettySQLFormatter { public static void print(String sql) { System.out.println(FormatStyle.BASIC.getFormatter().format(sql)); } public static void print(String remark, String sql) { System.out.println(remark + FormatStyle.BASIC.getFormatter().format(sql)); } public static String getPrettySql(String sql) { return FormatStyle.BASIC.getFormatter().format(sql); } public static String getPrettySql(String remark, String sql) { return remark + FormatStyle.BASIC.getFormatter().format(sql); } public static void main(String[] args) { System.out.println(getPrettySql("select * from MyUser as A join MyFriend as B on A.id = B.pid where B.name like ? ")); }} |
接下来,把这个拦截器配置在mybatis-config.xml里
 1 <?xml version="1.0" encoding="UTF-8"?>
 2 <!DOCTYPE configuration PUBLIC "-//mybatis.org//DTD Config 3.0//EN"
 3         "http://mybatis.org/dtd/mybatis-3-config.dtd">
 4 <configuration>
 5     <settings>
 6         <setting name="cacheEnabled" value="true"/>
 7     </settings>
 8
 9     <plugins>
10         <plugin interceptor="com.cnblogs.yjmyzz.db.interceptor.MybatisInterceptor">
11         </plugin>
12     </plugins>
13
14 </configuration>
最后在application.yml里指定mybatis-config.xml所在的路径:

示例源码见:https://github.com/yjmyzz/spring-boot-dubbo-demo (dubbox2.8.5-multi-ds分支)