1.概述
-
spring security有参考的中文翻译文档https://springcloud.cc/spring-security-zhcn.html - 在学习
spring security的时候,参考的书籍并不是很多,线上的技术博文也是没有系统的全面的介绍,不得不去参考源代码,发费了大量时间和精力,而我试图也通过一系列的文章,能结合自己的学习经历,循序渐进的表达清楚自己所理解到的点。 - 所有的文章都是对源代码的解读,最后会给出一个小小的demo。
- 选用的
spring boot版本1.4.3.RELEASE,spring cloud版本Camden.SR4(后面有结合网关zuul做oauth2 认证授权介绍)。版本非spring 最新版本,选用的是平时使用最多版本。 - 文章是作为学习笔记性质为目的.当然如果文章能帮到有需要的朋友自然是特别开心和幸福的事情。有理解错误和不到位的点也希望各位指出,一起学习一起成长,一直没有都没敢写公开技术文章,第一本人水平有限,第二是不希望因为自己的错误给别人造成误导。
2.启动
2.1 简单的开始
从文档中可知,spring引入我们的项目只需要分为两步
- maven引入需要的包,spring boot中引入的spring security版本为4.1.4
 <dependency>
        <groupId>org.springframework.boot</groupId>
        <artifactId>spring-boot-starter-security</artifactId>
 </dependency>
- 配置spring security(spring security官方文档给出的例子,后面简称例子1)
@EnableWebSecurity
public class WebSecurityConfig extends WebSecurityConfigurerAdapter {
<span class="hljs-meta"><span class="hljs-meta">@Autowired</span></span>
<span class="hljs-function"><span class="hljs-keyword"><span class="hljs-function"><span class="hljs-keyword">public</span></span></span><span class="hljs-function"> </span><span class="hljs-keyword"><span class="hljs-function"><span class="hljs-keyword">void</span></span></span><span class="hljs-function"> </span><span class="hljs-title"><span class="hljs-function"><span class="hljs-title">configureGlobal</span></span></span><span class="hljs-params"><span class="hljs-function"><span class="hljs-params">(AuthenticationManagerBuilder auth)</span></span></span><span class="hljs-function"> </span><span class="hljs-keyword"><span class="hljs-function"><span class="hljs-keyword">throws</span></span></span><span class="hljs-function"> Exception </span></span>{
    auth
        .inMemoryAuthentication()
            .withUser(<span class="hljs-string"><span class="hljs-string">"user"</span></span>).password(<span class="hljs-string"><span class="hljs-string">"password"</span></span>).roles(<span class="hljs-string"><span class="hljs-string">"USER"</span></span>);
}

}
2.2 简单后面的繁琐
我们洁简的应用spring security到我们的项目,然后却开启了非常强大的功能,上面的例子,在内存中配置了一个用户名为user,密码为password,并且拥有USER角色的用户。我们还是要探究一下,spring security到底为我们做了一些什么样的工作。
我们的入手点只有两个,@EnableWebSecurity注解和WebSecurityConfigurerAdapter这个适配器类。
2.2.1 @EnableWebSecurity 注解
注解源代码
@Retention(value = java.lang.annotation.RetentionPolicy.RUNTIME)
@Target(value = { java.lang.annotation.ElementType.TYPE })
@Documented
@Import({ WebSecurityConfiguration.class,
        SpringWebMvcImportSelector.class,
        OAuth2ImportSelector.class })
@EnableGlobalAuthentication
@Configuration
public @interface EnableWebSecurity {
    boolean debug() default false;
此处还是有必要简单翻译一下官方对于类的注释,以便于更加清楚的理解注解的作用
注释中提到两个很重要的点,以及一个配置示例,
- 第一个点:
@EnableWebSecurity配置到拥有注解@Configuration的类上,就可以获取到spring security的支持. - 第二个点:
WebSecurityConfigurer的子类可以扩展spring security的应用
由此可知@EnableWebSecurity使我们拥有spring security的能力。WebSecurityConfigurer 使我们能根据业务扩展我们的应用,而WebSecurityConfigurerAdapter是WebSecurityConfigurer 的一个适配器,必然也是做了很多默认的工作。后面我们会一一说到。
从以上可以稍微总结一下我们下一步需要探究的问题,
-
WebSecurityConfigurerAdapter到底为我们做了什么工作. - 上面注解的源代码中Import了一个很重要的配置类
WebSecurityConfiguration怎样组件我们的过滤器(或者说过滤器链)
2.2.2 spring security创建流程
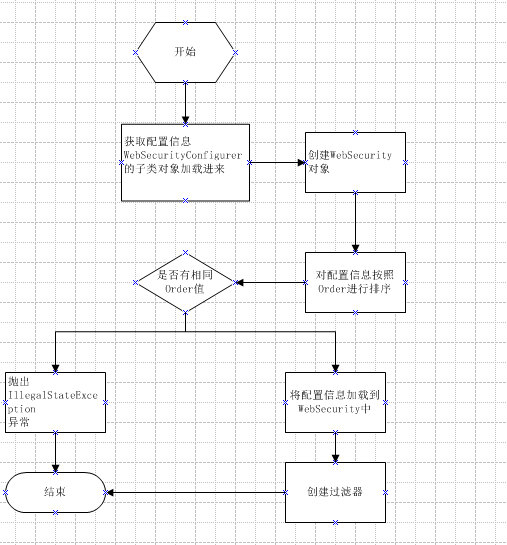
spring security加载流程
- 如果我们忽略掉细节,只看最重要的步骤,大概如此.下面我们对每一个步骤来做相应的源代码解释
WebSecurityConfiguration中的 setFilterChainProxySecurityConfigurer()方法
@Autowired(required = false)
public void setFilterChainProxySecurityConfigurer(
ObjectPostProcessor<Object> objectPostProcessor,
//T1 使用@Value获取到配置信息
@Value("#{@autowiredWebSecurityConfigurersIgnoreParents.getWebSecurityConfigurers()}") List<SecurityConfigurer<Filter, WebSecurity>> webSecurityConfigurers)
throws Exception {
<span class="hljs-comment"><span class="hljs-comment">//T2 创建一个webSecurity 对象</span></span>
webSecurity = objectPostProcessor
.postProcess(<span class="hljs-keyword"><span class="hljs-keyword">new</span></span> WebSecurity(objectPostProcessor));
<span class="hljs-keyword"><span class="hljs-keyword">if</span></span> (debugEnabled != <span class="hljs-keyword"><span class="hljs-keyword">null</span></span>) {
webSecurity.debug(debugEnabled);
}
<span class="hljs-comment"><span class="hljs-comment">//T3对configures进行排序</span></span>
Collections.sort(webSecurityConfigurers, AnnotationAwareOrderComparator.INSTANCE);
<span class="hljs-comment"><span class="hljs-comment">//T4对Order进行比较是否有相同的,由于前面进行了排序,只要比较前后有相同的就可以</span></span>
Integer previousOrder = <span class="hljs-keyword"><span class="hljs-keyword">null</span></span>;
Object previousConfig = <span class="hljs-keyword"><span class="hljs-keyword">null</span></span>;
<span class="hljs-keyword"><span class="hljs-keyword">for</span></span> (SecurityConfigurer<Filter, WebSecurity> config : webSecurityConfigurers) {
Integer order = AnnotationAwareOrderComparator.lookupOrder(config);
<span class="hljs-keyword"><span class="hljs-keyword">if</span></span> (previousOrder != <span class="hljs-keyword"><span class="hljs-keyword">null</span></span> && previousOrder.equals(order)) {
<span class="hljs-keyword"><span class="hljs-keyword">throw</span></span> <span class="hljs-keyword"><span class="hljs-keyword">new</span></span> IllegalStateException(
<span class="hljs-string"><span class="hljs-string">"@Order on WebSecurityConfigurers must be unique. Order of "</span></span>
+ order + <span class="hljs-string"><span class="hljs-string">" was already used on "</span></span> + previousConfig + <span class="hljs-string"><span class="hljs-string">", so it cannot be used on "</span></span>
+ config + <span class="hljs-string"><span class="hljs-string">" too."</span></span>);
}
previousOrder = order;
previousConfig = config;
}
<span class="hljs-keyword"><span class="hljs-keyword">for</span></span> (SecurityConfigurer<Filter, WebSecurity> webSecurityConfigurer : webSecurityConfigurers) {
<span class="hljs-comment"><span class="hljs-comment">//T5将配置信息配置到webSecurity中</span></span>
webSecurity.apply(webSecurityConfigurer);
}
<span class="hljs-keyword"><span class="hljs-keyword">this</span></span>.webSecurityConfigurers = webSecurityConfigurers;
}
-
T1(注释标记处)获取配置信息
@Value("#{@autowiredWebSecurityConfigurersIgnoreParents.getWebSecurityConfigurers()}"
可以看一下autowiredWebSecurityConfigurersIgnoreParents.getWebSecurityConfigurers()的源代码
public List<SecurityConfigurer<Filter, WebSecurity>> getWebSecurityConfigurers() {
        List<SecurityConfigurer<Filter, WebSecurity>> webSecurityConfigurers = new ArrayList<SecurityConfigurer<Filter, WebSecurity>>();
        Map<String, WebSecurityConfigurer> beansOfType = beanFactory
                .getBeansOfType(WebSecurityConfigurer.class);
        for (Entry<String, WebSecurityConfigurer> entry : beansOfType.entrySet()) {
            webSecurityConfigurers.add(entry.getValue());
        }
        return webSecurityConfigurers;
    }
其实我们根据debug获取到的来看,这个beansOfType 就是我们定义的继承自WebSecurityConfigurerAdapter的类,通过查看父类的定义,我们知道调用build()方法最后返回的必须是一个Filter对象,可以自行参考顶级父类(或接口)WebSecurityConfigurer和SecurityBuilder
-
T2这里直接用new 来创建一个WebSecurity的对象 -
T3当有多个配置项时进行排序 -
T4进行order重复验证 -
T5将配置信息配置到webSecurity中,变量configurers中会存储这个信息
WebSecurityConfiguration中的 springSecurityFilterChain()方法
- 为我们创建了一个名字叫做
springSecurityFilterChain的Filter
源代码:
@Bean(name = AbstractSecurityWebApplicationInitializer.DEFAULT_FILTER_NAME)
    public Filter springSecurityFilterChain() throws Exception {
        boolean hasConfigurers = webSecurityConfigurers != null
                && !webSecurityConfigurers.isEmpty();
        //这里的意思是我们是否有自定义配置其实就是是否有注入WebSecurityConfigurer的子类,没有的话,我默认的创建一个默认的,但是默认的我们自己不可修改
        if (!hasConfigurers) {
            WebSecurityConfigurerAdapter adapter = objectObjectPostProcessor
                    .postProcess(new WebSecurityConfigurerAdapter() {
                    });
           //请参考上面的代码
            webSecurity.apply(adapter);
        }
       //现在为止webSecurity对象的信息已经填充完毕,我们可以构建一个Filter
        return webSecurity.build();
    }
- 请查看代码的注释,我们可以知道,到此为止,已经建立了一个
Filter对象,而这个Filter将会拦截掉我们的请求,对请求进行过滤拦截,从而起到对资源进行认证保护的作用。然后这个Filter并非我们自己平时定义的Filter这么简单,这个过滤器也只是一个代理的过滤器而已,里面还会有过滤器链,下一篇文章会针对过滤器链进行编写。
2.2.3 WebSecurityConfigurerAdapter为我们做了什么
- 还是从最重要的开始
- 1.
HttpSecurity通过getHttp()获取,后面会详细说到这个类 -
UserDetailsService用户信息获取
-
-
AuthenticationManager认证管理类
后面会详细讲解到这些信息,包括这些信息在过滤其中起到什么作用,然后最重要的是,我们要先理清楚过滤器的机制,下一篇会详细讲过滤器链
-