Asp.Net中很方便就能做个上传,例如做一个图片的上传:
<asp:FileUpload ID="picUpload" runat="server" />
<asp:Button ID="btnUpload" runat="server"  Text="上传" CssClass="btn"  onclick="btnUpload_Click" CausesValidation="false"/>
对应的上传代码如下:
protected void btnUpload_Click(object sender, EventArgs e)
        {
            if (!picUpload.HasFile)
            {
                picAssetItem.ImageUrl = "";
                labUpload.Text = "请选择要上传的图片";
                return;
            }
            string fileExtension = Path.GetExtension(picUpload.FileName).ToLower();
            Match match = Regex.Match(fileExtension, "jpg|jpeg|png");
            if (!match.Success)
            {
                picAssetItem.ImageUrl = "";
                labUpload.Text = "请上传jpg或者png格式的图片";
                return;
            }
            if (picUpload.PostedFile.ContentLength > 8192000)
            {
                picAssetItem.ImageUrl = "";
                labUpload.Text = "文件大小超出8M!请重新选择!";
                return;
            }
            string uploadPath = ConfigurationManager.AppSettings["UploadPath"];
            uploadPath += DateTime.Today.ToString("yyyy-MM-dd");
            if (!Directory.Exists(Server.MapPath(uploadPath)))
            {
                log.Info("Creating folder " + uploadPath + " on server");
                try
                {
                    Directory.CreateDirectory(Server.MapPath(uploadPath));
                }
                catch (Exception ex)
                {
                    log.Error("Failed to create folder");
                    log.Error(ex);
                    labUpload.Text = "系统错误,上传失败";
                    return;
                }
            }
            string imageUUID = System.Guid.NewGuid().ToString();
            string imageName = imageUUID + fileExtension;
            string imagePath = Server.MapPath(uploadPath + "/" + imageName);
            string thumbImagePath = Server.MapPath(uploadPath + "/thumb-" + imageName);
            try
            {
                picUpload.PostedFile.SaveAs(imagePath);

                System.Drawing.Image image = System.Drawing.Image.FromStream(picUpload.PostedFile.InputStream, true);
                System.Drawing.Size newSize = new System.Drawing.Size(400, 300);
                System.Drawing.Image bitmap = new System.Drawing.Bitmap(newSize.Width, newSize.Height);
                System.Drawing.Graphics graphics = System.Drawing.Graphics.FromImage(bitmap);
                graphics.InterpolationMode = System.Drawing.Drawing2D.InterpolationMode.High;
                graphics.SmoothingMode = System.Drawing.Drawing2D.SmoothingMode.HighQuality;
                graphics.Clear(System.Drawing.Color.White);

                graphics.DrawImage(image,
                    new System.Drawing.Rectangle(0, 0, bitmap.Width, bitmap.Height),
                    new System.Drawing.Rectangle(0, 0, image.Width, image.Height),
                    System.Drawing.GraphicsUnit.Pixel);
                bitmap.Save(thumbImagePath, System.Drawing.Imaging.ImageFormat.Jpeg);
            }
            catch (Exception ex)
            {
                log.Error("Failed to save image");
                log.Error(ex);
                labUpload.Text = "系统错误,上传失败";
                return;
            }
            txtImagePath.Text = DateTime.Today.ToString("yyyy-MM-dd") +"/" + imageName;
            picAssetItem.ImageUrl = uploadPath + "/thumb-" + imageUUID + ".jpg";
            labUpload.Text = "上传成功";
        }
上面的代码是把图片存到本地的文件夹中,按日期进行存储,存储的文件用uuid进行命名。同时生成一张固定大小的缩略图,用来显示用。
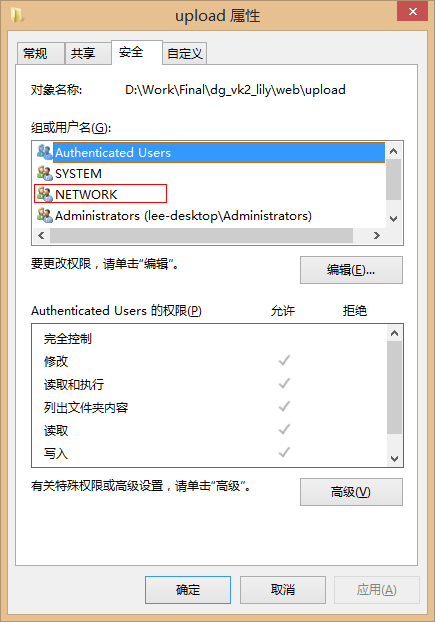
上传小文件,还是蛮方便的,不过需要注意的是,对服务器的文件夹,必须对NETWORK组添加读写的权限:
另外,貌似只能上传小于4M 的文件,稍大的文件上传会直接无法显示网页。这个也是可以设置的,具体不想深究,能用就行:
<system.web>
...
<!-- 加入下面设置-->
<httpRuntime executionTimeout="90" maxRequestLength="40960" useFullyQualifiedRedirectUrl="false"
minFreeThreads="8" minLocalRequestFreeThreads="4" appRequestQueueLimit="100"/>

</system.web>