提及到分布式ID自动生成方案,大家肯定都非常熟悉,并且能说出自家拿手的几种方案。确实,ID作为系统数据的重要标识,重要性不言而喻,而各种方案也是历经多代优化,个人认为可以按照分布式ID自动生成方式进行以下分类:
实现方式
1、完全依赖数据源方式
ID的生成规则,读取控制完全由数据源控制,常见的如数据库的自增长ID,序列号等,或Redis的INCR/INCRBY原子操作产生顺序号等。
2、半依赖数据源方式
ID的生成规则,有部分生成因子需要由数据源(或配置信息)控制,如snowflake算法。
3、不依赖数据源方式
ID的生成规则完全由机器信息独立计算,不依赖任何配置信息和数据记录,如常见的UUID,GUID等
实践方案
实践方案适用于以上提及的三种实现方式,可作为这三种实现方式的一种补充,旨在提升系统吞吐量,但原有实现方式的局限性依然存在。
1、实时获取方案
顾名思义,每次要获取ID时,实时生成。简单快捷,ID都是连续不间断的,但吞吐量可能不是最高。
2、预生成方案
预先生成一批ID放在数据池里,可简单自增长生成,也可以设置步长,分批生成,需要将这些预先生成的数据,放在存储容器里(JVM内存,Redis,数据库表均可)。可以较大幅度地提升吞吐量,但需要开辟临时存储空间,断电宕机后可能会丢失已有ID,ID可能有间断。
方案简介
以下对目前流行的分布式ID方案做简单介绍。
1、数据库自增长ID
属于完全依赖数据源的方式,所有的ID存储在数据库里,是最常用的ID生成办法,在单体应用时期得到了最广泛的使用,建立数据表时利用数据库自带的auto_increment作主键,或是使用序列完成其他场景的一些自增长ID的需求。
- 优点:非常简单,有序递增,方便分页和排序。
- 缺点:分库分表后,同一数据表的自增ID容易重复,无法直接使用(可以设置步长,但局限性很明显);性能吞吐量整个较低,如果设计一个单独的数据库来实现 分布式应用的数据唯一性,即使使用预生成方案,也会因为事务锁的问题,高并发场景容易出现单点瓶颈。
- 适用场景:单数据库实例的表ID(包含主从同步场景),部分按天计数的流水号等;分库分表场景、全系统唯一性ID场景不适用。
2、Redis生成ID
也属于完全依赖数据源的方式,通过Redis的INCR/INCRBY自增原子操作命令,能保证生成的ID肯定是唯一有序的,本质上实现方式与数据库一致。
- 优点:整体吞吐量比数据库要高。
- 缺点:Redis实例或集群宕机后,找回最新的ID值有点困难。
- 适用场景:比较适合计数场景,如用户访问量,订单流水号(日期 流水号)等。
3、UUID、GUID生成ID
UUID:按照OSF制定的标准计算,用到了以太网卡地址、纳秒级时间、芯片ID码和许多可能的数字。由以下几部分的组合:当前日期和时间(UUID的第一个部分与时间有关,如果你在生成一个UUID之后,过几秒又生成一个UUID,则第一个部分不同,其余相同),时钟序列,全局唯一的IEEE机器识别号(如果有网卡,从网卡获得,没有网卡以其他方式获得)
GUID:微软对UUID这个标准的实现。UUID还有其它各种实现,不止GUID一种,不一一列举了。
这两种属于不依赖数据源方式,真正的全球唯一性ID
- 优点:不依赖任何数据源,自行计算,没有网络ID,速度超快,并且全球唯一。
- 缺点:没有顺序性,并且比较长(128bit),作为数据库主键、索引会导致索引效率下降,空间占用较多。
- 适用场景:只要对存储空间没有苛刻要求的都能够适用,比如各种链路追踪、日志存储等。
4、snowflake算法生成ID
属于半依赖数据源方式,原理是使用Long类型(64位),按照一定的规则进行填充:时间(毫秒级) 集群ID 机器ID 序列号,每部分占用的位数可以根据实际需要分配,其中集群ID和机器ID这两部分,在实际应用场景中要依赖外部参数配置或数据库记录。
- 优点:高性能、低延迟、去中心化、按时间有序
- 缺点:要求机器时钟同步(到秒级即可)
- 适用场景:分布式应用环境的数据主键
雪花ID算法听起来是不是特别适用分布式架构场景?但目前的分布式生产环境,借用了多种云计算、容器化技术,实例的个数随时有变化,还需要处理服务器实例时钟回拨的问题,固定规划ID然后通过配置来使用snowflake的场景可行性不高,一般是自动启停,增减机器,这样就需要对snowflake进行一些改造才能更好地应用到生产环境中。
百度uid-generator项目
UidGenerator项目基于snowflake原理实现,只是修改了机器ID部分的定义(实例重启的次数),并且64位bit的分配支持配置,官方提供的默认分配方式如下图:

具体的实现有两种,一种是实时生成ID,另一种是预先生成ID方式
1、DefaultUidGenerator
启动时向数据库WORKER_NODE表插入当前实例的IP,Port等信息,再获取该数据的自增长ID作为机器ID部分。
简易流程图如下:

提供获取ID的方法,并且检测是否有时钟回拨,有回拨现象直接抛出异常,当前版本不支持时钟顺拨后漂移操作。简易流程图如下:

核心代码如下:
/**
 * Get UID
 *
 * @return UID
 * @throws UidGenerateException in the case: Clock moved backwards; Exceeds the max timestamp
 */
protected synchronized long nextId() {
    long currentSecond = getCurrentSecond();

    // Clock moved backwards, refuse to generate uid
    if (currentSecond < lastSecond) {
        long refusedSeconds = lastSecond - currentSecond;
        throw new UidGenerateException("Clock moved backwards. Refusing for %d seconds", refusedSeconds);
    }

    // At the same second, increase sequence
    if (currentSecond == lastSecond) {
        sequence = (sequence   1) & bitsAllocator.getMaxSequence();
        // Exceed the max sequence, we wait the next second to generate uid
        if (sequence == 0) {
            currentSecond = getNextSecond(lastSecond);
        }

    // At the different second, sequence restart from zero
    } else {
        sequence = 0L;
    }

    lastSecond = currentSecond;

    // Allocate bits for UID
    return bitsAllocator.allocate(currentSecond - epochSeconds, workerId, sequence);
}
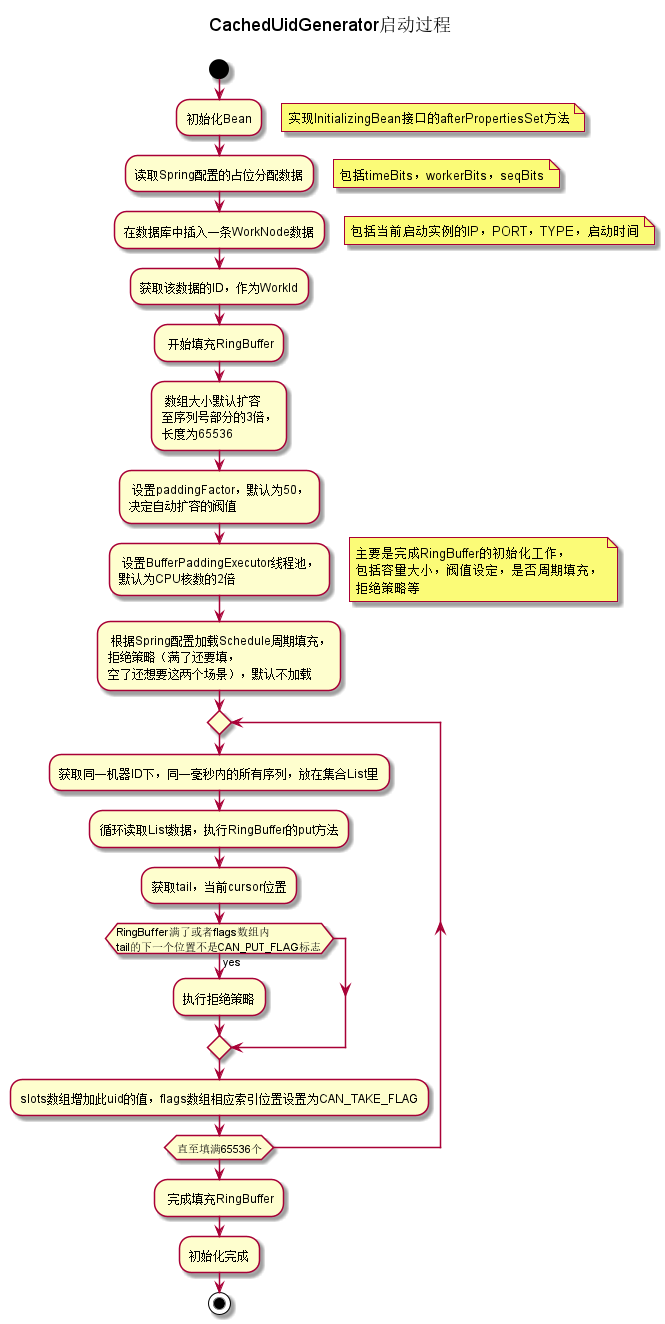
2、CachedUidGenerator
机器ID的获取方法与上一种相同,这种是预先生成一批ID,放在一个RingBuffer环形数组里,供客户端使用,当可用数据低于阀值时,再次调用批量生成方法,属于用空间换时间的做法,可以提高整个ID的吞吐量。
与DefaultUidGenerator相比较,初始化时多了填充RingBuffer环形数组的逻辑,简单流程图如下:
核心代码:
/**
* Initialize RingBuffer & RingBufferPaddingExecutor
**/
private void initRingBuffer() {
   // initialize RingBuffer
   int bufferSize = ((int) bitsAllocator.getMaxSequence()   1) << boostPower;
   this.ringBuffer = new RingBuffer(bufferSize, paddingFactor);
   LOGGER.info("Initialized ring buffer size:{}, paddingFactor:{}", bufferSize, paddingFactor);

   // initialize RingBufferPaddingExecutor
   boolean usingSchedule = (scheduleInterval != null);
   this.bufferPaddingExecutor = new BufferPaddingExecutor(ringBuffer, this::nextIdsForOneSecond, usingSchedule);
   if (usingSchedule) {
       bufferPaddingExecutor.setScheduleInterval(scheduleInterval);
   }

   LOGGER.info("Initialized BufferPaddingExecutor. Using schdule:{}, interval:{}", usingSchedule, scheduleInterval);

   // set rejected put/take handle policy
   this.ringBuffer.setBufferPaddingExecutor(bufferPaddingExecutor);
   if (rejectedPutBufferHandler != null) {
       this.ringBuffer.setRejectedPutHandler(rejectedPutBufferHandler);
   }
   if (rejectedTakeBufferHandler != null) {
       this.ringBuffer.setRejectedTakeHandler(rejectedTakeBufferHandler);
   }

   // fill in all slots of the RingBuffer
   bufferPaddingExecutor.paddingBuffer();

   // start buffer padding threads
   bufferPaddingExecutor.start();
}

public synchronized boolean put(long uid) {
    long currentTail = tail.get();
    long currentCursor = cursor.get();
    // tail catches the cursor, means that you can't put any cause of RingBuffer is full
    long distance = currentTail - (currentCursor == START_POINT ? 0 : currentCursor);
    if (distance == bufferSize - 1) {
        rejectedPutHandler.rejectPutBuffer(this, uid);
        return false;
    }
    // 1. pre-check whether the flag is CAN_PUT_FLAG
    int nextTailIndex = calSlotIndex(currentTail   1);
    if (flags[nextTailIndex].get() != CAN_PUT_FLAG) {
        rejectedPutHandler.rejectPutBuffer(this, uid);
        return false;
    }
    // 2. put UID in the next slot
    // 3. update next slot' flag to CAN_TAKE_FLAG
    // 4. publish tail with sequence increase by one
    slots[nextTailIndex] = uid;
    flags[nextTailIndex].set(CAN_TAKE_FLAG);
    tail.incrementAndGet();
    // The atomicity of operations above, guarantees by 'synchronized'. In another word,
    // the take operation can't consume the UID we just put, until the tail is published(tail.incrementAndGet())
    return true;
}
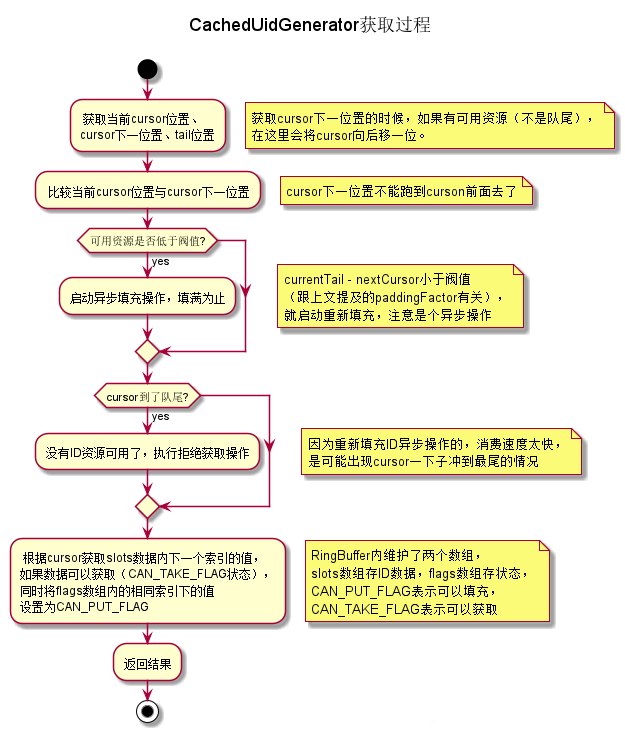
ID获取逻辑,由于有RingBuffer这个缓冲数组存在,获取ID直接从RingBuffer取出即可,同时RingBuffer自身校验何时再触发重新批量生成即可,这里获取的ID值与DefaultUidGenerator的明显区别是,DefaultUidGenerator获取的ID,时间戳部分就是当前时间的,CachedUidGenerator里获取的是填充时的时间戳,并不是获取时的时间,不过关系不大,都是不重复的,一样用。简易流程图如下:
核心代码:
public long take() {
    // spin get next available cursor
    long currentCursor = cursor.get();
    long nextCursor = cursor.updateAndGet(old -> old == tail.get() ? old : old   1);
    // check for safety consideration, it never occurs
    Assert.isTrue(nextCursor >= currentCursor, "Curosr can't move back");
    // trigger padding in an async-mode if reach the threshold
    long currentTail = tail.get();
    if (currentTail - nextCursor < paddingThreshold) {
        LOGGER.info("Reach the padding threshold:{}. tail:{}, cursor:{}, rest:{}", paddingThreshold, currentTail,
                nextCursor, currentTail - nextCursor);
        bufferPaddingExecutor.asyncPadding();
    }
    // cursor catch the tail, means that there is no more available UID to take
    if (nextCursor == currentCursor) {
        rejectedTakeHandler.rejectTakeBuffer(this);
    }
    // 1. check next slot flag is CAN_TAKE_FLAG
    int nextCursorIndex = calSlotIndex(nextCursor);
    Assert.isTrue(flags[nextCursorIndex].get() == CAN_TAKE_FLAG, "Curosr not in can take status");
    // 2. get UID from next slot
    // 3. set next slot flag as CAN_PUT_FLAG.
    long uid = slots[nextCursorIndex];
    flags[nextCursorIndex].set(CAN_PUT_FLAG);
    // Note that: Step 2,3 can not swap. If we set flag before get value of slot, the producer may overwrite the
    // slot with a new UID, and this may cause the consumer take the UID twice after walk a round the ring
    return uid;
}
另外有个细节可以了解一下,RingBuffer的数据都是使用数组来存储的,考虑CPU Cache的结构,tail和cursor变量如果直接用原生的AtomicLong类型,tail和cursor可能会缓存在同一个cacheLine中,多个线程读取该变量可能会引发CacheLine的RFO请求,反而影响性能,为了防止伪共享问题,特意填充了6个long类型的成员变量,加上long类型的value成员变量,刚好占满一个Cache Line(Java对象还有8byte的对象头),这个叫CacheLine补齐,有兴趣可以了解一下,源码如下:
public class PaddedAtomicLong extends AtomicLong {
    private static final long serialVersionUID = -3415778863941386253L;
    /** Padded 6 long (48 bytes) */
    public volatile long p1, p2, p3, p4, p5, p6 = 7L;
    /**
     * Constructors from {@link AtomicLong}
     */
    public PaddedAtomicLong() {
        super();
    }
    public PaddedAtomicLong(long initialValue) {
        super(initialValue);
    }
    /**
     * To prevent GC optimizations for cleaning unused padded references
     */
    public long sumPaddingToPreventOptimization() {
        return p1   p2   p3   p4   p5   p6;
    }
}
以上是百度uid-generator项目的主要描述,我们可以发现,snowflake算法在落地时有一些变化,主要体现在机器ID的获取上,尤其是分布式集群环境下面,实例自动伸缩,docker容器化的一些技术,使得静态配置项目ID,实例ID可行性不高,所以这些转换为按启动次数来标识。
美团ecp-uid项目
在uidGenerator方面,美团的项目源码直接集成百度的源码,略微将一些Lambda表达式换成原生的java语法,例如:
// com.myzmds.ecp.core.uid.baidu.impl.CachedUidGenerator类的initRingBuffer()方法
// 百度源码
this.bufferPaddingExecutor = new BufferPaddingExecutor(ringBuffer, this::nextIdsForOneSecond, usingSchedule);

// 美团源码
this.bufferPaddingExecutor = new BufferPaddingExecutor(ringBuffer, new BufferedUidProvider() {
    @Override
    public List<Long> provide(long momentInSecond) {
        return nextIdsForOneSecond(momentInSecond);
    }
}, usingSchedule);
并且在机器ID生成方面,引入了Zookeeper,Redis这些组件,丰富了机器ID的生成和获取方式,实例编号可以存储起来反复使用,不再是数据库单调增长这一种了。
美团的ecp-uid项目不但集成了百度现有的UidGenerator算法,原生的snowflake算法,还包含优秀的leaf segment算法,鉴于篇幅没有详尽描述。