1.模板引擎的基础概念
1.1 模板引擎
模板引擎是 node.js 提供的第三方模块。
让开发者以更加友好的方式拼接字符串,使项目代码更加清晰、更加易于维护。
// 未使用模板引擎的写法
var ary = [{ name: '张三', age: 20}];
var str = '<ul>';
for(var i = 0; i< ary.length; i++) {
  str += '<li>
      <span>'+ ary[i].name + '</span>
      <span>'+ ary[i].age + '</span>
  </li>';
}
str += '</ul>';

// 使用模板引擎的写法
<ul>
  {{each ary}}
     <li>{{$value.name}}</li>
     <li>{{$value.age}}</li>
  {{/each}}
</ul>
1.2 art-template 模板引擎
1、在命令行工具中使用 npm install art-template 命令进行下载
2、在项目中引入模板引擎
const template = require('art-template')
3、告诉模板引擎要拼接的数据和模板在哪
const html = template('模板路径', 数据);
1.3 art-template 代码示例
// 导入模板引擎模块
const template = require('art-template');
// 将特定模板与特定数据进行拼接
const html = template('./views/index.art', {
  data: {
    name: '张三',
    age: 20
  }
})
模板中代码:
<div>
  <span>{{data.name}}</span>
  <span>{{data.age}}</span>
</div>
例子:
新建 template 文件夹,然后在命令行工具中切换到 template 目录,下载 art-template :
npm install art-template
安装完成后,新建 app.js 文件,导入模板引擎:
// 导入模板引擎
const template = require('art-template');
创建 views 文件夹,并新建 index.art 文件:
<!DOCTYPE html>
<html lang="en">
<head>
  <meta charset="UTF-8">
  <meta name="viewport" content="width=device-width, initial-scale=1.0">
  <title>Document</title>
</head>
<body>

</body>
</html>
回到 app.js 文件中:
// 导入模板引擎
const template = require('art-template');
const path = require('path');

const viwes = path.join(__dirname, 'views', 'index.art')
// template 方法是用来拼接字符串
// 第1个参数:模板路径,绝对路径 (__dirname 当前文件所在的路径)
// 第2个参数,要显示的数据,对象类型
// 返回拼接好的字符串
const html = template(viwes, {
  name: '张三',
  age: 20
})

console.log(html)
打开 views/index.art 文件:
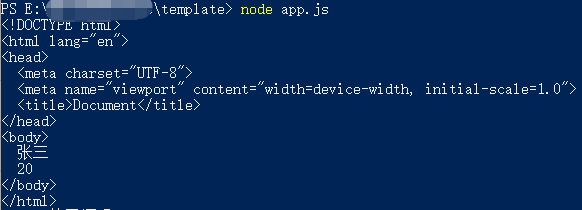
<!DOCTYPE html>
<html lang="en">
<head>
  <meta charset="UTF-8">
  <meta name="viewport" content="width=device-width, initial-scale=1.0">
  <title>Document</title>
</head>
<body>
  {{name}}
  {{age}}
</body>
</html>
打开命令行工具,输入:
node app.js
结果可以看到:
2.模板引擎语法
2.1、模板语法
● art-template 同时支持两种模板语法:标准语法和原始语法。
● 标准语法可以让模板更容易读写,原始语法具有强大的逻辑处理能力。.
2.2、输出
将某项数据输出在模板中,标准语法和原始语法如下:
标准语法:
{{ 数据 }}
原始语法:
<%= 数据 %>
例如:
<!-- 标准语法 -->
<h2>{{value}}</h2>
<h2>{{a ? b : c}}</h2>
<h2>{{a + b}}</h2>

<!-- 原始语法 -->
<h2><%= value %></h2>
<h2><%= a ? b : c %></h2>
<h2><%= a + b %></h2>
例子:新建 01js 文件:
// 导入模板引擎
const template = require('art-template');
const path = require('path');

const views = path.join(__dirname, 'views', '01.art')
// template 方法是用来拼接字符串
// 第1个参数:模板路径,绝对路径 (__dirname 当前文件所在的路径)
// 第2个参数,要显示的数据,对象类型
// 返回拼接好的字符串
const html = template(viwes, {
  name: '张三',
  age: 20
})

console.log(html)
01.art 文件:
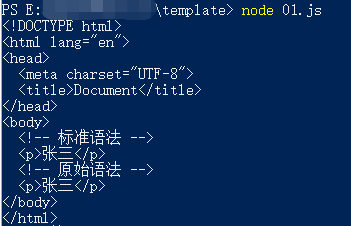
<!DOCTYPE html>
<html lang="en">
<head>
  <meta charset="UTF-8">
  <meta name="viewport" content="width=device-width, initial-scale=1.0">
  <title>Document</title>
</head>
<body>
  <!-- 标准语法 -->
  <p>{{ name }}</p>
  <!-- 原始语法 -->
  <p><%= name %></p>
</body>
</html>
到命令行工具中运行 node 01.js
可以看到:不管是标准语法还是原始语法,都可以输出“张三”’
修改下 01.art 文件:
<!DOCTYPE html>
<html lang="en">
<head>
  <meta charset="UTF-8">
  <title>Document</title>
</head>
<body>
  <!-- 标准语法 -->
  <p>{{ name }}</p>
  <p>{{ 1 + 1 }}</p>
  <!-- 原始语法 -->
  <p><%= name %></p>
  <p><%= 1 + 2 %></p>
</body>
</html>
在命令行工具中重新运行 01.js,可以看到标准语法中输出:2,原始语法中输出:3

打开 01.js 文件,增加 content:
// 导入模板引擎
const template = require('art-template');
const path = require('path');

const views = path.join(__dirname, 'views', '01.art')
// template 方法是用来拼接字符串
// 第1个参数:模板路径,绝对路径 (__dirname 当前文件所在的路径)
// 第2个参数,要显示的数据,对象类型
// 返回拼接好的字符串
const html = template(viwes, {
  name: '张三',
  age: 20,
  content: '<h1>我是标题</h1>'
})

console.log(html)
修改 01.art 文件:
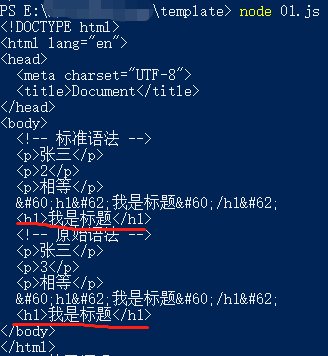
<!DOCTYPE html>
<html lang="en">
<head>
  <meta charset="UTF-8">
  <title>Document</title>
</head>
<body>
  <!-- 标准语法 -->
  <p>{{ name }}</p>
  <p>{{ 1 + 1 }}</p>
  <p>{{ 1 + 1 == 2 ? '相等' : '不相等' }}</p>
  {{ content }}
  <!-- 原始语法 -->
  <p><%= name %></p>
  <p><%= 1 + 2 %></p>
  <p><%= 1 + 1 == 2 ? '相等' : '不相等' %></p>
  <%= content %>
</body>
</html>
结果是:

模板引擎认为:默认情况下如果数据中带标签,是不会解析出来的,因为这是处于安全性的考虑。如果说你确定当前数据变量中的标签是安全的,那么可以进行原文输出,让模板引擎解析。
2.3、原文输出
标准语法:
{{@ 数据 }}
原始语法:
<%- 数据 %>
例子:下面我们把 01.art 文件中的数据改为原文输出:
<!DOCTYPE html>
<html lang="en">
<head>
  <meta charset="UTF-8">
  <title>Document</title>
</head>
<body>
  <!-- 标准语法 -->
  <p>{{ name }}</p>
  <p>{{ 1 + 1 }}</p>
  <p>{{ 1 + 1 == 2 ? '相等' : '不相等' }}</p>
  {{ content }}
  {{@ content }}
  <!-- 原始语法 -->
  <p><%= name %></p>
  <p><%= 1 + 2 %></p>
  <p><%= 1 + 1 == 2 ? '相等' : '不相等' %></p>
  <%= content %>
  <%- content %>
</body>
</html>
重新运行后可以看到:
注意:当数据中携带 HTML 标签,默认模板引擎不会解析标签;如果你确定数据中的标签是安全的,那么可以使用原文输出的方式对标签进行解析。
2.4、条件判断
在模板中可以根据条件来决定显示那块 HTML 代码。
标准语法:
<!-- 标准语法 -->
{{if 条件}} ... {{/if}}
{{if v1}} ... {{else if v2}} ... {{/if}}
例子:新建 02.js 文件:
// 导入模板引擎
const template = require('art-template');
const path = require('path');

const views = path.join(__dirname, 'views', '02.art')
// template 方法是用来拼接字符串
// 第1个参数:模板路径,绝对路径 (__dirname 当前文件所在的路径)
// 第2个参数,要显示的数据,对象类型
// 返回拼接好的字符串
const html = template(views, {
    name: '张三',
    age: 20
})

console.log(html);
新建 02.art 文件:
{{if age > 18}}
    年龄大于18
{{/if}}
在命令行工具中输入:node 02.js
可以看到结果输出是: 年龄大于18
修改 02.js 文件的年龄为:17
修改 02.art 文件:
{{if age > 18}}
    年龄大于18
{{else if age < 15 }}
    年龄小于15
{{else}}
    年龄不符合要求
{{/if}}
在命令行工具中输入:node 02.js
可以看到结果输出是: 年龄不符合要求
原始语法:
<!-- 原始语法 -->
<% if (value){ %> ... <% } %>
<% if (v1){ %> ... <% } else if (v2) { %> ... <% } %>
例子:修改 02.art 文件:
{{if age > 18}}
    年龄大于18
{{else if age < 15 }}
    年龄小于15
{{else}}
    年龄不符合要求
{{/if}}

<% if (age > 18) { %>
    年龄大于18
<% } else if (age < 15) { %>
    年龄小于15
<% } else { %>
    年龄不符合要求
<% } %>
重新运行 02.js 文件,
可以看到结果:

2.5、循环
标准语法:
{{each 数据}}{{/each}}
原始语法:
<% for() { %><% } %>
示例代码:
<!-- 标准语法 -->
{{each target}}
  {{ $index }} {{$value}}
{{/each}}

<!-- 原始语法 -->
<% for(var i = 0; i < target.length; i++) { %>
  <%= i %> <% target[i] %>
<% } %>
例子:新建 03.js 文件:
// 导入模板引擎
const template = require('art-template');
const path = require('path');

const views = path.join(__dirname, 'views', '03.art')
// template 方法是用来拼接字符串
// 第1个参数:模板路径,绝对路径 (__dirname 当前文件所在的路径)
// 第2个参数,要显示的数据,对象类型
// 返回拼接好的字符串
const html = template(views, {
    users: [
    {name: '张三', age: 20, sex: '男'},
    {name: '李四', age: 30, sex: '男'},
    {name: '玛丽', age: 15, sex: '女'},
  ]
})

console.log(html);
新建 03.art 文件:
<ul>
  {{each users}}
    <li>
      {{$value.name}}
      {{$value.age}}
      {{$value.sex}}
    </li>
  {{/each}}
</ul>
运行后可以看到:

下面写个原始语法的循环,继续修改 03.art 文件:
<ul>
  {{each users}}
    <li>
      {{$value.name}}
      {{$value.age}}
      {{$value.sex}}
    </li>
  {{/each}}
</ul>

<ul>
  <% for (var i = 0; i< users.length; i++) { %>
    <li>
      <%= users[i].name %>
      <%= users[i].age %>
      <%= users[i].sex %>
    </li>
  <% } %>
</ul>
重新运行后的结果还是和刚才一样。
2.6、子模板
使用子模板可以将网站公共区块(头部、底部)抽离到单独的文件中。
标准语法:
{{include "模板"}}
原始语法:
<% include("模板") %>
示例代码:
<!-- 标准语法 -->
{{include "。/header.art"}}

<!-- 原始语法 -->
<% include("./header.art") %>
例子:新建 04.js 文件:
// 导入模板引擎
const template = require('art-template');
const path = require('path');

const views = path.join(__dirname, 'views', '04.art')
// template 方法是用来拼接字符串
// 第1个参数:模板路径,绝对路径 (__dirname 当前文件所在的路径)
// 第2个参数,要显示的数据,对象类型
// 返回拼接好的字符串
const html = template(views, {
    msg: '我是首页'
});

console.log(html);
在 views 目录下,新建 common 文件夹,用来存放公共模板。并创建 header.art 和 footer.art文件:
<!-- header.art -->
我是头部

<!-- fotter.art-->
我是底部
在 views 目录下,新建 04.art 文件:
{{ include './common/header.art' }}
<div> {{ msg }} </div>
{{ include './common/footer.art' }}
回到命令工具,运行 node 04.js
结果是:

再在 04.art 中写下原始语法引用模板:
{{ include './common/header.art' }}
<% include('./common/header.art') %>
<div> {{ msg }} </div>
{{ include './common/footer.art' }}
<% include('./common/footer.art') %>
结果也是可以一样显示。
2.7、模板继承
使用模板继承可以将网站 HTML 骨架抽离到单独的文件中,其他页面模板可以继承骨架文件。

2.8、模板继承示例
骨架文件:
<!DOCTYPE html>
<html lang="en">
<head>
  <meta charset="UTF-8">
  <title>HTML骨架模板</title>
  {{block 'head'}}{{/block}}
</head>
<body>
  {{block 'content'}}{{/block}}
</body>
</html>
其他页面继承骨架:
<!-- index.art 首页模板 -->
{{extend './layout.art'}}
{{block 'head'}}<link rel="stylesheet" href="custom.css">{{/block}}
{{block 'content'}}<div>This is just an awesome page.</div>{{/block}}
例子:新建 05.js 文件:
// 导入模板引擎
const template = require('art-template');
const path = require('path');

const views = path.join(__dirname, 'views', '05.art')
// template 方法是用来拼接字符串
// 第1个参数:模板路径,绝对路径 (__dirname 当前文件所在的路径)
// 第2个参数,要显示的数据,对象类型
// 返回拼接好的字符串
const html = template(views, {
    msg: '首页模板'
});

console.log(html);
在 common 目录下中 新建 layout.art 文件:
<!DOCTYPE html>
<html lang="en">
<head>
    <meta charset="UTF-8">
    <title>Document</title>
    {{block 'link'}} {{/block}}
</head>
<body>
    {{block 'content'}} {{/block}}
</body>
</html>
在 views 目录下新建 05.art 文件:
{{extend './common/layout.art'}}

{{block 'link'}}
<link rel="stylesheet" type="text/css" href="./main.css">
{{/block}}

{{block 'content'}}
<p>{{ msg }}</p>
{{/block}}
回到命令行工具运行 node 05.js
结果可以看到:

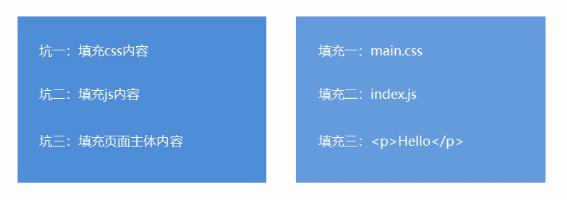
2.9、模板配置
1、向模板中导入变量 template.defaults.imports.变量名 = 变量值;
dateformat 处理时间格式
https://www.npmjs.com/package/dateformat
下载安装:
npm install dateformat
例子:新建 06.js 文件:
// 导入模板引擎
const template = require('art-template');
const path = require('path');
var dateFormat = require('dateformat');

const views = path.join(__dirname, 'views', '06.art')
// template 方法是用来拼接字符串
// 第1个参数:模板路径,绝对路径 (__dirname 当前文件所在的路径)
// 第2个参数,要显示的数据,对象类型
// 返回拼接好的字符串
const html = template(views, {
    time: new Date()
});

console.log(html);
新建 06.art 文件,元输出原始的日期时间:
{{ time }}
在命令行运行 node 06.js
结果是:

" 代码引号
下面对日期时间进行处理,修改 06.js 文件:
// 导入模板引擎
const template = require('art-template');
const path = require('path');
var dateFormat = require('dateformat');

const views = path.join(__dirname, 'views', '06.art')

// 导入模板变量
template.defaults.imports.dateFormat = dateFormat;

// template 方法是用来拼接字符串
// 第1个参数:模板路径,绝对路径 (__dirname 当前文件所在的路径)
// 第2个参数,要显示的数据,对象类型
// 返回拼接好的字符串
const html = template(views, {
    time: new Date()
});

console.log(html);
修改 06.art 文件:
{{ dateFormat(time) }}
重新运行后可以看到结果:

也可以自定义格式:
{{ dateFormat(time, "yyyy-mm-dd") }}
结果是:

2、设置模板根目录 template.defaults.root = 模板目录
修改 06.js 文件:
// 导入模板引擎
const template = require('art-template');
const path = require('path');
var dateFormat = require('dateformat');

// 设置模板根目录
template.defaults.root = path.join(__dirname, 'views')

// 导入模板变量
template.defaults.imports.dateFormat = dateFormat;

// template 方法是用来拼接字符串
// 第1个参数:模板路径,绝对路径 (__dirname 当前文件所在的路径)
// 第2个参数,要显示的数据,对象类型
// 返回拼接好的字符串
const html = template('06.art', {
    time: new Date()
});

console.log(html);
在命令工具中重新运行 node 06.js ,看到果还是一样的。
3、设置模板默认后缀 template.defaults.extname = '.art'
还是修改 06.js 文件:
// 导入模板引擎
const template = require('art-template');
const path = require('path');
var dateFormat = require('dateformat');

// 设置模板根目录
template.defaults.root = path.join(__dirname, 'views')

// 导入模板变量
template.defaults.imports.dateFormat = dateFormat;

// 配置模板的牧人后缀
template.defaults.extname = '.art';

// template 方法是用来拼接字符串
// 第1个参数:模板路径,绝对路径 (__dirname 当前文件所在的路径)
// 第2个参数,要显示的数据,对象类型
// 返回拼接好的字符串
const html = template('06', {
    time: new Date()
});

console.log(html);
在命令工具中重新运行 node 06.js ,看到果还是一样的。
还可以更改文件的后缀
在 views 目录下创建 07.html 文件:
我是07.html模板
修改 06.js 文件:
// 导入模板引擎
const template = require('art-template');
const path = require('path');
var dateFormat = require('dateformat');

// 设置模板根目录
template.defaults.root = path.join(__dirname, 'views')

// 导入模板变量
template.defaults.imports.dateFormat = dateFormat;

// 配置模板的牧人后缀
template.defaults.extname = '.html';

// template 方法是用来拼接字符串
// 第1个参数:模板路径,绝对路径 (__dirname 当前文件所在的路径)
// 第2个参数,要显示的数据,对象类型
// 返回拼接好的字符串
const html = template('06.art', {
    time: new Date()
});
console.log(template('07', {}));
console.log(html);
重新运行 node 06.js 的结果:

3.案例
3.1、案例介绍-学生档案管理
目标:模板引擎应用,强化 node.js 项目制作流程。
知识点:http请求响应、数据库、模板引擎、静态资源访问。
3.2、制作流程
1、建立项目文件夹并生成项目描述文件 package.json
2、创建网站服务器,实现客户端和服务器端通信
3、连接数据库并根据需求设计学员信息表
4、创建路由并实现页面模板呈现
5、实现静态资源访问
6、实现学生信息添加功能
7、实现学生信息展示功能
https://www.cnblogs.com/joe235/p/12895747.html
3.3、第三方模块 router
功能:实现路由。
使用步骤:
1、获取路由对象
2、调用路由对象提供的方法创建路由
3、启用路由,使路由生效
示例代码:
const getRouter = require('router');
const router = getRouter();
router.get('/add', (req, res) => {
  res.end('hello world')
})
server.on('request', (req. res) => {
  router(req, res)
})
下载安装:
npm install router
引入 router 模块:
// 引入 router 模块
const getRouter = require('router');
// 获取路由对象
const router = getRouter();
创建路由:
router.get('/test', (req, res) => {
  res.end('test')
})
router.get('/index', (req, res) => {
  res.end('index')
})
使用路由:
// 当客户端访问服务器端的时候
app.on('request', (req, res) => {
  // res.end('ok');
  router(req, res, () => {})
});
3.4、第三方模块 serve-static
功能:实现静态资源访问服务。
步骤:
1、引入 serve-static 模块获取创建静态资源服务功能的方法
2、调用方法创建静态资源服务并指定静态资源服务目录
3、启动静态资源服务功能
示例代码:
const serveStatic = require('serve-static')
const serve = serveStatic('public')
server.on('request', () => {
  serve(req. res)
})
server.listen(3000)
下载安装:
npm install serve-static
// 引入静态资源访问模块
const serveStatic = require('serve-static');
实现静态资源访问服务:
// 实现静态资源访问服务
const serve = serveStatic('public')
启用静态资源访问服务功能:
serve(req, res, () => {})