第一天
spring概念和ioc入门(ioc操作xml配置文件)
spring是一种一站式框架,在javaee三层结构中,每一层都提供不同的解决技术
web springMVC
service spring的ioc
dao spring的jdbcTemplate
-------------------------------------------------------------------------------------
spring的ioc操作
1、把对象的创建交给spring进行管理
2、ioc操作两部分
ioc的配置文件方式
ioc的注解方式--第二天
Ioc底层原理
使用技术
xml配置文件
dom4j
工厂设计模式
反射
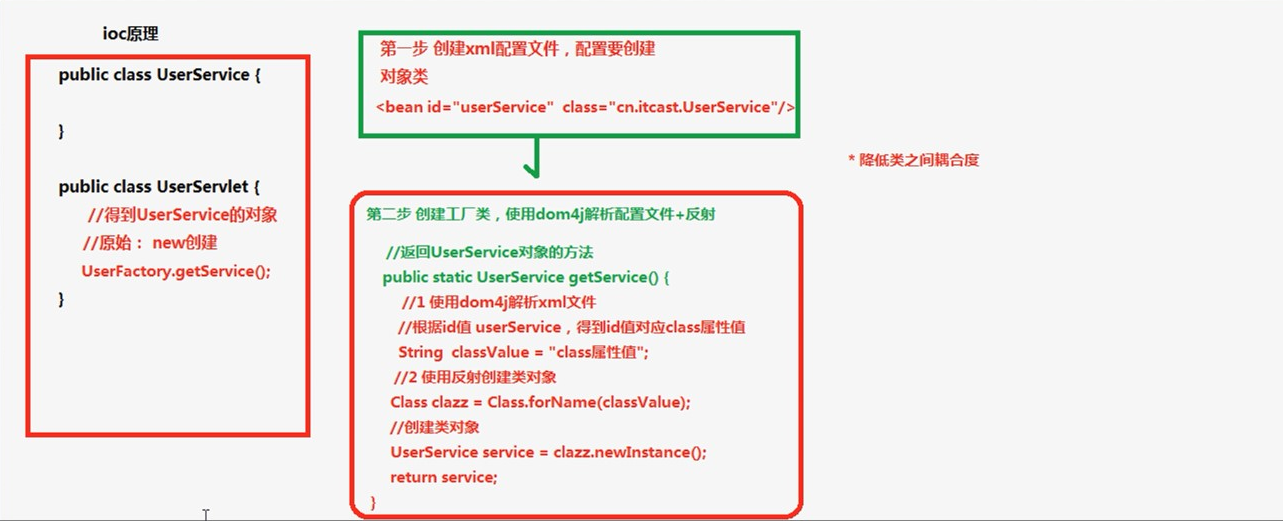
IOC入门案例
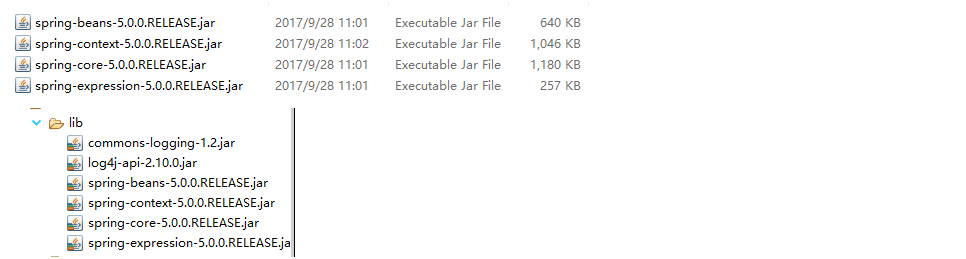
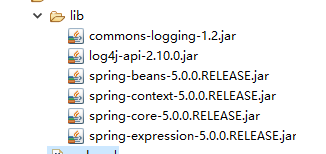
1、导入jar包
Core container
Beans Core Context Spel
做最基本功能的时候,导入上述四个核心jar包
导入日志相关的jar包
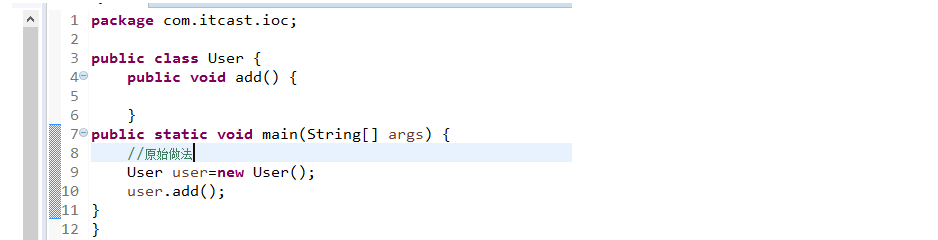
2、创建类,创建方法。
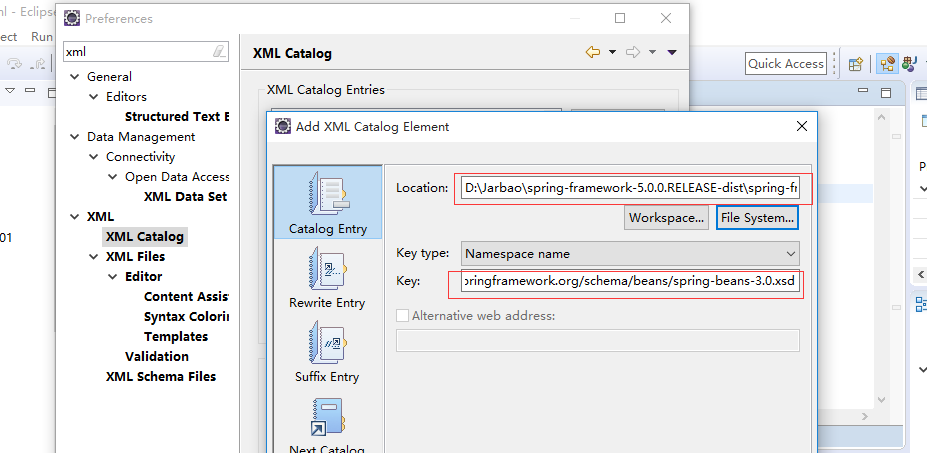
3、创建spring配置文件
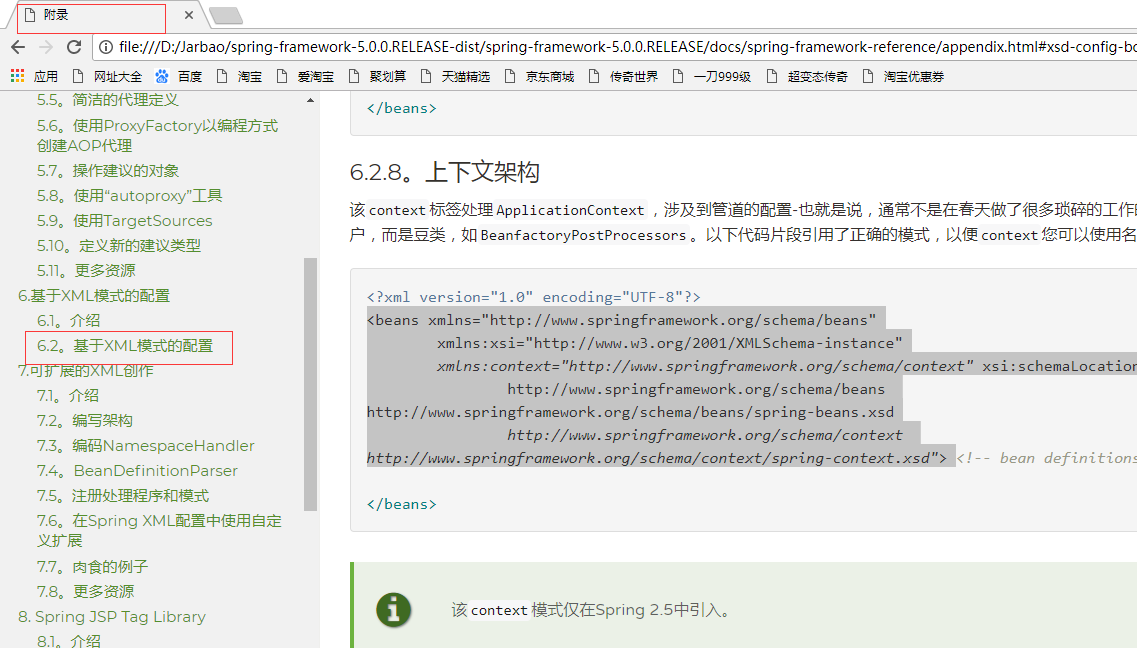
src下,建议applicationContext.xml
引入schema约束
<beans xmlns="http://www.springframework.org/schema/beans"
xmlns:xsi="http://www.w3.org/2001/XMLSchema-instance"
xsi:schemaLocation="http://www.springframework.org/schema/beans
http://www.springframework.org/schema/beans/spring-beans-3.0.xsd"><!-- ioc入门 -->
<bean id="user" class="com.itcast.ioc.User"></bean>4、写代码测试
解决eclipsede 提示问题
Spring的bean管理(xml配置文件)
bean实例化三种方式实现
使用类的无参构造创建。(常用)
<bean id="user" class="com.itcast.ioc.User"></bean>
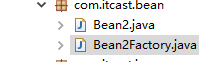
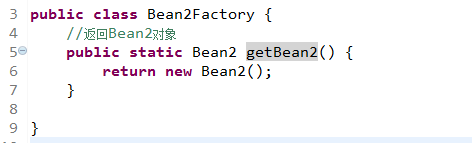
使用静态工厂创建

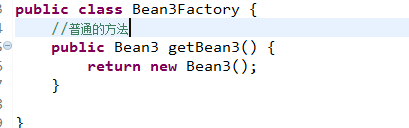
使用实例工厂

Bean标签常用属性
id属性 :任意命名,不能包含特殊符号
class属性 :创建对象所在类的全路径
name:和id属性一样
scope:Bean的作用范围 singleton(默认值) prototype
属性注入方式(3种)
set方法注入(常用)
<!-- 使用set方法注入 -->
<bean id="demo1" class="com.itcast.proper.ProDemo1">
<property name="username" value="joan"></property>
</bean>public class ProDemo1 {
private String username;
public void setUsername(String username) {
this.username = username;
}
/*public ProDemo1(String username) {
super();
this.username = username;
}*/
public void show() {
System.out.println("demo1--------"+username);
}
} @Test
public void test2() {
//加载spring配置文件,根据创建对象
ApplicationContext context=new ClassPathXmlApplicationContext("bean1.xml");
//得到配置创建的对象
ProDemo1 bb=(ProDemo1) context.getBean("demo1");
System.out.println(bb);
bb.show();

有参构造注入
<!-- 使用有参构造注入属性 -->
<bean id="demo1" class="com.itcast.proper.ProDemo1">
<constructor-arg name="username" value="xiaohu"></constructor-arg>public class ProDemo1 {
private String username;
public ProDemo1(String username) {
super();
this.username = username;
}
public void show() {
System.out.println("demo1--------"+username);
}
}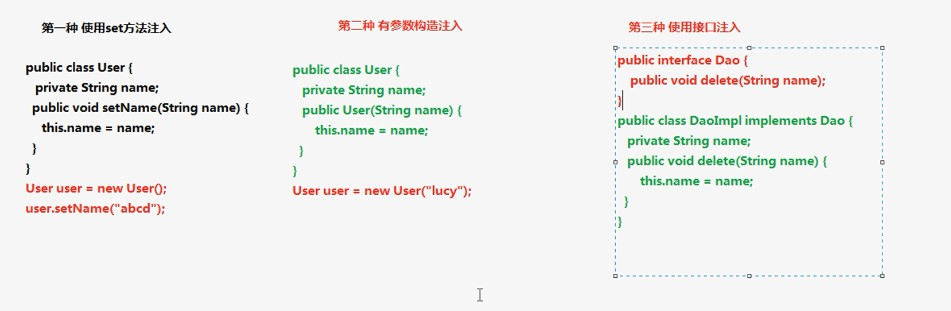
注入对象类型属性(重点)
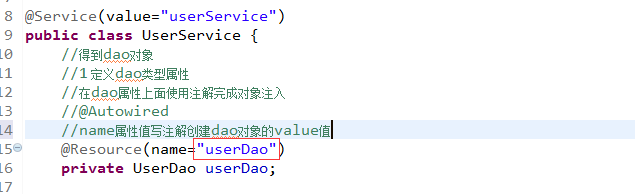
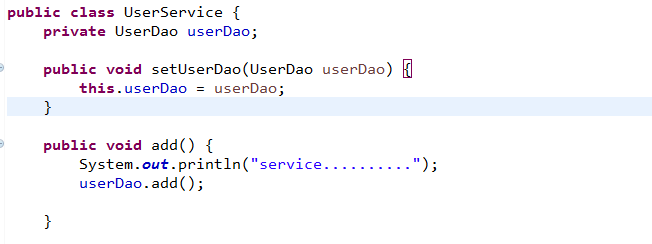
1 创建service类和dao类
在service得到dao对象
public class UserService {
//1 定义到类型属性
private UserDao userDao;
//生成set方法
public void setUserDao(UserDao userDao) {
this.userDao = userDao;
}
public void add() {
System.out.println("service.................");
/*UserDao dao=new UserDao();
dao.add();*/
userDao.add();
}
}
3 配置文件
<!-- 注入对象类型的属性 -->
<!--1 配置service和dao对象 -->
<bean id="userDao" class="com.itcast.ioc.UserDao"></bean>
<bean id="userService" class="com.itcast.ioc.UserService">
<!--注入dao对象
name属性值:service类里面属性名称
ref属性值: dao配置bean标签中id值-->
<property name="userDao" ref="userDao"></property>
</bean>P名称空间注入

<!-- p名称空间注入-->
<bean id="person" class="com.itcast.proper.Person" p:pname="lucy"></bean>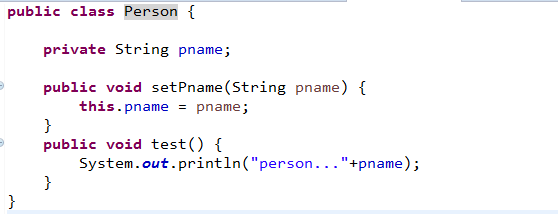
注入复杂类型属性
private String[] arrs;
private List<String> list;
private Map<String,String> map;
private Properties properties;
public void setArrs(String[] arrs) {
this.arrs = arrs;
}
public void setList(List<String> list) {
this.list = list;
}
public void setMap(Map<String, String> map) {
this.map = map;
}
public void setProperties(Properties properties) {
this.properties = properties;
}<!--注入复杂型 -->
<bean id="person" class="com.itcast.proper.Person">
<!--数组 -->
<property name="arrs">
<list>
<value>小王</value>
<value>小er</value>
<value>小san</value>
</list>
</property>
<!-- list-->
<property name="list">
<list>
<value>aa</value>
<value>bb</value>
<value>cc</value>
</list>
</property>
<!-- map -->
<property name="map">
<map>
<entry key="1" value="lucy"></entry>
<entry key="2" value="joan"></entry>
<entry key="3" value="hutao"></entry>
</map>
</property>
<!-- properties -->
<property name="properties">
<props>
<prop key="driverclass">com.mysql.jdbc.Driver</prop>
<prop key="username">root</prop>
<prop key="password">176166</prop>
</props>
</property>
</bean>@Test
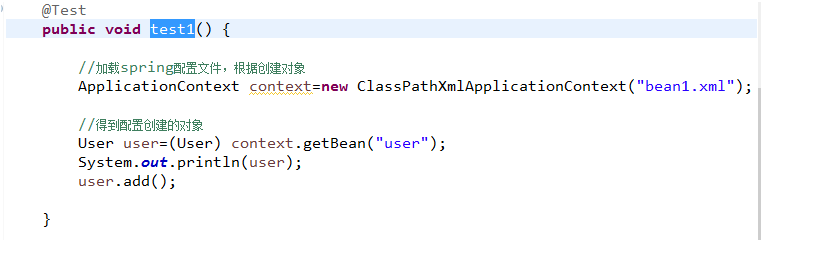
public void test1() {
//加载spring配置文件,根据创建对象
ApplicationContext context=new ClassPathXmlApplicationContext("bean1.xml");
//得到配置创建的对象
Person person=(Person) context.getBean("person");
System.out.println(person);
person.test();
IOC和DI区别
IOC 控制反转 把对象的创建交给spring进行配置
DI 依赖注入 向类里面的属性设置值
关系:依赖注入不能单独存在,需要在ioc基础之上完成操作
Spring整合web原理

new 对象,功能可以实现,效率很低
实现思想:把加载配置文件和创建对象过程,在服务器启动时候完成。
实现原理
(1)ServletContext对象
(2) 监听器
(3)具体使用:
--在服务器启动时候,为每个项目创建一个ServletContext对象
--在ServletContext对象创建时候,使用监听器可以具体到ServletContext对象什么时候创建
--使用监听器听到ServletContext对象创建时候,加载spring配置文件,把配置文件配置对象创建。
把创建出来的对象放到ServletContext域对象里面(setAttribute)
获取对象时候,到ServletContext域得到(getAttribute)
------------------------------------------------------------------------------------------------------
第二天
spring的ioc操作(注解)和aop概念
1、spring的bean管理(注解)
(1)注解创建对象
(2)注解注入属性
(3)xml和注解方式混合使用
@注解名称(属性名称=属性值)注解
spring注解开发准备
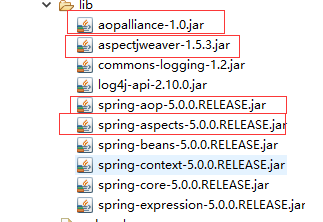
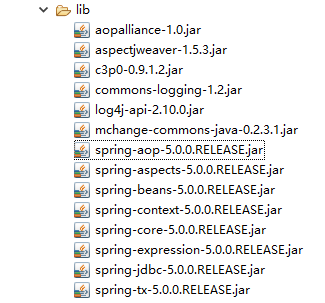
1、导入jar包
基本的jar
aop的jar

2 创建类,创建方法
3 创建spring配置文件
引入约束
<beans xmlns="http://www.springframework.org/schema/beans"
xmlns:xsi="http://www.w3.org/2001/XMLSchema-instance"
xmlns:context="http://www.springframework.org/schema/context" xsi:schemaLocation="
http://www.springframework.org/schema/beans http://www.springframework.org/schema/beans/spring-beans.xsd
http://www.springframework.org/schema/context http://www.springframework.org/schema/context/spring-context.xsd">
<!--开启注解扫描
(1)到包里面扫描类、方法、属性上面是否有注解
-->
<context:component-scan base-package="com.anno"></context:component-scan>
<!--只会扫描属性上面的注解 -->
<context:annotation-config></context:annotation-config>注解创建对象


创建对象有四个注解
Component
Controller :web层
Service : 业务层
Repository :持久层
目前来说,功能是一样的
创建对象是单实例还是多实例
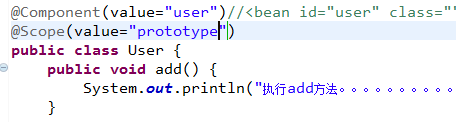
注解注入属性
(1)Autowired
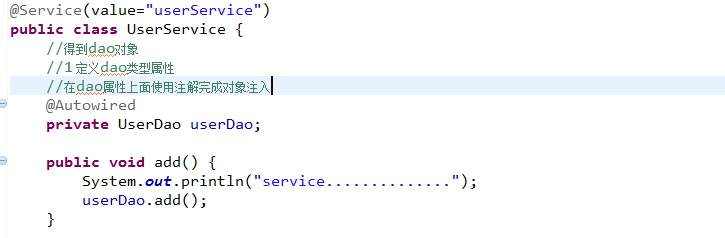


(2) Resource

配置文件和注解混合使用
2 AOP
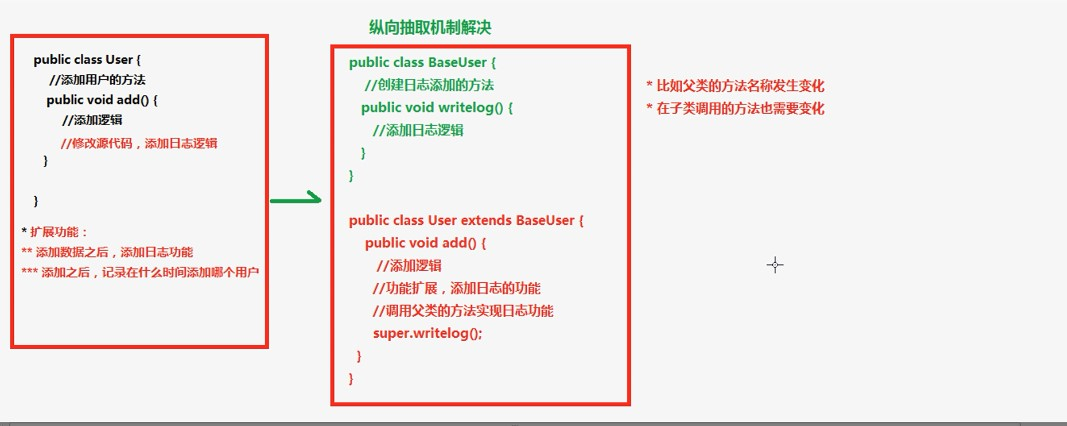
AOP横向抽取机制
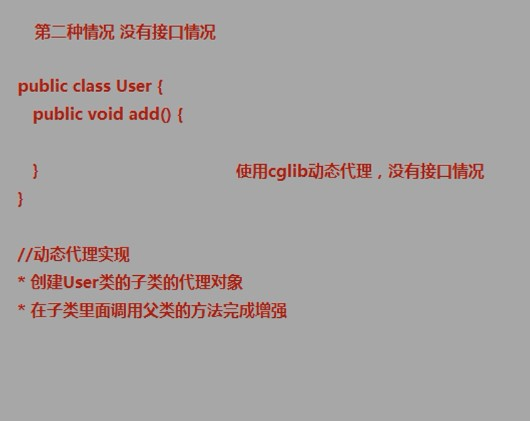
底层使用动态代理方式实现
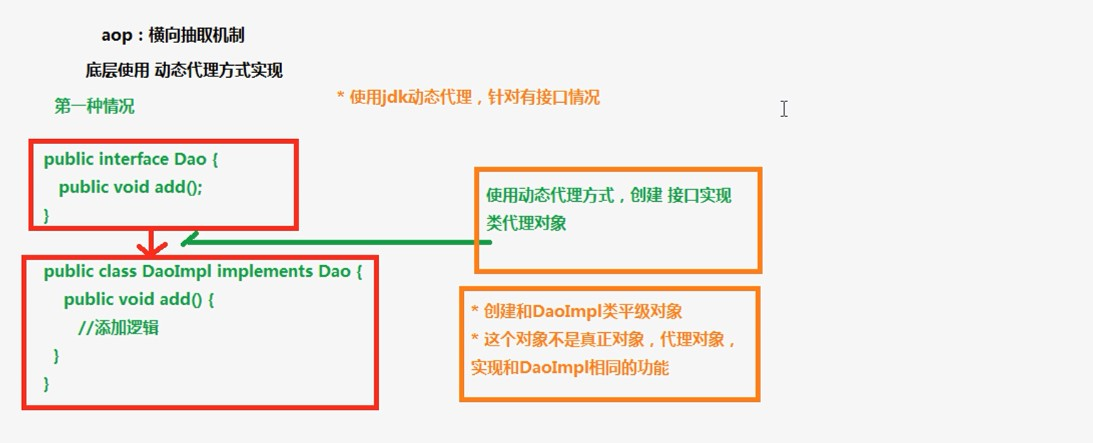
AOP相关术语
Joinpoint(连接点):在类里面可以被增强的方法
Pointcut(切入点):实际被增强的方法称为切入点
Advice(通知/增强):增强的逻辑,称为增强,比如扩展日志功能,这个日志功能称为增强
前置通知 before
后置通知 after
异常通知 exception
最终通知 final
环绕通知 around 在方法之前和之后执行
Aspect( 切面):把增强应用到具体方法上面,过程称为切面。
Introduction引入
Target 代理目标对象(要增强的类)
Weaving 织入 :是把增强应用到目标的过程 advice应用到target的过程
Proxy 代理
Spring的aop操作
1 使用aspectj实现
aspectj不是spring的一部分,和spring一起使用进行aop操作
spring2.0以后新增了对Aspectj支持
2 使用aspectj实现aop有两种方式
(1)基于aspectj的xml配置
(2)基于aspectj的注解方式
Aop操作准备
1、基本jar包+aop相关jar
约束
<beans xmlns="http://www.springframework.org/schema/beans"
xmlns:xsi="http://www.w3.org/2001/XMLSchema-instance"
xmlns:aop="http://www.springframework.org/schema/aop"
xsi:schemaLocation="
http://www.springframework.org/schema/beans http://www.springframework.org/schema/beans/spring-beans.xsd
http://www.springframework.org/schema/aop http://www.springframework.org/schema/aop/spring-aop.xsd">
1 切入点:实际增强的方法
2 常用的表达式:
execution(<访问修饰符>?<返回类型><方法名>()
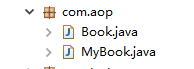
execution(* com.aop.Book.add(..))
execution(* com.aop.Book.*(..))
execution(*.*.*.(..))
<!-- 1 配置对象 -->
<bean id="book" class="com.aop.Book"></bean>
<bean id="myBook" class="com.aop.MyBook"></bean>
<!-- 2 配置aop操作 -->
<aop:config>
<!-- 2.1 配置切入点-->
<aop:pointcut expression="execution(*.com.aop.Book.*(..))" id="pointcut1"/>
<!--2.2 配置切面
把增强用到方法上面-->
<aop:aspect ref="myBook">
<aop:before method="before1" pointcut-ref="pointcut1"/>
</aop:aspect>
</aop:config>
//环绕通知
public void around1(ProceedingJoinPoint proceedingJoinPoint) throws Throwable {
System.out.println("之前...........");
//执行被增强的方法
proceedingJoinPoint.proceed();
System.out.println("之后。。。。。。。。。");
}
Log4介绍
1 导入jar
2 配置文件 (src下)log4j.properties
----------------------------------------------------------------------
Spring整合web项目演示
常规配置,每次访问action时,都会加载spring配置文件
2 解决方案:
在服务器启动时候,创建对象加载配置文件
底层使用ServletContext对象
3 在spring里面不需要我们自己写代码实现
封装了一个监听器,只需要配置监听器
配置监听器之前导入spring整合web项目jar包

在web.xml中

------------------------------------------------------------------------------------------------------------
第三天
基于aspectj的注解aop
1 使用注解方式实现aop操作
第一步 创建对象

第二步:开启aop操作
<!--开启aop操作 -->
<aop:aspectj-autoproxy></aop:aspectj-autoproxy>
第三步:在增强类上使用注解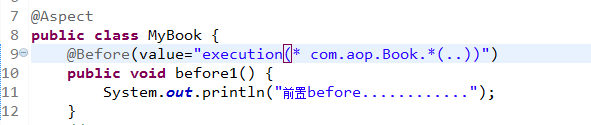
jdbcTemplate和spring管理事物
jdbcTemplate对jdbc进行封装
CRUD
增加
导入jar包

数据库驱动jar
@Test
public void add() {
//设置数据库信息
DriverManagerDataSource dataSource=new DriverManagerDataSource();
dataSource.setDriverClassName("com.mysql.jdbc.Driver");
dataSource.setUrl("jdbc:mysql:///spring_day03");
dataSource.setUsername("root");
dataSource.setPassword("176166");
//
JdbcTemplate jdbcTemplate=new JdbcTemplate(dataSource);
//添加
/*String sql="insert into user value(?,?)";
int row=jdbcTemplate.update(sql,"lucy","250");*/
//修改
/*String sql="update user set password=? where username=?";
int row=jdbcTemplate.update(sql,"1234","lucy");*/
//删除
String sql="delete from user where username=?";
int row=jdbcTemplate.update(sql,"lucy");
System.out.println(row);
查询
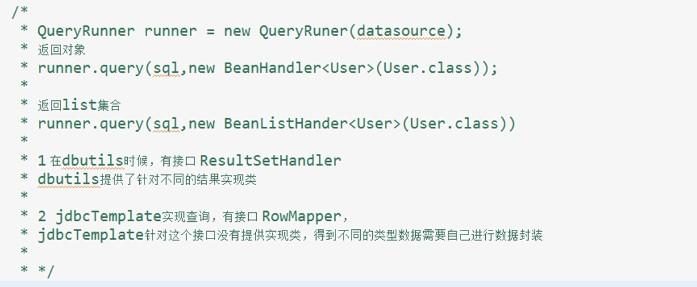
1 查询返回一个值

2 查询返回对象
//查询返回对象
String sql="select * from user where username=?";
User user=jdbcTemplate.queryForObject(sql, new MyRowMapper(), "lucy");
System.out.println(user);
class MyRowMapper implements RowMapper<User>{
@Override
public User mapRow(ResultSet rs, int arg1) throws SQLException {
//1 从结果集中得到数据
String username=rs.getString("username");
String password=rs.getString("password");
//数据封装到对象里面
User user=new User();
user.setUsername(username);
user.setPassword(password);
return user;
}
}
//查询返回list集合
String sql="select * from user";
List<User> list=jdbcTemplate.query(sql, new MyRowMapper());
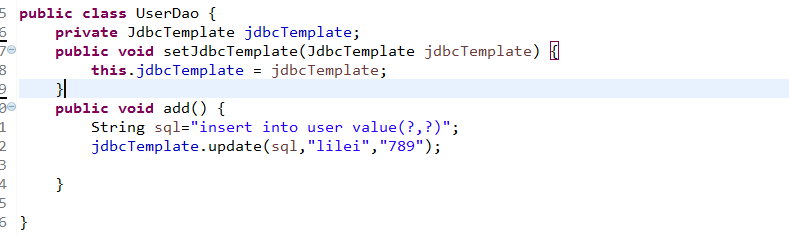
System.out.println(list.size());Spring配置连接池和dao使用jdbcTemplate
1 c3p0连接池
第一步导入jar包 c3po mchange-commoms
2 创建spring配置文件 配置连接池
1
2 dao使用jdbcTemplate


Spring的事务管理
1 事务概念 特性,不考虑隔离性产生问题() 设置隔离级别
Spring事务管理两种方式
编程式
声明式(基于xml , 基于注解)
spring的事务管理api
为不同的dao层框架,提供接口不同的实现类
配置事务管理器
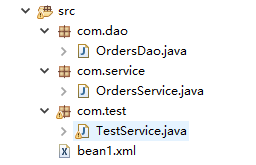
搭建转账环境
1 创建数据库表

2 创建service和dao类,完成注入
<bean id="ordersService" class="com.service.OrdersService">
<property name="ordersDao" ref="userDao"></property>
</bean>
<bean id="ordersDao" class="com.dao.OrdersDao">
<property name="jdbcTemplate" ref="jdbcTemplate"></property>
</bean>
<bean id="jdbcTemplate" class="org.springframework.jdbc.core.JdbcTemplate">
<property name="dataSource" ref="dataSource"></property>
</bean>(1)service层又叫业务逻辑层
(2)dao层
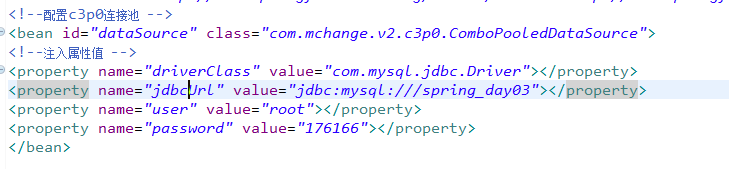
<!--配置c3p0连接池 -->
<bean id="dataSource" class="com.mchange.v2.c3p0.ComboPooledDataSource">
<!--注入属性值 -->
<property name="driverClass" value="com.mysql.jdbc.Driver"></property>
<property name="jdbcUrl" value="jdbc:mysql:///spring_day03"></property>
<property name="user" value="root"></property>
<property name="password" value="176166"></property>
</bean>
<bean id="ordersService" class="com.service.OrdersService">
<property name="ordersDao" ref="ordersDao"></property>
</bean>
<bean id="ordersDao" class="com.dao.OrdersDao">
<property name="jdbcTemplate" ref="jdbcTemplate"></property>
</bean>
<!-- 创建jdbcTemplate对象 -->
<bean id="jdbcTemplate" class="org.springframework.jdbc.core.JdbcTemplate">
<property name="dataSource" ref="dataSource"></property>
</bean>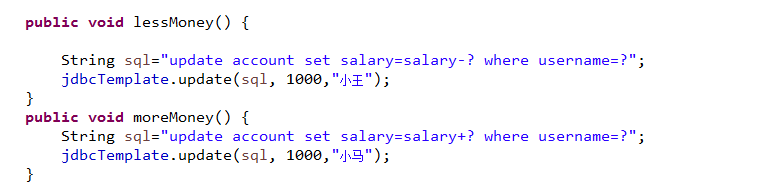
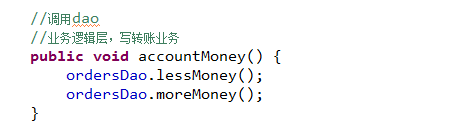
出现异常,进行事务回滚。
声明式事务管理(xml配置)
1 配置文件方式使用aop思想配置
第一步:配置事务管理器
<!--配置事务管理器 -->
<bean id="transactionManager" class="org.springframework.jdbc.datasource.DataSourceTransactionManager">
<property name="dataSource" ref="dataSource"></property>
</bean>第二步:配置事务的增强
<!-- 配置事务的增强 -->
<tx:advice id="txadvice" transaction-manager="transactionManager">
<!--做事务操作 -->
<tx:attributes>
<tx:method name="account*" propagation="REQUIRED"/>
</tx:attributes>
</tx:advice>第三步:配置切面
<!-- 配置切面 -->
<aop:config>
<!-- 切入点-->
<aop:pointcut expression="execution(* com.service.OrdersService.(..))" id="pointcut1"/>
<!-- 切面 -->
<aop:advisor advice-ref="txadvice" pointcut-ref="pointcut1"/>
</aop:config>
解决了异常会自行回滚。声明式事务管理(注解)
第一步AND第二步
<!-- 配置事务管理器 -->
<bean id="transactionManager" class="org.springframework.jdbc.datasource.DataSourceTransactionManager">
<property name="dataSource" ref="dataSource"></property>
</bean>
<!-- 开启事务注解-->
<tx:annotation-driven transaction-manager="transactionManager"/>第三步

第四天
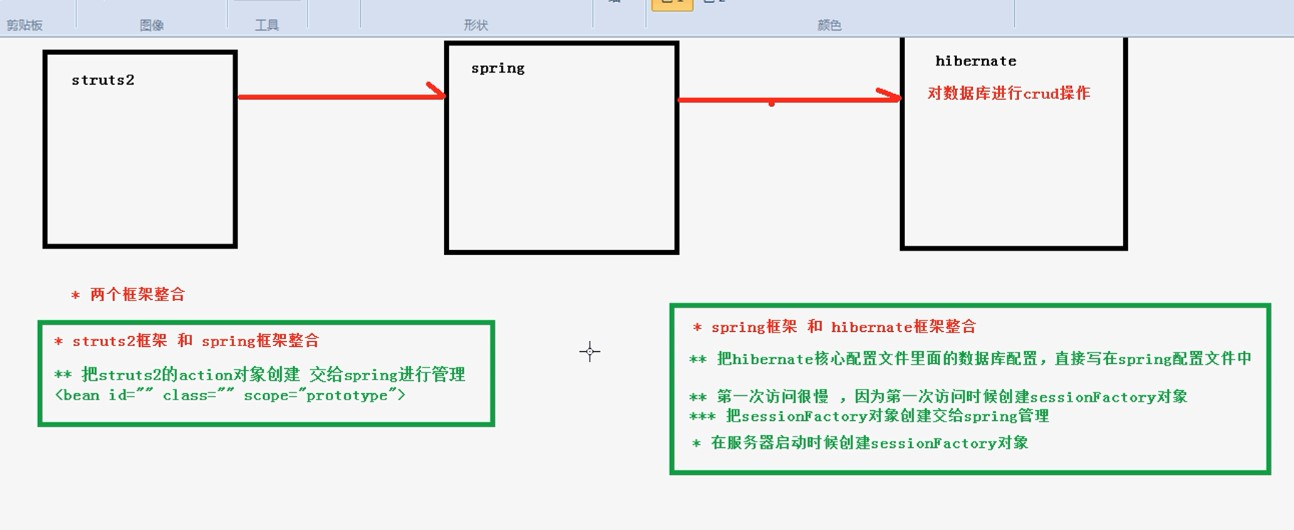
ssh整合 struts2+hibernate5.x+spring4.x
1 spring整合struts2
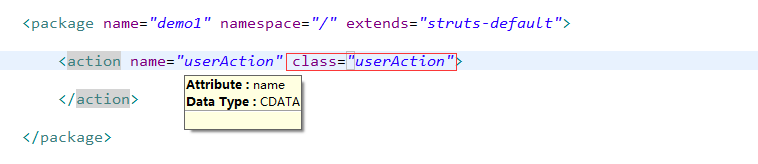

默认的情况下spring会从web-inf目录下去找spring的配置文件,并且spring的配置文件名是applicationContext.xml.
web.xml
<context-param>
<param-name>contextConfigLocation</param-name>
<param-value>classpath:applicationContext.xml</param-value>
</context-param>
<filter>
<filter-name>struts2</filter-name>
<filter-class>org.apache.struts2.dispatcher.filter.StrutsPrepareAndExecuteFilter</filter-class>
</filter>
<filter-mapping>
<filter-name>struts2</filter-name>
<url-pattern>/*</url-pattern>
</filter-mapping>
<listener>
<listener-class>org.springframework.web.context.ContextLoaderListener</listener-class>
</listener>2 spring整合hibernate
一 导入hibernate的jar包
strutes 和hibernate有重复的jar
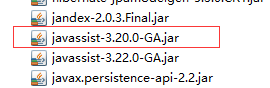
删除低版本的jar
导入SSH整合的jar
二 搭建hibernate环境
1 创建实体类
2 配置实体类映射关系
3 创建核心配置文件
三 把hibernate核心配置文件啊数据库配置在spring中进行配置


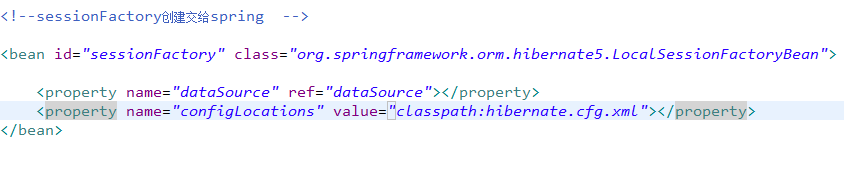
四 把hibernate的sessionFactory交给spring配置
spring中进行了封装
ssh整合代码:https://github.com/hutaoying/ssh_demo