首先到Amazon的官网下载APP-SDK,之后解压就可以,不过这个里面有很多的sdk,我们只用导入广告的adk就行,这个要比google的简单,直接加入jar的包就行。在这里附上amazon SDK的下载路径:
1 https://developer.amazon.com/public/resources/development-tools/sdk
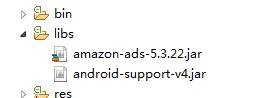
解压adk后找到jar包,copy到android工程的libs目录就可以,如lib目录如下如所示:
接着我们就需要修改Android的代码了,其实还是老一套修改清单文件,接着写java代码就行:
加入所需的权限:
1     <uses-permission android:name="android.permission.INTERNET" />
2     <uses-permission android:name="android.permission.ACCESS_COARSE_LOCATION" />
3     <uses-permission android:name="android.permission.ACCESS_FINE_LOCATION" />
4     <uses-permission android:name="android.permission.ACCESS_NETWORK_STATE" />
5     <uses-permission android:name="android.permission.ACCESS_WIFI_STATE" />
声明Activity
1         <activity
2      android:name="com.amazon.device.ads.AdActivity"
3      android:configChanges="keyboardHidden|orientation|screenSize">
4      </activity>
接着看看Activity的实现:
 1 /**
 2  * Copyright 2013-2014 Amazon.com, Inc. or its affiliates. All Rights Reserved.
 3  * Licensed under the Apache License, Version 2.0 (the "License").
 4  * You may not use this file except in compliance with the License.
 5  * A copy of the License is located at http://aws.amazon.com/apache2.0/
 6  * or in the "license" file accompanying this file.
 7  * This file is distributed on an "AS IS" BASIS, WITHOUT WARRANTIES OR
 8  * CONDITIONS OF ANY KIND, either express or implied.
 9  * See the License for the specific language governing permissions and
10  * limitations under the License.
11  */
12 package com.lemi.testamazon;
13
14 import com.amazon.device.ads.*;
15
16 import android.app.Activity;
17 import android.os.Bundle;
18 import android.util.Log;
19 import android.view.LayoutInflater;
20 import android.view.View;
21 import android.view.ViewGroup.LayoutParams;
22
23
24 public class MainActivity extends Activity {
25     private AdLayout adView;
26
27     private static final String APP_KEY = "sample-app-v1_pub-2";
28     private static final String LOG_TAG = "lemi";
29
30     @Override
31     public void onCreate(final Bundle savedInstanceState) {
32         super.onCreate(savedInstanceState);
33         AdRegistration.enableLogging(true);
34         LayoutInflater inflater = (LayoutInflater)this.getSystemService(this.LAYOUT_INFLATER_SERVICE);
35         View view = inflater.inflate(R.layout.main, null);
36
37         this.adView = (AdLayout) view.findViewById(R.id.ad_view);
38         this.adView.setListener(new SampleAdListener());
39
40         addContentView(view, new LayoutParams(LayoutParams.FILL_PARENT,LayoutParams.FILL_PARENT));
41
42         try {
43             AdRegistration.setAppKey(APP_KEY);
44         } catch (final Exception e) {
45             Log.e(LOG_TAG, "Exception thrown: " + e.toString());
46             return;
47         }
48
49         loadAd();
50
51     }
52
53
54     public void loadAd() {
55         this.adView.loadAd();
56     }
57
58     class SampleAdListener extends DefaultAdListener
59     {
60
61         @Override
62         public void onAdLoaded(final Ad ad, final AdProperties adProperties) {
63             Log.i(LOG_TAG, adProperties.getAdType().toString() + " ad loaded successfully.");
64         }
65
66         @Override
67         public void onAdFailedToLoad(final Ad ad, final AdError error) {
68             Log.w(LOG_TAG, "Ad failed to load. Code: " + error.getCode() + ", Message: " + error.getMessage());
69         }
70
71         @Override
72         public void onAdExpanded(final Ad ad) {
73             Log.i(LOG_TAG, "Ad expanded.");
74
75         }
76
77         @Override
78         public void onAdCollapsed(final Ad ad) {
79             Log.i(LOG_TAG, "Ad collapsed.");
80
81         }
82     }
83 }
需要注意的是我在这里使用的Amazon的测试接口,如果你是自己开发的应用,你还是要换上自己申请的KEY值
1 private static final String APP_KEY = "sample-app-v1_pub-2";
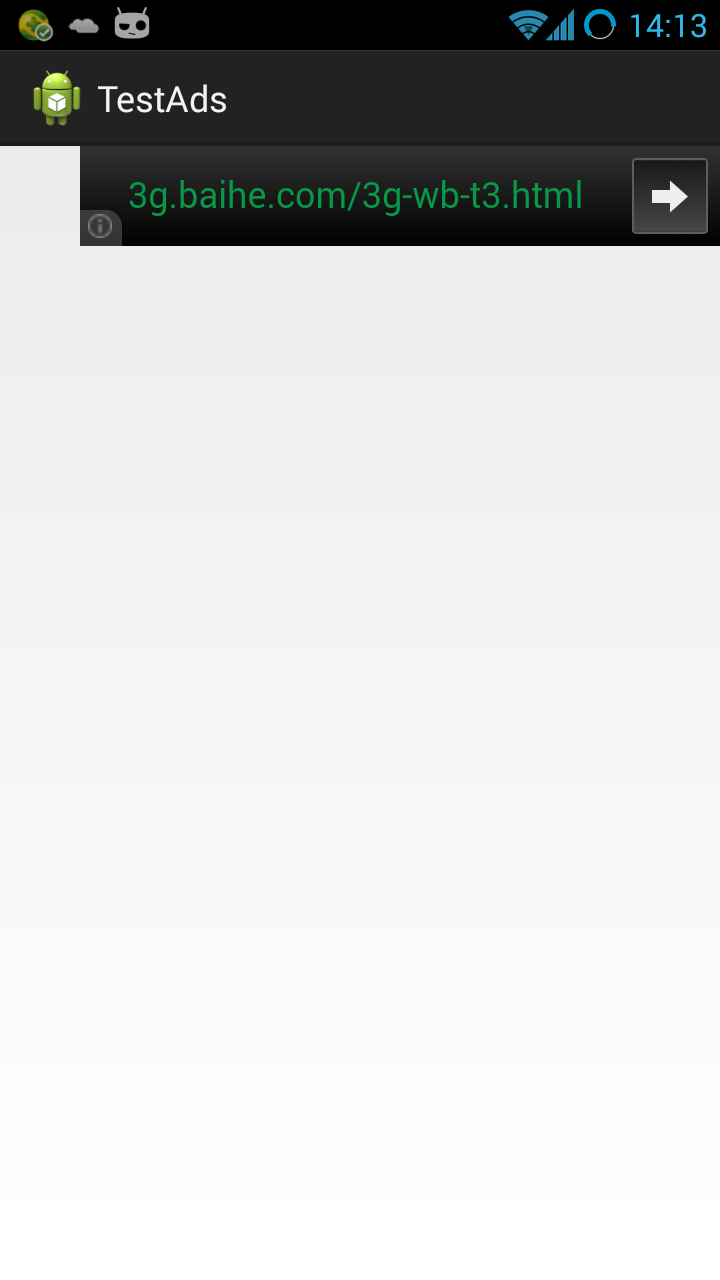
上一张截图吧: