1.Flink中exactly once实现原理分析
生产者从kafka拉取数据以及消费者往kafka写数据都需要保证exactly once。目前flink中支持exactly once的source不多,有kafka source;能实现exactly once的sink也不多,如kafka sink、streamingFileSink,其都要开启checkpoint才能实现exactly once。接下来以FlinkKafkaProducer为例,深入研究其源代码,从而理解flink中的exactly once(精准一次性语义)是怎么实现的。
1.1 大致流程图(也叫分两阶段提交原理)
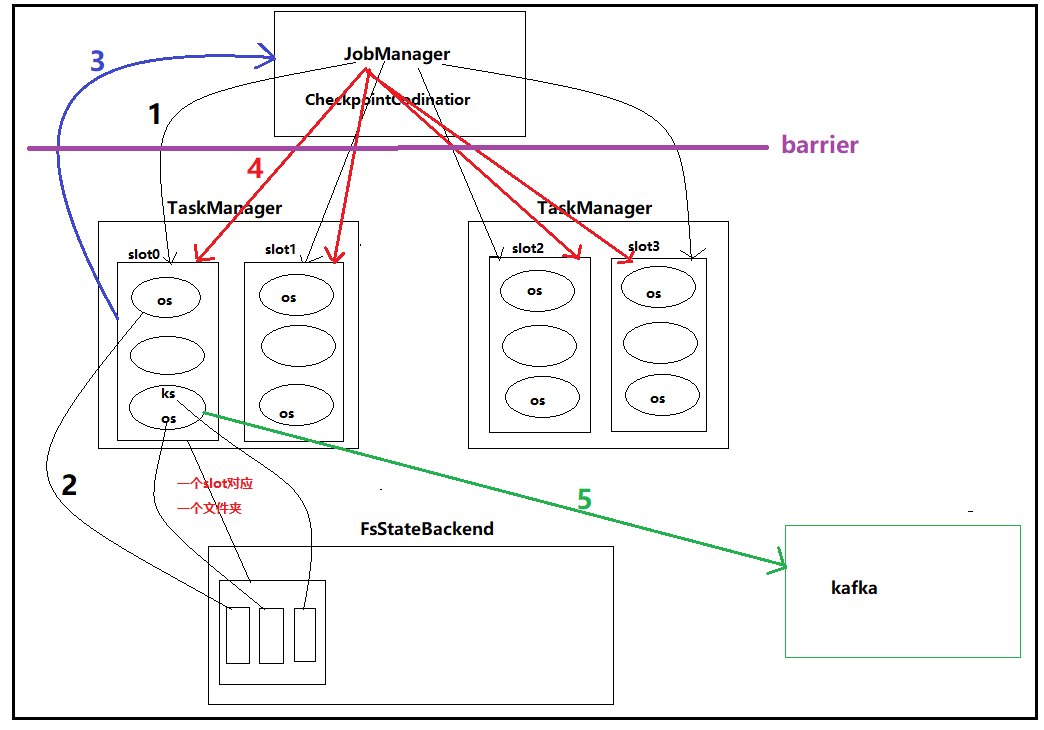
1. JobManager定期(通过CheckpointCodinator)向各个包含state的subTask发起checkpoint的请求
2. subTask将各自的state写入到相应的statebackend,一个资源槽对应一个文件,其中各个subTask的state写入这个文件中
3. 各个subTask向JobManager发送checkpoint成功的消息
4. 当所有subTask都发送了checkpoint成功的消息后,jobManager会向所有实现了checkpoint的subTask发送成功的消息
5. subTask往kafka写数据,并且向Kafka提交事务()
注意:为了保证一个流水线(pipeline)上的operrator state和keyedstate数据一致,flink引入了barrier机制,即在jobmanager和taskManager间设置一个barrier,相当于节流,保证在checkpoint时,source不能在读取数据
问题:kafka涉及到生产者往里面写数据一个事务,以及消费者读取数据一个事务,这两个事物间有什么联系?
1.2 源码解析
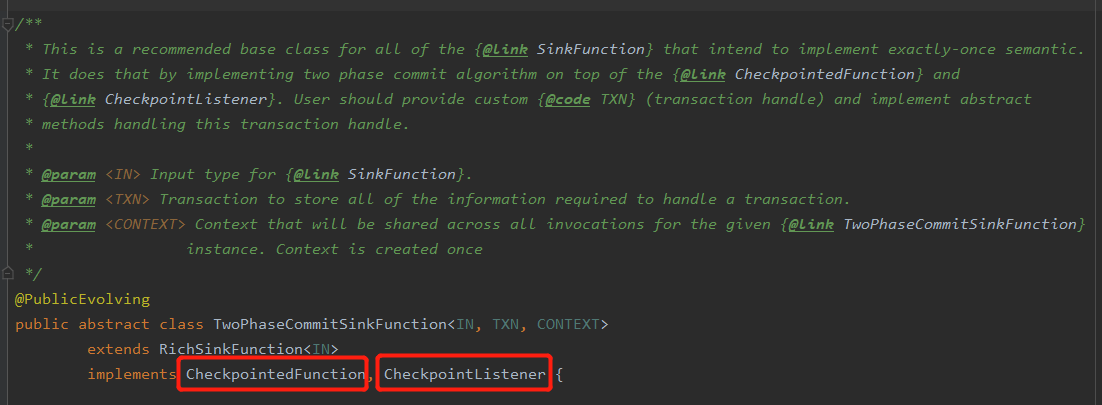
(1)首先看FlinkKafkaProducer类,可以发现其继承了TwoPhaseCommitSinkFunction

(2)TwoPhaseCommitSinkFunction是所有要实现一次性语义的SinkFunction的一个比较推荐的基类,其实现了两个重要的接口,分别为:CheckpointedFunction, CheckpointListener
- CheckpointedFunction接口
此接口中包含两个方法,分别为snapshotState方法、initializeState方法,源代码如下


public interface CheckpointedFunction {

    /**
     * This method is called when a snapshot for a checkpoint is requested. This acts as a hook to the function to
     * ensure that all state is exposed by means previously offered through {@link FunctionInitializationContext} when
     * the Function was initialized, or offered now by {@link FunctionSnapshotContext} itself.
     *
     * @param context the context for drawing a snapshot of the operator
     * @throws Exception
     */
    void snapshotState(FunctionSnapshotContext context) throws Exception;

    /**
     * This method is called when the parallel function instance is created during distributed
     * execution. Functions typically set up their state storing data structures in this method.
     *
     * @param context the context for initializing the operator
     * @throws Exception
     */
    void initializeState(FunctionInitializationContext context) throws Exception;

}
其中snapshotState方法是用checkpoint时,拍快照,其能将state持久化到statebackend。这里面存了一些transactionID、subTask编号、以及kafka的相关信息(用来写数据)。若是checkpoint成功了,但是subTask并没有成功将数据写入kafka,则会通过这个方法恢复原先最近的state进行恢复,然后继续
initializeState方法可以用来恢复state,解释可能以前将state持久化到了statebackend,但并没有将数据成功写入kafka,则可以ton过这个方法恢复最近的state,然后将数据继续往kafka写数据。
- CheckpointListener接口
此接口中包含一个notifyCheckpointComplete方法
源码如下
/**
 * This interface must be implemented by functions/operations that want to receive
 * a commit notification once a checkpoint has been completely acknowledged by all
 * participants.
 */
@PublicEvolving
public interface CheckpointListener {

    /**
     * This method is called as a notification once a distributed checkpoint has been completed.
     *
     * Note that any exception during this method will not cause the checkpoint to
     * fail any more.
     *
     * @param checkpointId The ID of the checkpoint that has been completed.
     * @throws Exception
     */
    void notifyCheckpointComplete(long checkpointId) throws Exception;
}
notifyCheckpointComplete方法什么时候被调用呢?所有分区的subTask向JobManager相应checkpoint后才会被调用,即告知各个subTask,这次checkpoint成功了,可以进行下一步的操作了,该方法源码如下:
    @Override
    public final void notifyCheckpointComplete(long checkpointId) throws Exception {
        // the following scenarios are possible here
        //
        //  (1) there is exactly one transaction from the latest checkpoint that
        //      was triggered and completed. That should be the common case.
        //      Simply commit that transaction in that case.
        //
        //  (2) there are multiple pending transactions because one previous
        //      checkpoint was skipped. That is a rare case, but can happen
        //      for example when:
        //
        //        - the master cannot persist the metadata of the last
        //          checkpoint (temporary outage in the storage system) but
        //          could persist a successive checkpoint (the one notified here)
        //
        //        - other tasks could not persist their status during
        //          the previous checkpoint, but did not trigger a failure because they
        //          could hold onto their state and could successfully persist it in
        //          a successive checkpoint (the one notified here)
        //
        //      In both cases, the prior checkpoint never reach a committed state, but
        //      this checkpoint is always expected to subsume the prior one and cover all
        //      changes since the last successful one. As a consequence, we need to commit
        //      all pending transactions.
        //
        //  (3) Multiple transactions are pending, but the checkpoint complete notification
        //      relates not to the latest. That is possible, because notification messages
        //      can be delayed (in an extreme case till arrive after a succeeding checkpoint
        //      was triggered) and because there can be concurrent overlapping checkpoints
        //      (a new one is started before the previous fully finished).
        //
        // ==> There should never be a case where we have no pending transaction here
        //

        Iterator<Map.Entry<Long, TransactionHolder<TXN>>> pendingTransactionIterator = pendingCommitTransactions.entrySet().iterator();
        Throwable firstError = null;

        while (pendingTransactionIterator.hasNext()) {
            Map.Entry<Long, TransactionHolder<TXN>> entry = pendingTransactionIterator.next();
            Long pendingTransactionCheckpointId = entry.getKey();
            TransactionHolder<TXN> pendingTransaction = entry.getValue();
            if (pendingTransactionCheckpointId > checkpointId) {
                continue;
            }

            LOG.info("{} - checkpoint {} complete, committing transaction {} from checkpoint {}",
                name(), checkpointId, pendingTransaction, pendingTransactionCheckpointId);

            logWarningIfTimeoutAlmostReached(pendingTransaction);
            try {
                commit(pendingTransaction.handle);
            } catch (Throwable t) {
                if (firstError == null) {
                    firstError = t;
                }
            }

            LOG.debug("{} - committed checkpoint transaction {}", name(), pendingTransaction);

            pendingTransactionIterator.remove();
        }

        if (firstError != null) {
            throw new FlinkRuntimeException("Committing one of transactions failed, logging first encountered failure",
                firstError);
        }
    }
注意,该方法除了提醒个subTask此次checkpoint成功了外,还会提交事务,具体见源码如下(为该方法源码的一部分):
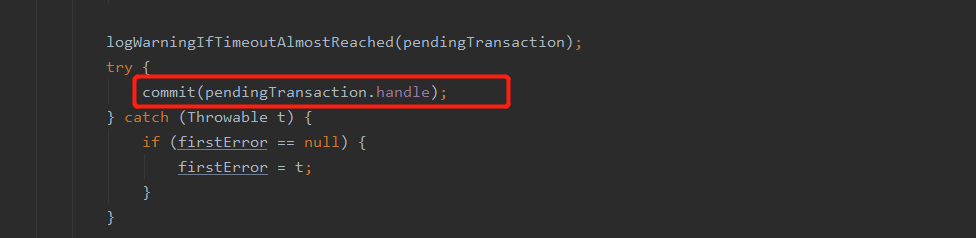
FlinkKafkaProducer中的commit方法
    @Override
    protected void commit(FlinkKafkaProducer.KafkaTransactionState transaction) {
        if (transaction.isTransactional()) {
            try {
                transaction.producer.commitTransaction();
            } finally {
                recycleTransactionalProducer(transaction.producer);
            }
        }
    }
若是事务提交失败后,该怎么办呢?没关系,事务提交失败后,会根据重启策略重启,并调用initializeState方法恢复先前最近的一个state,继续往kafka写数据,提交事务,再次提交事务时,就不是调用commit方法了,而是调用FlinkKafkaProducer中的recoverAndCommit方法(这块也可能是preCommit方法,自己还没完全看懂源码),先恢复数据再commit事务,源码如下
@Override
    protected void recoverAndCommit(FlinkKafkaProducer.KafkaTransactionState transaction) {
        if (transaction.isTransactional()) {
            try (
                FlinkKafkaInternalProducer<byte[], byte[]> producer =
                    initTransactionalProducer(transaction.transactionalId, false)) {
                producer.resumeTransaction(transaction.producerId, transaction.epoch);
                producer.commitTransaction();
            } catch (InvalidTxnStateException | ProducerFencedException ex) {
                // That means we have committed this transaction before.
                LOG.warn("Encountered error {} while recovering transaction {}. " +
                        "Presumably this transaction has been already committed before",
                    ex,
                    transaction);
            }
        }
    }
注意:这里可以保证checkpoint成功,以及事务提交成功,但是没法保证它俩在一起同时成功。但这也没关系,就算checkpoint成功了,事务没成功也没关系。事务没成功会回滚,它会从statebackend中恢复数据,然后再向kafka中写数据,提交事务。
2 自定义两阶段提交sink实例
自定义两阶段提交sink,其面向的存储系统一定要支持事务,比如mysq,0.11版以后的kafka。简单来说,自定义两阶段提交sink就是继承TwoPhaseCommitSinkFunction类,然后重写里面的方法,具体见下面的例子
MySQL分两阶段提交的Sink
druid连接池
package cn._51doit.flink.day11;

import com.alibaba.druid.pool.DruidDataSourceFactory;

import javax.sql.DataSource;
import java.sql.Connection;
import java.sql.SQLException;
import java.util.Properties;

public class DruidConnectionPool {

    private transient static DataSource dataSource = null;

    private transient static Properties props = new Properties();

    static {

        props.put("driverClassName", "com.mysql.jdbc.Driver");
        props.put("url", "jdbc:mysql://172.16.200.101:3306/bigdata?characterEncoding=UTF-8");
        props.put("username", "root");
        props.put("password", "123456");
        try {
            dataSource = DruidDataSourceFactory.createDataSource(props);
        } catch (Exception e) {
            e.printStackTrace();
        }

    }

    private DruidConnectionPool() {
    }

    public static Connection getConnection() throws SQLException {
        return dataSource.getConnection();
    }
}
MySqlTwoPhaseCommitSinkFunction
package cn._51doit.flink.day11;


import org.apache.flink.api.common.ExecutionConfig;
import org.apache.flink.api.common.typeutils.base.VoidSerializer;
import org.apache.flink.api.java.tuple.Tuple2;
import org.apache.flink.api.java.typeutils.runtime.kryo.KryoSerializer;
import org.apache.flink.streaming.api.functions.sink.TwoPhaseCommitSinkFunction;

import java.sql.Connection;
import java.sql.PreparedStatement;
import java.sql.SQLException;

public class MySqlTwoPhaseCommitSink extends TwoPhaseCommitSinkFunction<Tuple2<String, Integer>, MySqlTwoPhaseCommitSink.ConnectionState, Void> {


    public MySqlTwoPhaseCommitSink() {
        super(new KryoSerializer<>(MySqlTwoPhaseCommitSink.ConnectionState.class, new ExecutionConfig()), VoidSerializer.INSTANCE);
    }

    @Override
    protected MySqlTwoPhaseCommitSink.ConnectionState beginTransaction() throws Exception {

        System.out.println("=====> beginTransaction... ");
        //Class.forName("com.mysql.jdbc.Driver");
        //Connection conn = DriverManager.getConnection("jdbc:mysql://172.16.200.101:3306/bigdata?characterEncoding=UTF-8", "root", "123456");
        Connection connection = DruidConnectionPool.getConnection();
        connection.setAutoCommit(false);
        return new ConnectionState(connection);

    }


    @Override
    protected void invoke(MySqlTwoPhaseCommitSink.ConnectionState connectionState, Tuple2<String, Integer> value, Context context) throws Exception {
        Connection connection = connectionState.connection;
        PreparedStatement pstm = connection.prepareStatement("INSERT INTO t_wordcount (word, counts) VALUES (?, ?) ON DUPLICATE KEY UPDATE counts = ?");
        pstm.setString(1, value.f0);
        pstm.setInt(2, value.f1);
        pstm.setInt(3, value.f1);
        pstm.executeUpdate();
        pstm.close();

    }

    @Override
    protected void preCommit(MySqlTwoPhaseCommitSink.ConnectionState connectionState) throws Exception {
        System.out.println("=====> preCommit... " + connectionState);
    }

    @Override
    protected void commit(MySqlTwoPhaseCommitSink.ConnectionState connectionState) {
        System.out.println("=====> commit... ");
        Connection connection = connectionState.connection;
        try {
            connection.commit();
            connection.close();
        } catch (SQLException e) {
            throw new RuntimeException("提交事物异常");
        }
    }

    @Override
    protected void abort(MySqlTwoPhaseCommitSink.ConnectionState connectionState) {
        System.out.println("=====> abort... ");
        Connection connection = connectionState.connection;
        try {
            connection.rollback();
            connection.close();
        } catch (SQLException e) {
            throw new RuntimeException("回滚事物异常");
        }
    }

    static class ConnectionState {

        private final transient Connection connection;

        ConnectionState(Connection connection) {
            this.connection = connection;
        }

    }


}
3 将数据写入Hbase
使用hbase的幂等性结合at least Once(flink中state能恢复,在两次checkpoint间可能会有重复读取数据的情况)实现精确一次性语义
HBaseUtil
package cn._51doit.flink.day11;

import org.apache.hadoop.conf.Configuration;
import org.apache.hadoop.hbase.HBaseConfiguration;
import org.apache.hadoop.hbase.client.Connection;
import org.apache.hadoop.hbase.client.ConnectionFactory;

/**
 * Hbase的工具类,用来创建Hbase的Connection
 */
public class HBaseUtil {
    /**
     * @param zkQuorum zookeeper地址,多个要用逗号分隔
     * @param port     zookeeper端口号
     * @return
     */
    public static Connection getConnection(String zkQuorum, int port) throws Exception {
        Configuration conf = HBaseConfiguration.create();
        conf.set("hbase.zookeeper.quorum", zkQuorum);
        conf.set("hbase.zookeeper.property.clientPort", port + "");
        Connection connection = ConnectionFactory.createConnection(conf);
        return connection;
    }
}
MyHbaseSink
package cn._51doit.flink.day11;

import org.apache.flink.api.java.tuple.Tuple2;
import org.apache.flink.api.java.utils.ParameterTool;
import org.apache.flink.configuration.Configuration;
import org.apache.flink.streaming.api.functions.sink.RichSinkFunction;
import org.apache.hadoop.hbase.TableName;
import org.apache.hadoop.hbase.client.Connection;
import org.apache.hadoop.hbase.client.Put;
import org.apache.hadoop.hbase.client.Table;

import java.util.ArrayList;
import java.util.List;

public class MyHbaseSink extends RichSinkFunction<Tuple2<String, Double>> {

    private transient  Connection connection;

    private transient Integer maxSize = 1000;

    private transient Long delayTime = 5000L;

    private transient Long lastInvokeTime;

    private transient List<Put> puts = new ArrayList<>(maxSize);

    public MyHbaseSink() {}

    public MyHbaseSink(Integer maxSize, Long delayTime) {
        this.maxSize = maxSize;
        this.delayTime = delayTime;
    }

    @Override
    public void open(Configuration parameters) throws Exception {
        super.open(parameters);

       ParameterTool params = (ParameterTool) getRuntimeContext()
               .getExecutionConfig().getGlobalJobParameters();

        //创建一个Hbase的连接
        connection = HBaseUtil.getConnection(
                params.getRequired("hbase.zookeeper.quorum"),
                params.getInt("hbase.zookeeper.property.clientPort", 2181)
        );

        lastInvokeTime = System.currentTimeMillis();
    }

    @Override
    public void invoke(Tuple2<String, Double> value, Context context) throws Exception {

        String rk = value.f0;
        Put put = new Put(rk.getBytes());
        put.addColumn("data".getBytes(), "order".getBytes(), value.f1.toString().getBytes());

        puts.add(put);


        //使用ProcessingTime
        long currentTime = System.currentTimeMillis();

        //加到一个集合中
        if(puts.size() == maxSize || currentTime - lastInvokeTime >= delayTime) {

            //获取一个HbaseTable
            Table table = connection.getTable(TableName.valueOf("myorder"));

            table.put(puts);

            puts.clear();

            lastInvokeTime = currentTime;

            table.close();
        }

    }

    @Override
    public void close() throws Exception {
        connection.close();
    }
}
4 ProtoBuf
protoBuf是一种序列化机制,数据存储还是二进制,其特点是序列化、反序列化快,占用空间小(相比json而言,是它的1/3)、跨平台、跨语言。
4.1 protobuf的使用测试
(1)创建一个maven工程
(2)导入pom依赖,具体内容见下
<?xml version="1.0" encoding="UTF-8"?>
<project xmlns="http://maven.apache.org/POM/4.0.0"
         xmlns:xsi="http://www.w3.org/2001/XMLSchema-instance"
         xsi:schemaLocation="http://maven.apache.org/POM/4.0.0 http://maven.apache.org/xsd/maven-4.0.0.xsd">
    <modelVersion>4.0.0</modelVersion>

    <groupId>org.example</groupId>
    <artifactId>protobuf-bean</artifactId>
    <version>1.0-SNAPSHOT</version>

    <properties>
        <maven.compiler.source>1.8</maven.compiler.source>
        <maven.compiler.target>1.8</maven.compiler.target>
        <encoding>UTF-8</encoding>
    </properties>
    <dependencies>
        <dependency>
            <groupId>com.google.protobuf</groupId>
            <artifactId>protobuf-java</artifactId>
            <version>3.7.1</version>
        </dependency>

        <dependency>
            <groupId>com.google.protobuf</groupId>
            <artifactId>protobuf-java-util</artifactId>
            <version>3.7.1</version>
        </dependency>
        <dependency>
            <groupId>org.apache.kafka</groupId>
            <artifactId>kafka-clients</artifactId>
            <version>2.4.0</version>
        </dependency>

        <dependency>
            <groupId>junit</groupId>
            <artifactId>junit</artifactId>
            <version>4.12</version>
            <scope>test</scope>
        </dependency>
    </dependencies>
    <build>
        <extensions>
            <extension>
                <groupId>kr.motd.maven</groupId>
                <artifactId>os-maven-plugin</artifactId>
                <version>1.6.2</version>
            </extension>
        </extensions>
        <plugins>
            <plugin>
                <groupId>org.xolstice.maven.plugins</groupId>
                <artifactId>protobuf-maven-plugin</artifactId>
                <version>0.6.1</version>

                <configuration>
                    <protocArtifact>
                        com.google.protobuf:protoc:3.7.1:exe:${os.detected.classifier}
                    </protocArtifact>
                    <pluginId>grpc-java</pluginId>
                </configuration>
                <executions>
                    <execution>
                        <goals>
                            <goal>compile</goal>
                            <goal>compile-custom</goal>
                        </goals>
                    </execution>
                </executions>
            </plugin>

        </plugins>
    </build>

</project>
(3)在main目录下创建一个proto文件夹,在这个文件夹下编辑相应的xxx.proto文件,具体如下
syntax = "proto3";
option java_package = "cn._51doit.proto";
option java_outer_classname = "OrderProto";

message Order {
    int32 id = 1;
    string time = 2;
    double money  = 3;
}
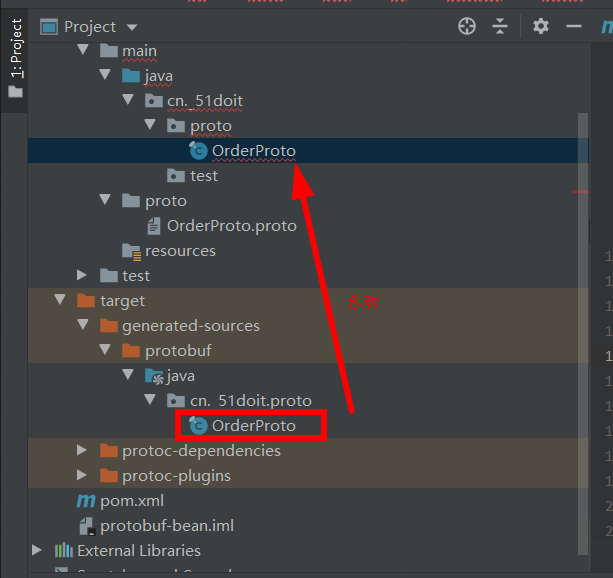
(4)在maven的plugins中会有个protobuf插件,点击里面的protobuf.compile,即可在项目中的target目录下生成相应的protobuf bean文件(支持多种语言的schema信息)
(5)将得到的proto bean移到自己想要的目录中即可
此测试就是将json数据转成protoBuf bean格式数据,然后在将其序列化输出,以及反序列化至bean输出
OrderProtoTest
package cn._51doit.test;

import cn._51doit.proto.OrderProto;
import com.google.protobuf.InvalidProtocolBufferException;
import com.google.protobuf.util.JsonFormat;

public class OrderProtoTest {
    public static void main(String[] args) throws InvalidProtocolBufferException {
        String json = "{"id": 100, "time": "2020-07-01", "money": 66.66}";

        //使用工具类生成一个类
        OrderProto.Order.Builder bean = OrderProto.Order.newBuilder();

        //将数据拷贝的bean中
        JsonFormat.parser().merge(json, bean);

        bean.setId(666);
        bean.setTime("2019-10-18");
        bean.setMoney(888.88);
        //序列化转成二进制
        //bean -> byte数组
        byte[] bytes = bean.build().toByteArray();

        System.out.println("二进制:" + bytes);

        //反序列化
        //二进制数组转成bean
        OrderProto.Order order = OrderProto.Order.parseFrom(bytes);
        System.out.println("对象格式:" + order);
    }
}
4.2 将数据以ProtoBuf的二进制形式发送到Kafka
DataToKafka
package cn._51doit.test;

import cn._51doit.proto.DataBeanProto;
import org.apache.kafka.clients.producer.KafkaProducer;
import org.apache.kafka.clients.producer.ProducerRecord;

import java.util.Properties;

public class DataToKafka {
    public static void main(String[] args) {
        // 1 配置参数
        Properties props = new Properties();
        //连接kafka节点
        props.setProperty("bootstrap.servers", "feng05:9092,feng06:9092,feng07:9092");
        props.setProperty("key.serializer", "org.apache.kafka.common.serialization.StringSerializer");
        props.setProperty("value.serializer", "org.apache.kafka.common.serialization.ByteArraySerializer");

        String topic = "dataproto";

        // 2 kafka的生产者
        KafkaProducer<String,  byte[]> producer = new KafkaProducer<String,  byte[]>(props);
        DataBeanProto.DataBean.Builder bean = DataBeanProto.DataBean.newBuilder();
        DataBeanProto.DataBeans.Builder list = DataBeanProto.DataBeans.newBuilder();

        for (int i = 1; i <= 100; i++) {
            //往bean中设置属性
            bean.setId(i);
            bean.setTitle("doit-" + i);
            bean.setUrl("www.51doit.cn");
            //将bean追加到list中
            list.addDataBean(bean);
            //清空原来分组的数据
            bean.clear();

            if(list.getDataBeanCount() == 10) {
                //将beans的集合转成protobuf的二进制
                byte[] bytes = list.build().toByteArray();
                ProducerRecord<String, byte[]> record = new ProducerRecord<>(topic, bytes);
                producer.send(record); //一次发送10条
                producer.flush();
                list.clear();
            }
        }
        System.out.println("message send success");
        // 释放资源
        producer.close();
    }

}
4.3 Flume的KafkaChannel整合kafka序列化器
需求:(1)在kafka中定义序列化器,在数据写入kafka前,将之转成对应的二进制存入kafka
(2)Flink从Kafka中拉取刚存入相应格式的二进制数据,转成ProtoBuf的Bean

(1)kafka序列化器的实现
大致思路就是首先获取一个protoBuf bean,然后定义一个序列化器,实现一个Serializer接口,在里面重写serialize方法,具体逻辑见下面代码。将该代码打包,放到flume的lib文件夹中,注意需要将flume的lib中protobuf-java-2.5.0.jar注释或者删除掉。
KafkaProtoBufSerializer
package cn._51doit.test;


import cn._51doit.proto.UserProto;
import com.google.protobuf.InvalidProtocolBufferException;
import com.google.protobuf.util.JsonFormat;
import org.apache.kafka.common.header.Headers;
import org.apache.kafka.common.serialization.Serializer;

import java.util.Map;

public class KafkaProtoBufSerializer implements Serializer<byte[]> {

    @Override
    public void configure(Map<String, ?> configs, boolean isKey) {

    }

    @Override
    public byte[] serialize(String topic, byte[] data) {
        // 将source传给channel的数据转成ProtoBuf的二进制
        //line是一个json
        String line = new String(data);
        UserProto.User.Builder bean = UserProto.User.newBuilder();
        //使用工具类将JSON的数据的数据set到bean中
        try {
            JsonFormat.parser().merge(line, bean);
        } catch (InvalidProtocolBufferException e) {
            return null;
        }
        return bean.build().toByteArray(); //返回的是ProtoBuf的二进制
    }

    @Override
    public byte[] serialize(String topic, Headers headers, byte[] data) {
        return new byte[0];
    }

    @Override
    public void close() {

    }
}
(2)Flink的Kafka反序列化器的实现
注意,此处除了要设置反序列化,即将kafka中确定topic中的protoBuf格式的二进制数据序列化成protoBuf的bean,还要指定bean的序列化规则(注册自定义的序列化类),这样flink处理该数据时才能进行网络传输
DataBeanProto(bean,跨语言)
使用4.1方法生成
DataBeansDeserializer反序列化器
package cn._51doit.flink.day11;

import org.apache.flink.api.common.serialization.DeserializationSchema;
import org.apache.flink.api.common.typeinfo.TypeInformation;

import java.io.IOException;

/**
 * 自定义的Flink反序列化器
 */
public class DataBeansDeserializer implements DeserializationSchema<DataBeanProto.DataBeans> {

    //反序列化
    @Override
    public DataBeanProto.DataBeans deserialize(byte[] message) throws IOException {
        return DataBeanProto.DataBeans.parseFrom(message);
    }


    @Override
    public boolean isEndOfStream(DataBeanProto.DataBeans nextElement) {
        return false;
    }

    @Override
    public TypeInformation<DataBeanProto.DataBeans> getProducedType() {
        return TypeInformation.of(DataBeanProto.DataBeans.class);
    }
}
PBSerializer序列化器
package cn._51doit.flink.day11;

import com.esotericsoftware.kryo.Kryo;
import com.esotericsoftware.kryo.Serializer;
import com.esotericsoftware.kryo.io.Input;
import com.esotericsoftware.kryo.io.Output;
import com.google.protobuf.Message;

import java.lang.reflect.Method;
import java.util.HashMap;

public class PBSerializer extends Serializer<Message> {

        /* This cache never clears, but only scales like the number of
         * classes in play, which should not be very large.
         * We can replace with a LRU if we start to see any issues.
         */
        final protected HashMap<Class, Method> methodCache = new HashMap<Class, Method>();

        /**
         * This is slow, so we should cache to avoid killing perf:
         * See: http://www.jguru.com/faq/view.jsp?EID=246569
         */
        protected Method getParse(Class cls) throws Exception {
            Method meth = methodCache.get(cls);
            if (null == meth) {
                meth = cls.getMethod("parseFrom", new Class[]{ byte[].class });
                methodCache.put(cls, meth);
            }
            return meth;
        }

        //序列化
        @Override
        public void write(Kryo kryo, Output output, Message mes) {
            byte[] ser = mes.toByteArray();
            output.writeInt(ser.length, true);
            output.writeBytes(ser);
        }

        //反序列化
        @Override
        public Message read(Kryo kryo, Input input, Class<Message> pbClass) {
            try {
                int size = input.readInt(true);
                byte[] barr = new byte[size];
                input.readBytes(barr);
                return (Message)getParse(pbClass).invoke(null, barr);
            } catch (Exception e) {
                throw new RuntimeException("Could not create " + pbClass, e);
            }
        }
    }
测试类
ProtoBufDemo
package cn._51doit.flink.day11;

import cn._51doit.flink.day10.FlinkUtilsV2;
import org.apache.flink.api.common.functions.FlatMapFunction;
import org.apache.flink.api.java.utils.ParameterTool;
import org.apache.flink.streaming.api.datastream.DataStream;
import org.apache.flink.streaming.api.datastream.SingleOutputStreamOperator;
import org.apache.flink.util.Collector;

public class ProtoBufDemo {

    public static void main(String[] args) throws Exception{

        ParameterTool parameters = ParameterTool.fromPropertiesFile(args[0]);

        DataStream<DataBeanProto.DataBeans> dataBeansStream = FlinkUtilsV2.createKafkaDataStream(parameters, "dataproto", "gid", DataBeansDeserializer.class);
        //注册自定义的序列化类
        FlinkUtilsV2.getEnv().getConfig().registerTypeWithKryoSerializer(DataBeanProto.DataBeans.class, PBSerializer.class);
        FlinkUtilsV2.getEnv().getConfig().registerTypeWithKryoSerializer(DataBeanProto.DataBean.class, PBSerializer.class);

        SingleOutputStreamOperator<DataBeanProto.DataBean> dataBeanStream = dataBeansStream.flatMap(
                new FlatMapFunction<DataBeanProto.DataBeans, DataBeanProto.DataBean>() {
                    @Override
                    public void flatMap(DataBeanProto.DataBeans list, Collector<DataBeanProto.DataBean> out) throws Exception {

                        for (DataBeanProto.DataBean dataBean : list.getDataBeanList()) {
                            out.collect(dataBean);
                        }
                    }
                });

        dataBeanStream.print();

        FlinkUtilsV2.getEnv().execute();

    }
}