IOS9任务管理器特效的实现
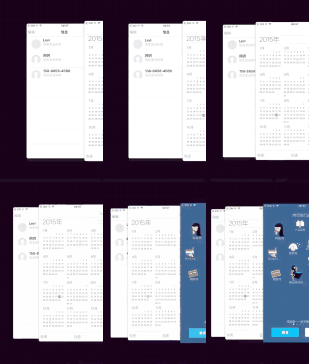
IOS9中通过双击home键可以打开任务管理器,和以前版本不一样的地方时这这次使用的3D的特效,见下图:

那么如何在我们的APP中也制作出这样的特效呢?在GItHub上有一个iCarousel第三方框架供我们使用。以下是我在这个库的基础上学习任务管理器特效的过程。
一、简单实现功能:
1、先下载iCarousel的框架,下载好之后随便保存在什么地方都行,只要你能找到就OK。
2、新建一个IOS项目,然后在项目文件中点击添加一个Group,命名为iCarousel,然后右键添加文件,找到1中下载的iCarousel的文件中的iCarousel.h和iCarousel.m这两个文件,并导入。
3、在新建项目中原有的ViewController.m中使用#import导入iCarousel.h。然后在- (void)viewDidLoad {}函数中增加如下语句:
 1 //新建1个iCarousel对象并初始化
 2     iCarousel *icar = [[iCarousel alloc]initWithFrame:CGRectMake(100, 100, 214, 300)];
 3 //设置iCarousel的类型为时间机器型
 4     icar.type = iCarouselTypeTimeMachine;
 5 //设置数据源和代理
 6     icar.delegate = self;
 7     icar.dataSource = self;
 8
 9 //把创建好的iCarousel对象添加到当前View
10     [self.view addSubview:icar];
以上就完成了iCarousel对象的创建及初始化、添加到当前View等工作。接下来看iCarousel的数据源和代理方法,在Xcode中按住Command然后点击上面代码中的iCarousel,会跳转到iCarousel.h文件中,代码如下:
1 @protocol iCarouselDataSource, iCarouselDelegate;
2
3 @interface iCarousel : UIView
4
5 @property (nonatomic, weak_delegate) IBOutlet __nullable id<iCarouselDataSource> dataSource;
6 @property (nonatomic, weak_delegate) IBOutlet __nullable id<iCarouselDelegate> delegate;
可以看到iCarousel的代理是iCarouselDataSource和iCarouselDelegate,同样安住Command然后点击iCarouselDataSource,跳转到如下代码:
 1 @protocol iCarouselDataSource <NSObject>
 2
 3 - (NSInteger)numberOfItemsInCarousel:(iCarousel *)carousel;
 4 - (UIView *)carousel:(iCarousel *)carousel viewForItemAtIndex:(NSInteger)index reusingView:(nullable UIView *)view;
 5
 6 @optional
 7
 8 - (NSInteger)numberOfPlaceholdersInCarousel:(iCarousel *)carousel;
 9 - (UIView *)carousel:(iCarousel *)carousel placeholderViewAtIndex:(NSInteger)index reusingView:(nullable UIView *)view;
10
11 @end
可见这个协议中有四个方法需要实现,其中前两个是必须要实现的,后两个是可以选择实现,接下来我们仔细看看发现,第一个方法根据字面意思看是反悔iCarousel中元素的个数,第二个方法则是返回一个UIView,参数中有Index什么的,这时候如果以前用过UITableView就会想到,iCarousel和UITableView有点像,接下来我们把这两个方法复制到我们的程序中,并实现它:
 1 - (NSInteger)numberOfItemsInCarousel:(iCarousel *)carousel{
 2 //    返回Item的个数
 3     return 10;
 4 }
 5 - (UIView *)carousel:(iCarousel *)carousel viewForItemAtIndex:(NSInteger)index reusingView:(nullable UIView *)view{
 6 //    初始化view并在上面添加元素
 7     if (view==nil) {
 8         view = [[UIView alloc]initWithFrame:CGRectMake(100, 100, 214, 214)];
 9         view.backgroundColor = [UIColor redColor];
10         view.contentMode = UIViewContentModeCenter;
11         UILabel  *label = [[UILabel alloc] initWithFrame:view.bounds];
12         label.text = @"这是iCarousel练习";
13         label.textAlignment = NSTextAlignmentCenter;
14         [view addSubview:label];
15     }
16     return view;
17 }
完成了以上代码,我们就可以尝试运行看看有没有效果了:
虽然看起来不好看,但是通过这一步最基本的功能已经实现了,以后再研究如何让它更美观。