1:iOS模态是加载可能会很慢,可能不是在UI线程中执行。
1     /// 使用 presentViewController 时 在模态时可能很很慢。由于某种原因,presentViewController里的内容并不会真的马上触发执行,除非有一个主线程事件触发这种消费。比如在弹出慢的时候,你随便点击一下屏幕,马上就能弹出来。所以需要主动触发一下。
2     CViewController *cvc = [[CViewController alloc] init];
3     dispatch_async(dispatch_get_main_queue(), ^{
4         [self presentViewController:cv animated:YES completion:nil];
5     });
2: 设置行间距
 1     ///设置行间距之后的问题。如果是一行的文字并且有汉字的话,设置过行间距之后高度会加上行间距,如果只有一行没有汉字的话,在设置行间距之后高度也不会加上行间距。同时如果字符串中有'
'的话,boundingRectWithSize 计算出的高度会忽略'
'或是把换行符当做一个普通的字符来计算宽度或者是高度。
 2     NSMutableParagraphStyle * paragraphStyle = [[NSMutableParagraphStyle alloc] init];
 3     /// 行间距
 4     paragraphStyle.lineSpacing = 5.0;
 5     /// 段落之间的间距
 6     paragraphStyle.paragraphSpacing = 15.0;
 7     /// 文字对齐样式
 8     paragraphStyle.alignment = NSTextAlignmentLeft;
 9     /// 首行缩进
10     paragraphStyle.firstLineHeadIndent = 8.0;
11     /// 整体缩进(首行除外)
12     paragraphStyle.headIndent = 20.0;
13     /// 尾部缩进
14     paragraphStyle.tailIndent = 20.0;
15     /// 断行模式 (以词, 字符, 裁剪,...xyz, abc...xyz, xyz...)
16     paragraphStyle.lineBreakMode = NSLineBreakByWordWrapping;
17     /// 最小行高
18     paragraphStyle.minimumLineHeight = 10.0;
19     /// 最大行高
20     paragraphStyle.maximumLineHeight = 20.0;
21     /// 设置文字书写方向,从左到右还是从右到左
22     paragraphStyle.baseWritingDirection = NSWritingDirectionNatural;
23     /// 原始行间距的倍数
24     paragraphStyle.lineHeightMultiple = 1.5;
25     /// d段首行空白距离
26     paragraphStyle.paragraphSpacingBefore = 20.0;
27     /// 连字符,只支持0和1
28     paragraphStyle.hyphenationFactor = 1;
3: 设置LeftBarButtonItem,返回按钮,设置的图片是蓝色
1     /*
2      The unselected image is autogenerated from the image argument. The selected image
3      is autogenerated from the selectedImage if provided and the image argument otherwise.
4      To prevent system coloring, provide images with UIImageRenderingModeAlwaysOriginal (see UIImage.h)
5      */
6     /// 如果图片是蓝色的话(UITabBarItem, UIBarButtonItem),要设置图片的渲染模式为原始样式
7     UIImage *tempImage = [UIImage imageNamed:@"FF_Return"];
8     tempImage = [tempImage imageWithRenderingMode:UIImageRenderingModeAlwaysOriginal];
9     self.navigationItem.leftBarButtonItem = [[UIBarButtonItem alloc] initWithImage:tempImage style:UIBarButtonItemStyleDone target:self action:@selector(FF_mm)];
4:UITabBarController的ViewController的tabBarItem只设置title,不设置Image,title不会显示。
5:UITableView 对 Section 画圆角
 1 - (void)drawRect:(CGRect)rect
 2 {
 3     CGFloat cornerRadius = 10.f;
 4     self.backgroundColor = UIColor.clearColor;
 5     CAShapeLayer *layer = [[CAShapeLayer alloc] init];
 6     CGMutablePathRef pathRef = CGPathCreateMutable();
 7     CGRect bounds = CGRectInset(self.bounds, 10, 0);
 8     BOOL addLine = NO;
 9     if (_indexPath.row == 0 && _indexPath.row == self.sectionCellNumber-1) {
10         CGPathAddRoundedRect(pathRef, nil, bounds, cornerRadius, cornerRadius);
11     } else if (_indexPath.row == 0) {
12         /// 起始点
13         CGPathMoveToPoint(pathRef, nil, CGRectGetMinX(bounds), CGRectGetMaxY(bounds));
14         /// 画左上角的弧线。即 起始点-左上点的直线 和 左上点-上中点的直线 以 半径 的 切线。
15         CGPathAddArcToPoint(pathRef, nil, CGRectGetMinX(bounds), CGRectGetMinY(bounds), CGRectGetMidX(bounds), CGRectGetMinY(bounds), cornerRadius);
16         CGPathAddArcToPoint(pathRef, nil, CGRectGetMaxX(bounds), CGRectGetMinY(bounds), CGRectGetMaxX(bounds), CGRectGetMidY(bounds), cornerRadius);
17         CGPathAddLineToPoint(pathRef, nil, CGRectGetMaxX(bounds), CGRectGetMaxY(bounds));
18         addLine = YES;
19
20     } else if (_indexPath.row == self.sectionCellNumber -1) {
21         CGPathMoveToPoint(pathRef, nil, CGRectGetMinX(bounds), CGRectGetMinY(bounds));
22         CGPathAddArcToPoint(pathRef, nil, CGRectGetMinX(bounds), CGRectGetMaxY(bounds), CGRectGetMidX(bounds), CGRectGetMaxY(bounds), cornerRadius);
23         CGPathAddArcToPoint(pathRef, nil, CGRectGetMaxX(bounds), CGRectGetMaxY(bounds), CGRectGetMaxX(bounds), CGRectGetMidY(bounds), cornerRadius);
24         CGPathAddLineToPoint(pathRef, nil, CGRectGetMaxX(bounds), CGRectGetMinY(bounds));
25     } else {
26         CGPathAddRect(pathRef, nil, bounds);
27         addLine = YES;
28     }
29     layer.path = pathRef;
30     CFRelease(pathRef);
31     //颜色修改
32     layer.fillColor = [UIColor colorWithWhite:1.f alpha:0.5f].CGColor;
33     layer.strokeColor=[UIColor blackColor].CGColor;
34     if (addLine == YES) {
35         CALayer *lineLayer = [[CALayer alloc] init];
36         CGFloat lineHeight = (1.f / [UIScreen mainScreen].scale);
37         lineLayer.frame = CGRectMake(CGRectGetMinX(bounds)+10, bounds.size.height-lineHeight, bounds.size.width-10, lineHeight);
38         //分割线的颜色,没有可以不设置
39         lineLayer.backgroundColor = [UIColor redColor].CGColor;
40         [layer addSublayer:lineLayer];
41     }
42     UIView *testView = [[UIView alloc] initWithFrame:bounds];
43     [testView.layer insertSublayer:layer atIndex:0];
44     testView.backgroundColor = UIColor.clearColor;
45     self.backgroundView = testView;
46 }
6:去掉NavigationBar的底部线
 1     /// 通过设置背景图片和阴影图片来隐藏底部分割线
 2     [self.navigationController.navigationBar setBackgroundImage:[self FF_AcquireImageWithColor:[UIColor greenColor]] forBarMetrics:UIBarMetricsDefault];
 3     [self.navigationController.navigationBar setShadowImage:[UIImage new]];
 4
 5 /// 根据颜色获取图片
 6 - (UIImage *)FF_AcquireImageWithColor:(UIColor *)color {
 7     CGRect re = CGRectMake(0, 0, 1.0, 1.0);
 8     UIGraphicsBeginImageContext(re.size);
 9     CGContextRef ref = UIGraphicsGetCurrentContext();
10     CGContextSetFillColorWithColor(ref, [color CGColor]);
11     CGContextFillRect(ref, re);
12     UIImage *aim = UIGraphicsGetImageFromCurrentImageContext();
13     UIGraphicsEndImageContext();
14     return aim;
15 }
    /// 通过裁剪来隐藏 (有副作用。别用)
    self.navigationController.navigationBar.barTintColor = [UIColor greenColor];
    self.navigationController.navigationBar.translucent = NO;
    self.navigationController.navigationBar.clipsToBounds = YES;
1     /// 隐藏底部分割线
2     self.navigationController.navigationBar.barTintColor = [UIColor blackColor];
3     UIView *tempView = [self.navigationController.navigationBar.subviews  firstObject];
4     /// 透明度
5     self.navigationController.navigationBar.translucent = NO;
6     UIView *otherView = [tempView.subviews firstObject];
7     if ([otherView isKindOfClass:[UIImageView class]]) {
8         otherView.hidden = YES;
9     }
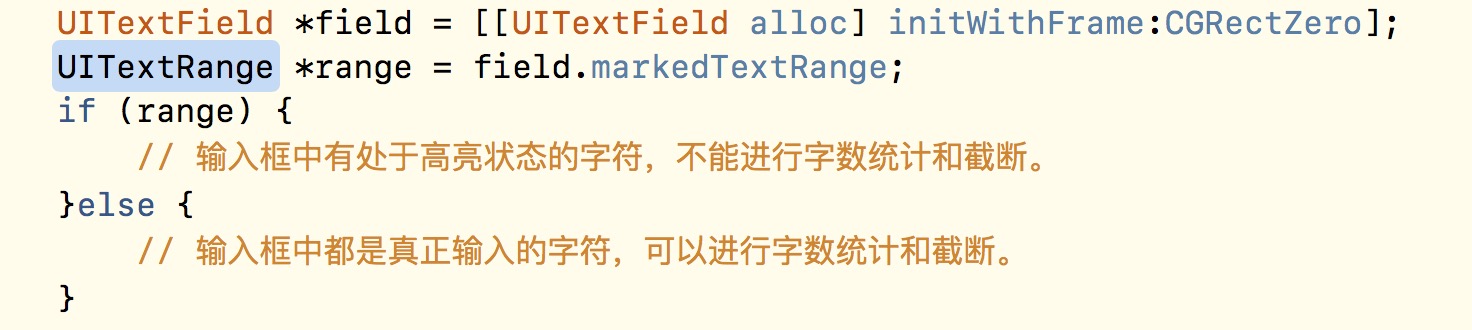
7:对文本框输入的字数进行实时统计时,使用iOS系统自带的键盘,有时在输入框中填入的是占位字符(高亮展示),等用户选中键盘上的候选词在替换为真正输入的字符。故在统计字数时可以利用UITextRange,如果返回空,就是没有处于高亮状态的字符
8:预处理
预处理指令:宏定义, 条件编译, 文件包含
宏定义:宏定义一般以大写字母表示,以便于变量名作区分,同时在使用宏时,只进行简单的置换,不进行正确性检查,不进行逻辑运算处理。
条件编译
#if 编译预处理中的条件命令, 相当于C语法中的if语句
#ifdef 是否申明了某个宏, #ifndef 是否未声明某个宏,#elif 相当于C中的else if, #else 相当于C中的else,#endif 条件命令的结束标志
同时#if 用于判断条件是否成立, #ifdef, #ifndef 用于判断宏是否被定义。
文件包含, #include会造成重复导入, #import便面重复导入, class用于.h中声明改class存在,在.m中导入。
预处理连接符:‘#’ ‘##’
‘#’:在含参数宏中,假如希望在字符串中包含宏的参数本身,#符号用作一个预处理运算符,它可以把语言符号转化成字符串该过程称为字符串化(stringizing)。
‘##’: 链接前后形成一个新的字符串。 如: #define CONNECT(a) a ## Sign 则 NSLog(%"@", CONNECT(@"Test")) 输出为 TestSign
在宏定义中换行只需要在结尾加上“”
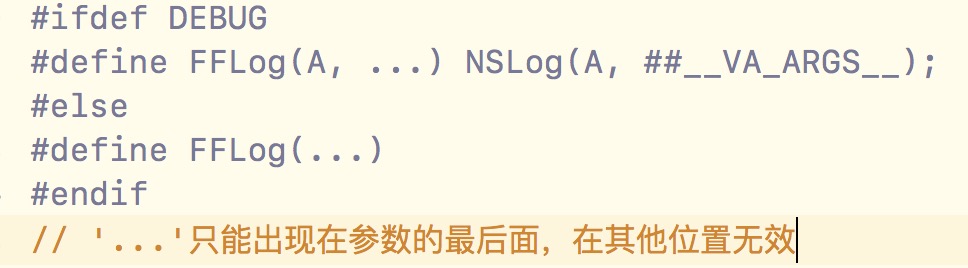
‘...’和‘VA_ARGS’: 关于省略号··· 代表的是个数可变的参数即可变参数,一般会与__VA__ARGS__结合使用,__VA__ARGS__表示保留名,将省略号省略的参数传递给宏。例如
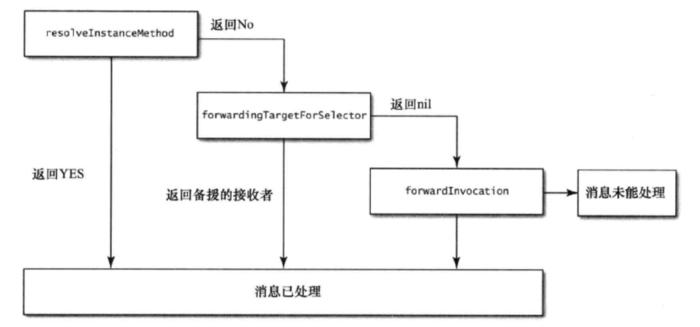
9 消息转发。经过三步, A 动态解析 B 被援接受者 C 完全转发
10:[UIApplication ShareApplication].keywindow 获取的window如果有alert的话,获取的就是UIWindowLevelAlert的window而不是UIWindowLevelNormal的。
UIWindowLevelNormal = 0
UIWindowLevelStatusBar = 1000
UIWindowLevelAlert = 2000
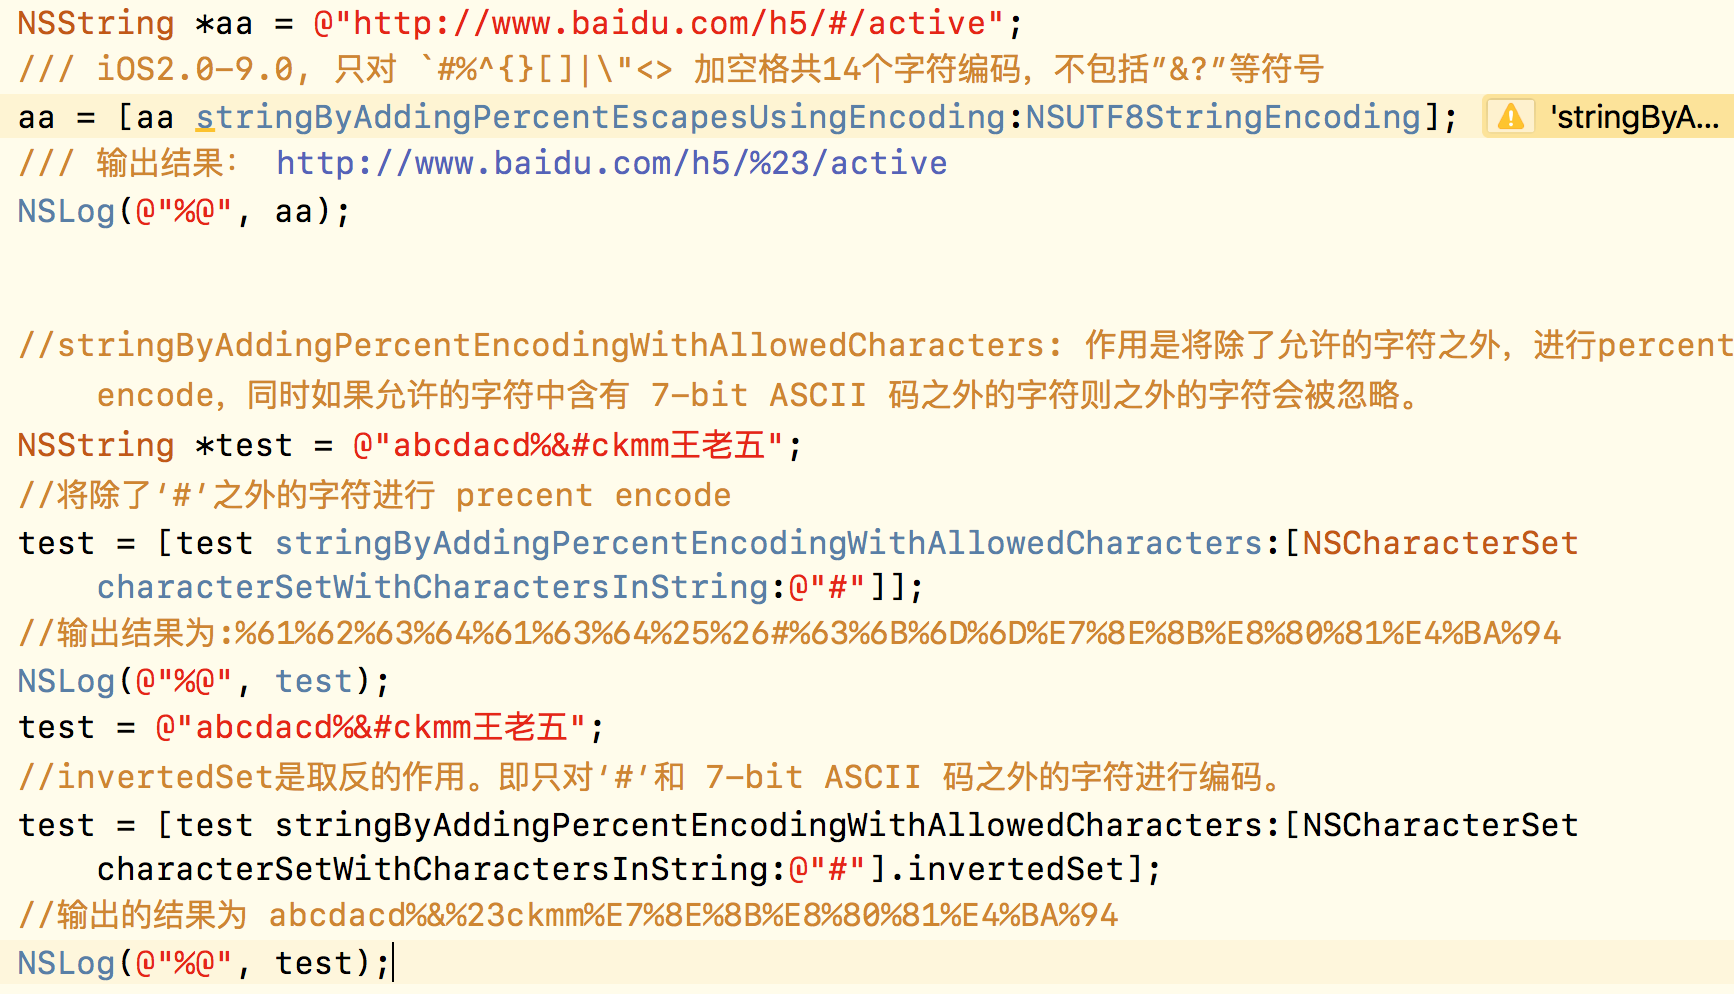
11:对URL中的特殊字符进行处理
Last: 在终端转换声音文件成需要的格式
afconvert /Users/szsh/Desktop/bing.mp3(原始文件的路径) /Users/szsh/Desktop/bing.caf(目标文件的路径) -d ima4 -f caff -v