spring boot 系列学习记录:http://www.cnblogs.com/jinxiaohang/p/8111057.html
码云源码地址:https://gitee.com/jinxiaohang/springboot
本次练习在之前第04章—整合Mybatis基础上进行,也算是Bootstrap-Table基础上进行扩展。
在使用mybatis时,我会将实体类属性和表字段名一致,这样可以不用配映射关系,会自动映射。
在使用JPA时,要以一定方式进行设置实体类属性和表字段名,举个例子:类名UserInfo->表名user_info ,属性userId->字段user_id,属性password->字段password。
一、下载组件
下载bootstrap-table:http://bootstrap-table.wenzhixin.net.cn/zh-cn/getting-started/
下载bootstrap:https://v3.bootcss.com/
下载jqurey:http://jquery.com/
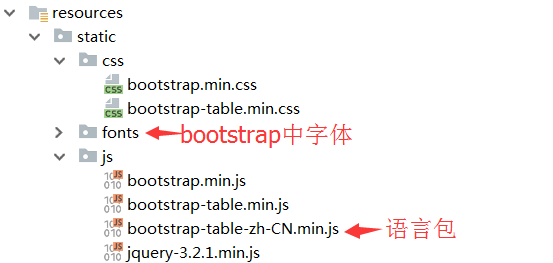
下载源码后解压出来,在demo中导入我们想要的代码。
如下图所示:
jquery的一个js文件、
bootstrap的一个js文件、一个css文件、一个字体包
bootstrap-table的两个js文件、一个css文件
二、bootstrap-table使用
在resources下的static中,新建一个html文件添加以下内容:(这里就与第17章写的不太一样了)
<!DOCTYPE html>
<html lang="zh-CN">
<head>

    <meta charset="utf-8">
    <meta name="viewport" content="width=device-width, initial-scale=1">
    <meta name="viewport" content="width=device-width, initial-scale=1, maximum-scale=1, user-scalable=no">

    <title>
        开始使用 Bootstrap Table
    </title>

    <link rel="stylesheet" href="css/bootstrap.min.css"><!--需要添加fonts图标显示才会好-->
    <link rel="stylesheet" href="css/bootstrap-table.min.css">
    <script src="js/jquery-3.2.1.min.js"></script>
    <script src="js/bootstrap.min.js"></script>
    <script src="js/bootstrap-table.min.js"></script>
    <script src="js/bootstrap-table-zh-CN.min.js"></script>

</head>

<body>
<div class="container">
    <div id="toolbar" class="btn-group">
        <button id="btn_add" type="button" class="btn btn-default">
            <span class="glyphicon glyphicon-plus" aria-hidden="true"></span>新增
        </button>
        <button id="btn_edit" type="button" class="btn btn-default">
            <span class="glyphicon glyphicon-pencil" aria-hidden="true"></span>修改
        </button>
        <button id="btn_delete" type="button" class="btn btn-default">
            <span class="glyphicon glyphicon-remove" aria-hidden="true"></span>删除
        </button>
    </div>
    <table id="table"></table>
</div>
</body>

<script>
    //先销毁表格
    $('#table').bootstrapTable('destroy');

    $('#table').bootstrapTable({

        url:'/api/user/paging',
        method: 'GET',                      //请求方式(*)
        //contentType: "application/x-www-form-urlencoded",//一种编码。好像在post请求的时候需要用到。这里用的get请求,注释掉这句话也能拿到数据
        //dataType:'jsonp',                   //跨域设置
        toolbar: '#toolbar',                //工具按钮用哪个容器
        pagination: true,                   //是否显示分页(*)
        pageNumber:1,//初始化加载第一页,默认第一页
        pageSize: 2,//每页的记录行数(*)
        pageList: [2,3,4],//可供选择的每页的行数(*)
        dataField: "rows",//这是返回的json数组的key.默认好像是"rows".这里只有前后端约定好就行
        showColumns: true,                  //是否显示所有的列
        //minimumCountColumns: 2,             //最少允许的列数
        showRefresh: true,                  //是否显示刷新按钮
        queryParamsType:'',
        queryParams: function queryParams(params) {
            var param = {
                offset: (params.pageNumber-1)*params.pageSize,//偏移量
                limit: params.pageSize//长度
            };
            return param;
        },
        sidePagination: "server",
        columns: [{
            checkbox: true,
            align: 'center'//水平居中
        }, {
            field: 'userId',
            title: 'ID',
            align: 'center'//水平居中
        }, {
            field: 'username',
            title: 'Name',
            align: 'center'//水平居中
        }, {
            field: 'password',
            title: 'Age',
            align: 'center'//水平居中
        }
        ]
    });
</script>
三、分页在各层的实现
dao层添加:
    @Select("select * from user limit #{offset},#{limit}")
    List<User> paging(Map<String,Object> param);
service层添加:
    /**
     * 分页获取数据
     * @param param
     * @return
     */
    Map<String,Object> paging(Map<String,Object> param);
serviceimpl层添加:
    @Override
    public Map<String,Object> paging(Map<String, Object> param) {
        //bootstrap-table要求服务器返回的json须包含:totlal,rows
        Map<String,Object> result = new HashMap<String,Object>();
        List<User> rows = userMapper.paging(param);
        int total = userMapper.list().size();
        result.put("total",total);
        result.put("rows",rows);
        return result;
    }
controller层添加:
    @GetMapping("paging")
    public Map<String,Object> paging(@RequestParam int limit,@RequestParam int offset){
        /*所需参数*/
        Map<String, Object> param=new HashMap<String, Object>();
        param.put("limit", limit);
        param.put("offset", offset);
        return userService.paging(param);
    }
四、运行展示
访问http://127.0.0.1:8080/api/user/paging?offset=0&limit=5,接口数据格式展示:

运行效果展示:

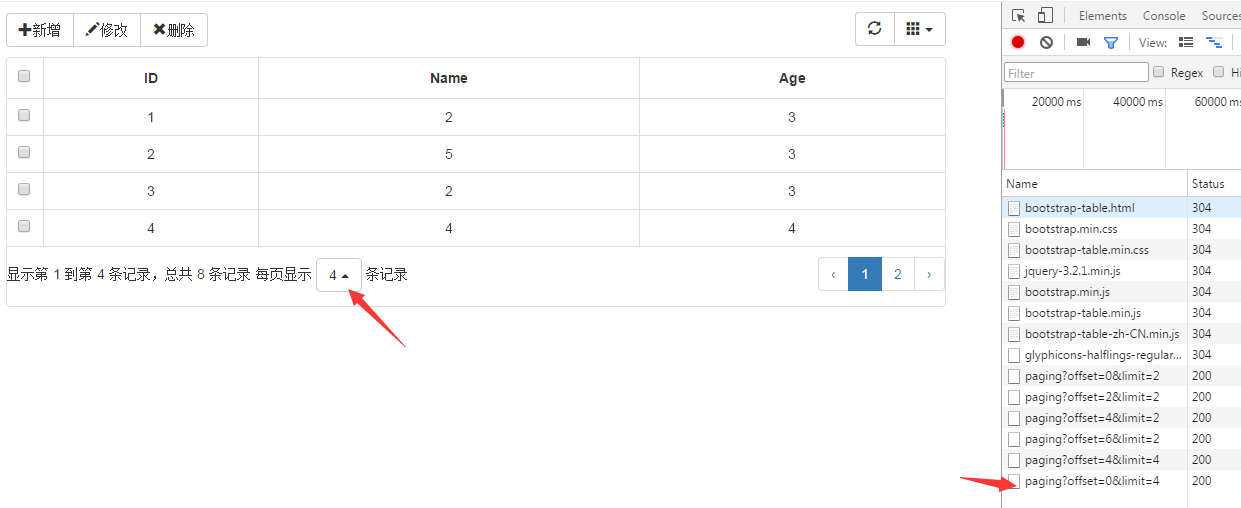
显示条数可根据两项修改。
pageSize: 2,//每页的记录行数(*)
pageList: [2,3,4],//可供选择的每页的行数(*)
五、总结
这次才实现真正意义上的分页。