Vue声明周期与路由:
vue实例的生命周期:
 data: {
   message: '床前明月光' 3 },
   methods: {
   show() {
   console.log('执行show方法') 7 },
 update() {

  this.message = '玻璃好上霜'
 }
 }

 <button @click="update">update</button>  <h3 id="h3">{{ message }}</h3>
分析生命周期相关方法的执行时机
//===创建时的四个事件
beforeCreate() { // 第一个被执行的钩子方法:实例被创建出来之前执行
console.log(this.message) //undefined
this.show() //TypeError: this.show is not a function
// beforeCreate执行时,data 和 methods 中的 数据都还没有没初始化
},
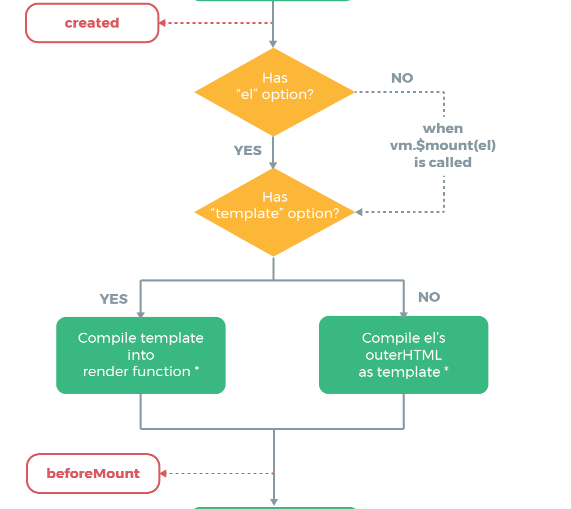
created() { // 第二个被执行的钩子方法
console.log(this.message) //床前明月光
this.show() //执行show方法
// created执行时,data 和 methods 都已经被初始化好了!
// 如果要调用 methods 中的方法,或者操作 data 中的数据,最早,只能在 created 中操作
},
beforeMount() { // 第三个被执行的钩子方法
console.log(document.getElementById('h3').innerText) //{{ message }}
// beforeMount执行时,模板已经在内存中编辑完成了,尚未被渲染到页面中
},
mounted() { // 第四个被执行的钩子方法
console.log(document.getElementById('h3').innerText) //床前明月光
// 内存中的模板已经渲染到页面,用户已经可以看见内容
},
//===运行中的两个事件
beforeUpdate() { // 数据更新的前一刻
console.log('界面显示的内容:' + document.getElementById('h3').innerText)
console.log('data 中的 message 数据是:' + this.message)
// beforeUpdate执行时,内存中的数据已更新,但是页面尚未被渲染
},
updated() {
console.log('界面显示的内容:' + document.getElementById('h3').innerText)
console.log('data 中的 message 数据是:' + this.message)
// updated执行时,内存中的数据已更新,并且页面已经被渲染
}
二、路由
Vue.js 路由允许我们通过不同的 URL 访问不同的内容。
通过 Vue.js 可以实现多视图的单页Web应用(single page web application,SPA)。Vue.js 路由需要载入 vue-router 库
案例:
 <div id="app"> 2 <h1>Hello App!</h1> 3 <p> 4 <!-- 使用 router-link 组件来导航. -->
<!-- 通过传入 `to` 属性指定链接. -->
 <!-- <router-link> 默认会被渲染成一个 `<a>` 标签 -->
<router-link to="/">首页</router-link> 8 <router-link to="/student">会员管理</router-link> 9 <router-link to="/teacher">讲师管理</router-link>
 </p>
 <!-- 路由出口 -->
 <!-- 路由匹配到的组件将渲染在这里 -->
 <router-view></router-view>
 </div>


----js:
<script>
   // 1. 定义(路由)组件。
 // 可以从其他文件 import 进来
 const Welcome = { template: '<div>欢迎</div>' }
 const Student = { template: '<div>student list</div>' }
const Teacher = { template: '<div>teacher list</div>' }
 // 2. 定义路由
 // 每个路由应该映射一个组件。
const routes = [
 { path: '/', redirect: '/welcome' }, //设置默认指向的路径
 { path: '/welcome', component: Welcome },
 { path: '/student', component: Student },
 { path: '/teacher', component: Teacher }
 ]

 // 3. 创建 router 实例,然后传 `routes` 配置
 const router = new VueRouter({
 routes // (缩写)相当于 routes: routes
})

 // 4. 创建和挂载根实例。
 // 从而让整个应用都有路由功能
 const app = new Vue({
 el: '#app',
router
 })

 // 现在,应用已经启动了!
 </script>