【转】http://blog.csdn.net/whaomian/article/details/6820099
现在这篇文章将探讨一下,如何用地图显示地理信息,以及我们怎么自定义地图的Annotation,也就是地图图钉。
接下来的叙述都是为了实现下面的效果:
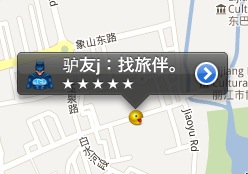
上图显示的内容包括:
1. 在界面显示一副地图;
2. 在地图上显示一个“笑脸”图标,笑脸所在的位置就是你的当前位置,或者你自己任意设定的地理位置;
3. 点击“笑脸”图标之后,会弹出一个类似标签(Annotation)的东西,标签上有三种内容:左边一副蝙蝠侠的图片,中间文字内容,以及最右边的按钮。
其中2和3都是属于自定义地图Annotation。
下面我们就一步步来实现上图的效果吧。
===显示地图===
第一步:
首先在你的工程的frameworks下面加入Mapkit.framework。至于如何加入一个framework,请参考之前的一篇文章。
加入Mapkit.framework之后,在需要用到地图的类的头文件中加入“#import <MapKit/MapKit.h>”。这时候便可以使用所有关于地图的功能了。
显示地图十分简单,只要在xib文件里面,将一个MKMapView拖进容纳这幅地图的View当中即可。这时候进行调试,将出现一个全球的地图。原因是因为你没有给地图一个显示的地理信息,所以初始化的地图只能显示一个全球的范围。
那么下一步便是将地图跳转到你需要显示的地理位置。加入你通过之前文章的阅读,已经获取到了当前位置,保存到checkinLocation(一个CLLocation的指针)当中了。
第二步:
在需要显示地图的View类中定义一个mapView:IBOutlet MKMapView *mapView。并且在xib中将之前拖进来的MKMapView和这个mapView成员变量建立outlets的关系(什么?不懂?那就从头学一下xcode吧)。
在类的实现文件(.m)中加入以下代码(方法名自己起吧,我这里起的是initMapView):
- - (void) initMapView {
- MKCoordinateSpan theSpan;
- //设置地图的范围,越小越精确
- theSpan.latitudeDelta = 0.02;
- theSpan.longitudeDelta = 0.02;
- MKCoordinateRegion theRegion;
- theRegion.center = [checkinLocation coordinate]; //让地图跳到之前获取到的当前位置checkinLocation
- theRegion.span = theSpan;
- [mapView setRegion:theRegion];
- }
然后,你在显示这个View的时候(比如在viewDidLoad函数中)调用initMapView,地图便可以跳到你要显示的位置了。这里关键的函数是setRegion,已经被MKMapView类封装好了。
至此,你的应用就可以显示地图,并且跳到你设定的任何位置了。是不是特简单?简直简单到我在怀疑我是否有写这篇文章的需要了。不过,废话少说。下面还是来看看如何自定义Annotation吧。
===自定义Annotation===
如果不采取自定义的Annotation,ios默认的是一个图钉的形状,如下图(一个紫色的图钉):

当然,千里执行始于足下,我们还是首先来看看如何在特定的位置显示以上的默认的小图钉吧。
第一步:
先定义一个自己的Annotation的类:
- @interface MyMapAnnotation : NSObject<MKAnnotation> {
- CLLocationCoordinate2D location;
- NSString *title;
- NSString *subtitle;
- NSString *headImage;
- }
- @property CLLocationCoordinate2D location;
- @property (nonatomic, copy) NSString *title;
- @property (nonatomic, copy) NSString *subtitle;
- @property (nonatomic, copy) NSString *headImage;
- @end
从上面代码可以看到,MyMapAnnotation类继承于MKAnnotation。里面包含四个成员变量。其中location保存要显示这个Annotation的位置。其他三个变量对应我们之前那个效果图的几点内容:头像、文字内容。
这个类的实现文件(.m)文件很简单,就定义好dealloc和init方法就好,这里不再赘述。
第二步:
在要显示地图的View类中实现MKMapViewDelegate,并实现viewForAnnotation函数,代码如下:
- - (MKAnnotationView *)mapView:(MKMapView *)theMapView viewForAnnotation:(id <MKAnnotation>)annotation {
- if ([annotation isKindOfClass:[MKUserLocation class]])
- return nil;
- // 处理我们自定义的Annotation
- if ([annotation isKindOfClass:[MyMapAnnotation class]]) {
- static NSString* travellerAnnotationIdentifier = @"TravellerAnnotationIdentifier";
- MKPinAnnotationView* pinView = (MKPinAnnotationView *)
- [mapView dequeueReusableAnnotationViewWithIdentifier:travellerAnnotationIdentifier];
- if (!pinView)
- {
- // if an existing pin view was not available, create one
- MKAnnotationView* customPinView = [[[MKAnnotationView alloc]
- initWithAnnotation:annotation reuseIdentifier:travellerAnnotationIdentifier] autorelease];
- customPinView.pinColor = MKPinAnnotationColorPurple;
- customPinView.animatesDrop = YES; //如果不需要这个从天而降的效果,设置为NO即可。
- customPinView.canShowCallout = NO;
- return customPinView;
- }
- else
- {
- pinView.annotation = annotation;
- }
- return pinView;
- }
- return nil;
- }
这段代码将实现默认的一个图钉的效果。
细 心地你会发现,上面的代码似乎没有涉及到地理位置,那么地图将怎么知道将这个Annotation放到合适的位置呢?稍安勿躁,稍候将会介绍如何设置 Annotation的位置,同时设置Annotation的其他内容(还记得Annotation的定义里面有位置信息,还有几项内容信息吧)。
如果我不喜欢图钉,我想把它换成之前效果图中的笑脸呢?那就把上述代码改成如下:
- - (MKAnnotationView *)mapView:(MKMapView *)theMapView viewForAnnotation:(id <MKAnnotation>)annotation {
- if ([annotation isKindOfClass:[MKUserLocation class]])
- return nil;
- if ([annotation isKindOfClass:[TravellerMapAnnotation class]]) {
- static NSString* travellerAnnotationIdentifier = @"TravellerAnnotationIdentifier";
- MKPinAnnotationView* pinView = (MKPinAnnotationView *)
- [mapView dequeueReusableAnnotationViewWithIdentifier:travellerAnnotationIdentifier];
- if (!pinView)
- {
- // if an existing pin view was not available, create one
- MKAnnotationView* customPinView = [[[MKAnnotationView alloc]
- initWithAnnotation:annotation reuseIdentifier:travellerAnnotationIdentifier] autorelease];
- UIImage *image = [UIImage imageNamed:@"smileFace.png"];
- customPinView.image = image; //将图钉变成笑脸。
- [image release];
- return customPinView;
- }
- else
- {
- pinView.annotation = annotation;
- }
- return pinView;
- }
- return nil;
- }
从上述代码看出,也就是将定义pinColor的代码段去掉,换成设置image的代码:customPinView.image = image.
同样很简单吧。哎,我还有没有写下去的必要呢。(画外音:废话少说!!!)
第三步:
正如之前的疑问,哪里定义Annotation的地理位置以及其他内容呢?不仅仅如此,还有,怎么让用户点击笑脸(或者图钉)之后,弹出一个标签,显示定义好的内容呢。下面我们先看看最后一个问题,怎么让用户点击笑脸(或者图钉)之后,弹出一个标签,显示定义好的内容呢?
还是上面那段代,将它进一步改成:
- - (MKAnnotationView *)mapView:(MKMapView *)theMapView viewForAnnotation:(id <MKAnnotation>)annotation {
- if ([annotation isKindOfClass:[MKUserLocation class]])
- return nil;
- if ([annotation isKindOfClass:[TravellerMapAnnotation class]]) {
- // try to dequeue an existing pin view first
- static NSString* travellerAnnotationIdentifier = @"TravellerAnnotationIdentifier";
- MKPinAnnotationView* pinView = (MKPinAnnotationView *)
- [mapView dequeueReusableAnnotationViewWithIdentifier:travellerAnnotationIdentifier];
- if (!pinView)
- {
- // if an existing pin view was not available, create one
- MKAnnotationView* customPinView = [[[MKAnnotationView alloc]
- initWithAnnotation:annotation reuseIdentifier:travellerAnnotationIdentifier] autorelease];
- customPinView.canShowCallout = YES; //很重要,运行点击弹出标签
- UIButton* rightButton = [UIButton buttonWithType:UIButtonTypeDetailDisclosure];
- [rightButton addTarget:self
- action:@selector(showDetails:) //点击右边的按钮之后,显示另外一个页面
- forControlEvents:UIControlEventTouchUpInside];
- customPinView.rightCalloutAccessoryView = rightButton;
- MyMapAnnotation *travellerAnnotation = (TravellerMapAnnotation *)annotation;
- UIImageView *headImage = [[UIImageView alloc] initWithImage:[UIImage imageNamed:travellerAnnotation.headImage]];
- customPinView.leftCalloutAccessoryView = headImage; //设置最左边的头像
- [headImage release];
- UIImage *image = [UIImage imageNamed:@"smileFace.png"];
- customPinView.image = image;
- customPinView.opaque = YES;
- [travellerImage release];
- return customPinView;
- }
- else
- {
- pinView.annotation = annotation;
- }
- return pinView;
- }
- return nil;
- }
上面的代码很容易理解(加上我的注释之后),有点objective-C以及cocoa基础的朋友都会看懂。如果你看不懂,拜托,我这里不负责扫盲啊。
也许你有个疑问,似乎没见到设置文字信息呀。其实,之前自定义的MyMapAnnotation继承自MKAnnotation,所以只要你给一个MyMapAnnotation对象的title和subtitle填上内容之后,它会自动显示,不需要你手动让它显示。
下面我们就来看看如何添加MyMapAnnotation的内容吧。
其实这也十分简单,就是创建一个新的MyMapAnnotation,然后往里面添加内容即可。比如:
- TravellerMapAnnotation *travellerAnnotation = [[TravellerMapAnnotation alloc] init];
- travellerAnnotation.location = checkinlocation.coordinate;
- travellerAnnotation.title = [travellerNames objectAtIndex:i];
- travellerAnnotation.subtitle = [scores objectAtIndex:i];
- travellerAnnotation.headImage = [headImages objectAtIndex:i];
现在还残留的一个问题是(这是历史遗留的问题,由于某种原因,我们暂时忽略了它。。。!跑题了吧,大叔。。。):
如何将创建好的一个或者多个甚至成千上万个MyMapAnnotation加入地图并显示它呢。
这个问题更加简单。加入建立了100个MyMapAnnotations,并且全部存进了一个NSArray中,MyMapAnnotationsArray,那么我们需要做的就十分简单了:
mapView
addAnnotations:MyMapAnnotationsArray
也就是调用MKMapView的addAnnotations方法将所有创建好的Annotations加进来即可