一、sping中的概念
spring是一个容器框架,可以配置各种bean(action/service/domain/dao),并且可以维护bean与bean的关系,当我们需要使用某个bean的时候,通过getBean(id)使用即可。
bean:是java中的任何一种对象,javabean/service/action/数据源/dao
bean元素的作用是,当我们的spring框架加载的时候,spring就会自动的创建一个bean对象,并放入内存
ioc(inverse of control)控制反转:
所谓控制反转就是把创建对象(bean),和维护对象(bean)的关系的权利从程序中转移到spring的容器(applicationContext.xml),儿程序本身不再维护。
di(dependency injection)依赖注入:
实际上di和ioc是同一个概念,spring设计者认为di更准确的表示spring的核心技术。
二、开发一个spring项目
1、引入spring的开发包
最小配置spring.jar该包把常用的jar都包括,还要写日志的包common-logging.jar
2、创建spring的一个核心文件applicationContext.xml
[hibernate有核心hibernate.cfg.xml,struts有核心文件struts-config.xml],该文件一般放在src目录下,在该文件中引入xsd文件,可以从给出的案例中拷贝一份。
3、配置applicationContext.xml,配置bean
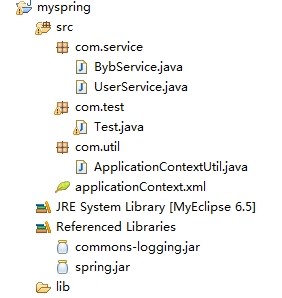
applicationContext.xml
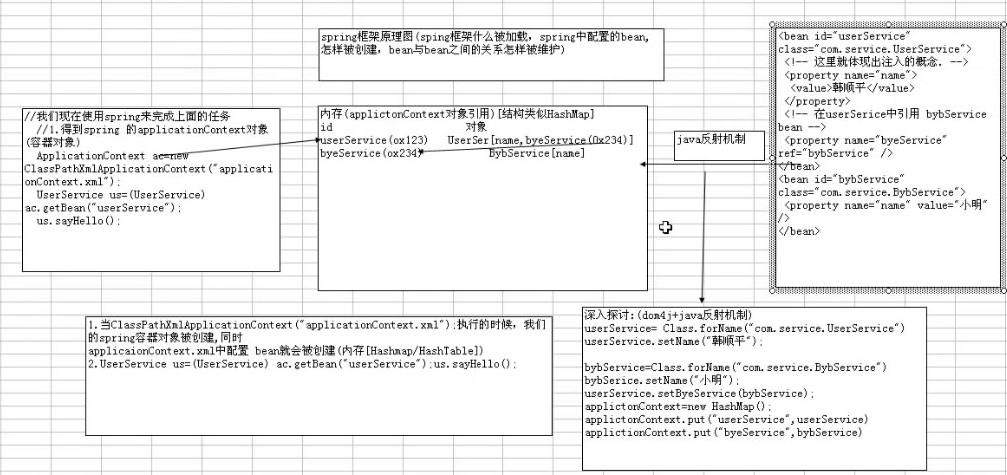
<?xml version="1.0" encoding="UTF-8"?>

<!--
  - Application context definition for JPetStore's business layer.
  - Contains bean references to the transaction manager and to the DAOs in
  - dataAccessContext-local/jta.xml (see web.xml's "contextConfigLocation").
  -->
<beans xmlns="http://www.springframework.org/schema/beans"
        xmlns:xsi="http://www.w3.org/2001/XMLSchema-instance"
        xmlns:aop="http://www.springframework.org/schema/aop"
        xmlns:tx="http://www.springframework.org/schema/tx"
        xsi:schemaLocation="
            http://www.springframework.org/schema/beans http://www.springframework.org/schema/beans/spring-beans-2.5.xsd
            http://www.springframework.org/schema/aop http://www.springframework.org/schema/aop/spring-aop-2.5.xsd
            http://www.springframework.org/schema/tx http://www.springframework.org/schema/tx/spring-tx-2.5.xsd">

    <!-- 在容器文件中配置bean(service/dao/domain/action/数据源) -->
    <!-- bean元素的作用是,当我们的spring框架加载的时候,spring就会自动的创建一个bean对象,并放入内存
        UserService userService = new UserService();
        userService.setName("韩顺平");
    -->
    <bean id="userService" class="com.service.UserService">
        <!-- 这里体现出注入的概念 -->
        <property name="name">
            <value>韩顺平</value>
        </property>

        <!-- 在userService中引用bybService bean -->
        <property name="bybService" ref="bybService"/>
    </bean>
    <bean id="bybService" class="com.service.BybService">
        <property name="name" value="小明"/>
    </bean>
</beans>
4、开发代码
UserService.java
package com.service;

public class UserService {
    private String name;

    private BybService bybService;

    public String getName() {
        return name;
    }

    public void setName(String name) {
        this.name = name;
    }

    public void sayHello(){
        System.out.println("hello "+name);
        bybService.sayBye();
    }

    public BybService getBybService() {
        return bybService;
    }

    public void setBybService(BybService bybService) {
        this.bybService = bybService;
    }
}
BybService.java
package com.service;

public class BybService {
    private String name;

    public String getName() {
        return name;
    }

    public void setName(String name) {
        this.name = name;
    }

    public void sayBye(){
        System.out.println("bye "+name);
    }
}
ApplicationContextUtil.java
package com.util;

import org.springframework.context.ApplicationContext;
import org.springframework.context.support.ClassPathXmlApplicationContext;

final public class ApplicationContextUtil {
    private static ApplicationContext ac = null;

    private ApplicationContextUtil(){};

    static{
        ac = new ClassPathXmlApplicationContext("applicationContext.xml");
    }

    public static ApplicationContext getApplicationContext(){
        return ac;
    }
}
Test.java
package com.test;

import org.springframework.context.ApplicationContext;
import org.springframework.context.support.ClassPathXmlApplicationContext;
import com.service.BybService;
import com.service.UserService;
import com.util.ApplicationContextUtil;

public class Test {
    public static void main(String[] args) {
        /*
        //使用传统的方法,来调用UserService的sayHello方法
        UserService userService = new UserService();
        userService.setName("顺平");
        userService.sayHello();        //print:    hello 顺平
        */

        //使用spring来完成上面的任务
        //1、得到spring的applicationContext对象(容器对象)
        ApplicationContext ac = new ClassPathXmlApplicationContext("applicationContext.xml");
        UserService us = (UserService) ac.getBean("userService");
        us.sayHello();                //print:    hello 顺平
bye 小明

        //使用ApplicationContextUtil
        //((UserService) ApplicationContextUtil.getApplicationContext().getBean("userService")).sayHello();

        //从ac[代表applicationContext容器]中
        BybService bybService =  (BybService) ac.getBean("bybService");
        bybService.sayBye();        //print:    bye 小明
    }
}
三、细节讨论
传统的方法和使用spring的方法
1、使用spring,没有new对象,我们把创建对象的任务交给spring框架
2、spring的运行原理图