开发平台:windows7+Eclipse+andriod SDK(24.0)+ADT(23.0.4)。这个环境的搭建在前一篇文章(Mobile testing下的appium测试)里面已经描述了。
具体步骤:
1,建一个android project,填好项目名,然后再选择minimum requeired SDK时:如果选择的这个sdk版本低于3.0那么创建安装工程的同时也会创建一个appcomat_v7工程,这个主要是为了兼容低版本的安卓系统的;如果不想要这个v7工程的话,就选择minimum requeired SDK大于3.0,这里我选的是API19 (android 4.4),编译的版本也是这个。然后后面都点下一步就可以了,当然在launcher icon和Activity页面可以配置自己需要的icon和activity。
2,工程建好后,有3个xml需要修改:AndroidManifest.xml,res/layout/main.xml和res/values/strings.xml。它们的作用分布是:
AndroidManifest:它是Android程序的全局配置文件,是每个 android程序中必须的文件。它位于我们开发的应用程序的根目录下,描述了package中的全局数据,包括package中暴露的组件 (activities, services, 等等),以及他们各自的实现类,各种能被处理的数据和启动位置等重要信息。
main: App主窗体布局文件,你的应用长什么样都在这边定义,有Design和Text两种模式
strings:可以理解为i18n文件,这个文件用来存放程序调用的各种字符串
manifest.xml:
<manifest xmlns:android="http://schemas.android.com/apk/res/android"
    package="com.example.myAndroid3"
    android:versionCode="1"
    android:versionName="1.0" >

    <uses-sdk
        android:minSdkVersion="8"
        android:targetSdkVersion="21" />

    <application
        android:allowBackup="true"
        android:icon="@drawable/ic_launcher"
        android:label="@string/app_name"
        android:theme="@android:style/Theme.Black.NoTitleBar" >
        <activity android:name="com.example.myAndroid3.myActivity" android:label="@string/app_name">
        <intent-filter>
            <action android:name="android.intent.action.MAIN"></action>
            <category android:name="android.intent.category.LAUNCHER"></category>
        </intent-filter>
        </activity>
        <activity android:name="com.example.myAndroid3.mySecond" android:label="@string/app_name">
        <intent-filter>
            <action android:name="android.intent.category.DEFAULT"></action>
        </intent-filter>
        </activity>
    </application>

</manifest>
main.xml:
<?xml version="1.0" encoding="utf-8"?>
<LinearLayout xmlns:android="http://schemas.android.com/apk/res/android"
              android:orientation="vertical"
              android:layout_width="fill_parent"
              android:layout_height="fill_parent">
    <TextView
            android:layout_width="fill_parent"
            android:layout_height="180dp"
            android:text="@string/default_message"
            android:id="@+id/hellotextView" android:textColor="#00ff00" android:gravity="center"/>
    <Button
            android:layout_width="wrap_content"
            android:layout_height="wrap_content"
            android:text="@string/button_send"
            android:id="@+id/hellobutton" android:layout_gravity="center"/>
</LinearLayout>
strings.xmls:
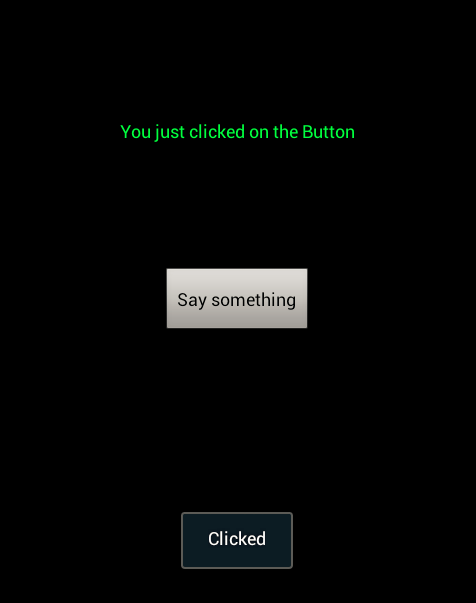
<resources>
    <string name="app_name">myAndroid3</string>
    <string name="button_send">Say something</string>
    <string name="default_message">Click button below!</string>
    <string name="interact_message">You just clicked on the Button!</string>
</resources>
3,然后新建一个类,我这里是myActivity,然后加上如下代码:
public class myActivity extends Activity{
     /**
     * Called when the activity is first created.
     */
    public void onCreate(Bundle savedInstanceState) {
        super.onCreate(savedInstanceState);
        setContentView(R.layout.main);
      //定义helltobtn
        Button hellobtn = (Button)findViewById(R.id.hellobutton);
      //监听hellobtn
        hellobtn.setOnClickListener(new View.OnClickListener() {
            @Override
            public void onClick(View v) {
               //定义hellotextview
                TextView hellotv = (TextView)findViewById(R.id.hellotextView);
               //弹出toast浮动控件显示btn被点击
                Toast.makeText(myActivity.this,"Clicked",Toast.LENGTH_SHORT).show();
               //在textview上显示interact_message的内容
                hellotv.setText(R.string.interact_message);
            }
        });
    }
}
3,编译没错后,就可以连上真机(需打开开发者调试模式)或者模拟器,选择这个工程然后run as android application了, 然后就可以看到apk被安装,打开apk开始摇滚吧。