重新装了个虚拟机,回顾一下最近三天的工作:
Centos 查看版本 cat /etc/redhat-release
yum -y upgrade 升级所有包,不改变软件设置和系统设置,系统版本升级,内核不改变
目前的版本为CentOS Linux release 7.2.1511 (Core)
添加内核参数
默认配置下,在 CentOS 使用 Docker 可能会碰到下面的这些警告信息:
WARNING: bridge-nf-call-iptables is disabled
WARNING: bridge-nf-call-ip6tables is disabled
添加内核配置参数以启用这些功能。
$ sudo tee -a /etc/sysctl.conf <<-EOF
net.bridge.bridge-nf-call-ip6tables = 1
net.bridge.bridge-nf-call-iptables = 1
EOF
然后重新加载 sysctl.conf 即可
$ sudo sysctl -p
添加 yum 源
虽然 CentOS 软件源 Extras 中有 Docker,名为 docker,但是不建议使用系统源中的这个版本,它的版本相对比较陈旧,而且并非 Docker 官方维护的版本。因此,我们需要使用 Docker 官方提供的 CentOS 软件源。
执行下面的命令添加 yum 软件源。
$ sudo tee /etc/yum.repos.d/docker.repo <<-'EOF'
[dockerrepo]
name=Docker Repository
baseurl=https://yum.dockerproject.org/repo/main/centos/7/
enabled=1
gpgcheck=1
gpgkey=https://yum.dockerproject.org/gpg
EOF
安装 Docker
更新 yum 软件源缓存,并安装 docker-engine。
$ sudo yum update
$ sudo yum install docker-engine
启动 Docker 引擎
$ sudo systemctl enable docker
$ sudo systemctl start docker
建立 docker 用户组
默认情况下,docker 命令会使用 Unix socket 与 Docker 引擎通讯。而只有 root用户和 docker 组的用户才可以访问 Docker 引擎的 Unix socket。出于安全考虑,一般 Linux 系统上不会直接使用 root 用户。因此,更好地做法是将需要使用 docker的用户加入 docker 用户组。
建立 docker 组:
$ sudo groupadd docker
将当前用户加入 docker 组:
$ sudo usermod -aG docker $USER
将Loop-LVM改为Direct-LVM

新添加一块硬盘SDB,新建分区,格式化
新添加一块硬盘 sdb
$dd if=/dev/zero of=/dev/sdb bs=4k count=1k
新建分区
$fdisk /dev/sdb
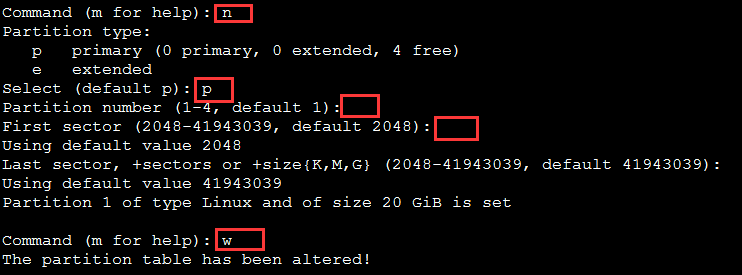
$mkfs.ext3 /dev/sdb
备份本地镜像,停止docker daemon并清除存储目录
$systemctl stop docker.service
$rm -rf /var/lib/docker
在/dev/sdb上创建LVM物理卷(PV)
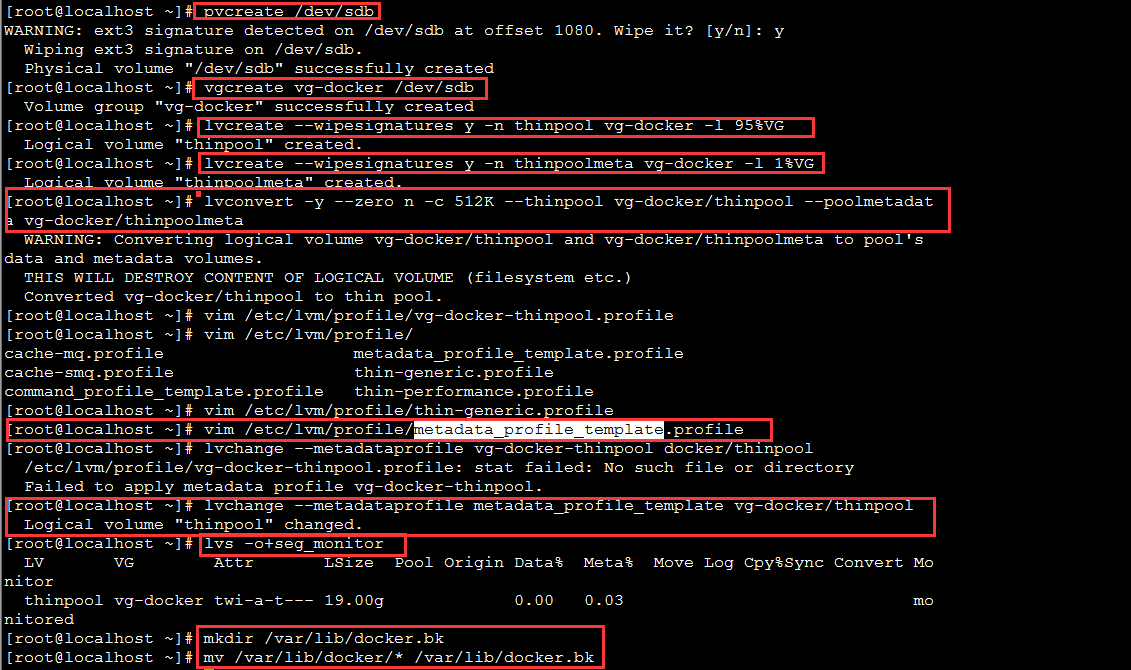
$pvcreate /dev/sdb
创建卷组vg-docker
$vgcreate vg-docker /dev/sdb
Create a thin pool named thinpool.
In this example, the data logical is 95% of the ‘docker’ volume group size. Leaving this free space allows for auto expanding of either the data or metadata if space runs low as a temporary stopgap.
$ lvcreate --wipesignatures y -n thinpool vg-docker -l 95%VG
$ lvcreate --wipesignatures y -n thinpoolmeta vg-docker -l 1%VG
Convert the pool to a thin pool.
$ lvconvert -y --zero n -c 512K --thinpool vg-docker/thinpool --poolmetadata vg-docker/thinpoolmeta
Configure autoextension of thin pools via an lvm profile.
$ vi /etc/lvm/profile/docker-thinpool.profile
thin_pool_autoextend_threshold = 80
thin_pool_autoextend_percent = 20
Apply your new lvm profile
$ lvchange --metadataprofile metadata_profile_template vg-docker/thinpool
Verify the lv is monitored.
$ lvs -o+seg_monitor
If the Docker daemon was previously started, move your existing graph driver directory out of the way.
$ mkdir /var/lib/docker.bk
$ mv /var/lib/docker/* /var/lib/docker.bk
Configure the Docker daemon with specific devicemapper options.


reload systemd to scan for changes,Start the Docker daemon
$ systemctl daemon-reload
$ systemctl start docker
$journalctl -fu dm-event.service
$ rm -rf /var/lib/docker.bk
参考文档
https://docs.docker.com/engine/userguide/storagedriver/device-mapper-driver/
http://blog.sina.com.cn/s/blog_6f2d2e310102wrvi.html
http://www.bubuko.com/infodetail-1039489.html