一、springBoot生命周期伴随的事件
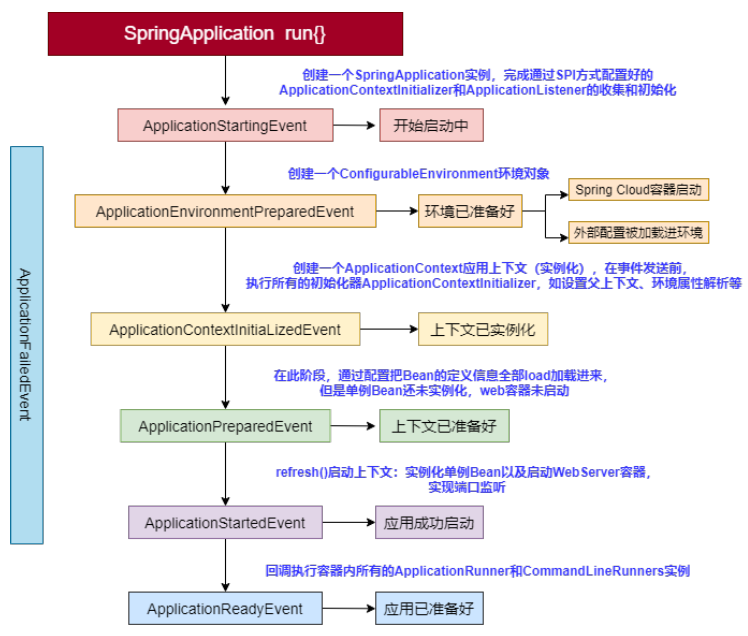
springBoot的启动过程就是通过事件机制驱动的,可以通过监听这些事件做一些定制化的功能。因为springBoot已经成为众多中间件和框架的基础,所以了解其整个生命周期是很必要的,接下来就从源码的角度去分析它的整个启动流程。
二、源码分析
1、实例化SpringApplication
public static ConfigurableApplicationContext run(Class<?>[] primarySources,
            String[] args) {
        return new SpringApplication(primarySources).run(args);
    }
public SpringApplication(ResourceLoader resourceLoader, Class<?>... primarySources) {
        this.resourceLoader = resourceLoader;
        Assert.notNull(primarySources, "PrimarySources must not be null");
        this.primarySources = new LinkedHashSet<>(Arrays.asList(primarySources));
        this.webApplicationType = WebApplicationType.deduceFromClasspath();
        setInitializers((Collection) getSpringFactoriesInstances(
                ApplicationContextInitializer.class));
        setListeners((Collection) getSpringFactoriesInstances(ApplicationListener.class));
        this.mainApplicationClass = deduceMainApplicationClass();
    }
构造方法里主要做了四件事:
(1)根据classpath下是否存在某些特定类来确定应用的类型,包括:REACTIVE、SERVLET和NONE三种类型,其中REACTIVE、SERVLET会以WEB应用的形式启动,NONE则会在应用执行完毕后结束进程
(2)利用SpringFactoriesLoader自动加载spring.factories文件中配置的 ApplicationContextInitializer,ApplicationContextInitializer原本是Spring框架Context模块下的一个接口,Spring Boot内部提供了一些该接口的实现类,使得我们有机会对ApplicationContext做一些特定的初始化工作
(3)利用SpringFactoriesLoader自动加载spring.factories文件中配置的 ApplicationListener,ApplicationListener同样是Context模块下的接口,Spring Boot内部提供了一些该接口的实现类,使得我们有机会在监听到某些应用事件发生时做一些特定的工作。
(4)根据main方法执行堆栈确定应用的主引导类,即Spring Boot项目自带的XXApplication类
2、进入到真正的run方法中
public ConfigurableApplicationContext run(String... args) {
        StopWatch stopWatch = new StopWatch();
        stopWatch.start();
        ConfigurableApplicationContext context = null;
        Collection<SpringBootExceptionReporter> exceptionReporters = new ArrayList<>();
        configureHeadlessProperty();
        //在这实例化SpringApplicationRunListener
        SpringApplicationRunListeners listeners = getRunListeners(args);
        //发布ApplicationStartingEvent事件
        listeners.starting();
        try {
            ApplicationArguments applicationArguments = new DefaultApplicationArguments(
                    args);
            ConfigurableEnvironment environment = prepareEnvironment(listeners,
                    applicationArguments);
            configureIgnoreBeanInfo(environment);
            Banner printedBanner = printBanner(environment);
            context = createApplicationContext();
            exceptionReporters = getSpringFactoriesInstances(
                    SpringBootExceptionReporter.class,
                    new Class[] { ConfigurableApplicationContext.class }, context);
            prepareContext(context, environment, listeners, applicationArguments,
                    printedBanner);
            refreshContext(context);
            afterRefresh(context, applicationArguments);
            stopWatch.stop();
            if (this.logStartupInfo) {
                new StartupInfoLogger(this.mainApplicationClass)
                        .logStarted(getApplicationLog(), stopWatch);
            }
            listeners.started(context);
            callRunners(context, applicationArguments);
        }
        catch (Throwable ex) {
            handleRunFailure(context, ex, exceptionReporters, listeners);
            throw new IllegalStateException(ex);
        }

        try {
            listeners.running(context);
        }
        catch (Throwable ex) {
            handleRunFailure(context, ex, exceptionReporters, null);
            throw new IllegalStateException(ex);
        }
        return context;
    }
(1)listeners.starting() —— 发布ApplicationStartingEvent事件
public void starting() {
        this.initialMulticaster.multicastEvent(
                new ApplicationStartingEvent(this.application, this.args));
    }
监听此事件的监听器:
LoggingApplicationListener:@since 2.0.0。对日志系统抽象LoggingSystem执行实例化以及初始化之前的操作,默认使用的是基于Logback的LogbackLoggingSystem
BackgroundPreinitializer:启动一个后台进行对一些类进行预热。如ValidationInitializer、JacksonInitializer...,因为这些组件有第一次惩罚的特点(并且首次初始化均还比较耗时),所以使用后台线程先预热效果更佳
DelegatingApplicationListener:它监听的是ApplicationEvent,而实际上只会ApplicationEnvironmentPreparedEvent到达时生效,所以此处忽略
LiquibaseServiceLocatorApplicationListener:略
(2)prepareEnvironment(listeners,applicationArguments) ——发布ApplicationEnvironmentPreparedEvent事件
Environment代表着应用的上下文环境,主要是解析获取profile和properties。
private ConfigurableEnvironment prepareEnvironment(
            SpringApplicationRunListeners listeners,
            ApplicationArguments applicationArguments) {
        // Create and configure the environment
        ConfigurableEnvironment environment = getOrCreateEnvironment();  ——(1)
        configureEnvironment(environment, applicationArguments.getSourceArgs()); ——(2)
        listeners.environmentPrepared(environment); ——(3)
        bindToSpringApplication(environment); ——(4)
        if (!this.isCustomEnvironment) {
            environment = new EnvironmentConverter(getClassLoader())
                    .convertEnvironmentIfNecessary(environment, deduceEnvironmentClass());
        }
        ConfigurationPropertySources.attach(environment); ——(5)
        return environment;
    }
主要做以下几件事情:
1)根据webApplicationType创建不同的Environment,web环境下创建了StandardServletEnvironment
2)将应用启动时候传入的args设置到Environment中去
3)发布ApplicationEnvironmentPreparedEvent事件,告诉之前获取的所有监听器,应用的上下文环境已经准备好了,这个时候监听器主要做的事情就是加载application.properties以及profile文件
4)将获取到的environment中的spring.main配置绑定到SpringApplication的source中
5)将创建好的Environment里获取到的MutablePropertySources再设置到configurationProperties属性值里面去,并且作为第一个元素。
(3)createApplicationContext()
终于到了创建应用上下文的时候了,前面都是在做准备工作,准备工作做好了,开始创建Spring中最核心的容器ApplicationContext了。
protected ConfigurableApplicationContext createApplicationContext() {
        Class<?> contextClass = this.applicationContextClass;
        if (contextClass == null) {
            try {
                switch (this.webApplicationType) {
                case SERVLET:
                    contextClass = Class.forName(DEFAULT_SERVLET_WEB_CONTEXT_CLASS); ——(1)
                    break;
                case REACTIVE:
                    contextClass = Class.forName(DEFAULT_REACTIVE_WEB_CONTEXT_CLASS);
                    break;
                default:
                    contextClass = Class.forName(DEFAULT_CONTEXT_CLASS);
                }
            }
            catch (ClassNotFoundException ex) {
                throw new IllegalStateException(
                        "Unable create a default ApplicationContext, "
                                + "please specify an ApplicationContextClass",
                        ex);
            }
        }
        return (ConfigurableApplicationContext) BeanUtils.instantiateClass(contextClass); ——(2)
    }
主要做了两件事:
1)加载ApplicationContext的class对象,如果是web应用加载的就是"org.springframework.boot.web.servlet.context.AnnotationConfigServletWebServerApplicationContext",这里说下Class.forName和ClassLoader的区别:
Class.forName除了将类的.class文件加载到jvm外,还会对类进行解释,执行static方法。
2)对类—AnnotationConfigServletWebServerApplicationContext进行初始化
public AnnotationConfigServletWebServerApplicationContext() {
        this.reader = new AnnotatedBeanDefinitionReader(this);
        this.scanner = new ClassPathBeanDefinitionScanner(this);
    }
进行初始化时会创建AnnotatedBeanDefinitionReader reader和ClassPathBeanDefinitionScanner scaner,扫描所有带@Component、@Service、@Repository、@Controller等注解的类,注册到容器中。
同时也会创建上下文的beanFactory,实际类型为DefaultListableBeanFactory。如下是其类图关系:
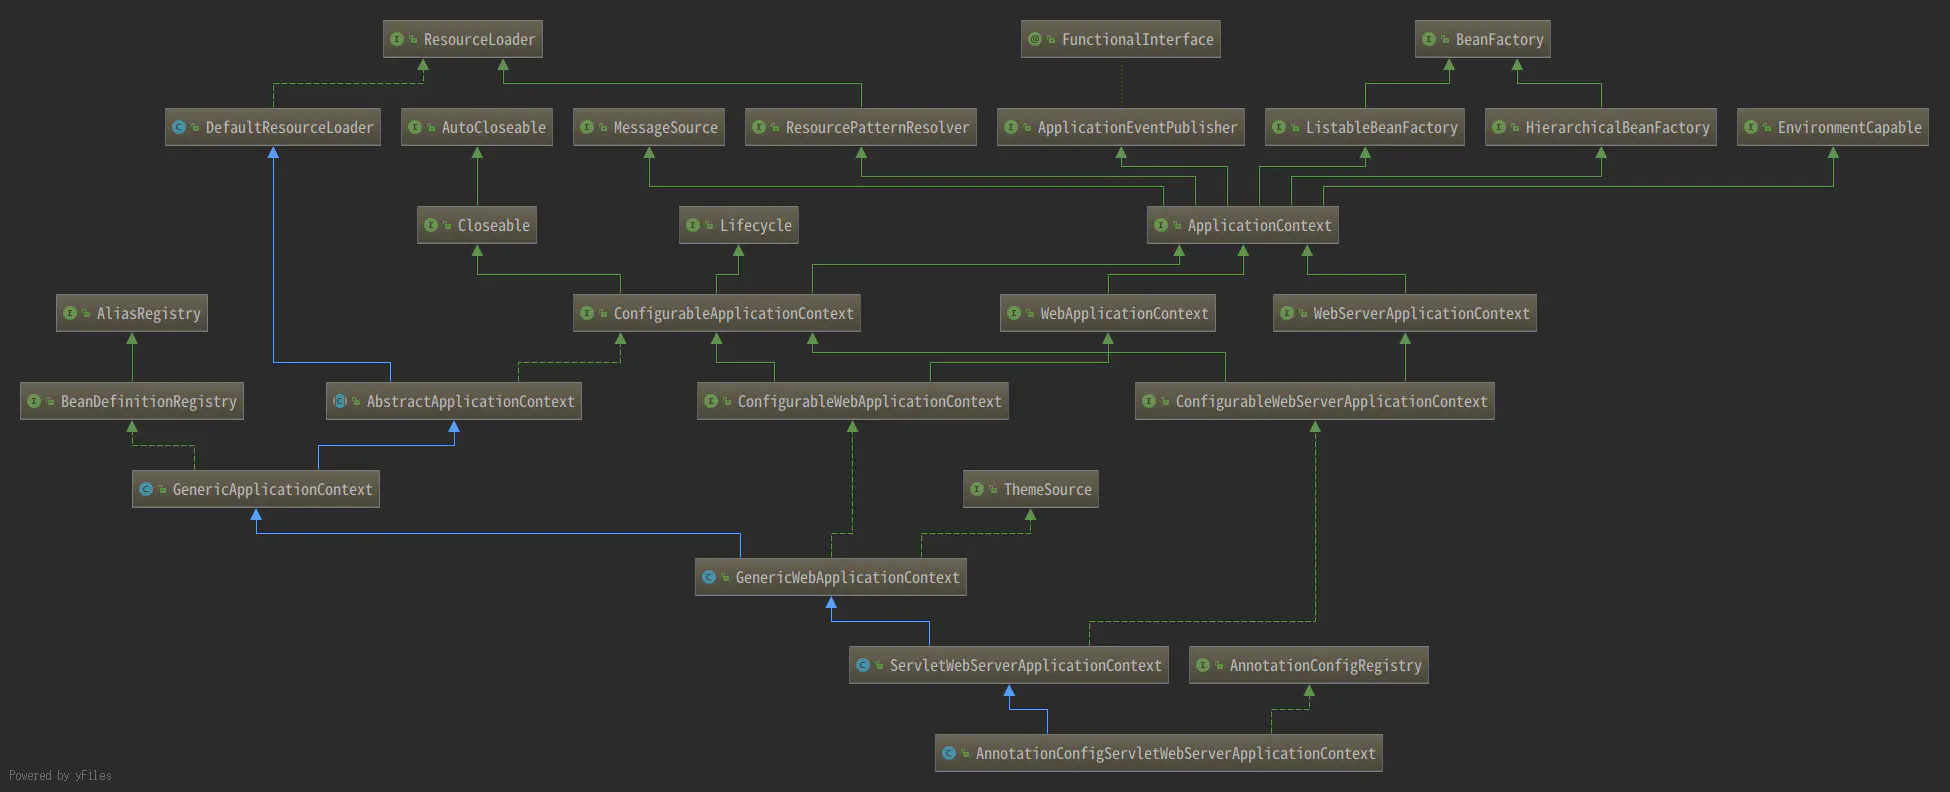
初始化子类之前必须先初始化其父类,在父类GenericApplicationContext中创建beanFactory:
public GenericApplicationContext() {
        this.beanFactory = new DefaultListableBeanFactory();
    }
(4)prepareContext()
将之前获取到的Environment、listeners、applicationArguments以及printBanner都设置到applicationContext中去,并发布ApplicationContextInitializedEvent事件和ApplicationPreparedEvent事件。
private void prepareContext(ConfigurableApplicationContext context,
            ConfigurableEnvironment environment, SpringApplicationRunListeners listeners,
            ApplicationArguments applicationArguments, Banner printedBanner) {
        context.setEnvironment(environment);
        postProcessApplicationContext(context);
        applyInitializers(context);
        //在此处发布ApplicationContextInitializedEvent
        listeners.contextPrepared(context);
        if (this.logStartupInfo) {
            logStartupInfo(context.getParent() == null);
            logStartupProfileInfo(context);
        }
        // Add boot specific singleton beans
        ConfigurableListableBeanFactory beanFactory = context.getBeanFactory();
        beanFactory.registerSingleton("springApplicationArguments", applicationArguments);
        if (printedBanner != null) {
            beanFactory.registerSingleton("springBootBanner", printedBanner);
        }
        if (beanFactory instanceof DefaultListableBeanFactory) {
            ((DefaultListableBeanFactory) beanFactory)
                    .setAllowBeanDefinitionOverriding(this.allowBeanDefinitionOverriding);
        }
        // Load the sources
        Set<Object> sources = getAllSources();
        Assert.notEmpty(sources, "Sources must not be empty");
        load(context, sources.toArray(new Object[0]));
        //在此处发布ApplicationPreparedEvent
        listeners.contextLoaded(context);
    }