参考:http://blog.csdn.net/zhangxin09/article/details/6885175
The Grid Panel is one of the centerpieces of Ext JS. It's an incredibly versatile component that provides an easy way to display, sort, group, and edit data.
Grid 面板为 Ext JS 的大头核心之一。它是一个通用性很强的组件,提供了一个简单的方式来显示、排序(sort)、分组(group)和编辑(edit)数据。
Basic Grid Panel

Let's get started by creating a basic Grid Panel. Here's all you need to know to get a simple grid up and running:
让我们开始创建一个基本的 Grid 面板。通过这个例子你可以学习到创建 Grid 的基本方法并让 Grid 顺利地跑起来。
Model and Store
A Grid Panel is simply a component that displays data contained in a Store. A Store can be thought of as a collection of records, or Model instances. For more information on Stores and Models see the Data guide. The benefit of this setup is clear separation of concerns. The Grid Panel is only concerned with displaying the data, while the Store takes care of fetching and saving the data using its Proxy.
一个 Grid 面板可以说仅仅是一个组件,它会把 Store 中的数据显示出来。Store 可以被看作是一记录集合,或模型的实例。欲了解更多 Store 和模型的信息,建议参阅该文。这种设计的好处是“各司其职(separation of concerns)”,并且十分清晰。Grid 面板只关注如何显示的数据,而 Store 则透过用其代理(Proxy)执行数据的获取和保存。
First we need to define a Model. A Model is just a collection of fields that represents a type of data. Let's define a model that represents a "User":
首先,我们需要定义一个模型。模型只是一种集合,表示一个数据类型的字段。让我们定义一个模型,它代表着“用户User”:
Ext.define('User', {
    extend: 'Ext.data.Model',
    fields: [ 'name', 'email', 'phone' ]
});
Next let's create a Store that contains several User instances.
接下来,我们创建一个包含多个用户 User 的 Store对象。
var userStore = Ext.create('Ext.data.Store', {
    model: 'User',
    data: [
        { name: 'Lisa', email: 'lisa@simpsons.com', phone: '555-111-1224' },
        { name: 'Bart', email: 'bart@simpsons.com', phone: '555-222-1234' },
        { name: 'Homer', email: 'home@simpsons.com', phone: '555-222-1244' },
        { name: 'Marge', email: 'marge@simpsons.com', phone: '555-222-1254' }
    ]
});
For sake of ease we configured the Store to load its data inline. In a real world application you'll usually configure the Store to use a Proxy to load data from the server. See the Data guide for more on using Proxies.
为了简单起见,我们直接写出 Store 其具体数据。而在真实的应用程序中,您通常会配置代理对象 Proxy,透过 Proxy 从服务器加载数据回来。更多请参阅使用 Proxy 的数据指导。
Grid Panel
Now that we have a Model which defines our data structure, and we've loaded several Model instances into a Store, we're ready to display the data using aGrid Panel:
当前我们有一 Model,Model 定义了我们的数据结构,然后将这几个 Model 实例添加到 Store,接着就可以使用 Grid 面板显示数据:
For the sake of ease we configured the grid with renderTo to immediately render the grid into the HTML document. In a real world application, the grid will usually be a child item of a Container and rendering will therefore be the responsibility of that Container and the developer must not render.
为了容易配置,我们令grid立刻渲染到了html文档。在真实的app中,grid通常是一个容器的子控件,这时渲染常常时容器的责任,开发者不要去渲染它。
Ext.create('Ext.grid.Panel', {
    renderTo: Ext.getBody(),
    store: userStore,
     400,
    height: 200,
    title: 'Application Users',
    columns: [
        {
            text: 'Name',
             100,
            sortable: false,
            hideable: false,
            dataIndex: 'name'
        },
        {
            text: 'Email Address',
             150,
            dataIndex: 'email',
            hidden: true
        },
        {
            text: 'Phone Number',
            flex: 1,
            dataIndex: 'phone'
        }
    ]
});
And that's all there is to it. We just created a Grid Panel that renders itself to the body element, and we told it to get its data from the userStore Storethat we created earlier. Finally we defined what columns the Grid Panel will have, and we used the dataIndex property to configure which field in theUser Model each column will get its data from. The Name column has a fixed width of 100px and has sorting and hiding disabled, the Email Addresscolumn is hidden by default (it can be shown again by using the menu on any other column), and the Phone Number column flexes to fit the remainder of the Grid Panel's total width. For a larger example, see the Array Grid Example.
相当简单,是吧!我们刚刚创建的一个 Grid 面板,以 body 元素为容器,然后我们告诉它从我们前面创建的 userStore 中取出其数据。最后,我们不但定义了 Grid 面板将有哪些列,而且通过 dataIndex 属性来配置每列从用户领域模型中得到的数据。列“Name”指定其宽度为固定的 100px,把排序和隐藏列都禁用;列“email”默认是隐藏的(可通过其他列上面的菜单打开显示该列);列“Phone Number”配置了 flex 为 1,表示其宽度自适应 Grid 面板宽度,即除总宽度后剩下的宽度。要查看实例,请访问“简单的Grid示例”。
Renderers
You can use the renderer property of the column config to change the way data is displayed. A renderer is a function that modifies the underlying value and returns a new value to be displayed. Some of the most common renderers are included in Ext.util.Format, but you can write your own as well:
您可以通过列的 renderer 配置项来改变数据的显示方式。渲染器本身是一个函数,根据传入的原始值来进行修改,返回的那个值就是显示的值。最常见的一些渲染器都包含在 Ext.util.Format,当然你可以自定义渲染器:
columns: [
    {
        text: 'Birth Date',
        dataIndex: 'birthDate',
        // format the date using a renderer from the Ext.util.Format class
        renderer: Ext.util.Format.dateRenderer('m/d/Y')
    },
    {
        text: 'Email Address',
        dataIndex: 'email',
        // format the email address using a custom renderer
        renderer: function(value) {
            return Ext.String.format('<a href="mailto:{0}">{1}</a>', value, value);
        }
    }
]
See Array Grid Example for a live demo that uses custom renderers.
现场演示一下自定义渲染器渲染。
Grouping
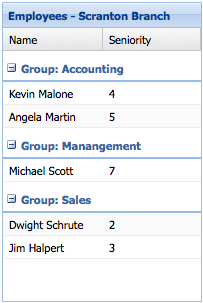
Organizing the rows in a Grid Panel into groups is easy, first we specify a groupField property on our store:
把 Grid 里面的行进行分组很容易,首先要在 Store 身上指定 groupField 属性:
Ext.create('Ext.data.Store', {
    model: 'Employee',
    data: ...,
    groupField: 'department'
});
For more on grouping in Stores please refer to the Data guide. Next we configure a grid with a grouping Feature that will handle displaying the rows in groups:
更多 Store 的分组请参阅数据指导。接下来,我们将配置 Grid 的 Feature 配置项以便进行行分组:
Ext.create('Ext.grid.Panel', {
    ...
    features: [{ ftype: 'grouping' }]
});
See Grouping Grid Panel for a live example.
可参考一下 Grouping Grid Panel 在线例子。
Selection Models
Sometimes Grid Panels are use only to display data on the screen, but usually it is necessary to interact with or update that data. All Grid Panels have aSelection Model which determines how data is selected. The two main types of Selection Model are Row Selection Model, where entire rows are selected, and Cell Selection Model, where individual cells are selected.
有时 Grid 面板被用于只是在屏幕上显示的数据,但更多的是进行交互动作或执行更新数据的任务。所有 Grid 面板都有一个选择模型(SelectionModel),以确定数据如何被选中。选择模型的两个主要类型是“整行选择模型”,抑或是“单元格选择模型”,也就是一行行地被选择,还是单个单元格被选中的问题。
Grid Panels use a Row Selection Model by default, but it's easy to switch to a Cell Selection Model:
Grid 面板默认使用行选择模型,但它很容易切换为单元格选择模型:
Ext.create('Ext.grid.Panel', {
    selType: 'cellmodel',
    store: ...
});
Using a Cell Selection Model changes a couple of things. Firstly, clicking on a cell now selects just that cell (using a Row Selection Model will select the entire row), and secondly the keyboard navigation will walk from cell to cell instead of row to row. Cell-based selection models are usually used in conjunction with editing.
使用单元格选择模型的话,得改变几件事情。首先,点击一个单元格,选择的只是那个单元格(如使用行选择模型,将选择整个行);其次,键盘导航不是行与行之间的移动,而是单元格之间的。单元格为基础的选择模型通常与编辑控件一起使用。
Editing
Grid Panel has built in support for editing. We're going to look at the two main editing modes - row editing and cell editing
Grid 面板支持行编辑。我们要看看编辑的两个主要模式——行编辑和单元格编辑。
Cell Editing
Cell editing allows you to edit the data in a Grid Panel one cell at a time. The first step in implementing cell editing is to configure an editor for each Columnin your Grid Panel that should be editable. This is done using the editor config. The simplest way is to specify just the xtype of the field you want to use as an editor:
单元格编辑就是允许你在 Grid 面板中针对某个单元格中的数据进行编辑。执行单元格编辑的第一步是配置每个 Grid 面板都应该是可编辑的列。以下就是编辑器的配置。最简单的方法是指定那个字段的 editor 为组件的 xtype:
Ext.create('Ext.grid.Panel', {
    ...
    columns: [
        {
            text: 'Email Address',
            dataIndex: 'email',
            editor: 'textfield'
       }
    ]
});
If you need more control over how the editor field behaves, the editor config can also take a config object for a Field. For example if we are using a Text Field and we want to require a value:
如果您需要更多的控制如何编辑字段的行为,编辑器配置也可以为字段的配置对象。例如,如果我们使用的是一个文本字段,我们需要一个值:
columns: [
    text: 'Name',
    dataIndex: 'name',
    editor: {
        xtype: 'textfield',
        allowBlank: false
    }
]
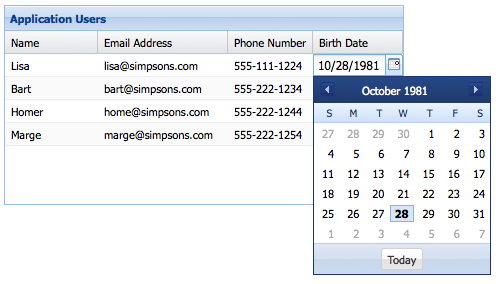
You can use any class in the Ext.form.field package as an editor field. Lets suppose we want to edit a column that contains dates. We can use aDate Field editor:
作为一个编辑字段,您可以使用在Ext.form.field包的任何类。让我们假设我们要编辑一列包含日期。我们可以使用一个日期字段编辑器:
columns: [
    {
        text: 'Birth Date',
        dataIndex: 'birthDate',
        editor: 'datefield'
    }
]
Any Ext.grid.column.Columns in a Grid Panel that do not have a editor configured will not be editable.
不配置编辑器的Grid面板中的任何一个Ext.grid.column.Columns都不支持编辑。
Now that we've configured which columns we want to be editable, and the editor fields that will be used to edit the data, the next step is to specify a selection model. Let's use a Cell Selection Model in our Grid Panel config:
现在,我们已经配置了那些可编辑的列,将使用的编辑器编辑数据字段,下一步是要指定一个选择模型。让我们用在我们的Grid面板配置的小区选择模型:
Ext.create('Ext.grid.Panel', {
    ...
    selType: 'cellmodel'
});
Finally, to enable editing we need to configure the Grid Panel with a Cell Editing Plugin:
最后打开编辑功能,我们为 Grid 面板配置上一个单元格编辑插件:
Ext.create('Ext.grid.Panel', {
    ...
    selType: 'cellmodel',
    plugins: [
        Ext.create('Ext.grid.plugin.CellEditing', {
            clicksToEdit: 1
        })
    ]
});
And that's all it takes to create an editable grid using cell editing. See Cell Editing for a working example.
而这一切都需要创建一个使用单元格编辑的 Grid,。请参阅单元格编辑实例。
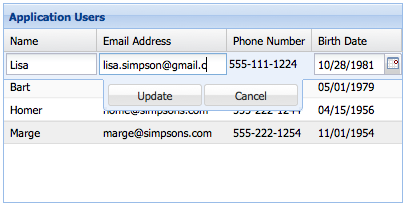
Row Editing
Row editing enables you to edit an entire row at a time, rather than editing cell by cell. Row editing works in exactly the same way as cell editing - all we need to do is change the plugin type to Ext.grid.plugin.RowEditing and set the selType to rowmodel.
行编辑就是说,让您同时编辑整个行。行编辑的效果完全与单元格编辑的方式相同,于是我们所需要做的的是改变插件类型为 Ext.grid.plugin.RowEditing 并设置 selType 为 rowmodel。
Ext.create('Ext.grid.Panel', {
    ...
    selType: 'rowmodel',
    plugins: [
        Ext.create('Ext.grid.plugin.RowEditing', {
            clicksToEdit: 1
        })
    ]
});
行编辑的在线例子 Row Editing - Live Example
Paging
Sometimes your data set is too large to display all on one page. Grid Panel supports displaying individual pages from the dataset using a Paging Toolbarwhich loads pages using previous/next buttons.
有时你的数据量太大,恰恰又要在一张页面上显示这些所有的数据,怎么办呢?Grid 面板支持两个不同方式的分页:1、使用“上一页/下一页”按钮的分页工具栏;2、使用滚动条进行上下翻页。
Store Setup
Before we can set up either type of paging on a Grid Panel, we have to configure the Store to support paging. In the below example we add a pageSize to the Store, and we configure our Reader with a totalProperty:
在设置Grid 两种类型的分页之前,我们必须要让 Store 支持分页。在下面的例子中,我们添加一个有 pageSize的Store,以及带有 totalProperty 配置项的 Reader 对象:
Ext.create('Ext.data.Store', {
    model: 'User',
    autoLoad: true,
    pageSize: 4,
    proxy: {
        type: 'ajax',
        url : 'data/users.json',
        reader: {
            type: 'json',
            root: 'users',
            totalProperty: 'total'
        }
    }
});
The totalProperty config tells the Reader where to get the total number of results in the JSON response. This Store is configured to consume a JSON response that looks something like this:
配置项 totalProperty 指定了从 JSON 结构中哪里可以获取结果的总数。该 Store 为 JsonStore 类型的,所以看起来像这样:
{
    "success": true,
    "total": 12,
    "users": [
        { "name": "Lisa", "email": "lisa@simpsons.com", "phone": "555-111-1224" },
        { "name": "Bart", "email": "bart@simpsons.com", "phone": "555-222-1234" },
        { "name": "Homer", "email": "home@simpsons.com", "phone": "555-222-1244" },
        { "name": "Marge", "email": "marge@simpsons.com", "phone": "555-222-1254" }
    ]
}
For more on Stores, Proxies, and Readers refer to the Data Guide.
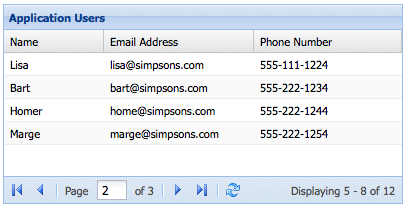
Paging Toolbar
Now that we've setup our Store to support paging, all that's left is to configure a Paging Toolbar. You could put the Paging Toolbar anywhere in your application layout, but typically it is docked to the Grid Panel:
现在,我们已设置了 Store及其分页,所有剩下的工作就是配置一个分页工具栏。你可以把分页工具栏定位在你应用程序的任何地方,但通常是停靠在 Grid 面板旁边:
Ext.create('Ext.grid.Panel', {
    store: userStore,
    columns: ...,
    dockedItems: [{
        xtype: 'pagingtoolbar',
        store: userStore,   // same store GridPanel is using
        dock: 'bottom',
        displayInfo: true
    }]
});
Buffered rendering 缓存渲染
Grids support buffered rendering of extremely large datasets as an alternative to using a paging toolbar. Your users can scroll through thousands of records without the performance penalties of renderering all the records on screen at once. The grid should be bound to a store with a pageSize specified.
grid支持缓存渲染,针对较大的数据。你的用户可以滚动几千条数据而没有性能影响。grid需要绑定到一个指定pageSize属性的stroe。
To use buffered rendering, configure your grid with the bufferedrenderer plugin. The Store can be fully loaded with a very large dataset.
为了使用缓存渲染,配置grid使用bufferedrenderer 插件。store可以用一个非常大的数据集来完全加载。
Only enough rows are rendered to fill the visible area of the grid with a little (configurable) overflow either side to allow scrolling. As scrolling proceeds, new rows are rendered in the direction of scroll, and rows are removed from the receding side of the table.
只有足够的行填充了屏幕并超过边界时才允许滚动。当滚动处理时,新行在滚动方向被渲染,旧行在远离的方向被移除。
Ext.create('Ext.grid.Panel', {
    // Use a BufferedRenderer plugin
    plugins: {
        ptype: 'bufferedrenderer'
    },
    // Configure the rest as usual
    ...
});
Buffered rendering of a loaded store Example
Buffered Stores
If a dataset is extremely large, then loading the full dataset into the Store may be infeasible. In this case, the solution is to use a buffered Store. When using a buffered store, the grid automatically uses the buffered rendering plugin.
如果一个数据集非常大,加载全部数据到store是不可行的。这时的解决方案是使用buffered Store。当使用一个缓存的store,grid自动使用缓存的渲染插件。
A buffered store must be configured with a pageSize, and maintains a sparsely populated cache of pages which are loaded from the server as needed.
buffered store 必须配置pageSize,并维护一个缺少页的缓存,它更加需要从服务器加载。
A buffered store only loads the pages required to render the visible portion of the dataset with a little (configurable) overflow either side to allow new data to be fetched by the buffered renderer for immediate rendering while new pages are fetched in the background to fulfill future scrolling demands.
buffered store仅加载需要渲染到视口的数据,另在上下留有余量,以便于在滚动时能尽快的显示。
As the user scrolls through the dataset, and pages move outside of the visible range, they may be purged from the store's page cache depending upon thepurgePageCount setting. Configuring this as zero means that once loaded, pages are never purged from the cache, and may be returned to and rendered with no Ajax delay.
当用户在数据中滚动时,页面移动到可视区域外,它们可以从页面缓存中获取到,依赖purgePageCount设置。配置这个为0意味着一旦加载,页面从不会从缓存中加载,并会没有ajax delay的被返回和渲染。