insert 插入讲解 :
1:创建一个表:
create table test( id int(4) not null auto_increment, name char(20) not null, age tinyint(2) not null default '0', dept varchar(16) default null, primary key(id), key index_name(name) );
2: 按指定规则 - 插入数据,在查询一下
insert into tset(id,name) values(1,'xutest');
3: 自增的插入方法:
insert into test(name) values('xutest1');

4: 不指定列插入

5: 一次插入两条数据:

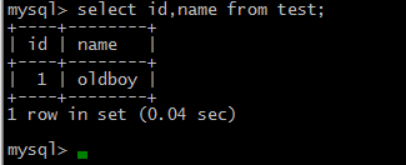
select 查询讲解 :
《select》
select * from xxx where id=2 ;
select * from xxx where id>2 and/or id<4 ;
select * from xxx limit 0,2; 第0行开始查,查2行记录
查询用户的密码
select user,host,password from mysql.user where user=xx and host='xxx';
select user,host from mysql.user;
排序:order by (asc 升序。 desc倒序)
select user,host from mysql.user order by user;
select user,host from mysql.user order by user asc;
select user,host from mysql.user order by user desc;
查看当前版本,用户,数据库,时间(调用的函数)
select database(); 查询当前进入的数据库
select user();/version();/ now();
多表查询:

使用explain 查询 select 查询语句执行计划:
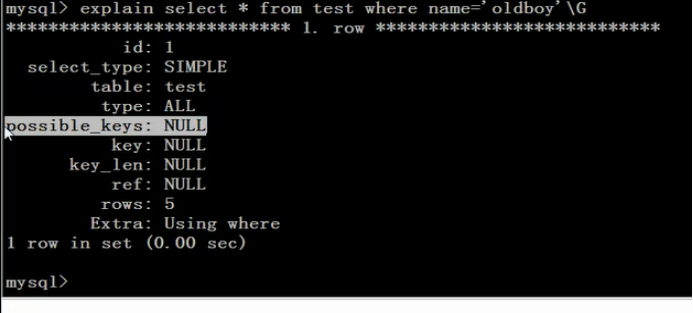
创建一个普通索引:

在使用explain 查询:会发现有索引了:

update修改表数据 :
---------------------------------------------------------------------------------------------------------------------------------------------------
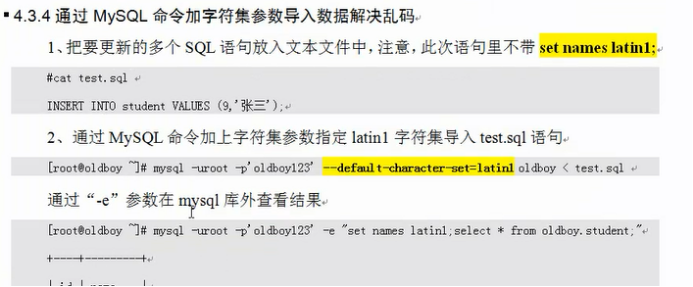
mysql 乱码 解决方法:
第一种方法:
set names latin1; 然后在插入数据,就不会显示乱码。.
第二种方法:
source test.sql;

第三种方法:
第四种方法:
------------------------------ --------------------------------------------------------------------------------------
mysql 数据库字符集详细介绍
创建GBK字符集数据库:
create database test2 DEFAULT CHARACTER SET gbk COLLATE gbk_chinese_ci;
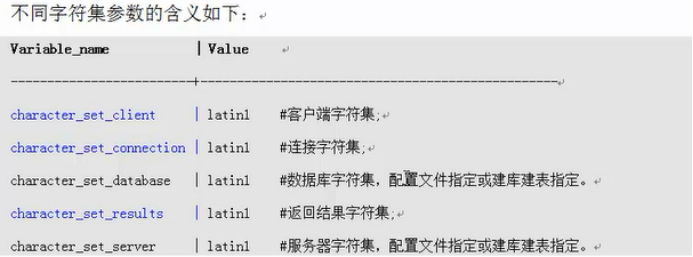
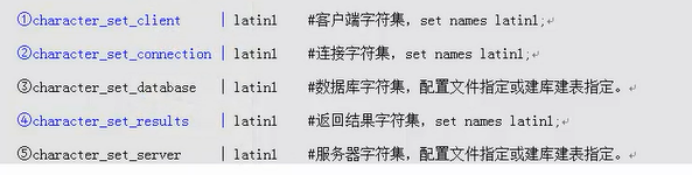
常见字符集:

如何选择字符集:

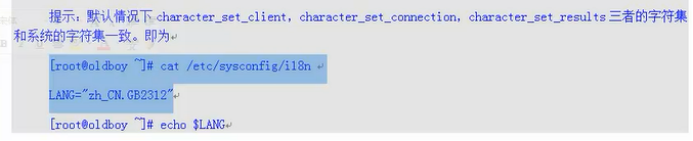
加粗的三个是客户端的字符集(客户端,连接,返回结果),客户端修改字符集后,mysql这边会显示出来

对应的讲解:
指定字符集登录:
指定字符集登录数据库:
mysyql -uroot -pxutest --default-character-set=latinl
mysyql -uroot -pxutest --default-character-set=latinl xutest < test.sql
或者临时设置字符集:

字符集:
永久更改字符集步骤:
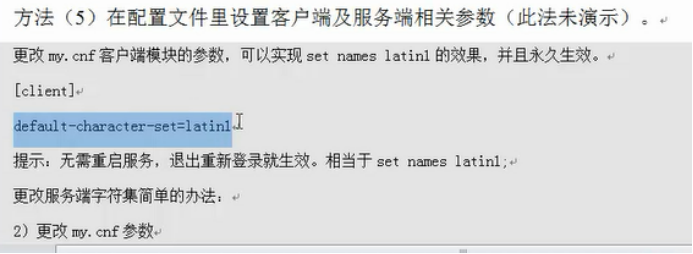
1: 更改客户端字符集方法:
my.cnf 添加如下这句:不需要重启就生效

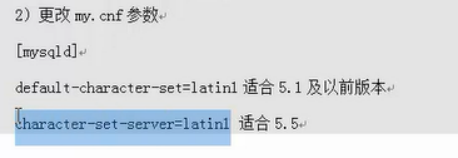
2:更改服务端字符集:

需要重启mysql服务器,才能生效!

------------------------ ----------------------
生产环境中---如何更改已有的数据库字符集:


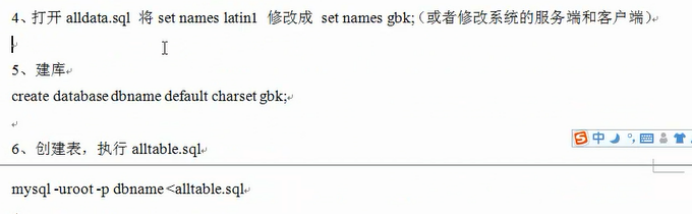
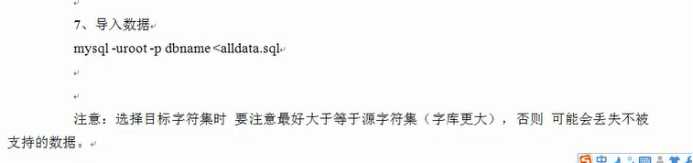
总结步骤:

----------------------------------------------附件扩展内容--------------------------------------------------------------------------------------
mysql 运维人员必须要会的常用操作命令:
《system 不退出mysql 执行命令》
system cat test.log
----------------------------------------------------------------
《desc》
查询表结构
desc mysql.user;
desc mysql.userG; 竖着显示
desc student; 查询student表结构
show columns from student 也是查询表结构,比较复杂很少用
----------------------------------------------------------------
《use》
use xutest; 使用xutest数据库
《rename》
rename table 原表名 to 新表名
----------------------------------------------------------------
explain 查询有没有走索引
explain select * from student where id=2 ; 查询有没有走索引
----------------------------------------------------------------
《insert》 插入
insert into test(id,name) values(1,'xutest');表test 的id 和name插入数据
insert into test(name) values('xutest1'); 根据自增插入
一次插入多条
insert into test values(1,'xutest'),(3,'xutest12');
----------------------------------------------------------------
《alter》 -
我们知道,在知道root密码时,可以使用“ALTER USER ‘root'@'localhost' IDENTIFIED BY ‘新密码';”指令来修改root
更改xutest 数据库字符集为utf8(数据库必须为空才能更改)
alter database xutest character set utf8;
改表名: alter table xutest to test;
增/删 改表的字段<alter table 表名 add 字段 类型 其他;>
alter table test add sex char(4);
alter table test add sex char(4) frist; 在第一列添加
alter table test add sex char(4) after name;在name列后增加age列
修改原字段名称及类型
alter table test change sex sex_new char(4);
删除字段
alter table test drop sex;
添加主键
alter table student change id id int primary key auto_increment;
删除主键
alter table student drop primary key;
删除普通索引
alter table student drop index index_name/index_age;
drop index index_name/index_age on student;
添加普通索引
alter table student add index index_name(name);
alter table student add index index_age(age);
添加唯一索引
alter table student add unique index index_age(age);
create: 指定dept 前8个字符创建索引
create index index_dept on student(dept(8));
创建联合索引
create index index_name_dept on student(name,dept);
create index index_name_dept on student(name(3),dept(5));
创建唯一索引:
create unique index index_name on student(name);
------------------------------------------------------
《create》
create user 'xutest'@'localhost' identified by 'xutest123';创建用户指定密码
grant all privileges on d3306.* to 'u3306'@'192.168.0.%'; 设置权限
create database d3306test; 创建数据库默认字符集
create database dbname defaule charset gbk;
创建指定字符集数据库:
create database `test2` DEFAULT CHARACTER SET utf8 COLLATE utf8_general_ci
create table student( <创建表(前提是use xxx 进入数 据库>
id int(4) not null,
name char(20) not null,
age tinyint(2) NOT NULL default '0',
dept varchar(16) default NULL
); DEFAULT=InnoDB AUTO_INCREMENT DEFAUTL CHARSET=utf8
----------------------------------------------------------------
《revoke》
收回权限 要和用户名的是对应的,不然不起作用
<show grants for xutest@localhost; 查看用户的权限对应 >
revoke insert on d3306.* from 'jeffrey'@'localhost';
----------------------------------------------
limit
select * from xxx limit 0,2; 第0行开始查,查2行记录
----------------------------------------
《select》
select * from xxx where id=2 ;
select * from xxx where id>2 and/or id<4 ;
select * from xxx limit 0,2; 第0行开始查,查2行记录
多表查询
select student.name,test.age from student,test where student.name=test.name and xx;
查询用户的密码
select user,host,password from mysql.user where user=xx and host='xxx';
select user,host from mysql.user;
排序:order by (asc 升序。 desc倒序)
select user,host from mysql.user order by user;
select user,host from mysql.user order by user asc;
select user,host from mysql.user order by user desc;
查看当前版本,用户,数据库,时间(调用的函数)
select database(); 查询当前进入的数据库
select user();/version();/ now();
----------------------------------------------------------------
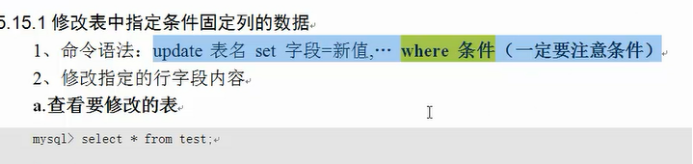
《update 》
update 表名 set 字段=新值,... where 条件();
update test set name="gongli" where id=3; 把id为3的名字改成gongli
更改用户密码
update mysql.user set password=password('456’) where user=’root’ and host=’localhost';
----------------------------------------------------------------
《 flush privileges》
刷新
flush privileges;
----------------------------------------------------------------
《show》
查看数据库data文件目录在哪
show global variables like "datadir";
show enginesG; 查看数据库支持的引擎
show processlist; 查看数据库连接情况
show full processlist 看完整的语句
mysql -u root -p'xutest' -S /data1/3307/mysql.sock -e "show full processlist;"|grep -v Sleep
show global status ; 全局状态(连接数,插入次数等等)
show character set; 查看mysql所有字符集详细
查看系统变量(my.cnf)
show variables/status/globalG; 查看my.cnf里面配置的所有参数,查看状态
-------------
set:
set names latin1; 临时设置字符集latin1
set global key_buffer_size=1024*1024*12
12M不重启mysql更改my.cnf参数key_bufxxx,如果mysql服务重启了就会失去。因此要在my.cnf里面也添加上以防服务器重启
set global sql_slave_skip_counter=1 跳过一个,然后在继续同步(先stop slave ,然后在开启)
stop slave sql_thread; 停掉slave 的 sql线程,还可以是io_thread:
-----------------
show variables like "key_buffer%"; 查看更改有没有生效
show master statuts; 查看master binlog日志的当前记录位置
show slave statusG; 查看从库状态。
show tables; 查看当前进入的数据库,里面表
show tables from/in xutest; 查看指定数据库,里面表
show grants for xutest@localhost; 查看用户的权限
show index from studentG; 查看student表内容
show databases; 查看已有的数据库
show databases like '%xutest%'; 查看所有包含xutest字段的数据库
show create database xutestG; 查看数据库xutest ,建表的字符集等信息(系统默认)
show create table studentG; 查看表的内容
----------------------------------------------------------------
《drop》
drop table student; 删除表
drop database test; 删除test 数据库
drop user "user"@"主机名" ;(delete 也可以删除用户)
----------------------------------------------------------------
《delete》
delete from mysql.user where user=''; 删除用户名是用的 主机。
delete from mysql.user where user='nova' and host='locallhost';
delete from mysql.user; 或者删除全部用户
删除表里面数据:
delete from test where id=1/id>3;
----------------------------------------------------------------
《truncate》
truncate table test; 直接清空test 表里面所有数据
----------------------------------------------------------------
《grant》
所有权限 d3306数据库和表 用户和主机名 设置密码 xutest123
grant all privileges on d3306.* to 'u3306'@'192.168.0.%' identified by 'xutest123';
更改root密码:
grant all privileges on *.* to 'root'@'localhost' identified by '123456';
如果没有原密码,就不需要加-p密码,可以直接修改
mysqladmin -h 127.0.0.1 -uroot -p123456 password '123456' -P 3306
grant select,create,delete,grant on d3306.* to 'u3306'@'192.168.0.%'(或者192.68.0.1/255.255.255.0 或者 是域名) identified by 'xutest123';
grant all privileges on d3306.* to 'u3306'@'192.168.0.%';
创建从库同步账号(在主库上面执行) replication slave权限
grant replication slave on *.* to 'rep'@'192.168.0.%' identified by 'xutest123';
切记改完账号密码,新建等要刷新
flush privileges;
----------------------------------------------------------------
加锁 - 备份的时候先把数据库锁住,不让用户在写数据,注意不能退出,
需要重新开一个窗口备份数据。
加锁
flush table with read lock; ---- 5.x - 7.x 系统
flush tables with read lock; ---- 5.1系统是是tables
锁的时间和如下两个参数有关:
interactive_timeout = 60
wait_timeout= 60
解锁
unlock tables;
--------------------------------------------------------------