spring与web的整合
1. 整合的原理:
Spring容器随着tomcat容器ServletContext的启动而启动,并且在初始化完成后放到整个应用都可以访问的范围。
ApplicationContext随着服务器的启动而启动,可以借助与Servlet/Filter/Listener任何一个;
把创建好的ApplicationContext放到ServletContext中,整个应用范围,想怎访问就怎么访问;
spring-web-4.2.4.RELEASE.jar包中提供了Listener的支持(spring建议的方式)
WebApplicationContextUtils是Spring官方提供的一个web环境下便捷从ServletContext中获取ApplicationContext的工具类。
2. 整合的步骤
● 添加依赖
<!-- https://mvnrepository.com/artifact/org.springframework/spring-web -->
<dependency>
    <groupId>org.springframework</groupId>
    <artifactId>spring-web</artifactId>
    <version>4.2.4.RELEASE</version>
</dependency>
<!-- https://mvnrepository.com/artifact/javax.servlet/javax.servlet-api -->
<dependency>
    <groupId>javax.servlet</groupId>
    <artifactId>javax.servlet-api</artifactId>
    <version>3.1.0</version>
    <scope>provided</scope>
</dependency>
● 配置监听器,监听web项目的启动
   <!-- needed for ContextLoaderListener -->
    <context-param>
        <param-name>contextConfigLocation</param-name>
        <param-value>classpath:applicationContext.xml</param-value>
    </context-param>

    <!-- Bootstraps the root web application context before servlet initialization -->
    <listener>
        <listener-class>org.springframework.web.context.ContextLoaderListener</listener-class>
    </listener>
● 创建servlet,在servlet中获取spring容器
 1 public class ContextServlet extends HttpServlet {
 2     private static final long serialVersionUID = 1L;
 3
 4     protected void doGet(HttpServletRequest request, HttpServletResponse response) throws ServletException, IOException {
 5         // 1. 获取spring容器
 6         // 获取servletContext域对象
 7         ServletContext servletContext = getServletContext();
 8         // web环境的spring容器
 9         WebApplicationContext applicationContext = WebApplicationContextUtils.getWebApplicationContext(servletContext);
10         // 2. 从容器中获取javabean对象
11         Person person = (Person) applicationContext.getBean("person4");
12         System.out.println(person.getUsername());
13         response.getWriter().append("Served at: ").append(request.getContextPath());
14     }
15
16     protected void doPost(HttpServletRequest request, HttpServletResponse response) throws ServletException, IOException {
17         doGet(request, response);
18     }
19 }
● 访问servlet进行测试
浏览器访问:http://localhost:8080/ContextServlet
spring容器基于注解方式的开发
● 优缺点:
缺点:
1、如果所有的内容都配置在.xml文件中,那么.xml文件将会十分庞大;如果按需求分开.xml文件,那么.xml文件又会非常多。总之这将导致配置文件的可读性与可维护性变得很低。
2、在开发中在.java文件和.xml文件之间不断切换,是一件麻烦的事,同时这种思维上的不连贯也会降低开发的效率。
优点:
Spring基于注解方式的开发,通过"@XXX"的方式,让注解与Java Bean紧密结合,既大大减少了配置文件的体积,又增加了Java Bean的可读性与内聚性。
● 开发步骤:
导入依赖
<!-- https://mvnrepository.com/artifact/org.springframework/spring-aop -->
<dependency>
    <groupId>org.springframework</groupId>
    <artifactId>spring-aop</artifactId>
    <version>4.2.4.RELEASE</version>
</dependency>
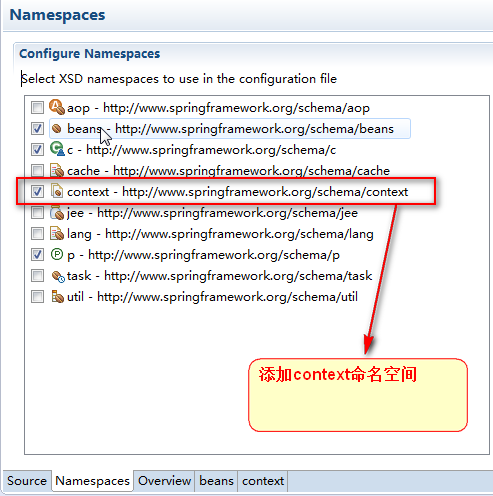
添加context命名空间的schema
开启注解扫描context:component-scan
   <!-- 开启spring的注解扫描 -->
    <!-- 扫描包下带注释的类及类中带注释的属性 -->
    <context:component-scan base-package="spring.annotation.demo"></context:component-scan>
添加注解
Spring中和注入相关的常见注解有Autowired、Resource、Qualifier、Service、Controller、Repository、Component。
- Autowired是自动按照类型注入,自动从spring的上下文找到合适的bean来注入
- Resource用来指定名称注入
- Qualifier和Autowired配合使用,指定bean的名称
- Service,Controller,Repository分别标记类是Service层类,Controller层类,数据存储层的类,spring扫描注解配置时,会标记这些类要生成bean。
- Component是一种泛指,标记类是组件,spring扫描注解配置时,会标记这些类要生成bean。
上面的Autowired和Resource是用来修饰字段,并做属性注入的。而Service,Controller,Repository,Component则是用来修饰类,标记这些类要生成bean。
1 @Repository
2 public class CarDao {
3     public void insertCar(){
4         System.out.println("CarDao中的insertCar的方法被调用... ...");
5     }
6 }
 1 @Service
 2 //@Component
 3 @Scope(value="singleton")
 4 public class CarService {
 5     // 自动按照类型注入,自动从spring上下文中找到合适的bean来注入
 6     @Autowired
 7     private CarDao carDao;
 8
 9     public void insertCar(){
10         carDao.insertCar();
11         System.out.println("CarService中的insertCar方法");
12     }
13
14     @PostConstruct
15     public void init(){
16         System.out.println("init方法被调用... ...");
17     }
18
19     @PreDestroy
20     public void destory(){
21         System.out.println("destory方法被调用... ...");
22     }
23 }
编写测试代码
1 public static void main(String[] args) {
2         ClassPathXmlApplicationContext applicationContext = new ClassPathXmlApplicationContext("applicationContext-annotation.xml");
3         CarService bean = (CarService) applicationContext.getBean("carService");
4         bean.insertCar();
5     }
@Autowired + @Qualifier 结合使用:指定注入bean的名称
@Resouce注解:@Resource注解实现的效果和@Autowired+@Qualifier的效果是一样的
@Scope用于指定scope作用域的(用在类上)
@PostConstruct用于指定初始化方法(用在方法上)
@PreDestory用于指定销毁方法(用在方法上)
@Value 可以为我们的基本数据类型以及string进行属性赋值
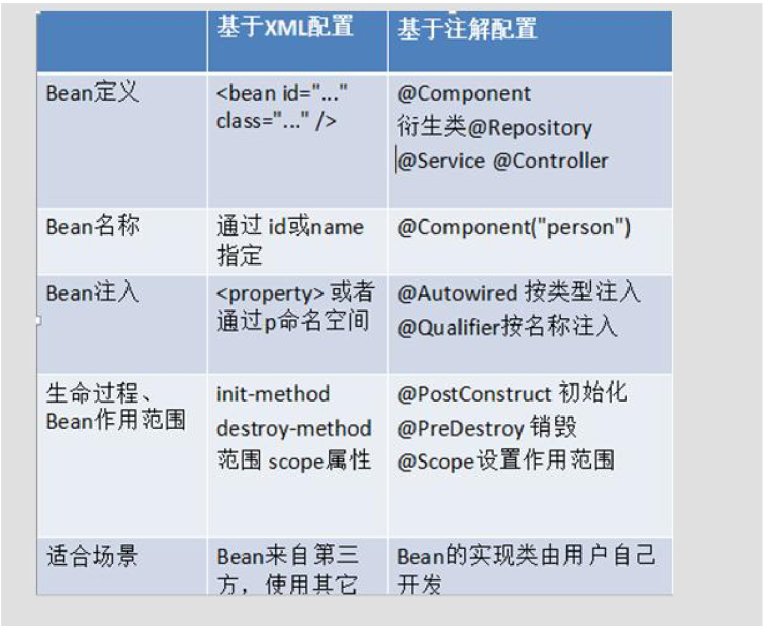
xml配置方式与注解方式的对比
spring与Junit整合测试
整合后测试的优点
整合后测试变得非常简单
避免频繁、重复的容器加载
整合Junit的步骤
导入spring-test的jar包
       <dependency>

             <groupId>org.springframework</groupId>

             <artifactId>spring-test</artifactId>

             <version>4.12</version>

             <scope>test</scope>

       </dependency>
编写Junit整合测试类
 1 @RunWith(SpringJUnit4ClassRunner.class)//使用Junit4进行测试
 2 @ContextConfiguration("classpath:applicationContext-annotation.xml")//加载配置文件
 3 public class JunitSpringTest {
 4     @Autowired
 5     private CarService carService;
 6
 7     @Autowired
 8     private CarDao carDao;
 9
10     @Test
11     public void test01(){
12         carDao.insertCar();
13     }
14 }