Cacti 监控安装配置
环境:
安装Cacti 的服务器
Linux 6.4 x64
ip 10.8.8.11
一: 配置iptables , selinux
vi /etc/sysconfig/iptables
-------------------------------------------------------------------------
# Firewall configuration written by system-config-firewall
# Manual customization of this file is not recommended.
*filter
:INPUT ACCEPT [0:0]
:FORWARD ACCEPT [0:0]
:OUTPUT ACCEPT [0:0]
-A INPUT -m state --state ESTABLISHED,RELATED -j ACCEPT
-A INPUT -p icmp -j ACCEPT
-A INPUT -i lo -j ACCEPT
-A INPUT -m state --state NEW -m tcp -p tcp --dport 22 -j ACCEPT
-A INPUT -m state --state NEW -m tcp -p tcp --dport 80 -j ACCEPT
-A INPUT -m state --state NEW -m tcp -p tcp --dport 3306 -j ACCEPT
-A INPUT -m state --state NEW -m tcp -p tcp --dport 161 -j ACCEPT
-A INPUT -j REJECT --reject-with icmp-host-prohibited
-A FORWARD -j REJECT --reject-with icmp-host-prohibited
COMMIT
--------------------------------------------------------------------------
vi /etc/selinux/config
--------------------------------------------------------------------------
# This file controls the state of SELinux on the system.
# SELINUX= can take one of these three values:
# enforcing - SELinux security policy is enforced.
# permissive - SELinux prints warnings instead of enforcing.
# disabled - No SELinux policy is loaded.
SELINUX=disabled
# SELINUXTYPE= can take one of these two values:
# targeted - Targeted processes are protected,
# mls - Multi Level Security protection.
SELINUXTYPE=targeted
--------------------------------------------------------------------------
reboot 重启服务器
二:安装配置WEB环境
lnmp 一键安装...省略....
三:安装配置Cacti Web服务
安装rrdtool、net-snmp以及相关依赖包
rrdtool 下载 : http://oss.oetiker.ch/rrdtool/
yum install rrdtool net-snmp rrdtool-devel net-snmp-devel net-snmp-utils net-snmp-python net-snmp-perl lm_sensors-devel
file-devel rpm-devel file intltool libart_lgpl libart_lgpl-devel elfutils pango-devel* cairo-devel* mysql-devel
Mod_auth_mysql php-mysql cairo dejavu-fonts-common.noarch dejavu-lgc-sans-mono-fonts.noarch dejavu-sans-mono-
fonts.noarch fontpackages-filesystem.noarch libXft libXrender libthai pango pixman perl-rrdtool net-snmp net-snmp-utils
tcp_wrappers-devel
chkconfig snmpd on 设置snmpd 开机启动
service snmpd start 启动snmpd服务
1. 下载Cactic 0.8.8a
wget http://www.cacti.net/downloads/cacti-0.8.8a.tar.gz
tar zxvf cacti-0.8.8a.tar.gz
cd cacti-0.8.8a
mkdir -p /opt/htdocs/cacti
cp -r * /opt/htdocs/cacti
chown upload:upload /opt/htdocs/cacti -R
chmod 700 /opt/htdocs/cacti -R
2. 设置Cacti 数据库
登陆mysql
/opt/local/mysql/bin/mysql -uroot -p123456
创建数据库
create database cactidb;
创建数据库用户
insert into mysql.user(Host,User,Password) values('localhost','cactiuser',password('123456'));
授权用户cactiuser对数据库cactidb完全访问
grant all on cactidb.* to 'cactiuser'@'%' identified by '123456' with grant option;
设置生效
flush privileges;
use cactidb
导入cacti数据库文件
source /opt/htdocs/cacti/cacti.sql
exit
3. 配置Cacti 文件
vi /opt/htdocs/cacti/include/config.php
-----------------------------------------------------------------------------------------
*/
/* make sure these values refect your actual database/host/user/password */
$database_type = "mysql";
$database_default = "cactidb";
$database_hostname = "localhost";
$database_username = "cactiuser";
$database_password = "123456";
$database_port = "3306";
$database_ssl = false;
/*
Edit this to point to the default URL of your Cacti install
ex: if your cacti install as at http://serverip/cacti/ this
would be set to /cacti/
*/
//$url_path = "/cacti/";
/* Default session name - Session name must contain alpha characters */
//$cacti_session_name = "Cacti";
?>
---------------------------------------------------------------------------------------------
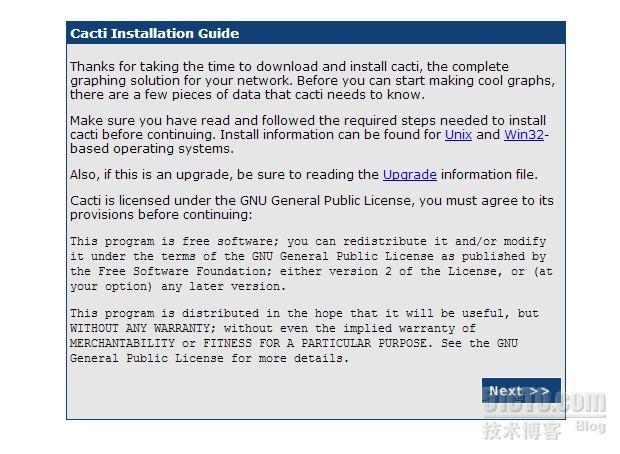
配置完成以后.在浏览器输入 10.8.8.11
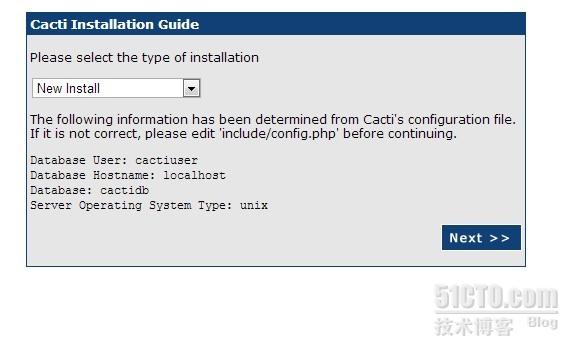
Please select the type of installation
选择New install
点Next,出现下面界面
登陆. 用户名密码都为 admin
如上提示,第一次登陆以后,会提示修改密码
设置定时采集
crontab -e
每5分钟采集一次
*/5 * * * * php /opt/htdocs/cacti/poller.php
四,配置监控机 Windows 7
监控Windows 需要 安装snmp 协议 (简单网络管理协议)
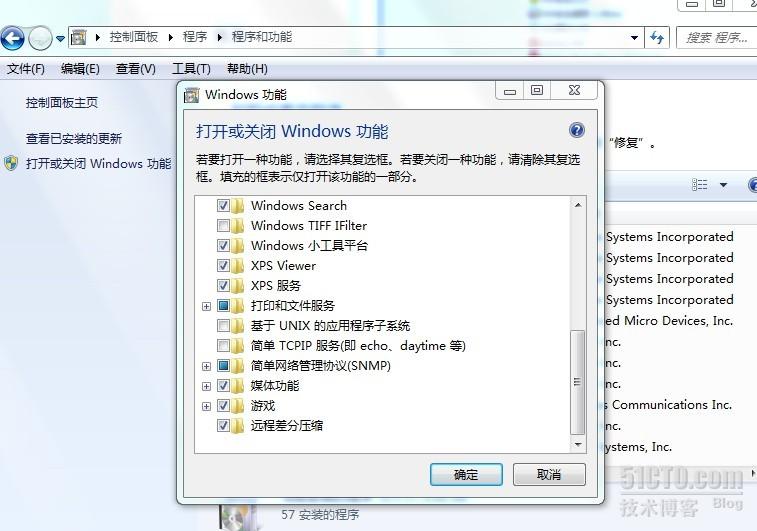
在控制面板中找到“卸载程序”
在弹出的窗口中单击“打开或关闭Windows功能”
勾选弹出窗口中的“简单网络管理协议(SNMP)”项后单击“确定”并根据提示完成安装即可
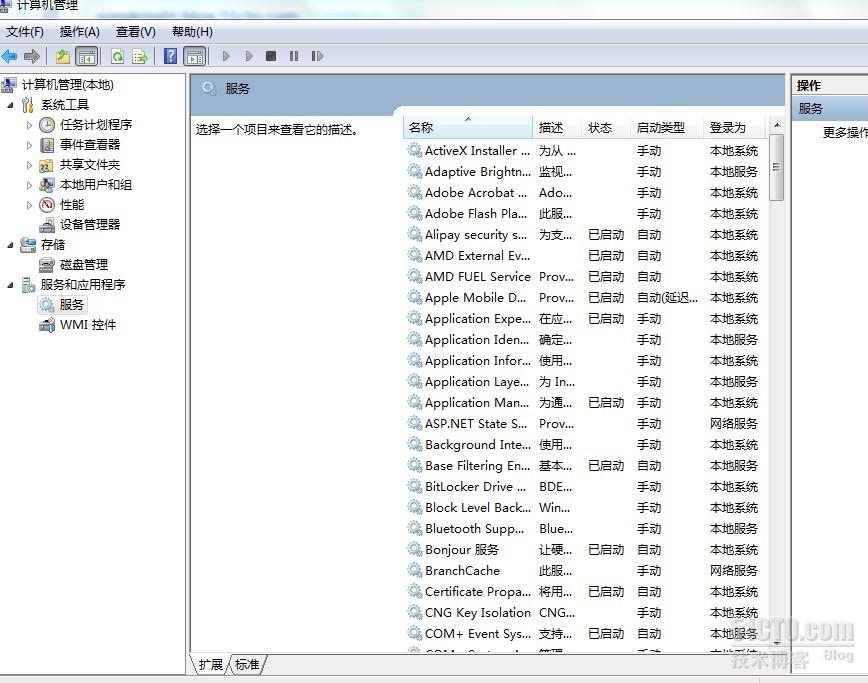
完成SNMP服务的安装后,右键单击“计算机”选择“管理”
在弹出的“计算机管理”窗口中左侧导航栏中找到“服务”,并在右侧找到“SNMP Service”项
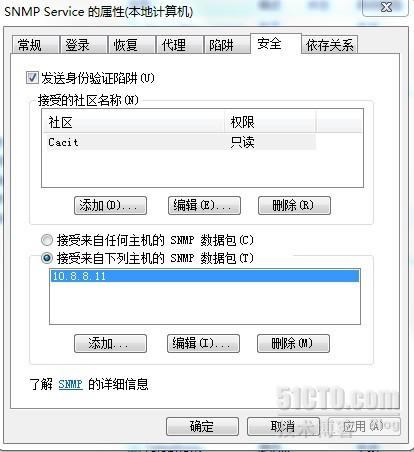
鼠标双击“SNMP Service”选项,在弹出的窗口中切换到“安全”选项卡中,如上图添加“接受的社区名称”和接收那些主机发出的SNMP数据包。
---------------------------------------------------------------------------------
2. 添加Linux 主机的监控
在Linux 下安装 snmp 服务
yum -y install net-snmp
设置开机自动启动 snmp服务
chkconfig snmpd on
启动 snmp 服务
service snmpd start
配置 snmp 服务
cd /etc/snmp/
mv snmpd.conf
vi snmpd.conf 修改下面内容
-------------------------------------------------------------
# sec.name source community
com2sec notConfigUser default public
更改为
com2sec notConfigUser 10.8.8.11 public
------------------------------------------------------------------
-------------------------------------------------------------------------------
####
# Finally, grant the group read-only access to the systemview view.
# group context sec.model sec.level prefix read write notif
access notConfigGroup "" any noauth exact systemview none none
将 systmview 更改为 all
-----------------------------------------------------------------------------------
------------------------------------------------------------------------------------
## incl/excl subtree mask
#view all included .1 80
去掉 #view 的注释
------------------------------------------------------------------------------------
成功以后会显示如下信息!
最后为主机添加图形
错误.1 不显示..
解决办法:
Console -> Data Source -> 选择没有图像的数据源 -> Turn On Data Source Debug MTurnode
复制到 Catic 安装主机 执行.
执行后会生成rrd文件
Data Source Debug 下面的 复制...
