转自 http://bits-please.blogspot.com/2015/08 (需要翻墙, 狗日的墙)
In this blog post, we'll be exploring Qualcomm's TrustZone implementation, as present on Snapdragon SoCs. If you haven't already, you might want to read theprevious blog post, in which I go into some detail about TrustZone in general.
Where do we start?
First of all, since Qualcomm's TrustZone implementation is closed-source, and as far as I could tell, there are no public documents detailing its architecture or design, we will probably need to reverse-engineer the binary containing the TrustZone code, and analyse it.
Acquiring the TrustZone image
We can attempt to extract the image from two different locations; either from the device itself, or from a factory image of the device.
My personal Nexus 5 device was already rooted, so extracting the image from the device should be pretty straight forward. Since the image is stored on the eMMC chip, and the blocks and partitions of the eMMC chip are available under "/dev/block/platform/msm_sdcc.1", I could simply copy the relevant partition to my desktop (using "dd").
Moreover, the partitions have meaningfully named links to them under "/dev/block/platform/msm_sdcc.1/by-name":

As you can see, there are two partitions here, one named "tz" (short for T rust Zone), and one named "tzb", which serves as a backup image to the "tz" image, and is identical to it.
However, having extracted the image this way, I was still rather unsatisfied, for two reasons:
- Although the TrustZone image is stored on the eMMC chip, it could easily be made inaccessible to the "Normal World" (by requiring the AxPROT bit on the system bus to be set), or several parts of it could be missing.
- Pulling the entire partition's data doesn't reveal information about the real (logical) boundary of the image, so it will require some extra work to determine where the image actually ends. (Actually, since the "tz" image is an ELF binary, its size is contained within the ELF header, but that's just a fluke on our part).
So, having extracted one image from the device, let's take a look at a factory image.
The Nexus 5's factory images are all available to download from Google . The factory image contains a ZIP with all the default images, and additionally contains the bootloader image.
After downloading the factory image and grepping for strings related to TrustZone, it quickly became apparent that the bootloader image contains the wanted code.
However, there was still a minor problem to solve here - the bootloader image was in an unknown format (although maybe some Google-fu could reveal the answers needed). Regardless, opening the file with a hex-editor and guessing at its structure revealed that the format is actually quite simple:

The bootloader file has the following structure:
- Magic value ("BOOTLDR!") - 8 bytes
- The number of images - 4 bytes
- The offset from the beginning of the file to the beginning of the image's data - 4 bytes
- The total size of the data contained in the images - 4 bytes
- An array with a number of entries matching the "number of images" field, above. Each entry in the array has two fields:
- The image name - 64 bytes (zero padded)
- The image length - 4 bytes
As you can see in the image above, the bootloader image contains an image called "tz", which is the image we're after. In order to unpack this file, I've written a small python script ( available here ) which receives a bootloader image and unpacks all of the files contained within it.
After extracting the image, and comparing it to the one extracted previously from the device, I verified that they were indeed identical. So I guess this means we can now move on to examine the TrustZone image.
Fixing up the TrustZone image
First of all, examining the file reveals that it is in fact an ELF file, which is pretty good news! This means that the memory segments and their mapped addresses should be available to us.
After opening the file with IDA Pro and letting the auto-analysis to run for a while, I wanted to start reversing the file. However, surprisingly, there seemed to be a lot of branches to unmapped addresses (or rather, addresses that weren't contained within the "tz" binary).
After taking a closer look, it seemed as though all the absolute branches that pointed to invalid addresses were within the first code segment of the file, and they were pointing into high addresses that weren't mapped. Also, there were no absolute branches to the address of that first code segment.
This seemed a little fishy... So how about we take a look at the ELF file's structure? Executing readelf reveals the following:

There's a NULL segment mapped to a higher address, which actually corresponds with the address range to which the invalid absolute branches were pointing! The guys over at Qualcomm are sneaky pandas :)
Anyway, I made a rather safe guess, which is that the first code segment is in fact mapped to the wrong address, and should actually be mapped to the higher address - 0xFE840000. So naturally, I wanted to rebase the segment using IDA's rebase feature, but lo and behold! This causes IDA to crash spectacularly:

I'm actually not sure if this was intended as an anti-reversing feature by Qualcomm, or if the NULL segment is just a result of their internal build process, but this can be easily bypassed by fixing the ELF file manually. All that's required is to move the NULL segment to an unused address (since it is ignored by IDA anyway), and to move the first code segment from its wrong address (0xFC86000) to the correct address (0xFE840000), like so:

Now, after loading the image in IDA, all the absolute branches are valid! This means we can move on to analyse the image.
Analysing the TrustZone image
First, it should be noted that the TrustZone image is a rather large (285.5 KB) binary file, with quite a small amount of strings, and with no public documentation. Moreover, the TrustZone system is comprised of a full kernel with capabilities such as executing applications, and much more. So... it's not clear where we should start, as reversing the whole binary would probably take far too long.
Since we would like to attack the TrustZone kernel from the application processor, the largest attack surface would probably be the secure monitor calls which enable the "Normal World" to interact with the "Secure World".
It should be noted, of course, that there are other vectors with which we can interact with the TrustZone, such as shared memory or maybe even interrupt handling, but since these pose a much smaller attack-surface, it is probably better to start by analysing the SMC calls.
So how do we find where the TrustZone kernel handles the SMC calls? First of all, let's recall that when executing an SMC call, similarly to the handling of SVC calls (that is, regular system calls in the "Normal World"), the "Secure World" must register the address of the vector to which the processor will jump when such an instruction is encountered.
The "Secure World"'s equivalent is the MVBAR ( M onitor V ector B ase A ddressR egister), which provides the address of the vector containing the handling functions for the different events which are handled by the processor in "Secure World".
Accessing the MVBAR is done using the MRC/MCR opcodes, with the following operands:

So this means we can simply search for an MCR opcode with the following operands in the TrustZone image, and we should be able to find the "Monitor Vector". Indeed, searching for the opcode in IDA returns the following match:

As you can see, the address of the "start" symbol (which is, by the way, the only exported symbol), is loaded into the MVBAR.
According to the ARM documentation , the "Monitor Vector" has the following structure:

Which means that if we look at the "start" symbol mentioned earlier, we can assign the following names to the addresses in that table:

Now, we can analyse the SMC_VECTOR_HANDLER function. Actually, this function is responsible for quite a few tasks; first, it saves all the state registers and the return address in a predefined address (in the "Secure World"), then, it switches over the stack to a preallocated area (also in the "Secure World"). Finally, after performing the necessary preparations, it goes on to analyse the operation requested by the user and operate according to it.
Since the code to issue SMCs is present in the Qualcomm's MSM branch of the Linux kernel, we can take a look at the format of commands which the "Normal World" can issue to the "Secure World".
SMC and SCM
Confusingly, Qualcomm chose to name the channel through which the "Normal World" interacts with the "Secure World" via SMC opcodes - SCM ( S ecure C hannelM anager).
Anyway, as I've mentioned in the previous blog post , the "qseecom" driver is used to communicate with the "Secure World" using SCMs.
The documentation provided by Qualcomm in the relevant source files is quite extensive, and is enough to get quite a good grip on the format of SCM commands.
Putting it shortly, SCM commands fall into one of two categories:
Regular SCM Call - These calls are used when there is information that needs to be passed from the "Normal World" to the "Secure World", which is needed in order to service the SCM call. The kernel populates the following structure:

And the TrustZone kernel, after servicing the SCM call, writes the response back to the "scm_response" structure:

In order to allocate and fill these structures, the kernel may call the wrapping function "scm_call", which receives pointers to kernel-space buffers containing the data to be sent, the location to which the data should be returned, and most importantly, the service identifier and command identifier.
Each SCM call has a "category", which means which TrustZone kernel subsystem is responsible for handling that call. This is denoted by the service identifier. The command identifier is the code which specifies, within a given service, which command was requested.
After the "scm_call" function allocates and populates the "scm_command" and "scm_response" buffers, it calls an internal "__scm_call" function which flushes all the caches (inner and outer caches), and calls the "smc" function.
This last function actually executes the SMC opcode, transferring control to the TrustZone kernel, like so:

Note that R0 is set to 1, R1 is set to point to a local kernel stack address, which is used as a "context ID" for that call, and R2 is set to point to the physical address of the allocated "scm_command" structure.
This "magic" value set in R0 indicates that this is a regular SCM call, using the "scm_command" structure. However, for certain commands where less data is required, it would be rather wasteful to allocate all these data structures for no reason. In order to address this issue, another form of SCM calls was introduced.
Atomic SCM Call - For calls in which the number of arguments is quite low (up to four arguments), there exists an alternate way to request an SCM call.
There are four wrapper functions, "scm_call_atomic_[1-4]", which correspond to the number of arguments requested. These functions can be called in order to directly issue an SMC for an SCM call with the given service and command IDs, and the given arguments.
Here's the code for the "scm_call_atomic1" function:

Where SCM_ATOMIC is defined as:

Note that both the service ID and the command ID are encoded into R0, along with the number of arguments in the call (in this case, 1). This is instead of the previous "magic" value of 1 used for regular SCM calls.
This different value in R0 indicates to the TrustZone kernel that the following SCM call is an atomic call, which means that the arguments will be passed in using R2-R5 (and not using a structure pointed to by R2).
Analysing SCM calls
Now that we understand how SCM calls work, and we've found the handling function in the TrustZone kernel which is used to handle these SCM calls, we can begin disassembling the SCM calls to try and find a vulnerability in one of them.
I'll skip over most of the analysis of the SCM handling function, since most of it is boilerplate handling of user input, etc. However, After switching the stack over to the TrustZone area and saving the original registers with which the call was performed, the handling function goes on to process the service ID and the command ID in order to see which internal handling function should be called.
In order to easily map between the service and command IDs and the relevant handling function, a static list is compiled into the TrustZone image's data segment, and is referenced by the SCM handling function. Here is a short snipped from the list:

As you can see, the list has the following structure:
- Pointer to the string containing the name of the SCM function
- "Type" of call
- Pointer to the handling function
- Number of arguments
- Size of each argument (one DWORD for each argument)
- The Service ID and Command ID, concatenated into a single DWORD - For example, the "tz_blow_sw_fuse" function above, has the type 0x2002 which means it belongs to the service ID 0x20 and its command ID is 0x02.
Now all that's left is to start disassembling each of these functions, and hope to find an exploitable bug.
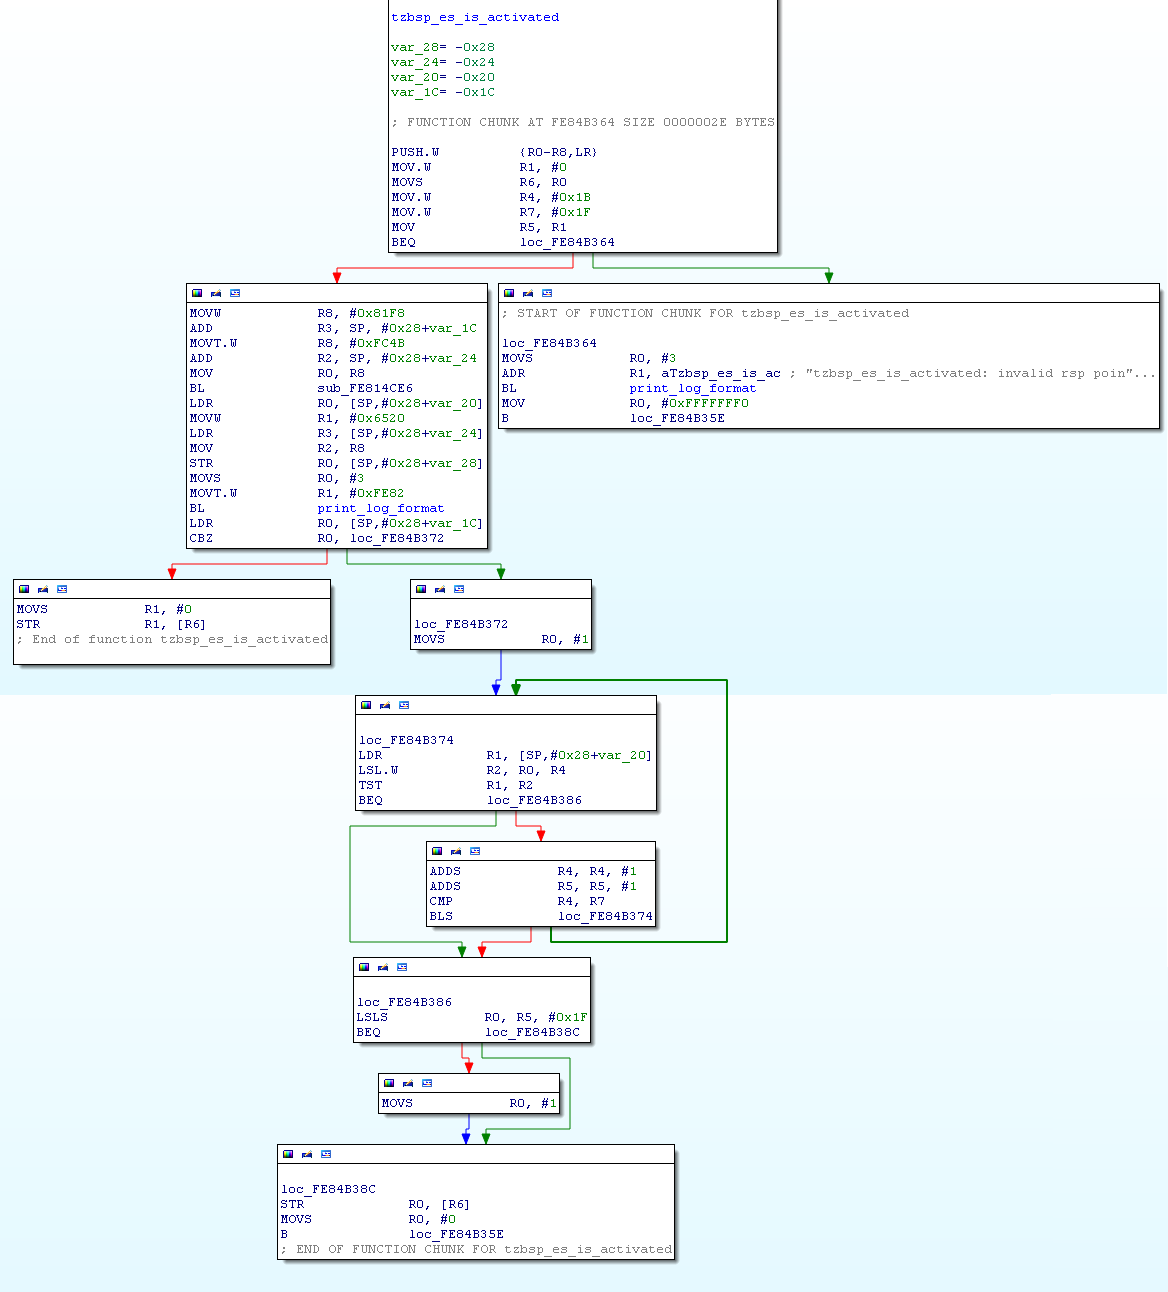
The Bug!
So after pouring over all of the aforementioned SMC calls (all 69 of them), I finally arrived at the following function:

Normally, when an SCM command is called using the regular SCM call mechanism, R0 will contain the "result address" which points to the "scm_response" buffer which was allocated by the kernel, but which is also validated by the TrustZone kernel to make sure it is actually a physical address within an "allowed" range - that is, a physical address which corresponds to the Linux kernel's memory, and not, for example, a memory location within the TrustZone binary.
This check is performed using an internal function which I will cover in more detail in the next blog post (so keep posted!).
But what happens if we use an atomic SCM call to execute a function? In that case, the "result address" used is the first argument passed by the atomic call.
Now - can you see the bug in the function above?
As opposed to other SCM handling functions, this function fails to validate the value in R0, the "result address", so if we pass in:
- R1 as a non-zero value (in order to pass the first branch)
- The fourth argument (which is passed in at var_1C above) as zero
- R0 as any physical address, including an address within the range of the TrustZone address space
The function will reach the left-most branch in the function above, and write a zero DWORD at the address contained in R0.
What's next?
In the next blog post I will share a detailed (and quite complex!) exploit for the vulnerability described above, which enables full code execution within the TrustZone kernel. I will also publish the full exploit code, so stay tuned!
Also, since this is only my second blog post, I'm really looking for some (any) input, specifically:
- What should I write more (or less) about?
- Blog design issues
- Research ideas :)