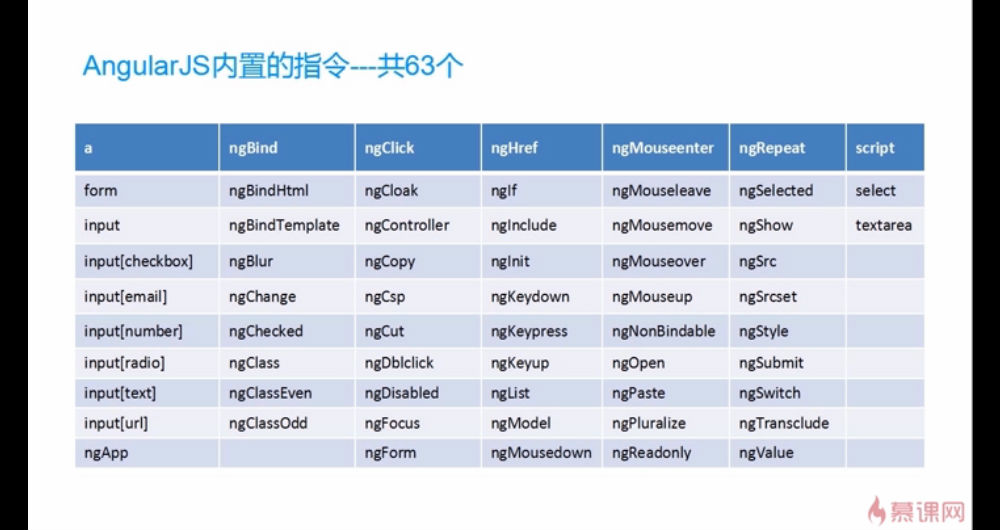
AngularJS 通过被称为 指令 的新属性来扩展 HTML。
正如你所看到的,AngularJS 指令是以 ng 作为前缀的 HTML 属性。
HTML5 允许扩展的(自制的)属性,以 data- 开头。
AngularJS 属性以 ng- 开头,但是您可以使用 data-ng- 来让网页对 HTML5 有效。
以下列举了一些指令,并不一定常用,但是都有用!
有些指令相关的demo,有兴趣的可以下载,github地址:https://github.com/392468072/demo
自带指令
1、ng-app此指令声明angular的边界,也就是应用程序入口(当然没有ng—app指令的时候也不要奇怪,还有其他方法可以做入口,angular.bootstrap(element,[modules],config))
2、ng-bind 就是绑定模板,其实和{{hash}}的效果是一样的,不过要注意的是{{hash}}在各种原因下可能会被用户看到,带来不好的用户体验
3、ng-model 它链接了页面可交互元素(input,textarea之类的)和位于$scope之上的model,这儿有点乱,自己理清楚即可
4、ng-controller设置子作用域对象$scope(父作用域为$rootScope)的初始状态,给子作用域$scope增加行为,控制业务逻辑
5、ng-init 初始化数组,可以方便测试,现在已经不推荐使用了
6、ng-repeat迭代输出 orderBy:“keyword”可以指定输出顺序
7、ng-click 允许自定义行为某个元素被点击,当然其它事件指令都有类似的作用如:
ng-dbclick双击 ng-mouseDown按下鼠标左键 ng-mouseUp松开鼠标左键 ng-mouseOver鼠标移出 ng-mouseEnter鼠标移入
ng-copy 文本被复制 ng-paste文本被粘贴 ng-select文本被选择 ng-change ng-blur ng-keydown等等,当然还有很多,就不11列出了
8、ng-submit 这肯定和form表单相关咯,对,就是submit form的意思
9、ng-href/ng-src 链接,这里可能会有人问,为什么不直接用html标签的属性呢?href/src = “{{hash}}”
因为官方说:The browser will fetch from the URL with the literal text {{hash}} until Angular replaces the expression inside {{hash}}.
如果浏览器将{{hash}}里的值,也即src/href属性值替换成文本以后可能就停止干活了.
10、ng-if 接收boolean值,若为false,它控制的DOM节点会被删除,若为true就会创建被插入DOM节点
11、ng-include 可以在模板中嵌入其他模板,实现前端页面的复用
12、ng-non-bindable指令指该元素的内部{{****}}不被绑定和转义,不受angular的掌控
13、ng-pluralize 应该是使成为复数
14、ng-show/ng-hide 显示、隐藏元素
15、ng-style设置style 接收一个css对象 ng-style={{cssObj}}
16、ng-switch这个指令相当于通过$scope内部变量控制dom的隐藏和显示,其实这个指令非常强大, 相当于是为html代码提供了ifelse的功能 (因为angular的html中不能通过ifelse控制逻辑)
17、ng-transclude自定义标签
自定义指令
最后说明:指令是可以自定义的
具体的有4种表现方式:
- E 页面标签,也就是新的html元素<hello-angular></hello-angular>
- A 元素的属性<input type="text" hello-angular="" />
- C css类选择器的值<input type="text" class="hello-angular"/>
- M 注释<!-- director:hello-angular -->
先来创建一个自定义指令(13—23行代码)
 1 <!DOCTYPE html>
 2 <html ng-app="app">
 3     <head>
 4         <meta charset="utf-8" />
 5         <title>自定义指令demo</title>
 6     </head>
 7     <body>
 8         <div ng-controller="testCon">
 9             <hello-angular>beauty</hello-angular>
10         </div>
11         <script type="text/javascript" src="js/angular.js"></script>
12         <script>
13             angular.module('app',[])
14             .directive('helloAngular',function(){
15                 return{
16                     restrict:'AECM',
17                     template:'<p>hello,<b ng-transclude></b></p>',
18                     transclude:true
19                 };
20             })
21             .controller('testCon',function($scope){
22
23             });
24         </script>
25     </body>
26 </html>
输出: hello,beauty
没错就是上面那个输出,不信可以试试咯!
restrict: 翻译为”限制“,也许细心的人会发现这个属性,一一对应指令的四种变现方式,这就对了,这就是被允许的表现方式
templace: 这其中是标签也可以是字符串,不是标签的话会报错,它的兄弟属性是templateUrl,两者只需其一
templateUrl: url?是的,必须是url才行咯,想想看,如果没有这个属性,template将会承载所有的标签,如果你要添加很长的一段代码,那么template的属性值会很长很长,
肯定会不方便咯
transclude: 前面那个<b>标签的属性ng-transclude肯定和这个有关系对吧,设置为true,一个乾坤大挪移就把<hello-angular>移动到template中的<b>标签里面咯
接着,小小的改下代码,17 18行改成下面这样,看俺replace的作用
1 restrict:'AECM',
2 replace:true,
3 template:'<p>hello</p>'
replace: 从单词的意思就可以看出来,替代,没错,就是用<p>hello</p>替代页面上的<hello-angular><hello-angular>
不要问卤煮为什么,自己敲一敲就ok。
再来一段代码,说明下面scope的用法
 1 <!DOCTYPE html>
 2 <html ng-app="app">
 3     <head>
 4         <meta charset="utf-8" />
 5         <title>自定义指令demo</title>
 6     </head>
 7     <body>
 8         <div ng-controller="testCon">
 9             <hello-angular info="person"></hello-angular>
10         </div>
11         <script type="text/javascript" src="js/angular.js"></script>
12         <script>
13             angular.module('app',[])
14             .directive('helloAngular',function(){
15                 return{
16                     restrict:'AECM',
17                     scope:{
18                         personReference:'=info'
19                     },
20                     template:'He is {{person.name}}'
21                 };
22             })
23             .controller('testCon',function($scope){
24                 $scope.person = {name:'Tom',age:180};
25             });
26         </script>
27     </body>
28 </html>
scope:自定义作用域,没有这个属性时默认使用父级controller的$scope,有socpe{}时,此scope继承父级controller的$scope
绑定策略的三种形式”=“,“@”,“&” 将本地作用域和DOM中的属性值绑定起来
”=“对一个对象的引用,后面的info是自定义标签中的属性(第9行代码),简而言之,personReference对象是person对象的引用
”@“表示对一个字符串的拷贝<ps:这儿不太确定,不过根据js来看,应该是这样>,这里不再赘述
”&“表示对父级作用域进行绑定,并将其中的属性包装成一个函数
 1 <!DOCTYPE html>
 2 <html ng-app="app">
 3     <head>
 4         <meta charset="utf-8" />
 5         <title>自定义指令demo</title>
 6     </head>
 7     <body>
 8         <div ng-controller="testCon">
 9             <hello-angular get-classes="classes" get-name="name"></hello-angular>
10         </div>
11         <script type="text/javascript" src="js/angular.js"></script>
12         <script>
13             angular.module('app',[])
14             .directive('helloAngular',function(){
15                 return{
16                     restrict:'AECM',
17                     scope:{
18                         getClasses:'&',
19                         getName:'&'
20                     },
21                     template:'there are {{classes}} classes<br /><div ng-repeat="i in name">NO.{{$index+1}} className is {{i}}</div>',
22                     controller:function($scope){
23                         $scope.classes = $scope.getClasses();
24                         $scope.name = $scope.getName();
25                     }
26                 };
27             })
28             .controller('testCon',function($scope){
29                 $scope.classes = 3;
30                 $scope.name = ['A','B','C'];
31             });
32         </script>
33     </body>
34 </html>
输出截图
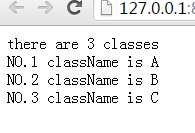
“=”,“@”,“&”简写方式(代码第18,19行)scope{}中属性值可以简写为“@”,不过也必须遵循和DOM节点的属性一一对应的原则,angular会进行自动匹配