Introduction
在本文中,您将学习一种在ASP.NET Core中使用Ocelot构建API网关的简单方法。也许你会问,什么是API网关。
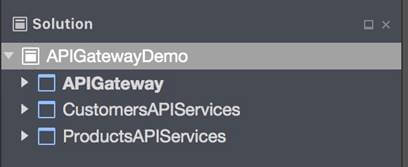
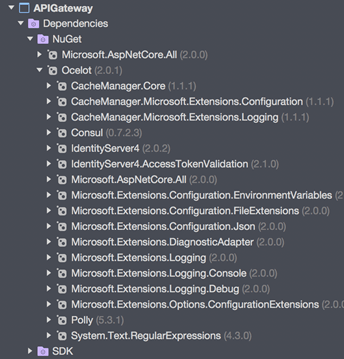
让我们先看看下面的截图。

上面的屏幕截图可以帮助您清楚地理解它。
API网关是我们系统的入口。 它包含许多内容,例如路由,身份验证,服务发现,日志记录等。
Ocelot
Ocelot面向使用.NET运行微服务/面向服务的体系结构的人员,这些人员需要在系统中具有统一的入口点。 您可以访问该项目的Github页面以找到更多信息。
我将使用一个简单的演示向您展示如何使用Ocelot。
Let's begin!
Step 1
首先创建三个项目
| Project Name | Project Type | Description |
| APIGateway | ASP.NET Core Empty | entry of this demo |
| CustomersAPIServices | ASP.NET Core Web API | API Service that handles something about customers |
| ProductsAPIServices | ASP.NET Core Web API | API Service that handles something about products |
Step 2
首先完成两个API服务。 在CustimersAPIServices项目中创建一个CustomerController。
- [Route("api/[controller]")]
- public class CustomersController : Controller
- {
- [HttpGet]
- public IEnumerable<string> Get()
- {
- return new string[] { "Catcher Wong", "James Li" };
- }
- [HttpGet("{id}")]
- public string Get(int id)
- {
- return $"Catcher Wong - {id}";
- }
- }
为了指定此服务的App URL,我们应该在Program类中添加UseUrls。
- public static IWebHost BuildWebHost(string[] args) =>
- WebHost.CreateDefaultBuilder(args)
- .UseStartup<Startup>()
- .UseUrls("http://localhost:9001")
- .Build();
在ProductsAPIServices项目中创建一个ProductsController。
- [Route("api/[controller]")]
- public class ProductsController : Controller
- {
- [HttpGet]
- public IEnumerable<string> Get()
- {
- return new string[] { "Surface Book 2", "Mac Book Pro" };
- }
- }
编辑Program类以添加UseUrls。
- public static IWebHost BuildWebHost(string[] args) =>
- WebHost.CreateDefaultBuilder(args)
- .UseStartup<Startup>()
- .UseUrls("http://localhost:9002")
- .Build();
Note
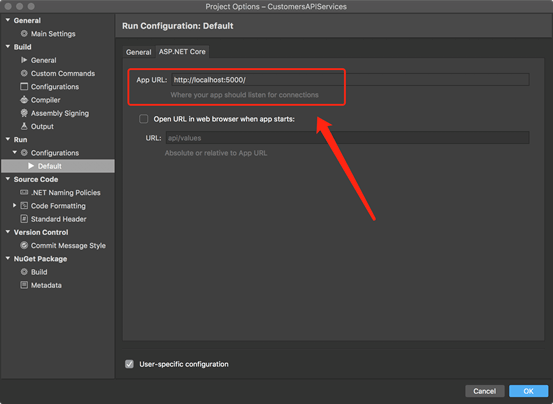
您还可以在“项目选项”页面中指定应用程序URL。
Step 3
运行客户服务和产品服务。
打开两个终端,然后使用“ dotnet run”命令启动它们。
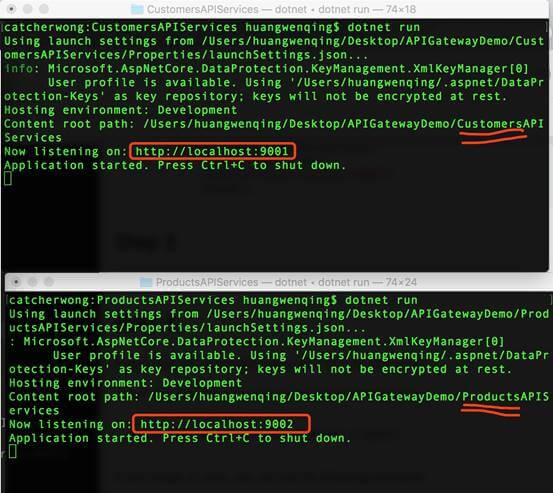
如您所见,客户服务正在监听http:// localhost:9001,产品服务正在监听http:// localhost:9002。
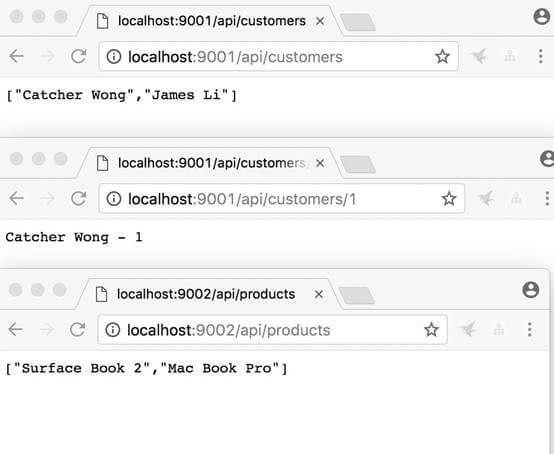
打开浏览器,验证服务是否正常。
Step 4
现在,我们应该转到APIGateway项目。 我们应该首先安装Ocelot软件包。
Install-Package Ocelot
安装此软件包后,您可以找到对它的依赖。
Step 5
添加configuration.json文件。
- {
- "ReRoutes": [
- {
- "DownstreamPathTemplate": "/api/customers",
- "DownstreamScheme": "http",
- "DownstreamHost": "localhost",
- "DownstreamPort": 9001,
- "UpstreamPathTemplate": "/customers",
- "UpstreamHttpMethod": [ "Get" ]
- },
- {
- "DownstreamPathTemplate": "/api/customers/{id}",
- "DownstreamScheme": "http",
- "DownstreamHost": "localhost",
- "DownstreamPort": 9001,
- "UpstreamPathTemplate": "/customers/{id}",
- "UpstreamHttpMethod": [ "Get" ]
- },
- {
- "DownstreamPathTemplate": "/api/products",
- "DownstreamScheme": "http",
- "DownstreamPort": 9002,
- "DownstreamHost": "localhost",
- "UpstreamPathTemplate": "/api/products",
- "UpstreamHttpMethod": [ "Get" ]
- }
- ],
- "GlobalConfiguration": {
- "RequestIdKey": "OcRequestId",
- "AdministrationPath": "/administration"
- }
- }
此文件是API网关的配置。 配置分为两部分-ReRoutes数组和GlobalConfiguration。
ReRoute是告诉Ocelot如何处理上游请求的对象。 全局配置有点怪异,并允许覆盖ReRoute特定设置。
采取这一部分来解释“ReRoutes section”。
- {
- "DownstreamPathTemplate": "/api/customers/{id}",
- "DownstreamScheme": "http",
- "DownstreamHost": "localhost",
- "DownstreamPort": 9001,
- "UpstreamPathTemplate": "/customers/{id}",
- "UpstreamHttpMethod": [ "Get" ]
- }
这些项目以“Downstream”开头,这意味着我们的请求将转发到http:// localhost:9001 / api / customers / {id}。
这些项目以"Upstream"开头,这意味着我们应该对/ customers / {id}`使用HTTP GET方法来访问此服务。
Step 6
编辑Startup类,以便我们可以在该项目中使用Ocelot。
- public class Startup
- {
- public Startup(IHostingEnvironment env)
- {
- var builder = new Microsoft.Extensions.Configuration.ConfigurationBuilder();
- builder.SetBasePath(env.ContentRootPath)
- //add configuration.json
- .AddJsonFile("configuration.json", optional: false, reloadOnChange: true)
- .AddEnvironmentVariables();
- Configuration = builder.Build();
- }
- //change
- public IConfigurationRoot Configuration { get; }
- public void ConfigureServices(IServiceCollection services)
- {
- Action<ConfigurationBuilderCachePart> settings = (x) =>
- {
- x.WithMicrosoftLogging(log =>
- {
- log.AddConsole(LogLevel.Debug);
- }).WithDictionaryHandle();
- };
- services.AddOcelot(Configuration, settings);
- }
- //don't use Task here
- public async void Configure(IApplicationBuilder app, IHostingEnvironment env)
- {
- await app.UseOcelot();
- }
- }
不要忘记将configuration.json文件添加到Configuration中。
Step 7
这是配置Ocelot的非常重要的步骤。
我们应该创建一个IWebHostBuilder的新实例。 而且,不要在这里使用var !!!
- public class Program
- {
- public static void Main(string[] args)
- {
- IWebHostBuilder builder = new WebHostBuilder();
- builder.ConfigureServices(s =>
- {
- s.AddSingleton(builder);
- });
- builder.UseKestrel()
- .UseContentRoot(Directory.GetCurrentDirectory())
- .UseStartup<Startup>()
- .UseUrls("http://localhost:9000");
- var host = builder.Build();
- host.Run();
- }
- }
我们还在此处指定API网关的应用URL。
Step 8
运行 API Gateway.
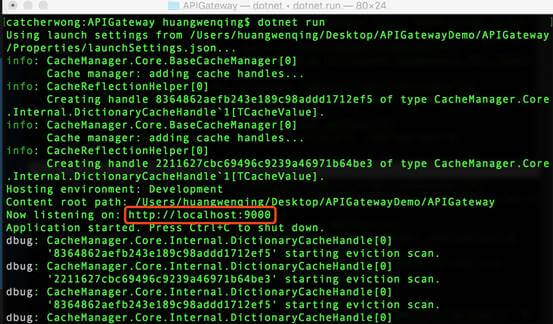
如您所见,我们的API网关在http:// localhost:9000上运行
我们打开浏览器访问我们的服务。

当访问http:// localhost:9000 / api / products时,我们将从http:// localhost:9002 / api / products获得结果。
当访问http:// localhost:9000 / customers时,我们将从http:// localhost:9001 / api / customers获得结果。
当访问http:// localhost:9000 / customers / 1时,我们将从http:// localhost:9001 / api / customers / 1获得结果。
Summary
本文介绍了如何通过Ocelot构建API网关。 希望这个能对您有所帮助!
顺便说一句,这是一个非常简单的演示。 我在本文中没有提到一些重要的事情,例如服务发现,身份验证和服务质量。
原文地址:https://www.c-sharpcorner.com/article/building-api-gateway-using-ocelot-in-asp-net-core/